
We’ve looked at what SVGs are and basic drawing elements. But most images move beyond simple lines, rectangles, and ellipses, and this is when knowing how to create complex paths in SVGs becomes important.
The SVG path element is far more advanced. It could be argued it’s the only element you ever need because it can draw any shape you desire. However, there’s one drawback, which is best illustrated with an example:
<path d="M500,500 L500,20 A480,480 0 0,1 968,607 z" />
It looks complicated and can be difficult to follow.
The path element requires a single d attribute with a string value containing a list of encoded drawing instructions. It’s not as complex as a regular expression, but it’s easy to become lost in the number jungle.
The drawing string is formed using a series of commands identified by an upper- or lowercase letter. The letter is followed by zero or more arguments which apply to that specific command. For example, the following path uses an M command to move the SVG pen to a starting point at 500,500 without drawing a line:
<path d="M500,500" />
The SVG viewBox attribute affects the pen’s location within the image itself. Using the 500,500 example above, the pen would be:
- centered horizontally and vertically when the SVG uses
viewBox="0 0 1000 1000" - positioned at the top left when
viewBox="500 500 1000 1000" - positioned at the bottom right when
viewBox="-500 -500 1000 1000" - outside the visible area when
viewBox="0 0 400 400".
Similarly, a lowercase m moves the pen relative to its current location — for example, 50 units left and 100 units up:
<path d="m50,-100" />
Drawing lines is similar: L draws a line to absolute co-ordinates, and l (lowercase L) draws a line relative to the current location. The following paths are therefore identical:
<path d="M500,500 L100,600" />
<path d="M500,500 l-400,100" />
H and h draw horizontal lines to an absolute or relative x location accordingly. For example:
<path d="M500,500 H800" />
<path d="M500,500 h300" />
Bonus points if you can guess what V and v do …
<path d="M500,500 V400" />
<path d="M500,500 v-100" />
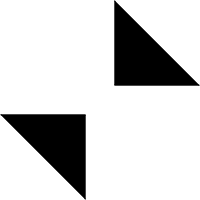
Finally, Z or z close the path by drawing a line from the current point to the starting point. Normally, Z would be the last command in your string, although it’s possible to create strings with multiple sub-paths. For example:
<path d="M500,500 L500,200 L800,500 z M400,600 L400,900 L100,600 z" />
The result is pictured below.
SVG paths can be styled with CSS or you can add stroke, stroke-width, fill and other attributes as required.
That’s the easy path options. It now gets mind-numbingly complex. Consider the A/a command, which draws an arc (section) of an ellipse with the following parameters:
A rx ry x-axis-rotation large-arc-flag sweep-flag x y
In this example:
rxis the ellipse x radiusryis the ellipse y radiusx-axis-rotationis the number of degrees the ellipse is rotatedlarge-arc-flagis0for the smallest arc or1for the largestsweep-flagis0for positive angles or1for negative (above or below the line)x yis the end point of the arc
Arcs can be difficult to visualize, but this Codepen arc tool will help.
However, arcs have limited use, so SVG paths also offer:
Frequently Asked Questions about SVG Path Element
What is the SVG path element and how does it work?
The SVG path element is a versatile tool used in SVG (Scalable Vector Graphics) to create complex shapes. Unlike other SVG elements like rectangle or circle, the path element allows you to define your own custom shapes. It works by using a series of commands that instruct the browser how to draw the path. These commands include ‘M’ for move to, ‘L’ for line to, ‘H’ for horizontal line to, ‘V’ for vertical line to, ‘C’ for curve to, ‘S’ for smooth curve to, ‘Q’ for quadratic Bézier curve, ‘T’ for smooth quadratic Bézier curve to, ‘A’ for elliptical Arc, ‘Z’ for close path, and many more. Each command is followed by coordinate points to define the shape.
How can I create a simple SVG path?
Creating a simple SVG path involves using the ‘d’ attribute in the path element to define the shape. For instance, to create a simple line, you can use the ‘M’ command to move the pen to a starting point, then the ‘L’ command to draw a line to a new point. Here’s an example:<svg>
<path d="M10 10 L90 90" stroke="black" fill="transparent"/></svg>
This code will draw a line from the point (10,10) to the point (90,90).
How can I create complex shapes using SVG path?
Creating complex shapes with SVG path involves using a combination of commands. For instance, to create a triangle, you can use the ‘M’ command to move to a starting point, then the ‘L’ command to draw lines to new points, and finally the ‘Z’ command to close the path. Here’s an example:<svg>
<path d="M10 10 L50 90 L90 10 Z" stroke="black" fill="transparent"/></svg>
This code will draw a triangle with vertices at the points (10,10), (50,90), and (90,10).
What are the different commands used in SVG path?
SVG path uses a variety of commands to draw shapes. These include ‘M’ (move to), ‘L’ (line to), ‘H’ (horizontal line to), ‘V’ (vertical line to), ‘C’ (curve to), ‘S’ (smooth curve to), ‘Q’ (quadratic Bézier curve), ‘T’ (smooth quadratic Bézier curve to), ‘A’ (elliptical Arc), and ‘Z’ (close path). Each command is followed by coordinate points to define the shape.
How can I fill color in an SVG path?
You can fill color in an SVG path by using the ‘fill’ attribute. The value of this attribute can be any valid CSS color. For instance, to fill a path with red color, you can use the following code:<svg>
<path d="M10 10 L50 90 L90 10 Z" stroke="black" fill="red"/></svg>
This code will draw a red triangle.
How can I stroke an SVG path?
You can stroke an SVG path by using the ‘stroke’ attribute. The value of this attribute can be any valid CSS color. For instance, to stroke a path with black color, you can use the following code:<svg>
<path d="M10 10 L50 90 L90 10 Z" stroke="black" fill="transparent"/></svg>
This code will draw a triangle with a black outline.
How can I control the thickness of the stroke in an SVG path?
You can control the thickness of the stroke in an SVG path by using the ‘stroke-width’ attribute. The value of this attribute can be any valid CSS length. For instance, to set the stroke width to 5 pixels, you can use the following code:<svg>
<path d="M10 10 L50 90 L90 10 Z" stroke="black" fill="transparent" stroke-width="5"/></svg>
This code will draw a triangle with a black outline that is 5 pixels thick.
How can I create curves using SVG path?
You can create curves using SVG path by using the ‘C’, ‘S’, ‘Q’, and ‘T’ commands. The ‘C’ command creates a cubic Bézier curve, the ‘S’ command creates a smooth cubic Bézier curve, the ‘Q’ command creates a quadratic Bézier curve, and the ‘T’ command creates a smooth quadratic Bézier curve. Each command is followed by coordinate points to define the curve.
How can I create arcs using SVG path?
You can create arcs using SVG path by using the ‘A’ command. This command is followed by seven parameters: rx, ry, x-axis-rotation, large-arc-flag, sweep-flag, x, and y. The rx and ry parameters define the radii of the ellipse that the arc is part of. The x-axis-rotation parameter defines the rotation of the ellipse. The large-arc-flag and sweep-flag parameters define which part of the ellipse the arc covers. The x and y parameters define the end point of the arc.
How can I animate an SVG path?
You can animate an SVG path by using the ‘animate’ element. This element allows you to animate various attributes of the path over time. For instance, to animate the ‘d’ attribute of a path, you can use the following code:<svg>
<path d="M10 10 L50 90 L90 10 Z">
<animate attributeName="d" from="M10 10 L50 90 L90 10 Z" to="M10 10 L50 50 L90 10 Z" dur="2s" repeatCount="indefinite"/>
</path></svg>
This code will animate the path from a triangle to a narrower triangle over a duration of 2 seconds, and the animation will repeat indefinitely.
 Craig Buckler
Craig is a freelance UK web consultant who built his first page for IE2.0 in 1995. Since that time he's been advocating standards, accessibility, and best-practice HTML5 techniques. He's created enterprise specifications, websites and online applications for companies and organisations including the UK Parliament, the European Parliament, the Department of Energy & Climate Change, Microsoft, and more. He's written more than 1,000 articles for SitePoint and you can find him @craigbuckler.