Visit the average Web development firm’s site and you’re sure to find a section devoted to ‘Our Process’ or ‘Our Approach’, which usually consists of a simple diagram showing the relationship between 3 or 4 ‘easy steps to success’. Some Web companies try to make their processes seem a bit more catchy by making all the steps start with the same letter — ‘Define, Develop, Deliver’ — or by creating a friendly acronym.
This approach may look attractive to potential clients, but beneath the word play, the vast majority of small, medium, and boutique Web developers have no true process to speak of. Managing Web projects is almost always a challenging and unpredictable exercise. Still, the majority of Web design and development firms rely on a haphazard trail of email and word documents to manage their projects.
This series is for developers who wish to enhance their service offerings, professionalism, and revenue capacity by incorporating industry-proven approaches to their development process.
Through this series, we’ll explore the realities of documenting and managing projects for the Web, compare some typical approaches and process systems, and learn how to apply them to maximize their value to both you and your clients. We’ll also look at some concepts that should help to convince you that the time and energy you invest in process, documentation, and best practices, is the absolute best investment you can make to ensure your clients satisfaction and your own profit.
Here’s what we’ll discuss in each part of this series:
- Documentation Techniques for Web Developers (starts below)
- Common Processes for Web and Software Development
- A Balanced Approach to Process Planning
- Writing Specifications that Work
- Connecting the Dots — Real World Implementation
Part 1 – Documentation Techniques for Web Developers
If you produce $1000, brochure-ware sites for a living, you don’t handle multiple projects simultaneously, and you have only cooperative, friendly clients, you might not need any of this information. There are plenty of independent contractors who successfully deliver projects using little or no documentation or methodology, but these individuals are few and far between.
Many developers choose to ‘wing’ their way through project after project and are skeptical about the value of process systems. The majority of Web developers and designers, however, hope to grow their business, improve their client retention and product quality, and make more money.
If you fall into the latter group, read on as we explore the possibilities and benefits of process and documentation.
Why Document? A Leap of Faith
Having faith in the value of great documentation is usually the result of doing it the ‘hard way’ for too long. Poor documentation is very, very expensive, and this becomes painfully evident once you learn to connect the impact of poor documentation to your bottom line.
It’s always obvious who ‘believes’ and who just talks the talk. Vendors who insist on using real process are usually doing it for themselves, not for their clients. They want to save time and money. They want to improve profitability and maximize client retention by doing quality work. The best way to do quality work is to implement a process that allows both the client and the vendor to have clear communications, a shared role in the project, well-defined goals, and the flexibility to handle problems.
Good process and documentation practices help to achieve this in the following ways:
- Good requirements and specifications ensure that a project maintains adequate profit margins by ‘locking-down’ the project scope, thereby avoiding costly changes due to ambiguities or gaps in the project plan.
Paying It Forward
The reason so many Web developers forgo the above benefits in favor of the ‘cowboy style’ process (i.e. no process at all) is simple: they just don’t have faith that the benefits of a documentation phase will outweigh the impact to their schedule and budget, and they can’t see fit to embark on a long documentation phase of seemingly little value.
They may believe in the value of process and documentation in concept, but to actually sit down and spend 12 hours writing specifications requires more than a conceptual agreement with the idea of documentation.
Unfortunately, a short-sighted approach usually results in an expensive development phase, a less satisfied client, and can even cause the dreaded 90-10 dynamic. The 90-10 dynamic refers to the late stages of many projects in which 90% of the effort goes into the final 10% of the project, usually as a result of ‘surprise’ requirements, misunderstandings, and general confusion regarding the work to be performed. After all, if you don’t have a well-written roadmap for the project, you really don’t know when the project is over!
Many Web professionals learn the hard (and expensive) way that a well-documented project is more profitable, and for that reason alone will begin investing time in process. Once the mental decision is made to use real process on your project, things slowly get better and better, and the idea of spending time writing specifications suddenly seems like a good one. Ultimately, you’ll also need to get your client involved if you want to maximize the benefits of a process-oriented work style, and this can be trickier then it sounds.
Convincing the Client
Occasionally, clients will resist or even refuse to take part in your recommended process. This is sometimes the result of the clients having an ‘I pay you and you get it done, so what do you need me for?’ attitude, and sometimes the result of their being intimidated or overwhelmed by your process. Unfortunately, this attitude is contradictory to best practices and some gentle persuasion might help to get the clients seeing things your way.
There are two rules to remember when you are frustrated with a client who refuses to participate in your development process:
- Even if the client doesn’t participate at all, it is still very much in your best interest (and your wallet’s best interest) to continue on with your process full-force. The results are best when the client is 100% committed to the process, but it’s still a worthwhile even if the client doesn’t take the documentation seriously.
Conclusion
Making the leap of faith to embrace the concepts of process and documentation may not be easy, but it’s certainly worthwhile.
Not only does it protect the interests of all parties, documentation can also save your business money (across the short and longer term), help you gain client buy-in and co-operation for the project’s duration, and allow you to implement best practices and take you business’s professionalism to a new level.
In short, the decision to embrace project documentation is the first step to better business.
Next, it’s time to talk processes. We’ll dissect a few of the more common processes in place in the Web development and software industries, and see exactly what we can learn from them — and how they apply to our own operations.
Part 2 – Common Process Methodologies
Web development and software development are closely related, but distinctly different industries. Although the tools, languages, applications, and skills used by Web developers differ from those used by their software development counterparts, there is great similarity in that both industries rely on proper planning, clarification and understanding of the project to be successful.
In this section, we’ll take a look at several methodologies used by both the software and Web development industries, and see what lessons are to be learned from both.
Due to the differences between the types of clients each attracts, these two industries operate quite separately and only rarely compare notes. This is an unfortunate reality for Web developers, because there is so much to be learned from the software industry, namely development processes that are proven to work, and are directly applicable to the Web developer’s work.
Remember, the software industry has been evolving since the late 60s — before most Web developers were born. And, in reality, most Web applications can easily be categorized as a software product with a browser-based client.
Email, Excel, and Word
Microsoft Office is by far the most accessible, most used, yet least utilized project management tool available today. The combination of Outlook, Excel, and Word can be formidable if used correctly, but the vast majority of Office users operate the tools in a perfunctory manner, failing to employ them strategically at all.
By far the most common method of capturing project requirements and specifications is in email threads. While convenient, this technique typically results in disorganized batches of information, haphazardly stored in various inbox folders. It’s not surprising that most developers leave all the information in email format, since the majority of communications are via email in the first place. That, however, is a trap. While emails can certainly provide useful reference when organized effectively, project requirements and specifications should always be documented more formally.
Is imperative that all information stored in email be migrated into the appropriate document, to eliminate the need to scour past emails for project information (or at least make it rare). Email should never be used as an ‘storage’ mechanism for information that belongs in a specific project document. It is, however, a convenient way of passively documenting all project activity and communication over a long time period. Getting the information out of emails and into a more useful document format takes some discipline, but your efforts will be rewarded handsomely once the benefits of a well-documented project start to kick in.
The use of Excel is also widespread – we create spreadsheets for everything from requirements documentation to bug tracking. Unlike Word, Excel has few capabilities that are truly helpful in the realm of Web development, and should be avoided unless you truly need spreadsheet functionality. As a rule, if you’re not adding up numbers or creating complex charts with formulae, resist the urge to document your projects in Excel. Exceptions to this include project estimations, budgeting, and other math-oriented applications.
Waterfall Technique
Highly popular until the mid 90s, the waterfall or ‘traditional’ method provides a robust but inflexible approach to development, in which a sequence of phases is completed resulting in a final launch. Each phase results in a milestone and deliverable, usually consisting of a document and some meetings to discuss the next phase. The project moves from planning, to design, to build, to testing, to migration, to release, and is only actually usable after all the phases are complete.
Although the waterfall technique goes against current thinking by establishing a rigid, inflexible development process, it also provides some benefits. Given the nature of the process, it’s much more difficult to encounter scope-creep or other extensions to the project timeline using the waterfall technique. This results in shorter development cycles, but frequently forces development groups to miss out on useful enhancements, redesigns, or quality improvement during the process. The entire team gets one slow-and-steady chance to build the application the first time, and there simply is no second chance.
The drawbacks of this method strongly outweigh, in my opinion, the advantages and the waterfall technique should only be used for small to medium sized projects in which the requirements are crystal clear, and are unlikely to change at all — a situation in which the waterfall technique would result in the earliest possible release.
However, most developers know how incredibly rare it is for anything to be ‘crystal-clear’ on day one of a project. So, the potential risks of the waterfall technique should generally be avoided when building Web applications. Such risks include:
- general inflexibility
- lack of early prototypes to prove design concepts and gain client buy-in
- exaggerated and sometimes unnecessary volume of paperwork
- inability to add features once development has begun
Change orders can be particularly tricky when using this technique, as even if everyone is in agreement on a desired change, there is no time to implement it without moving the entire project back.
Russian Style
A reference to the techniques employed by the Russian space program, this development approach is based on the ‘prototype early and often’ mentality. Contrary to most other methodologies, this approach urges developers to perform a meaningful, but ‘short as possible’ documentation and planning phase before embarking on a limited prototyping effort.
In practice, there is still considerable documentation involved in the early stages of development when working this way. However, no attempt is made to capture all required information prior to the programming phase. Thus, design flaws and other unpredictable issues are illuminated early and handled accordingly — all within a highly flexible mindset in which all developers expect to be building the same thing repeatedly, with improvements seen with each iteration.
The early prototypes are obviously not feature-complete and are usually limited to one area of concentration rather than the full-blown application. The learning curve moves into full force early in the project, however, and the developers gain an intimate knowledge of the project and its intended functionality much earlier than they may in other methods. This allows projects with a clear goal (like, ‘land on the moon’) but ill-defined tasks (like, ‘build spacesuit’) to experiment and perform research along the way.
Although counter-intuitive to traditional waterfall-method fans, this approach has several benefits to certain types of projects:
- It’s very useful when the specific requirements are unknown and cannot be documented. Prototyping early and often allows the developers to experiment with various techniques without investing heavily in any particular solution.
The Russian style also has its pitfalls, and can prove to be an expensive and lengthy approach for many applications. As a general rule, if the project manager feels that there is a good chance of capturing the majority of the requirements and specifications during the documentation phase, there is no reason to use the Russian technique. If, on the other hand, it seems daunting to make absolute recommendations for application architecture and platform commitments, some early prototyping might be in order and the Russian style could be useful.
Iterations: Rational Unified Process
Developed by the Rational Software Corporation, RUP is a project methodology based upon the UML documentation system, and supported by a large number of Rational Software tools such as ClearQuest, ClearCase, Rational Rose, RequisitePro, and more.
What is UML? UML stands for Unified Modeling Language. In short, UML is a markup and notation system, which allows software developers, Web developers, and others to create clear, concise, easy-to-understand diagrams and documentation for systems, applications, processes, and more. UML can be useful at any level and even the basic set of flowchart-type icons is very helpful. There are many tools to facilitate UML and ample online and print resources, making it easy to adopt. It’s a sure-fire way to increase your documentation quality and save you time. Learn more about UML here: uml.org
There is ongoing debate about the merits of the Rational Toolset, one of the most expensive, complex and heavily integrated product suites available today. Nevertheless, Rational Software continues to be a leader in the world of enterprise level software process infrastructure tools and shows no sign of slowing down. Tools aside, Rational has successfully managed to shift the entire paradigm of software development into a mentality of iterative development cycles.
Iterations are the new mantra of the software industry, and have replaced the rigid waterfall technique as the process paradigm of choice for most programming groups. The iterative approach takes many forms (including RUP) but can also be adapted by individuals simply by planning projects with multiple planning/programming/release cycles. UML has also evolved into a world-standard for documentation and is amazingly useful for large, complex documentation needs.
Ironically, the software process system (RUP) that brought some of the most useful lessons to the world of project management is amongst the most inapplicable to Web development, because RUP and Rational Tools are much too expensive and difficult for most Web developers to use effectively.
XP: Extreme Programming
Extreme Programming offers a streamlined approach to development, and is a self-proclaimed ‘lightweight’ methodology. It is highly focused on agility and flexibility, with few critical practices and an emphasis on iterations. It’s very powerful in the hands of a professional programmer with lots of formal methodology experience, but slightly tricky for self-trained or junior techs. Nevertheless, XP works for many teams and is gaining popularity. XP is debatably geared towards general software development rather than Web applications, but has been adopted by all types of teams throughout the world.
The ideal way to evaluate the XP technique is to visit Extreme Programming and click on the interactive ‘map’, which visually explains the general project structure. It provides an intelligent approach that revolves around a combination of key documents and processes, and is most suitable for an aggressive, process-oriented programmer.
The Cowboy Technique (AKA”faking it”)
Still the most popular technique among independent and boutique Web developers, the cowboy technique usually consists of a simple contract, some kind of specifications document, and that’s about it. One the project begins, the vendor uses email and phone to keep things going, gets an occasional signoff perhaps, and just pushes toward the end without a clear path.
Fans of the cowboy technique also tend to underestimate project values, and provide risky schedules with aggressive deadlines.
Invariably, the cowboy technique of project management will result in chaos to the greatest extent possible, as determined by the scope of the project. On a tiny brochure-ware project, there is little to go wrong and the cowboy technique will cause few problems. On a large project, the cowboy technique usually kills the profit margin, burns out the employees, and lets down the client.
There Is No Best Way, Only Best Practices
Having now reviewed a series of popular methodologies, it’s important to point out that none of these is perfect, as each project has its own unique needs, which are the product of the project type, client personality, and vendor skills.
The best methodology for you and your clients will be determined on a project-by-project basis, and might involve an adaptation or variation of any of the above methodologies. There are many more to learn from, and most have something unique to offer. In the next part of this series, we’ll discuss some concepts that will help you take the standard documents and process systems and adapt them to your needs.
Part 3 – Choosing a Balanced Approach
A Web development project is like a chess game: you have to plan every move to win, but you also need to be able to change the plan at any time. The only way to win is to understand all the options and apply best practice at every step.
In this section, we’ll look at the fundamental elements of various process systems, and learn how you can choose the best approach when planning your development projects.
Maintaining Flexibility and Optimal Speed
Flexibility and speed are essential factors in any project. However, keep in mind that these are not the only goals — a process that’s too flexible might lead to a never-ending project in which the plan continues to evolve, preventing you from reaching release. Some clients benefit from a rigid process; others can handle a more flexible and progressive system.
The winning approach is to make a conscious determination regarding the level of flexibility that’s appropriate to your client. If the client’s operations, or their dealings with you, are typically prone to unexpected changes and scope-creep, and you wish to maintain a tight grip on the project, you should attempt to make a very comprehensive document trail. Create a series of signoffs at critical decision points, and agree up-front on a specified limit to the number of iterations you’ll allow during development.
Conversely, if you have a trusted client who pays his bills, understands that a change order will impact the project budget and schedule, and participates well in process-driven management, you might take a totally different approach. A good client should be invited to participate in the review of many application iterations and is usually capable of making decisions without being ‘locked-down’ by a sea of documentation.
For each client, there is an ideal combination of project management elements, such as leadership, documentation, sign-offs milestones, and progress reports. Never begin a project without considering your client’s perspective, history, and business interests, so that you can formulate the ideal plan for success.
Making it Easy
It’s easier said than done! ‘Make it easy for the client’ is a lesson that teaches itself, as we try to work with clients using a process that is too daunting, boring, or complex for them. Clients come from all walks of life, and many may never have been through a Web development process before. Others might be disinterested, intimidated, or may trivialize the process with a ‘just get it done’ attitude.
Clients can always be educated — they can learn to see the value in formal process and documentation — but remember that they’re the ones who pay the bills. They should be accommodated to the extent possible without compromising the project’s success.
Typically, if you’re having trouble getting a client to participate in your process, the process may be too hard for them, or they might not like it. In this case, switch gears and use this new information about your client to establish a creative solution in which their meeting, communication, or work style can be accommodated so that they can contribute positively to the project.
Iterations, Iterations, Iterations
Whenever I see a project plan that includes a long period of development followed by a launch, I get nervous. I’ve learned the hard way that, whether you like it or not, you are probably going to release multiple iterations of your application. After all, most launch dates consist of a few scrambled versions of the application, then a couple of fixes here and there during the early days. Documents, too, tend to get passed around several times before someone finally signs on the dotted line.
Hassle? No way. Iterations are a part of life, and they’re a great way to enhance a Web development project. Use them to your advantage.
Let’s say you’re leading a 6-month project in which months 2, 3, and 4 are dedicated to development, with a final release at the beginning of month 6. How many releases would you ideally like to see in addition to the final release? Personally, I’d hope to see some kind of a beta after month 2, and 2 to 5 releases during months 3, 4, and 5.
There simply is no substitute for looking at a half-complete application on-screen and trying to decide if everything is going in the right direction. The iterative approach allows everyone, from client to developer, to be involved in the project from its inception, and lends a “step-by-step” feeling to the engagement, rather than the all-too-typical ‘big push’. Iterations also bring more visibility to the project, as everyone can see where the project is at all times.
Although it’s not always possible to plan the number of release iterations in a project plan, it’s extremely wise to include a significant period of ‘iterative development’ during the build phase of a project. This gives the developers an opportunity to complete small releases, gain experience with the application migration and client feedback processes, and stay on track. Iterative development is an established, proven technique and is critical to most popular development methodologies today.
Email Is Your Best Friend
Wouldn’t you love to have an employee who would do nothing but record every single word of your business communications 24 hours a day? Your email client and inbox are ready to handle the task.
The easiest kind of documentation is ‘passive documentation’ in which you simply capture the ordinary project communications and keep them handy for future reference. When you focus on using email communications for all-important correspondence, you are already creating a useful ‘paper trail’ for your projects without even trying.
If you can organize your inbox and are a decent typist, you have everything you need to ensure that you always have complete documentation of an entire project should there be any later misunderstandings, confusion, or legal issues. Always try to use email whenever possible (and appropriate), and keep a well-structured and clearly-organized inbox in which you can easily find anything you need — this will help you avoid situations in which you make a decision on the telephone, then realize you need to discuss a detail without remembering the exact original agreement.
There are many ways to maximize the effectiveness of your email archives:
- Write every email as if it might, one day, be read by a judge in a court case. Avoid being overly informal, and be sure that your communications are clear.
- Don’t allow long email threads to turn into a single long, scrolling email — this only makes for more confusing in the future. Be sure that each email stays on a single topic, and if the topic changes, be sure to delete the existing thread before you send your response. If you have 2 ideas in a single email, consider splitting them up.
- Use the subject line well. This is probably the simplest and most powerful tip in the list. A well written subject line makes the reader more comfortable, sets the tone for the email, and makes it easy to find and refer to in the future. Good subjects simply summarize the email, like ‘response to change order from 1/3/03’ or ‘options for merchant accounts’. Avoid meaningless, casual or irrelevant subjects such as ‘ok’ or ‘one more time’ or ‘moving forward’, etc.
Signoffs and Versioning
Signoffs serve everyone. Many vendors see client sign-offs as something that should come at the end of the project. While there should certainly be a signed ‘acceptance document’ to indicate the end of the engagement, it’s hard to agree on where that end may be if there were no signed-off project plans at the beginning!
Signoffs allow everyone in the project to understand when a critical milestone or document is being approved. It shows clients that you are organized and are taking their input seriously, and helps them to differentiate between making final decisions, and just providing opinions.
Signoffs also have a serious impact in the courtroom, or any legal proceedings. Although a signed document can still be disputed, it’s expected that someone who signed a document has taken the time to read and understand that document. This allows you to be extremely clear about how the project decisions were made, who made them, and who assumed responsibility for what, when.
If nothing else, a project should always include signoff at the following points, no matter how small the project is:
- The Contract
- Project Specifications (can be a single document, or many)
- Schedule/Workflow/Milestones
- Acceptance (project completion)
Just One Person in Charge
It’s exceedingly hard to manage a project ‘by committee’.
Group leadership efforts usually result in a long, ineffective project flow and a poor result. Most organizations are not capable of managing a project as a group, and will gravitate towards a leader-and-process solution if one is offered. As the developer, it’s your responsibility to assume this role and maintain control of all aspects of the project from beginning to end. It’s very rare that a client has the ability or know-how to effectively manage a technology vendor, and those who try are usually doing it simply to keep control, or because they’ve been burned by a previous vendor.
Good documentation practices offer a solution for this dynamic, because the owner of each document is the only person who can determine how the document is structured, what’s in it, and when the document is final and ready be signed. Thus, the owner of the document (or whoever is in control of it) is likely to be perceived as the leader of the project, or at least the person most knowledgeable about the details.
Another means of establishing control over an engagement is to arrive at all meetings (including phone calls) with a well-written and printed agenda to establish the meeting’s objective, participants, and major points. Following the meeting, a meeting report can be emailed to all participants to sum up the conclusions and ‘action items’ that resulted from the meeting.
Ultimately, the best way to be the single point of control in a project is to demonstrate that you know what you’re doing, that you have a process in place, and that you are the best person to lead the project. If everyone wants the project to succeed, they will frequently defer to the most promising leader. You can position yourself as that person by coming in to the project with a strong leadership attitude, and a clear idea of the steps ahead.
Part 4 – Write Great Specifications
The foundation of every process is the actual words written in the documents, not the document format or methodology used. In the next few pages, we’ll explore effective ways to capture requirements and other important data. To start, we’ll look at the classic documentation types, then, we’ll discuss some practices you can use to maximize the effectiveness of your documentation efforts.
Standard Document Types
Functional Requirements Documents
Perhaps the most important category of document types, a functional specifications document outlines what the application will do. It contains every behavior, activity, reaction, event, or other action that an application can perform. At a very high level, these might include:
“The application will back itself up on a nightly basis”
Or:
“A JavaScript validation system will prevent users from making reservations for dates that are already in the past.”
Obviously, these are simplistic examples and the above requirements could be expanded into a volume of notes and details. They do help to illustrate the distinction, though, between functional specifications (part of the general functional requirements of an application) and other types of information that document what an application is, how it should be built, or who will build it. For example, the following information is useful, but would not be part of a functional specifications document:
“The system will be built on a platform consisting of RedHat 9.0, PHP, MySQL, and Apache.” (This belongs in the technical specifications.)
“Client must approve all technical and functional documentation prior to development.” (This belongs in original contract/agreement.)
“The application can be expanded by adding more servers.” (If this specification continues to explain how the system will react to such expansion, it could stay. However, it is probably best mentioned in a technical specification document as part of the platform discussion.)
Although it may seem arbitrary to maintain such a restrictive interpretation of the term ‘functional requirement’, having a focused specification document has been proven to improve documentation quality in general by allowing each document to be concise, simple to read, and formatted for its specific purpose. Requirements and specifications, being the most important information in the entire project, deserve a document of their own, and that document will be more useful if it’s kept distinct and targeted.
As a general rule, the exercise of documenting requirements will lead the participants into an ongoing period of exploration and discovery, during which each requirement leads to more questions, which, in turn, lead to more requirements. The momentum can be difficult to get going, and the learning curve takes a bit of effort to overcome. Yet, a properly managed requirements documentation phase will invariably lead to a fast-paced discovery process in which countless details are revealed, considered, and handled before any development begins. Of course, this approach has many benefits:
- Corrections and changes are made prior to programming, when they are still easy and have less of an impact on the project budget and timeline.
- Developers are confronted by fewer on-the-fly changes, which increases morale and code quality.
- Clients get a chance to ask questions without impacting the developers, or risking issues related to change orders.
To make the most of the specifications documents, you’ll want to create a workflow scenario where the document gets passed from person to person, with one individual as the lead document manager and owner of the document. At first, you’ll need to do most of the work yourself, since most clients won’t know where to begin with this kind of process. However, you’ll soon find that, by reading the document, the client begins to think about details and provide you with useful information and insight into their true objectives.
For example, I recently created a requirements document for a Web-based application intended to automate various functions in a county health facility in California. For the first 10 days or so, I plugged away at the requirements document on my own, adding as much information and detail as I could. Once the document reached about 35 pages, I began getting the occasional question from the client, usually related to client-friendly issues such as click-paths or cosmetics.
One day, the client called and asked me why there was a requirement that said the ‘new patient’ form must have a button entitled ‘Insurance Information’, and why the button would lead to an ‘add insurance information’ form when clicked. I explained to the client that I had been told that each client would have insurance information, and that this information was to be captured.
Soon, the client clarified the requirement and I learned that 95% of the patients defaulted to a particular type of insurance, and the only patients about whom insurance information really needed to be captured were patients who were referred by a particular county agency.
Thus, a decision was made that if the user entered a certain value into the ‘referring agency’ field earlier on that page, the insurance form would appear as a pop-up. Wondering how many instances there were of this type of dependency, I asked the client to consider what other pages also needed to behave certain ways under certain circumstances. The next day, we got a list of about 10 similar requirements, some of which were quite complex and would have been extremely unpleasant for the programmers to repair if they’d been built incorrectly.
A single question about a small detail resulted in a useful dialog that saved many hours of development, by allowing my team to do it right the first time.
With time and practice, you can educate your client to be mindful and aware of form validation, pagination, field length, navigation and other details that are typically overlooked. It is up to you to set the example, but there is much to be gained by ‘coaching’ your client to participate more effectively. Once you’ve established some momentum around the document, and all project stakeholders are contributing, simply continue until the progress drops off, then stop. The point of diminishing returns comes abruptly, and you risk fatiguing your client if you force them to participate in documentation beyond that point.
The Pain of SiteMaps
It is my opinion that sitemaps are bad. That’s right — just plain bad.
I’m not just saying that they’re inferior to wireframe documents (described in the next section), or that they don’t accomplish much. I’m saying that they are actually bad for projects, are misleading, and usually cause wasted time and confusion.
Sitemaps provide a means of diagramming every page in a Website for planning purposes. This seems like a good idea but, in practice, sitemaps always fall short of that goal, and usually serve no purpose other than to give the client an impressive diagram to approve.
Sitemaps attempt to detail all pages in a site, approximate navigation and page flow, and to represent this information visually. However, if you take the average sitemap and try to draw a line between every pair of linked pages, you’ll soon have an illegible spider web of lines and boxes. As most Websites have persistent navigation (and even secondary navigation, like footers and sidebars) on every page, the lines between the boxes are generally arbitrary, and only serve to show a general relationship between pages within a section — something we intuitively know already. An approved sitemap causes people to think they have documented all the navigational details and page flows when in fact there are usually many pages and features left to discuss once the sitemap is approved.
Sitemaps also completely fail to capture information related to dynamic pages, and usually omit things like feedback/response pages, etc. Some pages behave differently depending on whether a user is logged in — another feature that’s rarely mentioned on the average sitemap. In addition, most sitemap authors attempt to squeeze an entire sitemap on a single page, resulting in a nice-looking but rather useless document.
Even basic information such as ‘when you click here, this happens’ is completely lost in the sitemap, which tends to be too cluttered to allow the addition of callouts or other notes to the pages. (A callout is a small text note with a line pointing to the element that the note refers to.) Understandably, the sitemap is not intended to provide incredible detail about anything, but the only thing it seems to provide is a bunch of boxes with the names of the individual pages typed in.
So, what’s better than the sitemap? The wireframe, of course!
The Joy of Wireframes
Used correctly, wireframes can be one of the most effective tools in a Web developer’s arsenal of project management techniques. Simple, though tedious to make, wireframes might seem like a painfully laborious exercise in documenting the obvious. However, you might soon find that a 10-page wireframe document reveals informational disconnects between your project team and your client, and provides a convenient documentation structure for capturing, discussing, and clarifying the matter at hand.
What is a Wireframe?
The wireframe document is a simple diagram created in Microsoft Visio, or Inspiration (for Mac users), or by hand, which shows the functional elements contained on a Web page but completely disregards the copy, graphics, fonts, colors, layout, and other aesthetic elements.
The objective of the wireframe is to document and clarify what elements (headers, footers, forms, buttons, ads, copy blocks, search boxes, etc.) will be included on a page, and how the page will behave when clicked (‘clicking here will re-sort the results by date’) so that the project team and the client can effectively communicate the specific requirements of a Website.
Why Aren’t There Any Graphics?
Using graphics on a wireframe undermines the purpose of the wireframe, which is to get both your client and yourself to truly consider the specific functional (not cosmetic) requirements of a page. Therefore, any colors, fonts, or graphics will serve as a distraction to the client, and will make it harder to keep them focused on the matter at hand. The cosmetic information is best left in a creative brief or other document so as not to disturb the discovery process that is so well facilitated by the wireframes.
A simple, unpolished look is generally best when it comes to wireframes. Keeping the wireframes slightly ‘rough’ demonstrates to the client that the document is not intended to look nice — that it is a working, living document, a vehicle for important non-graphical information, and doesn’t need to be dressed up.
To illustrate this point, let’s imagine you’re planning a Website that includes a ‘news module’ to allow the client to easily add/update/delete news stories and modify the way they appear on the homepage.
The initial homepage wireframe would show the basic elements of the page, including large blocks for repeated elements like ‘persistent top navigation’ or ‘footer’. These frequently-used elements will be diagrammed on a single page of the wireframe document, and will simply be referred to in the other pages, similar to the way includes are used in HTML pages. The wireframe would show any ads, copy blocks, or other elements that should be included on the page, as seen in the following sample:
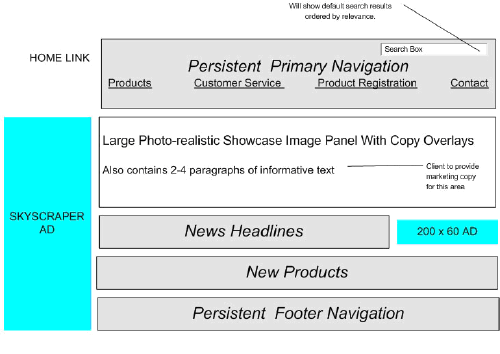
It seems simple enough, and it is — until the client has a look at it and (hopefully) starts asking questions. Soon, additional pages of the wireframe document can be created and callouts can be used to document simple specifications. As the document will be signed off by the client, it’s in your interests to get as much detail as possible into the callouts, ensure that everyone is clear on the project specifications, and that you are protected from potential misunderstandings.
If a ‘news headline’ page was to be created, it might be a good idea to document some of the character limits for headlines before development, to make sure that the specifications are acceptable to the client. The wireframe might look something like this:
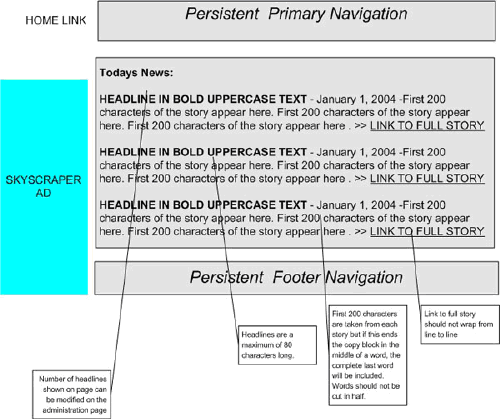
Over a period of days or weeks, this document can continue to expand, to become a definitive part of the project’s definition — allowing the client, project manager, and developers to be precisely clear about the work to be performed. This provides the following benefits to the project:
- It establishes names for each page in the site, making communication simpler throughout the project.
- It provides a very clear, simple mechanism for clients to approve project specifications, which are easy to read, and difficult to misunderstand.
- It helps to identify areas of confusion (‘what happens when you click here’, or ‘I thought it would automatically sort by date’, or ‘shouldn’t the article author appear on each page’, etc.).
- It provides a no-brainer way of accumulating notes and comments that relate to a single page — if there are too many notes on a wireframe page, you simply add another page.
- It contributes to the general documentation of the project, which makes for easier process and change order management, and better user acceptance at the end of the project. It’s usually not worth wireframing every single page in the site, but once the main pages are wireframed, it’s quite simple to cut/paste new wireframes and gain signoff on the majority of the pages.
- It forces everyone involved with the project to take a good look at what they’re creating, and what it will do. It makes everyone address problems such as ‘what happens if you click here, is it a pop-up or just a new page?’
- It helps clients to consider functional requirements without the distraction of visual elements like colors and fonts, saving valuable time in meetings and ensuring that the client actually understands what they’re getting.
- It provides one of the best ways to take a project plan and give it to a team of developers. It’s easy to understand, and helps everyone to get up to speed quickly, saving precious development dollars.
The Technical Specifications Document
The technical requirements document is similar to the functional requirements document, but answers a different question for a different audience. This document should answer the question, How Does It Work?, and, unlike the functional documents, should be limited to answering that question in a manner that would be useful to technical personal or other IT providers.
Because the ‘tech spec’ is geared towards a technical reader and contains no functional concepts that need to be approved or understood by a non-technical audience, the language can be highly technical in nature, and should contain any kind of information that is deemed useful. Typical technical specifications include information such as:
- Database Models
- Class diagrams or architectural plans
- Platform specifics including OS/language/compilation details
- Load Balancing and Migration Info
- Use of third party components or objects
- Licensing issues, when related to the above topics
- Performance expectations and limitations
- Integration techniques and i/o mappings
- Backup and disaster recovery planning
As you can see, the technical documentation says little about what an application actually does. It’s focused on how it does what it does, what makes it work, and sometimes why those particular solutions were chosen.
By separating the functional and technical documents, you’ll make your life easier in two ways. First, you need only collaborate with the interested parties during the documentation phase. In other words, you only need to talk about the functional specification with the people who are actually interested in the functionality, rather than having to deal with uninterested IT people who were asked to approve the documentation.
Second, you can ask your client to have specific individuals sign-off on each particular document. I like to have a high-level (but involved) person at the client organization sign off the functional specification, but I always seek the most technically savvy person I can find to sign off the technical specification. This approach to signoff creates the most comfortable outcome possible, as the people who will best understand the different documents are the people who take responsibility for their contents.
The Rest: Paradigms, Schedules, Workflow, Testing and Milestones
…Plus Use Cases and Test Cases and Deployment Plans and Integration Mappings, and Progress Reports, and Risk Assessment Documents, and User Acceptance Forms…
Depending on which process system, methodology, or personal style you use in your business, an incredible variety of documents can be used to capture and clarify information that’s not found in the functional or technical specifications documents.
Every project is different, and the critical information required to complete different projects can vary greatly. It’s important to consider which documents you will generate and seek to have signed off during the course of a project. The functional and technical specifications are highly targeted and concise, because they are critical-path tools for success. However, most other information can successfully be documented using whatever format seems most appropriate for the time and scenario.
Typical documents include:
- The Contract – This mandatory document is extremely useful and sets the tone for the entire engagement.
Why write a brief? The purpose of the brief is to get the major points of the technical/creative effort on paper so that the client can review them before you invest a large amount of time writing lengthy requirements documentation. By getting a sign-off on your brief, you’ve confirmed with the client that you are going in the right direction, and are less likely to miss the target. This approach is invaluable when working on a very large project, but is probably not required for smaller ones.
There are so many document types that it’s impossible to list them all here. Your success will be ensured by selecting the document trail that is relevant, useful, and practical. You might find yourself creating your own formats or document types, or repurposing the same documents over and over again. Either way, it is an excellent practice to establish a document trail early in the project and to share your plan with the client.
Consistent Nomenclature
If the documentation is to be successful, everyone must speak the same language. This includes the client, the developers, and anyone else involved in the project. When writing requirements, you can create naming conventions and nomenclature that can reduce confusion for the entire duration of the project. This requires that you establish naming conventions early in the project, and require everyone involved to use them as well.
For example, let’s say we’re developing an online store. During the early discussions, everyone kept referring to the ‘cart’, the ‘store’, the ‘product pages’, ‘the store page’, ‘the front page’, the ‘product closeup page’, etc. Although we usually know what is being referred to, a surprising amount of clarity can be gained by establishing naming conventions for the pages. You can accomplish that by using consistent nomenclature in our documentation, such as:
- Product Category Page: Shows 3 rows of 5 product thumbnails with prices below, limited to a single category, Reached by clicking a category in the category list in the left-side nav.
- Product Detail Page: Shows a single product, with detailed attributes.
- Search Results Page: Displays paginated results of a search, following the format established by the Product Category Page.
- Contact Feedback Page: Displays results of a feedback form after one is submitted by a user on the Feedback Form Page
By writing your requirements in a concise, distinct format, you’ll soon have the entire project team using your chosen nomenclature and communicating more effectively. This avoids ambiguity problems, such as the client referring to ‘the pages that come after you click on the search page but there aren’t any results’, etc.
Effective and consistent nomenclature is an excellent practice – it’s one of the pillars of great documentation and successful project management. Always try to name and identify everything early on, so that the other project members will be able to refer to the pages by their exact names as the planning unfolds.
Numbers and Dots
The most accessible and simple format for capturing requirements is via Microsoft Word, or a competing product such as OpenOffice or Star. Although many tools and systems have been specially designed for requirements gathering, Word is an excellent option for project managers who are just starting with formal documentation and aren’t ready to invest in custom tools.
The Word feature you’ll be using is the ‘Styles’ feature, which allows the author to establish styles, use the outline mode, and show numbering on screen. Make an outline, then assign the style ‘Heading 1’ to the top level, ‘Heading 2’ to the second level, and so on. This produces an easily-read and highly flexible document, with a format that follows a strict numeric organizational scheme, like this:
1. Merchant Account Integration
1.1 Authorize.net must be integrated with OSCommerce.
1.1.1 Vendor must work with John Doe at authorize.net to certify that the
installation is performed correctly.
1.1.2 Integration must be completed before August 21, 2003
1.2 Two-way integration must provide information about charge/authorization results
from within the admin screen
1.2.1 sub-requirement, etc.
Add as many levels as you need, and rearrange whenever you see fit. Additional benefits of Microsoft Word include the automatic generation of tables of contents, indexes, and other client-friendly cosmetic effects.
To learn how to use these techniques, use the built-in help in Microsoft Word to find information about the following features:
- Styles, especially Header 1, Header 2, Header 3
- Document Map
- Outline Mode
- Bullets and Numbering
- Table of Contents
More Is More
When I write requirements, I always try to follow 2 self-inflicted rules:
- If you can provide more detail, you should — that is, unless the details are intuitive to all concerned project members, irrelevant, ill-defined, or unlikely to have any benefit to anyone. Even if you understand the details, it’s still wise to record them in the document.
- Always keep your requirements organized so that you can refer to other sections easily, eliminating the need to repeat yourself. Not unlike SSI/includes in Web programming, a well organized document allows each section to refer to any other section to address global details such as navigation and style.
Taking the online store as an example, let’s say you are capturing an interface requirement and section 3.x of the functional specifications document is being used to capture interface requirements. You might start with a basic requirement such as:
3.3 The Product Detail Page will show a ‘zoom in’ button which, when clicked, will show an enlarged version of the product photo.
This is a perfectly legitimate requirement, and follows the traditional ‘a must do b’ format of well written requirements. However, there is much more to say about this feature, as evidenced in the next example:
3.3 The Product Detail Page will show a ‘zoom in’ button which, when clicked, will show an enlarged version of the product photo.
3.3.1 The zoom image will be displayed via DHTML, and will appear in a set position on the user’s screen.
3.3.2 Some products don’t have zoom images. For these products, the ‘zoom in’ button will be grayed out on the product detail page.
3.3.3 The DHTML browser compatibility level will be MSIE/NS 4+. Users whose browsers do not meet the specifications will not see the zoom images.
The expanded requirement is becoming much more useful. However, this feature raises the question, ‘How does the zoom image get in there?’ We’ll add to a different section of the document the following entry, which captures requirements for the administrative interface.
10.1.2 Zoom images can be uploaded from the Product Administration Page. If a product has no zoom image, a dialog box will appear to confirm ‘Are you sure you want to add this product with no zoom image?” prior to saving the product record.
If the administrators are allowed to upload the zoom image, they’ll need to know what type/format needs to be uploaded for proper display. Let’s add one more requirement to clarify this (notice that this is a sub-requirement of the above requirement 10.1.2, because it only relates to that requirement):
- Uploaded images must be jpeg format, less than 20k, and exactly 400×350 pixels in dimension.
- The admin interface will reject any zoom images that don’t meet the above spec by displaying an error message including the specification that wasn’t met by the image.
Okay, the requirement is beginning to become clearer now. But, clear requirements have a tendency to create more questions. For example, ‘How does the user return to the non-zoom image once it’s displayed?’ We’ll add yet another requirement to make sure that the developers build it right the first time:
3.3.4 While the zoom image is being displayed, the original ‘zoom in’ button will change into a ‘zoom out’ button so that the oo
Visit the average Web development firm’s site and you’re sure to find a section devoted to ‘Our Process’ or ‘Our Approach’, which usually consists of a simple diagram showing the relationship between 3 or 4 ‘easy steps to success’. Some Web companies try to make their processes seem a bit more catchy by making all the steps start with the same letter — ‘Define, Develop, Deliver’ — or by creating a friendly acronym.
This approach may look attractive to potential clients, but beneath the word play, the vast majority of small, medium, and boutique Web developers have no true process to speak of. Managing Web projects is almost always a challenging and unpredictable exercise. Still, the majority of Web design and development firms rely on a haphazard trail of email and word documents to manage their projects.
This series is for developers who wish to enhance their service offerings, professionalism, and revenue capacity by incorporating industry-proven approaches to their development process.
Through this series, we’ll explore the realities of documenting and managing projects for the Web, compare some typical approaches and process systems, and learn how to apply them to maximize their value to both you and your clients. We’ll also look at some concepts that should help to convince you that the time and energy you invest in process, documentation, and best practices, is the absolute best investment you can make to ensure your clients satisfaction and your own profit.
Here’s what we’ll discuss in each part of this series:
- Documentation Techniques for Web Developers (starts below)
- Common Processes for Web and Software Development
- A Balanced Approach to Process Planning
- Writing Specifications that Work
- Connecting the Dots — Real World Implementation
Part 1 – Documentation Techniques for Web Developers
If you produce $1000, brochure-ware sites for a living, you don’t handle multiple projects simultaneously, and you have only cooperative, friendly clients, you might not need any of this information. There are plenty of independent contractors who successfully deliver projects using little or no documentation or methodology, but these individuals are few and far between.
Many developers choose to ‘wing’ their way through project after project and are skeptical about the value of process systems. The majority of Web developers and designers, however, hope to grow their business, improve their client retention and product quality, and make more money.
If you fall into the latter group, read on as we explore the possibilities and benefits of process and documentation.
Why Document? A Leap of Faith
Having faith in the value of great documentation is usually the result of doing it the ‘hard way’ for too long. Poor documentation is very, very expensive, and this becomes painfully evident once you learn to connect the impact of poor documentation to your bottom line.
It’s always obvious who ‘believes’ and who just talks the talk. Vendors who insist on using real process are usually doing it for themselves, not for their clients. They want to save time and money. They want to improve profitability and maximize client retention by doing quality work. The best way to do quality work is to implement a process that allows both the client and the vendor to have clear communications, a shared role in the project, well-defined goals, and the flexibility to handle problems.
Good process and documentation practices help to achieve this in the following ways:
- Good requirements and specifications ensure that a project maintains adequate profit margins by ‘locking-down’ the project scope, thereby avoiding costly changes due to ambiguities or gaps in the project plan.
Paying It Forward
The reason so many Web developers forgo the above benefits in favor of the ‘cowboy style’ process (i.e. no process at all) is simple: they just don’t have faith that the benefits of a documentation phase will outweigh the impact to their schedule and budget, and they can’t see fit to embark on a long documentation phase of seemingly little value.
They may believe in the value of process and documentation in concept, but to actually sit down and spend 12 hours writing specifications requires more than a conceptual agreement with the idea of documentation.
Unfortunately, a short-sighted approach usually results in an expensive development phase, a less satisfied client, and can even cause the dreaded 90-10 dynamic. The 90-10 dynamic refers to the late stages of many projects in which 90% of the effort goes into the final 10% of the project, usually as a result of ‘surprise’ requirements, misunderstandings, and general confusion regarding the work to be performed. After all, if you don’t have a well-written roadmap for the project, you really don’t know when the project is over!
Many Web professionals learn the hard (and expensive) way that a well-documented project is more profitable, and for that reason alone will begin investing time in process. Once the mental decision is made to use real process on your project, things slowly get better and better, and the idea of spending time writing specifications suddenly seems like a good one. Ultimately, you’ll also need to get your client involved if you want to maximize the benefits of a process-oriented work style, and this can be trickier then it sounds.
Convincing the Client
Occasionally, clients will resist or even refuse to take part in your recommended process. This is sometimes the result of the clients having an ‘I pay you and you get it done, so what do you need me for?’ attitude, and sometimes the result of their being intimidated or overwhelmed by your process. Unfortunately, this attitude is contradictory to best practices and some gentle persuasion might help to get the clients seeing things your way.
There are two rules to remember when you are frustrated with a client who refuses to participate in your development process:
- Even if the client doesn’t participate at all, it is still very much in your best interest (and your wallet’s best interest) to continue on with your process full-force. The results are best when the client is 100% committed to the process, but it’s still a worthwhile even if the client doesn’t take the documentation seriously.
Conclusion
Making the leap of faith to embrace the concepts of process and documentation may not be easy, but it’s certainly worthwhile.
Not only does it protect the interests of all parties, documentation can also save your business money (across the short and longer term), help you gain client buy-in and co-operation for the project’s duration, and allow you to implement best practices and take you business’s professionalism to a new level.
In short, the decision to embrace project documentation is the first step to better business.
Next, it’s time to talk processes. We’ll dissect a few of the more common processes in place in the Web development and software industries, and see exactly what we can learn from them — and how they apply to our own operations.
Part 2 – Common Process Methodologies
Web development and software development are closely related, but distinctly different industries. Although the tools, languages, applications, and skills used by Web developers differ from those used by their software development counterparts, there is great similarity in that both industries rely on proper planning, clarification and understanding of the project to be successful.
In this section, we’ll take a look at several methodologies used by both the software and Web development industries, and see what lessons are to be learned from both.
Due to the differences between the types of clients each attracts, these two industries operate quite separately and only rarely compare notes. This is an unfortunate reality for Web developers, because there is so much to be learned from the software industry, namely development processes that are proven to work, and are directly applicable to the Web developer’s work.
Remember, the software industry has been evolving since the late 60s — before most Web developers were born. And, in reality, most Web applications can easily be categorized as a software product with a browser-based client.
Email, Excel, and Word
Microsoft Office is by far the most accessible, most used, yet least utilized project management tool available today. The combination of Outlook, Excel, and Word can be formidable if used correctly, but the vast majority of Office users operate the tools in a perfunctory manner, failing to employ them strategically at all.
By far the most common method of capturing project requirements and specifications is in email threads. While convenient, this technique typically results in disorganized batches of information, haphazardly stored in various inbox folders. It’s not surprising that most developers leave all the information in email format, since the majority of communications are via email in the first place. That, however, is a trap. While emails can certainly provide useful reference when organized effectively, project requirements and specifications should always be documented more formally.
Is imperative that all information stored in email be migrated into the appropriate document, to eliminate the need to scour past emails for project information (or at least make it rare). Email should never be used as an ‘storage’ mechanism for information that belongs in a specific project document. It is, however, a convenient way of passively documenting all project activity and communication over a long time period. Getting the information out of emails and into a more useful document format takes some discipline, but your efforts will be rewarded handsomely once the benefits of a well-documented project start to kick in.
The use of Excel is also widespread – we create spreadsheets for everything from requirements documentation to bug tracking. Unlike Word, Excel has few capabilities that are truly helpful in the realm of Web development, and should be avoided unless you truly need spreadsheet functionality. As a rule, if you’re not adding up numbers or creating complex charts with formulae, resist the urge to document your projects in Excel. Exceptions to this include project estimations, budgeting, and other math-oriented applications.
Waterfall Technique
Highly popular until the mid 90s, the waterfall or ‘traditional’ method provides a robust but inflexible approach to development, in which a sequence of phases is completed resulting in a final launch. Each phase results in a milestone and deliverable, usually consisting of a document and some meetings to discuss the next phase. The project moves from planning, to design, to build, to testing, to migration, to release, and is only actually usable after all the phases are complete.
Although the waterfall technique goes against current thinking by establishing a rigid, inflexible development process, it also provides some benefits. Given the nature of the process, it’s much more difficult to encounter scope-creep or other extensions to the project timeline using the waterfall technique. This results in shorter development cycles, but frequently forces development groups to miss out on useful enhancements, redesigns, or quality improvement during the process. The entire team gets one slow-and-steady chance to build the application the first time, and there simply is no second chance.
The drawbacks of this method strongly outweigh, in my opinion, the advantages and the waterfall technique should only be used for small to medium sized projects in which the requirements are crystal clear, and are unlikely to change at all — a situation in which the waterfall technique would result in the earliest possible release.
However, most developers know how incredibly rare it is for anything to be ‘crystal-clear’ on day one of a project. So, the potential risks of the waterfall technique should generally be avoided when building Web applications. Such risks include:
- general inflexibility
- lack of early prototypes to prove design concepts and gain client buy-in
- exaggerated and sometimes unnecessary volume of paperwork
- inability to add features once development has begun
Change orders can be particularly tricky when using this technique, as even if everyone is in agreement on a desired change, there is no time to implement it without moving the entire project back.
Russian Style
A reference to the techniques employed by the Russian space program, this development approach is based on the ‘prototype early and often’ mentality. Contrary to most other methodologies, this approach urges developers to perform a meaningful, but ‘short as possible’ documentation and planning phase before embarking on a limited prototyping effort.
In practice, there is still considerable documentation involved in the early stages of development when working this way. However, no attempt is made to capture all required information prior to the programming phase. Thus, design flaws and other unpredictable issues are illuminated early and handled accordingly — all within a highly flexible mindset in which all developers expect to be building the same thing repeatedly, with improvements seen with each iteration.
The early prototypes are obviously not feature-complete and are usually limited to one area of concentration rather than the full-blown application. The learning curve moves into full force early in the project, however, and the developers gain an intimate knowledge of the project and its intended functionality much earlier than they may in other methods. This allows projects with a clear goal (like, ‘land on the moon’) but ill-defined tasks (like, ‘build spacesuit’) to experiment and perform research along the way.
Although counter-intuitive to traditional waterfall-method fans, this approach has several benefits to certain types of projects:
- It’s very useful when the specific requirements are unknown and cannot be documented. Prototyping early and often allows the developers to experiment with various techniques without investing heavily in any particular solution.
The Russian style also has its pitfalls, and can prove to be an expensive and lengthy approach for many applications. As a general rule, if the project manager feels that there is a good chance of capturing the majority of the requirements and specifications during the documentation phase, there is no reason to use the Russian technique. If, on the other hand, it seems daunting to make absolute recommendations for application architecture and platform commitments, some early prototyping might be in order and the Russian style could be useful.
Iterations: Rational Unified Process
Developed by the Rational Software Corporation, RUP is a project methodology based upon the UML documentation system, and supported by a large number of Rational Software tools such as ClearQuest, ClearCase, Rational Rose, RequisitePro, and more.
What is UML? UML stands for Unified Modeling Language. In short, UML is a markup and notation system, which allows software developers, Web developers, and others to create clear, concise, easy-to-understand diagrams and documentation for systems, applications, processes, and more. UML can be useful at any level and even the basic set of flowchart-type icons is very helpful. There are many tools to facilitate UML and ample online and print resources, making it easy to adopt. It’s a sure-fire way to increase your documentation quality and save you time. Learn more about UML here: uml.org
There is ongoing debate about the merits of the Rational Toolset, one of the most expensive, complex and heavily integrated product suites available today. Nevertheless, Rational Software continues to be a leader in the world of enterprise level software process infrastructure tools and shows no sign of slowing down. Tools aside, Rational has successfully managed to shift the entire paradigm of software development into a mentality of iterative development cycles.
Iterations are the new mantra of the software industry, and have replaced the rigid waterfall technique as the process paradigm of choice for most programming groups. The iterative approach takes many forms (including RUP) but can also be adapted by individuals simply by planning projects with multiple planning/programming/release cycles. UML has also evolved into a world-standard for documentation and is amazingly useful for large, complex documentation needs.
Ironically, the software process system (RUP) that brought some of the most useful lessons to the world of project management is amongst the most inapplicable to Web development, because RUP and Rational Tools are much too expensive and difficult for most Web developers to use effectively.
XP: Extreme Programming
Extreme Programming offers a streamlined approach to development, and is a self-proclaimed ‘lightweight’ methodology. It is highly focused on agility and flexibility, with few critical practices and an emphasis on iterations. It’s very powerful in the hands of a professional programmer with lots of formal methodology experience, but slightly tricky for self-trained or junior techs. Nevertheless, XP works for many teams and is gaining popularity. XP is debatably geared towards general software development rather than Web applications, but has been adopted by all types of teams throughout the world.
The ideal way to evaluate the XP technique is to visit Extreme Programming and click on the interactive ‘map’, which visually explains the general project structure. It provides an intelligent approach that revolves around a combination of key documents and processes, and is most suitable for an aggressive, process-oriented programmer.
The Cowboy Technique (AKA”faking it”)
Still the most popular technique among independent and boutique Web developers, the cowboy technique usually consists of a simple contract, some kind of specifications document, and that’s about it. One the project begins, the vendor uses email and phone to keep things going, gets an occasional signoff perhaps, and just pushes toward the end without a clear path.
Fans of the cowboy technique also tend to underestimate project values, and provide risky schedules with aggressive deadlines.
Invariably, the cowboy technique of project management will result in chaos to the greatest extent possible, as determined by the scope of the project. On a tiny brochure-ware project, there is little to go wrong and the cowboy technique will cause few problems. On a large project, the cowboy technique usually kills the profit margin, burns out the employees, and lets down the client.
There Is No Best Way, Only Best Practices
Having now reviewed a series of popular methodologies, it’s important to point out that none of these is perfect, as each project has its own unique needs, which are the product of the project type, client personality, and vendor skills.
The best methodology for you and your clients will be determined on a project-by-project basis, and might involve an adaptation or variation of any of the above methodologies. There are many more to learn from, and most have something unique to offer. In the next part of this series, we’ll discuss some concepts that will help you take the standard documents and process systems and adapt them to your needs.
Part 3 – Choosing a Balanced Approach
A Web development project is like a chess game: you have to plan every move to win, but you also need to be able to change the plan at any time. The only way to win is to understand all the options and apply best practice at every step.
In this section, we’ll look at the fundamental elements of various process systems, and learn how you can choose the best approach when planning your development projects.
Maintaining Flexibility and Optimal Speed
Flexibility and speed are essential factors in any project. However, keep in mind that these are not the only goals — a process that’s too flexible might lead to a never-ending project in which the plan continues to evolve, preventing you from reaching release. Some clients benefit from a rigid process; others can handle a more flexible and progressive system.
The winning approach is to make a conscious determination regarding the level of flexibility that’s appropriate to your client. If the client’s operations, or their dealings with you, are typically prone to unexpected changes and scope-creep, and you wish to maintain a tight grip on the project, you should attempt to make a very comprehensive document trail. Create a series of signoffs at critical decision points, and agree up-front on a specified limit to the number of iterations you’ll allow during development.
Conversely, if you have a trusted client who pays his bills, understands that a change order will impact the project budget and schedule, and participates well in process-driven management, you might take a totally different approach. A good client should be invited to participate in the review of many application iterations and is usually capable of making decisions without being ‘locked-down’ by a sea of documentation.
For each client, there is an ideal combination of project management elements, such as leadership, documentation, sign-offs milestones, and progress reports. Never begin a project without considering your client’s perspective, history, and business interests, so that you can formulate the ideal plan for success.
Making it Easy
It’s easier said than done! ‘Make it easy for the client’ is a lesson that teaches itself, as we try to work with clients using a process that is too daunting, boring, or complex for them. Clients come from all walks of life, and many may never have been through a Web development process before. Others might be disinterested, intimidated, or may trivialize the process with a ‘just get it done’ attitude.
Clients can always be educated — they can learn to see the value in formal process and documentation — but remember that they’re the ones who pay the bills. They should be accommodated to the extent possible without compromising the project’s success.
Typically, if you’re having trouble getting a client to participate in your process, the process may be too hard for them, or they might not like it. In this case, switch gears and use this new information about your client to establish a creative solution in which their meeting, communication, or work style can be accommodated so that they can contribute positively to the project.
Iterations, Iterations, Iterations
Whenever I see a project plan that includes a long period of development followed by a launch, I get nervous. I’ve learned the hard way that, whether you like it or not, you are probably going to release multiple iterations of your application. After all, most launch dates consist of a few scrambled versions of the application, then a couple of fixes here and there during the early days. Documents, too, tend to get passed around several times before someone finally signs on the dotted line.
Hassle? No way. Iterations are a part of life, and they’re a great way to enhance a Web development project. Use them to your advantage.
Let’s say you’re leading a 6-month project in which months 2, 3, and 4 are dedicated to development, with a final release at the beginning of month 6. How many releases would you ideally like to see in addition to the final release? Personally, I’d hope to see some kind of a beta after month 2, and 2 to 5 releases during months 3, 4, and 5.
There simply is no substitute for looking at a half-complete application on-screen and trying to decide if everything is going in the right direction. The iterative approach allows everyone, from client to developer, to be involved in the project from its inception, and lends a “step-by-step” feeling to the engagement, rather than the all-too-typical ‘big push’. Iterations also bring more visibility to the project, as everyone can see where the project is at all times.
Although it’s not always possible to plan the number of release iterations in a project plan, it’s extremely wise to include a significant period of ‘iterative development’ during the build phase of a project. This gives the developers an opportunity to complete small releases, gain experience with the application migration and client feedback processes, and stay on track. Iterative development is an established, proven technique and is critical to most popular development methodologies today.
Email Is Your Best Friend
Wouldn’t you love to have an employee who would do nothing but record every single word of your business communications 24 hours a day? Your email client and inbox are ready to handle the task.
The easiest kind of documentation is ‘passive documentation’ in which you simply capture the ordinary project communications and keep them handy for future reference. When you focus on using email communications for all-important correspondence, you are already creating a useful ‘paper trail’ for your projects without even trying.
If you can organize your inbox and are a decent typist, you have everything you need to ensure that you always have complete documentation of an entire project should there be any later misunderstandings, confusion, or legal issues. Always try to use email whenever possible (and appropriate), and keep a well-structured and clearly-organized inbox in which you can easily find anything you need — this will help you avoid situations in which you make a decision on the telephone, then realize you need to discuss a detail without remembering the exact original agreement.
There are many ways to maximize the effectiveness of your email archives:
- Write every email as if it might, one day, be read by a judge in a court case. Avoid being overly informal, and be sure that your communications are clear.
- Don’t allow long email threads to turn into a single long, scrolling email — this only makes for more confusing in the future. Be sure that each email stays on a single topic, and if the topic changes, be sure to delete the existing thread before you send your response. If you have 2 ideas in a single email, consider splitting them up.
- Use the subject line well. This is probably the simplest and most powerful tip in the list. A well written subject line makes the reader more comfortable, sets the tone for the email, and makes it easy to find and refer to in the future. Good subjects simply summarize the email, like ‘response to change order from 1/3/03’ or ‘options for merchant accounts’. Avoid meaningless, casual or irrelevant subjects such as ‘ok’ or ‘one more time’ or ‘moving forward’, etc.
Signoffs and Versioning
Signoffs serve everyone. Many vendors see client sign-offs as something that should come at the end of the project. While there should certainly be a signed ‘acceptance document’ to indicate the end of the engagement, it’s hard to agree on where that end may be if there were no signed-off project plans at the beginning!
Signoffs allow everyone in the project to understand when a critical milestone or document is being approved. It shows clients that you are organized and are taking their input seriously, and helps them to differentiate between making final decisions, and just providing opinions.
Signoffs also have a serious impact in the courtroom, or any legal proceedings. Although a signed document can still be disputed, it’s expected that someone who signed a document has taken the time to read and understand that document. This allows you to be extremely clear about how the project decisions were made, who made them, and who assumed responsibility for what, when.
If nothing else, a project should always include signoff at the following points, no matter how small the project is:
- The Contract
- Project Specifications (can be a single document, or many)
- Schedule/Workflow/Milestones
- Acceptance (project completion)
Just One Person in Charge
It’s exceedingly hard to manage a project ‘by committee’.
Group leadership efforts usually result in a long, ineffective project flow and a poor result. Most organizations are not capable of managing a project as a group, and will gravitate towards a leader-and-process solution if one is offered. As the developer, it’s your responsibility to assume this role and maintain control of all aspects of the project from beginning to end. It’s very rare that a client has the ability or know-how to effectively manage a technology vendor, and those who try are usually doing it simply to keep control, or because they’ve been burned by a previous vendor.
Good documentation practices offer a solution for this dynamic, because the owner of each document is the only person who can determine how the document is structured, what’s in it, and when the document is final and ready be signed. Thus, the owner of the document (or whoever is in control of it) is likely to be perceived as the leader of the project, or at least the person most knowledgeable about the details.
Another means of establishing control over an engagement is to arrive at all meetings (including phone calls) with a well-written and printed agenda to establish the meeting’s objective, participants, and major points. Following the meeting, a meeting report can be emailed to all participants to sum up the conclusions and ‘action items’ that resulted from the meeting.
Ultimately, the best way to be the single point of control in a project is to demonstrate that you know what you’re doing, that you have a process in place, and that you are the best person to lead the project. If everyone wants the project to succeed, they will frequently defer to the most promising leader. You can position yourself as that person by coming in to the project with a strong leadership attitude, and a clear idea of the steps ahead.
Part 4 – Write Great Specifications
The foundation of every process is the actual words written in the documents, not the document format or methodology used. In the next few pages, we’ll explore effective ways to capture requirements and other important data. To start, we’ll look at the classic documentation types, then, we’ll discuss some practices you can use to maximize the effectiveness of your documentation efforts.
Standard Document Types
Functional Requirements Documents
Perhaps the most important category of document types, a functional specifications document outlines what the application will do. It contains every behavior, activity, reaction, event, or other action that an application can perform. At a very high level, these might include:
“The application will back itself up on a nightly basis”
Or:
“A JavaScript validation system will prevent users from making reservations for dates that are already in the past.”
Obviously, these are simplistic examples and the above requirements could be expanded into a volume of notes and details. They do help to illustrate the distinction, though, between functional specifications (part of the general functional requirements of an application) and other types of information that document what an application is, how it should be built, or who will build it. For example, the following information is useful, but would not be part of a functional specifications document:
“The system will be built on a platform consisting of RedHat 9.0, PHP, MySQL, and Apache.” (This belongs in the technical specifications.)
“Client must approve all technical and functional documentation prior to development.” (This belongs in original contract/agreement.)
“The application can be expanded by adding more servers.” (If this specification continues to explain how the system will react to such expansion, it could stay. However, it is probably best mentioned in a technical specification document as part of the platform discussion.)
Although it may seem arbitrary to maintain such a restrictive interpretation of the term ‘functional requirement’, having a focused specification document has been proven to improve documentation quality in general by allowing each document to be concise, simple to read, and formatted for its specific purpose. Requirements and specifications, being the most important information in the entire project, deserve a document of their own, and that document will be more useful if it’s kept distinct and targeted.
As a general rule, the exercise of documenting requirements will lead the participants into an ongoing period of exploration and discovery, during which each requirement leads to more questions, which, in turn, lead to more requirements. The momentum can be difficult to get going, and the learning curve takes a bit of effort to overcome. Yet, a properly managed requirements documentation phase will invariably lead to a fast-paced discovery process in which countless details are revealed, considered, and handled before any development begins. Of course, this approach has many benefits:
- Corrections and changes are made prior to programming, when they are still easy and have less of an impact on the project budget and timeline.
- Developers are confronted by fewer on-the-fly changes, which increases morale and code quality.
- Clients get a chance to ask questions without impacting the developers, or risking issues related to change orders.
To make the most of the specifications documents, you’ll want to create a workflow scenario where the document gets passed from person to person, with one individual as the lead document manager and owner of the document. At first, you’ll need to do most of the work yourself, since most clients won’t know where to begin with this kind of process. However, you’ll soon find that, by reading the document, the client begins to think about details and provide you with useful information and insight into their true objectives.
For example, I recently created a requirements document for a Web-based application intended to automate various functions in a county health facility in California. For the first 10 days or so, I plugged away at the requirements document on my own, adding as much information and detail as I could. Once the document reached about 35 pages, I began getting the occasional question from the client, usually related to client-friendly issues such as click-paths or cosmetics.
One day, the client called and asked me why there was a requirement that said the ‘new patient’ form must have a button entitled ‘Insurance Information’, and why the button would lead to an ‘add insurance information’ form when clicked. I explained to the client that I had been told that each client would have insurance information, and that this information was to be captured.
Soon, the client clarified the requirement and I learned that 95% of the patients defaulted to a particular type of insurance, and the only patients about whom insurance information really needed to be captured were patients who were referred by a particular county agency.
Thus, a decision was made that if the user entered a certain value into the ‘referring agency’ field earlier on that page, the insurance form would appear as a pop-up. Wondering how many instances there were of this type of dependency, I asked the client to consider what other pages also needed to behave certain ways under certain circumstances. The next day, we got a list of about 10 similar requirements, some of which were quite complex and would have been extremely unpleasant for the programmers to repair if they’d been built incorrectly.
A single question about a small detail resulted in a useful dialog that saved many hours of development, by allowing my team to do it right the first time.
With time and practice, you can educate your client to be mindful and aware of form validation, pagination, field length, navigation and other details that are typically overlooked. It is up to you to set the example, but there is much to be gained by ‘coaching’ your client to participate more effectively. Once you’ve established some momentum around the document, and all project stakeholders are contributing, simply continue until the progress drops off, then stop. The point of diminishing returns comes abruptly, and you risk fatiguing your client if you force them to participate in documentation beyond that point.
The Pain of SiteMaps
It is my opinion that sitemaps are bad. That’s right — just plain bad.
I’m not just saying that they’re inferior to wireframe documents (described in the next section), or that they don’t accomplish much. I’m saying that they are actually bad for projects, are misleading, and usually cause wasted time and confusion.
Sitemaps provide a means of diagramming every page in a Website for planning purposes. This seems like a good idea but, in practice, sitemaps always fall short of that goal, and usually serve no purpose other than to give the client an impressive diagram to approve.
Sitemaps attempt to detail all pages in a site, approximate navigation and page flow, and to represent this information visually. However, if you take the average sitemap and try to draw a line between every pair of linked pages, you’ll soon have an illegible spider web of lines and boxes. As most Websites have persistent navigation (and even secondary navigation, like footers and sidebars) on every page, the lines between the boxes are generally arbitrary, and only serve to show a general relationship between pages within a section — something we intuitively know already. An approved sitemap causes people to think they have documented all the navigational details and page flows when in fact there are usually many pages and features left to discuss once the sitemap is approved.
Sitemaps also completely fail to capture information related to dynamic pages, and usually omit things like feedback/response pages, etc. Some pages behave differently depending on whether a user is logged in — another feature that’s rarely mentioned on the average sitemap. In addition, most sitemap authors attempt to squeeze an entire sitemap on a single page, resulting in a nice-looking but rather useless document.
Even basic information such as ‘when you click here, this happens’ is completely lost in the sitemap, which tends to be too cluttered to allow the addition of callouts or other notes to the pages. (A callout is a small text note with a line pointing to the element that the note refers to.) Understandably, the sitemap is not intended to provide incredible detail about anything, but the only thing it seems to provide is a bunch of boxes with the names of the individual pages typed in.
So, what’s better than the sitemap? The wireframe, of course!
The Joy of Wireframes
Used correctly, wireframes can be one of the most effective tools in a Web developer’s arsenal of project management techniques. Simple, though tedious to make, wireframes might seem like a painfully laborious exercise in documenting the obvious. However, you might soon find that a 10-page wireframe document reveals informational disconnects between your project team and your client, and provides a convenient documentation structure for capturing, discussing, and clarifying the matter at hand.
What is a Wireframe?
The wireframe document is a simple diagram created in Microsoft Visio, or Inspiration (for Mac users), or by hand, which shows the functional elements contained on a Web page but completely disregards the copy, graphics, fonts, colors, layout, and other aesthetic elements.
The objective of the wireframe is to document and clarify what elements (headers, footers, forms, buttons, ads, copy blocks, search boxes, etc.) will be included on a page, and how the page will behave when clicked (‘clicking here will re-sort the results by date’) so that the project team and the client can effectively communicate the specific requirements of a Website.
Why Aren’t There Any Graphics?
Using graphics on a wireframe undermines the purpose of the wireframe, which is to get both your client and yourself to truly consider the specific functional (not cosmetic) requirements of a page. Therefore, any colors, fonts, or graphics will serve as a distraction to the client, and will make it harder to keep them focused on the matter at hand. The cosmetic information is best left in a creative brief or other document so as not to disturb the discovery process that is so well facilitated by the wireframes.
A simple, unpolished look is generally best when it comes to wireframes. Keeping the wireframes slightly ‘rough’ demonstrates to the client that the document is not intended to look nice — that it is a working, living document, a vehicle for important non-graphical information, and doesn’t need to be dressed up.
To illustrate this point, let’s imagine you’re planning a Website that includes a ‘news module’ to allow the client to easily add/update/delete news stories and modify the way they appear on the homepage.
The initial homepage wireframe would show the basic elements of the page, including large blocks for repeated elements like ‘persistent top navigation’ or ‘footer’. These frequently-used elements will be diagrammed on a single page of the wireframe document, and will simply be referred to in the other pages, similar to the way includes are used in HTML pages. The wireframe would show any ads, copy blocks, or other elements that should be included on the page, as seen in the following sample:
It seems simple enough, and it is — until the client has a look at it and (hopefully) starts asking questions. Soon, additional pages of the wireframe document can be created and callouts can be used to document simple specifications. As the document will be signed off by the client, it’s in your interests to get as much detail as possible into the callouts, ensure that everyone is clear on the project specifications, and that you are protected from potential misunderstandings.
If a ‘news headline’ page was to be created, it might be a good idea to document some of the character limits for headlines before development, to make sure that the specifications are acceptable to the client. The wireframe might look something like this:
Over a period of days or weeks, this document can continue to expand, to become a definitive part of the project’s definition — allowing the client, project manager, and developers to be precisely clear about the work to be performed. This provides the following benefits to the project:
- It establishes names for each page in the site, making communication simpler throughout the project.
- It provides a very clear, simple mechanism for clients to approve project specifications, which are easy to read, and difficult to misunderstand.
- It helps to identify areas of confusion (‘what happens when you click here’, or ‘I thought it would automatically sort by date’, or ‘shouldn’t the article author appear on each page’, etc.).
- It provides a no-brainer way of accumulating notes and comments that relate to a single page — if there are too many notes on a wireframe page, you simply add another page.
- It contributes to the general documentation of the project, which makes for easier process and change order management, and better user acceptance at the end of the project. It’s usually not worth wireframing every single page in the site, but once the main pages are wireframed, it’s quite simple to cut/paste new wireframes and gain signoff on the majority of the pages.
- It forces everyone involved with the project to take a good look at what they’re creating, and what it will do. It makes everyone address problems such as ‘what happens if you click here, is it a pop-up or just a new page?’
- It helps clients to consider functional requirements without the distraction of visual elements like colors and fonts, saving valuable time in meetings and ensuring that the client actually understands what they’re getting.
- It provides one of the best ways to take a project plan and give it to a team of developers. It’s easy to understand, and helps everyone to get up to speed quickly, saving precious development dollars.
The Technical Specifications Document
The technical requirements document is similar to the functional requirements document, but answers a different question for a different audience. This document should answer the question, How Does It Work?, and, unlike the functional documents, should be limited to answering that question in a manner that would be useful to technical personal or other IT providers.
Because the ‘tech spec’ is geared towards a technical reader and contains no functional concepts that need to be approved or understood by a non-technical audience, the language can be highly technical in nature, and should contain any kind of information that is deemed useful. Typical technical specifications include information such as:
- Database Models
- Class diagrams or architectural plans
- Platform specifics including OS/language/compilation details
- Load Balancing and Migration Info
- Use of third party components or objects
- Licensing issues, when related to the above topics
- Performance expectations and limitations
- Integration techniques and i/o mappings
- Backup and disaster recovery planning
As you can see, the technical documentation says little about what an application actually does. It’s focused on how it does what it does, what makes it work, and sometimes why those particular solutions were chosen.
By separating the functional and technical documents, you’ll make your life easier in two ways. First, you need only collaborate with the interested parties during the documentation phase. In other words, you only need to talk about the functional specification with the people who are actually interested in the functionality, rather than having to deal with uninterested IT people who were asked to approve the documentation.
Second, you can ask your client to have specific individuals sign-off on each particular document. I like to have a high-level (but involved) person at the client organization sign off the functional specification, but I always seek the most technically savvy person I can find to sign off the technical specification. This approach to signoff creates the most comfortable outcome possible, as the people who will best understand the different documents are the people who take responsibility for their contents.
The Rest: Paradigms, Schedules, Workflow, Testing and Milestones
…Plus Use Cases and Test Cases and Deployment Plans and Integration Mappings, and Progress Reports, and Risk Assessment Documents, and User Acceptance Forms…
Depending on which process system, methodology, or personal style you use in your business, an incredible variety of documents can be used to capture and clarify information that’s not found in the functional or technical specifications documents.
Every project is different, and the critical information required to complete different projects can vary greatly. It’s important to consider which documents you will generate and seek to have signed off during the course of a project. The functional and technical specifications are highly targeted and concise, because they are critical-path tools for success. However, most other information can successfully be documented using whatever format seems most appropriate for the time and scenario.
Typical documents include:
- The Contract – This mandatory document is extremely useful and sets the tone for the entire engagement.
Why write a brief? The purpose of the brief is to get the major points of the technical/creative effort on paper so that the client can review them before you invest a large amount of time writing lengthy requirements documentation. By getting a sign-off on your brief, you’ve confirmed with the client that you are going in the right direction, and are less likely to miss the target. This approach is invaluable when working on a very large project, but is probably not required for smaller ones.
There are so many document types that it’s impossible to list them all here. Your success will be ensured by selecting the document trail that is relevant, useful, and practical. You might find yourself creating your own formats or document types, or repurposing the same documents over and over again. Either way, it is an excellent practice to establish a document trail early in the project and to share your plan with the client.
Consistent Nomenclature
If the documentation is to be successful, everyone must speak the same language. This includes the client, the developers, and anyone else involved in the project. When writing requirements, you can create naming conventions and nomenclature that can reduce confusion for the entire duration of the project. This requires that you establish naming conventions early in the project, and require everyone involved to use them as well.
For example, let’s say we’re developing an online store. During the early discussions, everyone kept referring to the ‘cart’, the ‘store’, the ‘product pages’, ‘the store page’, ‘the front page’, the ‘product closeup page’, etc. Although we usually know what is being referred to, a surprising amount of clarity can be gained by establishing naming conventions for the pages. You can accomplish that by using consistent nomenclature in our documentation, such as:
- Product Category Page: Shows 3 rows of 5 product thumbnails with prices below, limited to a single category, Reached by clicking a category in the category list in the left-side nav.
- Product Detail Page: Shows a single product, with detailed attributes.
- Search Results Page: Displays paginated results of a search, following the format established by the Product Category Page.
- Contact Feedback Page: Displays results of a feedback form after one is submitted by a user on the Feedback Form Page
By writing your requirements in a concise, distinct format, you’ll soon have the entire project team using your chosen nomenclature and communicating more effectively. This avoids ambiguity problems, such as the client referring to ‘the pages that come after you click on the search page but there aren’t any results’, etc.
Effective and consistent nomenclature is an excellent practice – it’s one of the pillars of great documentation and successful project management. Always try to name and identify everything early on, so that the other project members will be able to refer to the pages by their exact names as the planning unfolds.
Numbers and Dots
The most accessible and simple format for capturing requirements is via Microsoft Word, or a competing product such as OpenOffice or Star. Although many tools and systems have been specially designed for requirements gathering, Word is an excellent option for project managers who are just starting with formal documentation and aren’t ready to invest in custom tools.
The Word feature you’ll be using is the ‘Styles’ feature, which allows the author to establish styles, use the outline mode, and show numbering on screen. Make an outline, then assign the style ‘Heading 1’ to the top level, ‘Heading 2’ to the second level, and so on. This produces an easily-read and highly flexible document, with a format that follows a strict numeric organizational scheme, like this:
1. Merchant Account Integration
1.1 Authorize.net must be integrated with OSCommerce.
1.1.1 Vendor must work with John Doe at authorize.net to certify that the
installation is performed correctly.
1.1.2 Integration must be completed before August 21, 2003
1.2 Two-way integration must provide information about charge/authorization results
from within the admin screen
1.2.1 sub-requirement, etc.
Add as many levels as you need, and rearrange whenever you see fit. Additional benefits of Microsoft Word include the automatic generation of tables of contents, indexes, and other client-friendly cosmetic effects.
To learn how to use these techniques, use the built-in help in Microsoft Word to find information about the following features:
- Styles, especially Header 1, Header 2, Header 3
- Document Map
- Outline Mode
- Bullets and Numbering
- Table of Contents
More Is More
When I write requirements, I always try to follow 2 self-inflicted rules:
- If you can provide more detail, you should — that is, unless the details are intuitive to all concerned project members, irrelevant, ill-defined, or unlikely to have any benefit to anyone. Even if you understand the details, it’s still wise to record them in the document.
- Always keep your requirements organized so that you can refer to other sections easily, eliminating the need to repeat yourself. Not unlike SSI/includes in Web programming, a well organized document allows each section to refer to any other section to address global details such as navigation and style.
Taking the online store as an example, let’s say you are capturing an interface requirement and section 3.x of the functional specifications document is being used to capture interface requirements. You might start with a basic requirement such as:
3.3 The Product Detail Page will show a ‘zoom in’ button which, when clicked, will show an enlarged version of the product photo.
This is a perfectly legitimate requirement, and follows the traditional ‘a must do b’ format of well written requirements. However, there is much more to say about this feature, as evidenced in the next example:
3.3 The Product Detail Page will show a ‘zoom in’ button which, when clicked, will show an enlarged version of the product photo.
3.3.1 The zoom image will be displayed via DHTML, and will appear in a set position on the user’s screen.
3.3.2 Some products don’t have zoom images. For these products, the ‘zoom in’ button will be grayed out on the product detail page.
3.3.3 The DHTML browser compatibility level will be MSIE/NS 4+. Users whose browsers do not meet the specifications will not see the zoom images.
The expanded requirement is becoming much more useful. However, this feature raises the question, ‘How does the zoom image get in there?’ We’ll add to a different section of the document the following entry, which captures requirements for the administrative interface.
10.1.2 Zoom images can be uploaded from the Product Administration Page. If a product has no zoom image, a dialog box will appear to confirm ‘Are you sure you want to add this product with no zoom image?” prior to saving the product record.
If the administrators are allowed to upload the zoom image, they’ll need to know what type/format needs to be uploaded for proper display. Let’s add one more requirement to clarify this (notice that this is a sub-requirement of the above requirement 10.1.2, because it only relates to that requirement):
- Uploaded images must be jpeg format, less than 20k, and exactly 400×350 pixels in dimension.
- The admin interface will reject any zoom images that don’t meet the above spec by displaying an error message including the specification that wasn’t met by the image.
Okay, the requirement is beginning to become clearer now. But, clear requirements have a tendency to create more questions. For example, ‘How does the user return to the non-zoom image once it’s displayed?’ We’ll add yet another requirement to make sure that the developers build it right the first time:
3.3.4 While the zoom image is being displayed, the original ‘zoom in’ button will change into a ‘zoom out’ button so that the user can return to the original view.
And, just for usability purposes:
3.3.4.1 Clicking on the zoom image will also return the user to the ordinary view.
This process of each requirement illuminating the need for more requirements is typical, and is a sign of good momentum in the documentation process. Even in the simple example above, there are many more considerations that could be addressed, such as:
- Can zoom images be added to existing products? How?
- How are zoom images stored on the server? What naming convention is used?
- What server-side process is used to evaluate the uploaded images?
- Does the zoom image show up in the product preview page?
Once you adopt the mentality of capturing and expanding upon requirements as we have above, you’ll find that lots of little details get documented that would otherwise have resulted in phone calls, repeated work, or other time-consuming productivity killers.
If the question, ‘How do you get back to the main product image?’ hadn’t been documented above, the client might have called months later asking the very same question. This could occupy 5 minutes of your time on the phone, plus 5 minutes communicating to your developer about how to fix the feature, plus the additional 15 minutes it might take for the developer to make the fix. That little detail cost you 25 minutes of time, and if there were only 20 similar incidents, you’ll have wasted 8 hours of time to avoid 30 minutes of documentation.
Meaningful Use Cases
‘Use cases’ are a proven means of capturing the essential paradigm of an application’s desired functionality. Although use cases can be considered functional requirements, they are typically captured in a special part of the document and corresponded to the main requirements using a numbering scheme. Other approaches involve the creation of a special use case document, or writing them right alongside the main requirements.
Use cases are simply a different way of answering the, ‘What does the application do?’ question, by answering the complimentary question, ‘What does someone do with the application?’ In other words, use cases offer an alternative approach to capturing requirements by allowing the author to write them from the perspective of an actual user.
Some requirements are best captured in the standard format of, ‘the application must do x and y.’ while others are much easier to describe through use cases. In general, requirements that are part of a long, complex process that spans multiple pages are good candidates for a use case. Take, for example, the following example of a use case that describes a content management tool at a high level:
1.4.4 Bob, the article writer, logs into the system and clicks the ‘submit article’ button. He uploads his work and fills out a short form detailing the article and its header information. The next day, Bob’s editor finds an email notification in his inbox telling him that a new submission is waiting for him. He logs into the system and is shown an alert that Bob’s article is waiting for approval. The editor reviews the article, and decides it needs to go back to Bob for revision. He adds several notes to the online form, and clicks the ‘return to author’ button. Bob is notified. He later logs in to read the editor’s notes, fixes the article and resubmits it. This time, the editor logs in, reviews the article, and approves it for publication. The system automatically sends the article to the publishing department (see use case 1.22.3)
Use cases work well to describe a long, complex process like the above sequence of events. It would be simple to write sub-cases to show how the flow might work under various approval sequences.
Use cases don’t work well when you’re describing simple things that could be captured in a standard requirements format. Let’s take the ‘zoom image’ example and see how it might work as a use case:
Steve, a potential customer surfing the ecommerce site, is viewing a product on a product detail page. He sees the ‘zoom in’ button and clicks it, which causes the main image to change into the zoomed image. The button changes also to provide way for him to return to the main image.
This use case is helpful, but is ambiguous and lacks conciseness when compared to the regular requirement we looked at in the previous section. Use cases and requirements need to work together, and each feature should be evaluated to determine the best documentation approach for that specific detail.
Test Cases
Yet another handy information type, test cases answer the question, ‘How can I prove that this works?’ The objective of a test case (also known as a test script) is to provide simple sequences that can be provided to a non-developer and reproduced to prove that the application actually works.
Test cases are written to give the testers some instructions about what to do. In the online store example, a simple but effective test case might read something like this:
Log in to the admin section as admin/admin. Add a product with no zoom image. Log out and visit the store pages and confirm that the new product is there and is correctly displayed. Confirm that the zoom image is greyed out. Return to the admin section as admin/admin and attempt to upload an incorrectly sized image as the zoom image for that product. Confirm that the system refuses to accept the image and gives a meaningful error message. Add a correctly sized image, then logout to confirm that the image is properly displayed on the product detail page for that product.
If you think that test cases aren’t much different from use cases, you’re absolutely right. In fact, test cases are really just functional requirements in reverse — changing the, ‘Application must do x and y’ format into a, ‘Does the application do x and y?’ format. The time you invest in writing good requirements can make it much easier to generate test cases, which we’ll discuss next.
Part 5 – Connecting the Dots
Now that we’ve had a look at the major points of documentation and process, let’s walk through some essential best practices and practical tips to help make it work for you. Keep in mind that process systems for Web development need to be flexible, manageable, easy, and effective if they are to be worthwhile.
Despite what you’ll read on so many Web development firms’ Websites, there is no magic sequence of events that you should ideally follow. On the contrary, effective project management is the result of a series of wise selections from a variety of documentation and process techniques. The simple secret is to take the time to consider the project, the client, and the objectives, then, to make a great plan.
Try to explore the following issues and select the appropriate approach from the available process and documentation techniques:
- How experienced is the client? How much documentation do they expect? Do they understand the benefits of process?
- Which documents are mandatory and should be part of the original project plan, and which documents might be included if deemed necessary during the project?
- Which documents need to be signed off by the client?
- Who will be doing the collaboration for the client? What is their availability and skill level?
- Should a large number of iterations be allowed, or should the project be more rigid?
In addition to some quality planning early on, it’s important to understand how these elements relate to and enhance each other. With experience, you will soon learn that well executed process feeds upon itself, and that the effectiveness and return on time-investment increases as your process skills improve. Fortunately, it’s not necessary to fully commit to a process system and execute accordingly — there is incredible benefit to implementing the basic pillars of good project management as best practices, such as those that follow.
Signoffs Are Gold
Many people assume that the purpose of a sign-off is to prove that the client accepted something in the event of a legal dispute. The real benefit, however, comes from the effect a sign-off request has on a client’s expectations and level of participation.
A client who is about to sign on a dotted line is much more likely to pay attention to the matter at hand. In addition, the client will know that the document is significant and is therefore more likely to understand that changes to the content following sign-off will be less welcome (or, better yet, billable).
This kind of understanding on the part of the client benefits everyone, improves client participation, and helps to manage expectations. Gain sign-off at every reasonable point in the project, and make the client used to signing-off documents from time to time.
Use Cases are Test Cases
Use cases and test cases are among the most frequently ignored requirement types, but are also two of the most useful. Be sure to consider writing use cases during the requirements rounds of your projects, and keep in mind that use cases have some additional benefits and flexibility you may not have realized.
Use cases are, for the most part, easily converted into test cases. In some cases, a use case can literally be used as a test case. This is a huge benefit when testing comes around, because test cases provide a framework for the testing and verification of functionality.
Developers and project managers are notoriously poor at testing their own code, and there’s no easy way to have an ordinary ‘user’ test your application comprehensively. By repurposing your use cases into test cases, you’ll have a simple list of activities in an easy to understand format that you can provide to your testers. They simply follow the sequence of events in the use/test case and note the results.
Requirements are Acceptance Criteria
When writing requirements, always keep in mind that the requirements can (and should) be used as ‘acceptance criteria’ at the end of the project. This means that a clear definition of the end of the project will be established, reducing the possibility for the ‘endless project’ in which details that hadn’t been considered stretch on for months with no clear picture of whether they were part of the original bid.
This mentality is also helpful when writing requirements, because it forces the author to think about the requirements as ‘things the application won’t do,’ in addition to ‘things the application must do.’
In other words, when you write requirements with acceptance criteria in mind, you are more likely to predict and document possible conflicts and write the requirements with those in mind. Technical requirements related to deployment, installation, or migration, such as ‘The application will be delivered to the client on CD and all installation and configuration will be performed by client,’ are helpful to clarify the migration and finalization of the engagement, reducing confusion.
Change Orders
Perhaps the single most significant benefit of a well documented and organized project, the change order is important because it impacts directly upon your bottom line.
Simply put, a well-run project is a breeding ground for successful projects, happy clients, easy change orders, and other essential elements of a successful Web development business.
When a client requests an alteration, expansion, or enhancement to a project mid-stream, your ability to get a fair value for your increased effort is directly tied to two things:
- The expectations, level of understanding, and attitude of the client
- The clarity and completeness of your documentation
A volume of coherent, complete, and signed-off documentation usually achieves both. Having read and signed multiple documents, the client’s expectations have already been adjusted enough so that they realize the requested change is ‘not in the specs’ and will require discussion. Once the issue is raised, there is little debate that the request is new and it will be much easier to get the client to pay for it.
Writing the change order is now an easy task, too. Simply make the requested additions to the original requirements document, and have the client sign it again in connection with a new agreement stating that the requirements have changed, the project value has changed, and perhaps the payment terms have altered, too.
Conclusion
Whether you leap full-force into a complete documentation and process system, or simply improve your basic practices to move towards a more effective workflow, there is undoubtedly some benefit to be had by improving your documentation skills.
The benefits of good process will become self-evident once you get through the initial learning curve, and your business will become more successful as a result. At the very least, you might sleep better at night knowing that you are well prepared for any project contingency or conflict.
Good luck, and remember that the best process systems are always being improved, modified, and customized to better fit business needs.
user can return to the original view.And, just for usability purposes:
3.3.4.1 Clicking on the zoom image will also return the user to the ordinary view.
This process of each requirement illuminating the need for more requirements is typical, and is a sign of good momentum in the documentation process. Even in the simple example above, there are many more considerations that could be addressed, such as:
- Can zoom images be added to existing products? How?
- How are zoom images stored on the server? What naming convention is used?
- What server-side process is used to evaluate the uploaded images?
- Does the zoom image show up in the product preview page?
Once you adopt the mentality of capturing and expanding upon requirements as we have above, you’ll find that lots of little details get documented that would otherwise have resulted in phone calls, repeated work, or other time-consuming productivity killers.
If the question, ‘How do you get back to the main product image?’ hadn’t been documented above, the client might have called months later asking the very same question. This could occupy 5 minutes of your time on the phone, plus 5 minutes communicating to your developer about how to fix the feature, plus the additional 15 minutes it might take for the developer to make the fix. That little detail cost you 25 minutes of time, and if there were only 20 similar incidents, you’ll have wasted 8 hours of time to avoid 30 minutes of documentation.
Meaningful Use Cases
‘Use cases’ are a proven means of capturing the essential paradigm of an application’s desired functionality. Although use cases can be considered functional requirements, they are typically captured in a special part of the document and corresponded to the main requirements using a numbering scheme. Other approaches involve the creation of a special use case document, or writing them right alongside the main requirements.
Use cases are simply a different way of answering the, ‘What does the application do?’ question, by answering the complimentary question, ‘What does someone do with the application?’ In other words, use cases offer an alternative approach to capturing requirements by allowing the author to write them from the perspective of an actual user.
Some requirements are best captured in the standard format of, ‘the application must do x and y.’ while others are much easier to describe through use cases. In general, requirements that are part of a long, complex process that spans multiple pages are good candidates for a use case. Take, for example, the following example of a use case that describes a content management tool at a high level:
1.4.4 Bob, the article writer, logs into the system and clicks the ‘submit article’ button. He uploads his work and fills out a short form detailing the article and its header information. The next day, Bob’s editor finds an email notification in his inbox telling him that a new submission is waiting for him. He logs into the system and is shown an alert that Bob’s article is waiting for approval. The editor reviews the article, and decides it needs to go back to Bob for revision. He adds several notes to the online form, and clicks the ‘return to author’ button. Bob is notified. He later logs in to read the editor’s notes, fixes the article and resubmits it. This time, the editor logs in, reviews the article, and approves it for publication. The system automatically sends the article to the publishing department (see use case 1.22.3)
Use cases work well to describe a long, complex process like the above sequence of events. It would be simple to write sub-cases to show how the flow might work under various approval sequences.
Use cases don’t work well when you’re describing simple things that could be captured in a standard requirements format. Let’s take the ‘zoom image’ example and see how it might work as a use case:
Steve, a potential customer surfing the ecommerce site, is viewing a product on a product detail page. He sees the ‘zoom in’ button and clicks it, which causes the main image to change into the zoomed image. The button changes also to provide way for him to return to the main image.
This use case is helpful, but is ambiguous and lacks conciseness when compared to the regular requirement we looked at in the previous section. Use cases and requirements need to work together, and each feature should be evaluated to determine the best documentation approach for that specific detail.
Test Cases
Yet another handy information type, test cases answer the question, ‘How can I prove that this works?’ The objective of a test case (also known as a test script) is to provide simple sequences that can be provided to a non-developer and reproduced to prove that the application actually works.
Test cases are written to give the testers some instructions about what to do. In the online store example, a simple but effective test case might read something like this:
Log in to the admin section as admin/admin. Add a product with no zoom image. Log out and visit the store pages and confirm that the new product is there and is correctly displayed. Confirm that the zoom image is greyed out. Return to the admin section as admin/admin and attempt to upload an incorrectly sized image as the zoom image for that product. Confirm that the system refuses to accept the image and gives a meaningful error message. Add a correctly sized image, then logout to confirm that the image is properly displayed on the product detail page for that product.
If you think that test cases aren’t much different from use cases, you’re absolutely right. In fact, test cases are really just functional requirements in reverse — changing the, ‘Application must do x and y’ format into a, ‘Does the application do x and y?’ format. The time you invest in writing good requirements can make it much easier to generate test cases, which we’ll discuss next.
Part 5 – Connecting the Dots
Now that we’ve had a look at the major points of documentation and process, let’s walk through some essential best practices and practical tips to help make it work for you. Keep in mind that process systems for Web development need to be flexible, manageable, easy, and effective if they are to be worthwhile.
Despite what you’ll read on so many Web development firms’ Websites, there is no magic sequence of events that you should ideally follow. On the contrary, effective project management is the result of a series of wise selections from a variety of documentation and process techniques. The simple secret is to take the time to consider the project, the client, and the objectives, then, to make a great plan.
Try to explore the following issues and select the appropriate approach from the available process and documentation techniques:
- How experienced is the client? How much documentation do they expect? Do they understand the benefits of process?
- Which documents are mandatory and should be part of the original project plan, and which documents might be included if deemed necessary during the project?
- Which documents need to be signed off by the client?
- Who will be doing the collaboration for the client? What is their availability and skill level?
- Should a large number of iterations be allowed, or should the project be more rigid?
In addition to some quality planning early on, it’s important to understand how these elements relate to and enhance each other. With experience, you will soon learn that well executed process feeds upon itself, and that the effectiveness and return on time-investment increases as your process skills improve. Fortunately, it’s not necessary to fully commit to a process system and execute accordingly — there is incredible benefit to implementing the basic pillars of good project management as best practices, such as those that follow.
Signoffs Are Gold
Many people assume that the purpose of a sign-off is to prove that the client accepted something in the event of a legal dispute. The real benefit, however, comes from the effect a sign-off request has on a client’s expectations and level of participation.
A client who is about to sign on a dotted line is much more likely to pay attention to the matter at hand. In addition, the client will know that the document is significant and is therefore more likely to understand that changes to the content following sign-off will be less welcome (or, better yet, billable).
This kind of understanding on the part of the client benefits everyone, improves client participation, and helps to manage expectations. Gain sign-off at every reasonable point in the project, and make the client used to signing-off documents from time to time.
Use Cases are Test Cases
Use cases and test cases are among the most frequently ignored requirement types, but are also two of the most useful. Be sure to consider writing use cases during the requirements rounds of your projects, and keep in mind that use cases have some additional benefits and flexibility you may not have realized.
Use cases are, for the most part, easily converted into test cases. In some cases, a use case can literally be used as a test case. This is a huge benefit when testing comes around, because test cases provide a framework for the testing and verification of functionality.
Developers and project managers are notoriously poor at testing their own code, and there’s no easy way to have an ordinary ‘user’ test your application comprehensively. By repurposing your use cases into test cases, you’ll have a simple list of activities in an easy to understand format that you can provide to your testers. They simply follow the sequence of events in the use/test case and note the results.
Requirements are Acceptance Criteria
When writing requirements, always keep in mind that the requirements can (and should) be used as ‘acceptance criteria’ at the end of the project. This means that a clear definition of the end of the project will be established, reducing the possibility for the ‘endless project’ in which details that hadn’t been considered stretch on for months with no clear picture of whether they were part of the original bid.
This mentality is also helpful when writing requirements, because it forces the author to think about the requirements as ‘things the application won’t do,’ in addition to ‘things the application must do.’
In other words, when you write requirements with acceptance criteria in mind, you are more likely to predict and document possible conflicts and write the requirements with those in mind. Technical requirements related to deployment, installation, or migration, such as ‘The application will be delivered to the client on CD and all installation and configuration will be performed by client,’ are helpful to clarify the migration and finalization of the engagement, reducing confusion.
Change Orders
Perhaps the single most significant benefit of a well documented and organized project, the change order is important because it impacts directly upon your bottom line.
Simply put, a well-run project is a breeding ground for successful projects, happy clients, easy change orders, and other essential elements of a successful Web development business.
When a client requests an alteration, expansion, or enhancement to a project mid-stream, your ability to get a fair value for your increased effort is directly tied to two things:
- The expectations, level of understanding, and attitude of the client
- The clarity and completeness of your documentation
A volume of coherent, complete, and signed-off documentation usually achieves both. Having read and signed multiple documents, the client’s expectations have already been adjusted enough so that they realize the requested change is ‘not in the specs’ and will require discussion. Once the issue is raised, there is little debate that the request is new and it will be much easier to get the client to pay for it.
Writing the change order is now an easy task, too. Simply make the requested additions to the original requirements document, and have the client sign it again in connection with a new agreement stating that the requirements have changed, the project value has changed, and perhaps the payment terms have altered, too.
Conclusion
Whether you leap full-force into a complete documentation and process system, or simply improve your basic practices to move towards a more effective workflow, there is undoubtedly some benefit to be had by improving your documentation skills.
The benefits of good process will become self-evident once you get through the initial learning curve, and your business will become more successful as a result. At the very least, you might sleep better at night knowing that you are well prepared for any project contingency or conflict.
Good luck, and remember that the best process systems are always being improved, modified, and customized to better fit business needs.
Frequently Asked Questions (FAQs) about Process and Documentation
What is the importance of process documentation in software development?
Process documentation in software development is crucial as it provides a detailed guide on how specific procedures and tasks should be performed. It serves as a reference point for developers, ensuring consistency and efficiency in the development process. It also aids in training new team members, reducing the learning curve and ensuring that they can quickly adapt to the established processes. Furthermore, process documentation helps in identifying potential areas of improvement, thereby enhancing productivity and quality of output.
What are the different types of technical documentation in software development?
There are several types of technical documentation in software development. These include system documentation, which provides an overview of the system’s architecture and functionalities; user documentation, which guides end-users on how to use the software; and process documentation, which outlines the procedures and standards to be followed during development. Other types include project documentation, which records the project’s progress, and API documentation, which provides information on how to interact with the software’s API.
What are the best practices for creating effective process documentation?
Creating effective process documentation involves several best practices. Firstly, it should be clear and concise, avoiding unnecessary jargon. Secondly, it should be regularly updated to reflect any changes in the processes. Thirdly, it should be easily accessible to all team members. Lastly, it should include visuals such as flowcharts and diagrams to aid in understanding.
What tools can be used for process documentation?
There are numerous tools available for process documentation. These include project management tools like Asana, which allow for the creation and tracking of tasks; collaboration tools like Slack, which facilitate communication among team members; and documentation tools like Cognidox, which provide a platform for creating, managing, and storing documents.
What are the stages of document control?
Document control involves five stages. These are document creation, where the document is initially drafted; document review, where it is checked for accuracy and completeness; document approval, where it is signed off by the relevant authorities; document distribution, where it is made accessible to the intended users; and document maintenance, where it is regularly updated to ensure its relevance.
How does process documentation facilitate collaboration?
Process documentation facilitates collaboration by providing a clear guide on how tasks should be performed. This ensures that all team members are on the same page, reducing misunderstandings and conflicts. It also allows for the easy delegation of tasks, as each team member knows what is expected of them.
What is project documentation and why is it important?
Project documentation is a record of all the information related to a project. It includes project plans, progress reports, and post-project reviews. It is important as it provides a historical record of the project, which can be referred to in future projects. It also aids in accountability, as it shows who did what and when.
How can process documentation be made more user-friendly?
Process documentation can be made more user-friendly by using clear and simple language, including visuals, and organizing information in a logical manner. It should also be easily accessible, with a search function to allow users to quickly find the information they need.
What role does process documentation play in quality assurance?
Process documentation plays a crucial role in quality assurance as it ensures that all tasks are performed consistently and according to set standards. This reduces errors and enhances the quality of the output. It also allows for the easy identification and rectification of any issues in the processes.
How can process documentation aid in risk management?
Process documentation aids in risk management by providing a clear guide on how to handle various situations. This reduces the likelihood of errors and mishaps. It also allows for the easy identification of potential risks, enabling proactive measures to be taken to mitigate them.
 Dave Hecker