In a previous article, we saw what the WordPress Links Manager is, how to access it, and how to use it to manage a sorted list of links. We also learnt how to display our links, thanks to the default widget. However, this widget is not perfect: while it is more than enough to display a basic blogroll, we can’t do all we want to do with it. In the next two articles, we will see how to use the Links Manager API to display our links. In this article, we will focus on describing the main function of the API, before learning how to use the other functions in the next article.
A Function to List Our Links
We find several functions in the Links Manager API. However, we won’t use all of them. In fact, if you have already seen some code that uses this API, you might also have seen the use of one the following three functions:get_links(), get_links_list() and wp_get_links(). You shouldn’t use these functions: they are all deprecated.
The function we will study in this article is wp_list_bookmarks(). All it does is display your links in the shape of a list, but some options allow us to customize the result and that’s why this function is so interesting.
Basically, you can use the wp_list_bookmarks() function without giving it any argument. It will then display all the categories, one after another. For each of these categories, it displays an unordered list with the different links with their image. Without any customization in the wp_list_bookmarks() function or even in the CSS, we see the result below.
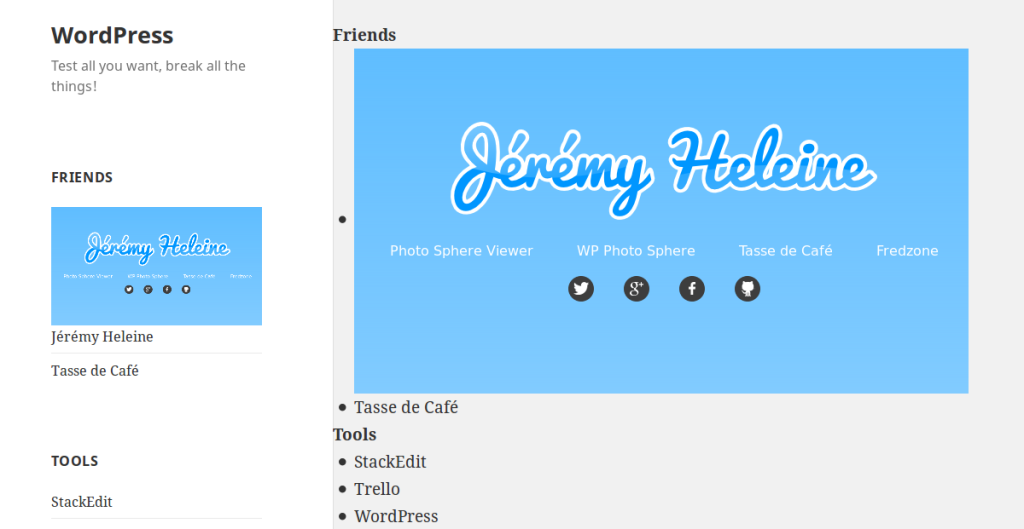 The default widget, on the left, has a better result. Let’s see the different available options to personalize our display.
Personalizing the Output
Thewp_list_bookmarks() function admits only one argument: an array listing all the options we want to customize. We will here separate these options into two categories: those which concern the data by themselves (such as how to retrieve a given category, or how to sort the links) and those which concern the display (such as which title to display).
Customizing the Data
Choosing the Categories
If you want to display links in several places, chances are great that you will want to choose one specific category to display in each place. That can be achieved thanks to thecategory option. As it is the first option we see, an example will be clearer, so I have included one below.
$args = array(
'category' => '4,5'
);

wp_list_bookmarks($args);wp_list_bookmarks() function, we only display two categories, identified by their ID. Here, you can indicate the IDs you want, separated by a comma. By default, this option is set to ' ' to display all the categories.
If you prefer, instead of listing the categories you want to display, you can list the ones you want to hide with the option exclude_category. As in the previous option, its value is a list of categories IDs to hide. By default, no category is hidden thanks to the value ' '.
The ID of a category is not always practical to use. That’s why you can use the option category_name. By default, its value is ' ' and all the categories are shown, but you can indicate the name of a category, so that only this category shows.
$args = array(
'category_name' => 'tools'
);category option.
In the case that your scripts don’t care about the categories, and you want to show all the links, regardless of their category, you can set the categorize option to false. Once this is set, it will not sort the links depending on their category. Instead, With this option, you will see all the links, in a fake category named “Bookmarks“.
 You can combine the option
 categorize with the others. For example, you can choose to only display the categories 4 and 5 with category, but not show that they are in different categories if you set the option categorize to false.
$args = array(
'category' => '4,5',
'categorize' => false
);
Choosing the Order
If you tried thecategory option with more than one ID, you should notice that WordPress automatically sorted the output. You can indicate '4,5' or '5,4', and the order will always be the same, unless you use another option.
This option is category_orderby. By default, categories are shown in alphabetical order thanks to the default value name. You can choose to sort categories by their ID with the value id, by their slug with the value slug, or by the number of links they contain with the value count.
A second option, named category_order, allows you to reverse the order by choosing the value DESC. By default, this option is set to ASC and the order is not reversed.
The example below displays two categories: the first category is the one which contains the greatest number of links.
$args = array(
'category' => '5,6',
'category_orderby' => 'count',
'category_order' => 'DESC'
);orderby option, you can, in fact, choose how links are sorted. A lot of values are accepted, and you can use several values (separated by a comma), which can be useful if two links are considered ‘equal’ by the first chosen order.
You can sort your links using their ID with link_id or their URL with url. Their name can also be used; with name, links are alphabetically sorted and, with length, they are sorted in function of the length of their name. Thanks to the owner value, you can sort the links following the user who added them.
Some values are less useful than others: you can sort the links following their target (target), their description (description), their attached notes (notes), their RSS address (rss) or even the value of their rel attribute (rel).
You can also choose to sort your links using the rating you have assigned to them (rating). A more interesting value is updated: it sorts the links following the last time the page they point to were updated. Finally, if you don’t want to use a specific order, the rand value can be used.
By default, links are sorted following their name. You can reverse this order, or any other you chose, by indicating DESC in the order option.
If you have a lot of links and only want to display a given number of them, you can indicate this number in the limit option. By default, it is set to -1 and shows all the links.
Below is an example which combines several options outlined above. It displays two categories with the order we defined in the previous example. Into these categories, links are sorted following their rating: the order is reversed to show the greatest rating in first. Moreover, we don’t show more than five links by category.
$args = array(
// Sort the categories
'category' => '5,6',
'category_orderby' => 'count',
'category_order' => 'DESC',

// Sort the links
'orderby' => 'rating',
'order' => 'DESC',
'limit' => 5
);
Displaying the Hidden Links
When you add a new link, you can decide to keep it private. WordPress’ default widget doesn’t show private links, but your scripts can, thanks to an option inwp_list_bookmarks(): hide_invisible. This option is a boolean. By default, it is set to true and hides private links, but you can set it to false and it will show all your links, even if some of them are private.
// Show me all the links, even the private ones!
$args(
'hide_invisible' => false
);Customizing the Display
An option calledecho allows you to decide if wp_list_bookmarks() must return (false) or display (true, the default value) the links. However, it returns the string that it echoes, so customizing it is not very practical. That’s why other options allow us to personalize this display.
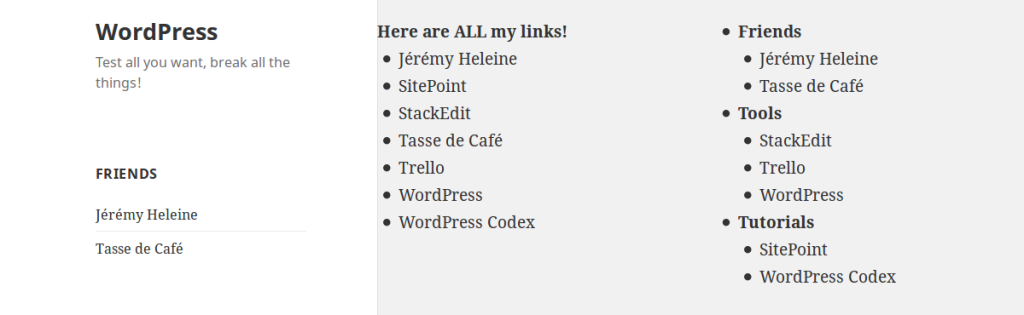
First, the title_li option, is useful in only one case; when you set categorize to false. In fact, WordPress uses this option to display the title above your links if they are not categorized. You can set it to null so that it does not display any title.
$args = array(
'categorize' => false,
'title_li' => 'Here are ALL my links!'
);h2 tag. You can change that by using the options title_before and title_after, which respectively display a text before and after the categories names (or the fake category if you set categorize to false). Don’t forget to close in title_after the tags you open in title_before!
// Display the titles in a smaller heading
$args = array(
'title_before' => '<h4>',
'title_after' => '</h4>'
);linkcat CSS class, but you can personalize it with the class option.
$args = array(
'class' => 'my-class'
);class option. With category_before and category_after, you can personalize the text that appears both before and after every category. By default, it defines a li tag, which then contains all the links in the current category.
$args = array(
'category_before' => '<div id=%id class=%class>',
'category_after' => '</div>'
);%id and %class tags used by WordPress to display the corresponding values.
Finally, we find before (default value: '<li>') and after (default value: '</li>'), which are similar to category_before and category_after but are used for each bookmark. In the same way, we find link_before and link_after, the equivalents of title_before and title_after.
$args = array(
'before' => '<li class="a-link">',
'after' => '</li>',
'link_before' => '<em>',
'link_after' => '</em>'
);
Generating a Table
To see how to use and combine several options in a concrete example, we will now learn how to generate a table listing all our links with just one function:wp_list_bookmarks().
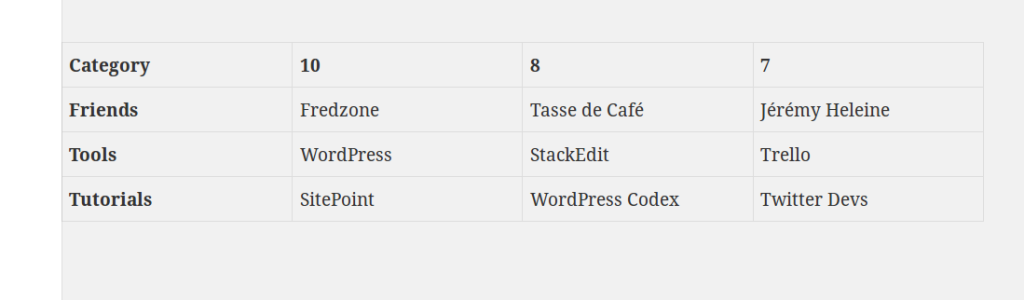
For this example, I created nine links, sorted into three categories. There are three links in each category. The first link is rated 10, the second eight and the last seven. We will use wp_list_bookmarks() to generate a table containing all these links. This table will contain a heading line and three more lines (one for each category). In each line, we will find the name of the category and the three links, sorted following their rating. See the image below to have an idea of the result.
 You can reproduce this example without the need to have as many links as are provided below. In fact, you just need to have the same number of links in each category (and the same rating system in each category).
First, let’s create our table.
You can reproduce this example without the need to have as many links as are provided below. In fact, you just need to have the same number of links in each category (and the same rating system in each category).
First, let’s create our table.
<table>
<tr>
<th>Category</th>
<th>10</th>
<th>8</th>
<th>7</th>
</tr>

< ?php
$args = array(
);

wp_list_bookmarks($args);
?>
</table>$args = array(
// Categories to display
'category' => '4,5,6',
'category_orderby' => 'name'
);wp_list_bookmarks() to sort the links following their rating, and then we reverse the default ascending order.
$args = array(
// Sort the links
'orderby' => 'rating',
'order' => 'DESC'
);category_before and category_after options to customize the code around each category. Before the category we open a tr tag that we close right after.
$args = array(
// One category = one line
'category_before' => '<tr>',
'category_after' => '</tr>'
);li tag for each category. But it’s still not enough, as we want to display the categories’ names in a heading cell. To do that, we use the title_before and title_after options to customize the code before and after each name.
$args = array(
// Category's name in a heading cell
'title_before' => '<th>',
'title_after' => '</th>'
);li tag: thanks to the before and after options we changed to use table cells.
$args = array(
// One link = one table cell
'before' => '<td>',
'after' => '</td>'
);$args = array(
// Categories to display
'category' => '4,5,6',
'category_orderby' => 'name',
// Sort the links
'orderby' => 'rating',
'order' => 'DESC',
// One category = one line
'category_before' => '<tr>',
'category_after' => '</tr>',
// Category's name in a heading cell
'title_before' => '<th>',
'title_after' => '</th>',
// One link = one table cell
'before' => '<td>',
'after' => '</td>'
);wp_list_bookmarks() function to generate something other than a list. The available options allow us to create virtually anything we want.
But in practice, it is not really overly helpful. wp_list_bookmarks() is not the perfect function to use to achieve what we did. In fact, what if the rating system is not exactly the same in each category? What if we want to display the rating and not only the link’s name?
There are a lot of things that are simply not possible with wp_list_bookmarks(), and that’s why the other functions exist.
In Conclusion
The WordPress Links Manager API is a very useful tool and, now, you can play with it the way you want to, thanks to the functions covered in this article. In theory, you could do a lot of things with only thewp_list_bookmarks() function, by playing with the available options. However, this is not the best solution when it comes to creating a sound and readable code. That’s why the other functions we will see in the next article in this series are very important.
Frequently Asked Questions about Mastering WordPress Links Manager API
What is the WordPress Links Manager API and why is it important?
The WordPress Links Manager API is a powerful tool that allows developers to manage and manipulate links within a WordPress site. It is important because it provides a structured way to add, edit, and delete links, as well as to organize them into categories. This can be particularly useful for sites with a large number of links, as it allows for better organization and easier management.
How can I use the WordPress Links Manager API to add a new link?
To add a new link using the WordPress Links Manager API, you can use the wp_insert_link function. This function takes an array of arguments, including the URL, name, and description of the link, and returns the ID of the newly created link. Here’s an example:$linkdata = array(
'link_url' => 'https://www.example.com',
'link_name' => 'Example',
'link_description' => 'This is an example link',);$link_id = wp_insert_link( $linkdata );
How can I edit an existing link using the WordPress Links Manager API?
To edit an existing link, you can use the wp_update_link function. This function takes an array of arguments, including the ID of the link to be updated and the new values for the link’s properties. Here’s an example:$linkdata = array(
'link_id' => 123,
'link_url' => 'https://www.newurl.com',
'link_name' => 'New Name',);wp_update_link( $linkdata );
How can I delete a link using the WordPress Links Manager API?
To delete a link, you can use the wp_delete_link function. This function takes the ID of the link to be deleted as its argument. Here’s an example:$link_id = 123;wp_delete_link( $link_id );
How can I retrieve a list of links using the WordPress Links Manager API?
To retrieve a list of links, you can use the wp_list_bookmarks function. This function takes an array of arguments to specify the criteria for the links to be retrieved, and returns an array of links that match these criteria. Here’s an example:$args = array(
'orderby' => 'name',
'order' => 'ASC',);$links = wp_list_bookmarks( $args );
How can I organize links into categories using the WordPress Links Manager API?
To organize links into categories, you can use the wp_set_link_cats function. This function takes the ID of the link and an array of category IDs as its arguments. Here’s an example:$link_id = 123;$cat_ids = array( 1, 2, 3 );wp_set_link_cats( $link_id, $cat_ids );
How can I retrieve a list of link categories using the WordPress Links Manager API?
To retrieve a list of link categories, you can use the get_terms function with ‘link_category’ as its argument. This function returns an array of link categories. Here’s an example:$categories = get_terms( 'link_category' );
How can I add a new link category using the WordPress Links Manager API?
To add a new link category, you can use the wp_insert_term function with ‘link_category’ as one of its arguments. This function takes an array of arguments, including the name and description of the category, and returns the ID of the newly created category. Here’s an example:$catdata = array(
'name' => 'Example Category',
'description' => 'This is an example category',);$category_id = wp_insert_term( $catdata, 'link_category' );
How can I edit an existing link category using the WordPress Links Manager API?
To edit an existing link category, you can use the wp_update_term function with ‘link_category’ as one of its arguments. This function takes an array of arguments, including the ID of the category to be updated and the new values for the category’s properties. Here’s an example:$catdata = array(
'name' => 'New Category Name',
'description' => 'New category description',);$category_id = 123;wp_update_term( $category_id, 'link_category', $catdata );
How can I delete a link category using the WordPress Links Manager API?
To delete a link category, you can use the wp_delete_term function with ‘link_category’ as one of its arguments. This function takes the ID of the category to be deleted as its argument. Here’s an example:$category_id = 123;wp_delete_term( $category_id, 'link_category' );
 Jérémy Heleine
Currently a math student, Jérémy is a passionate guy who is interested in many fields, particularly in the high tech world for which he covers the news everyday on some blogs, and web development which takes much of his free time. He loves learning new things and sharing his knowledge with others.