
the tyre company since 1894
Mascots have become hugely popular across the web. Although they feel more like a 50’s TV-era invention to me, they actually have their origins in a much earlier time than you’d guess. It was way back in the 1870’s that Quaker Oats trademarked ‘a man in Quaker garb’. Later in the 1890’s, Michelin introduced ‘Bibendu’, the Michelin Man who is still the public face of the company over 120 years later. Mascots can help establish a brand by giving it a more friendly, warm and inviting look. Since we use the social parts of our brain to assess characters — instead of our analytical language centers — a successful mascot can evoke a more emotional response than a standard logotype. Mascots are certainly an effective way of quickly setting a site mood. Moreover, a strong character helps visitors to connect more easily with your site by making it more memorable. It serves as a brand identity that people can relate to.
Today I am going to show you how to create your own effective mascot in Adobe Illustrator. While you would presumably want to create your own original design, the basic techniques we’re using should form a great base for you to take off in your own direction.
Before we start, there are few things that should be considered while designing a mascot:
Be Versatile
Your mascot should be versatile as its going to be used throughout your branding campaign, emails, business cards, letters and packaging.
Keep it Simple
Use a minimalist approach while designing your mascot that help people identify with them easily.
Make it Evergreen
Establishing a brand takes lot of efforts and time. Try to make your mascot timeless as its going to represent your company for years to come.
But perhaps you’re thinking ‘Aren’t product mascots an old-fashioned idea better suited to sugary breakfasts than modern web practices?‘
If so, feast your eyes on a few of these inspiring examples of characters in web design.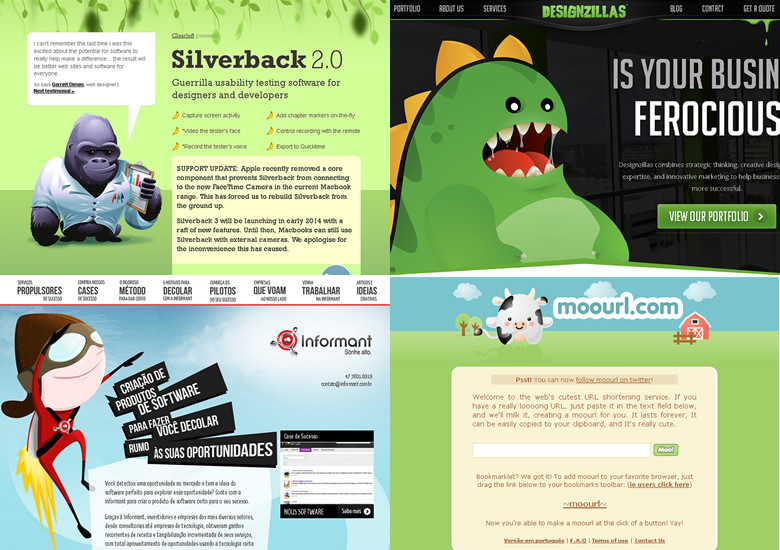
Keeping all the basics in mind now I’ll show you how to create a simple but effective character in illustrator.
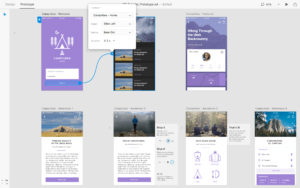
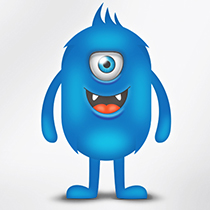
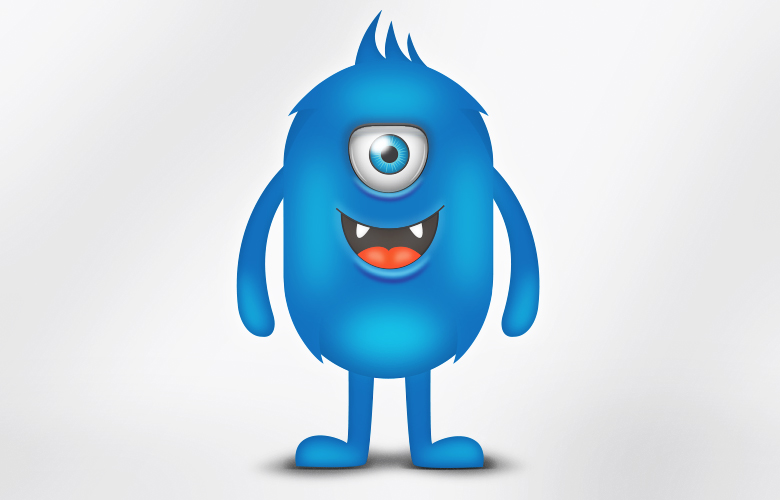
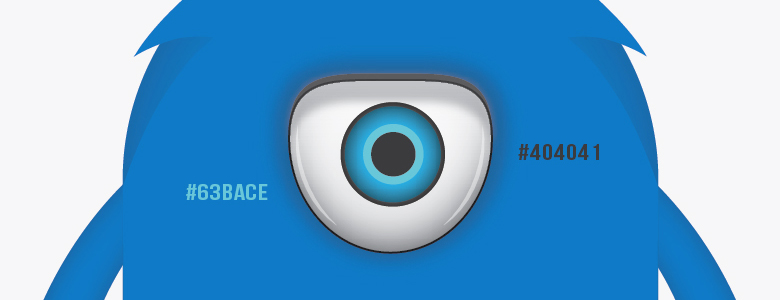
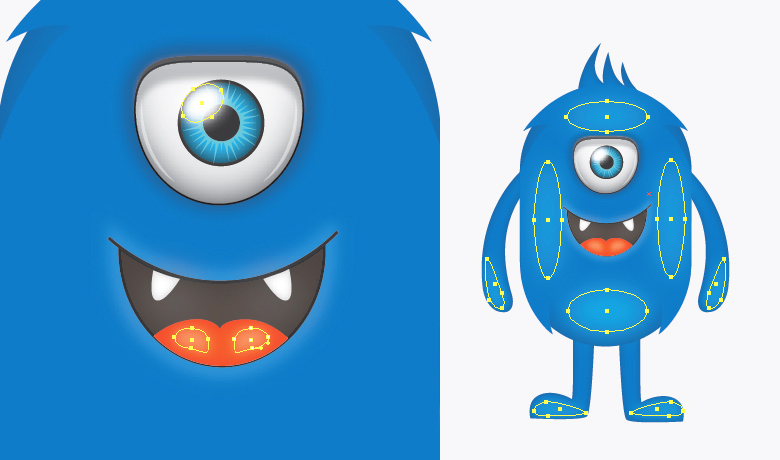
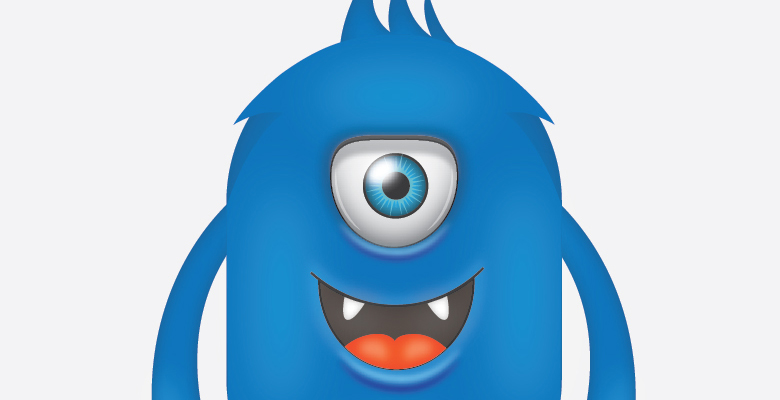
Before we get started, let’s have a peek at the final artwork so we know where we’re heading.Final result:
Step 1:
Step 2:
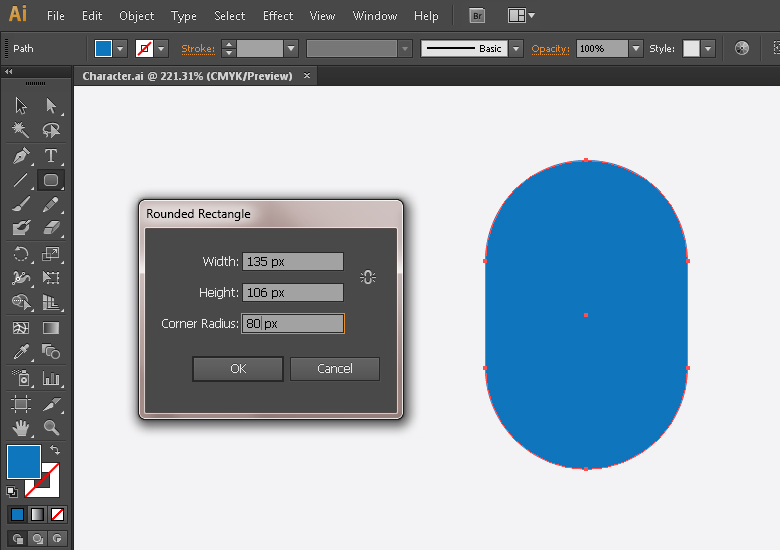
You can choose any color you want your character to be. I used #1B75BB fill color. Now pick the Rounded Rectangle Tool and click the canvas to view options window. Enter 135px for width, 106px for height and 80px for corner radius to draw the shape as mine.
Step 3:
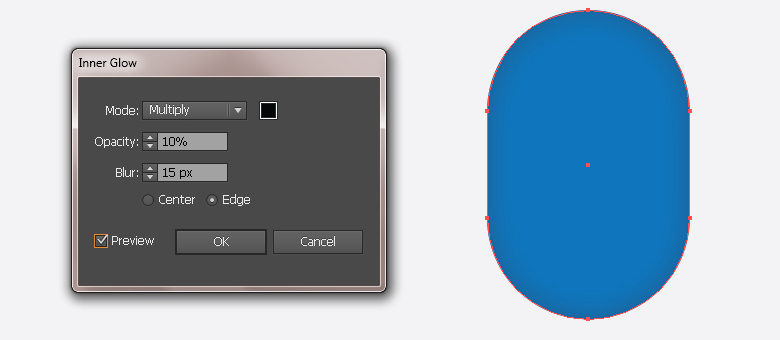
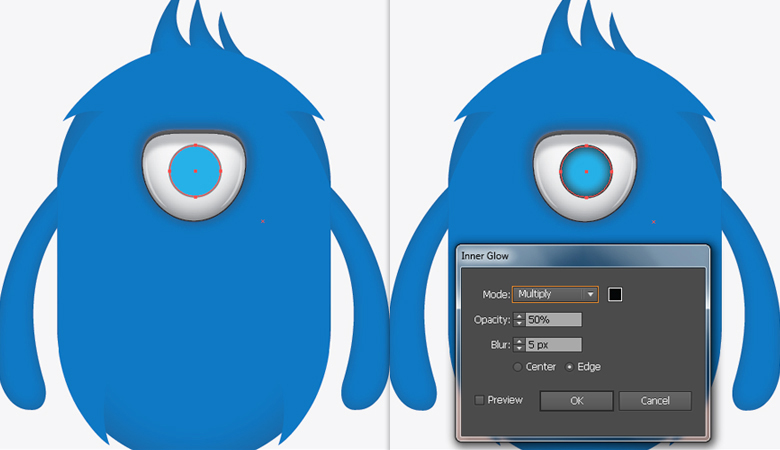
Select this shape by clicking the ring-shaped target present at right side of respective layer and go to “Effect”> “Stylize”> “Inner Glow”. Apply given settings here.
Step 4:
Now create a new layer by clicking the icon of “Create New Layer” present at the bottom of layers panel and pick the Pen Tool (“P”) to draw two spiky projections as shown below. You can try projections of various types to make a unique character.
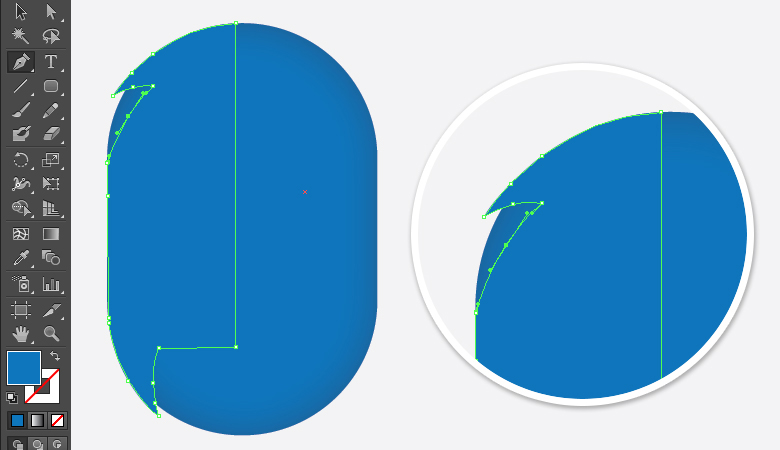
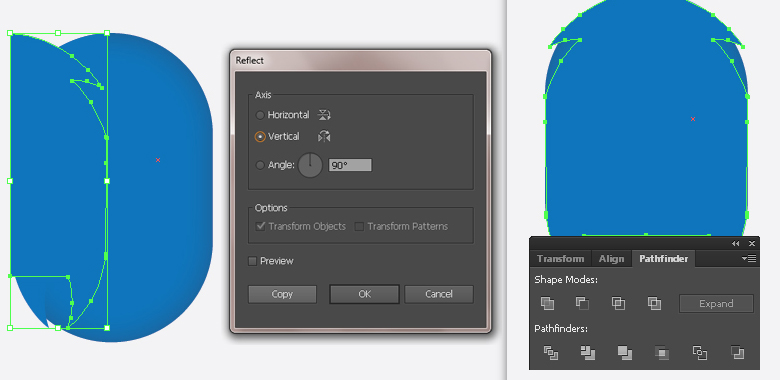
Next, we’ll copy this shape for the right side of character. To do so, select the shape and go to “Object”> “Transform”> “Reflect”. Now choose vertical axis and press “Copy”. Position the copy over the right side. After that, select both sides’ shapes and press “Unite” shape mode in the pathfinder panel (“Shift + Ctrl + F9”).
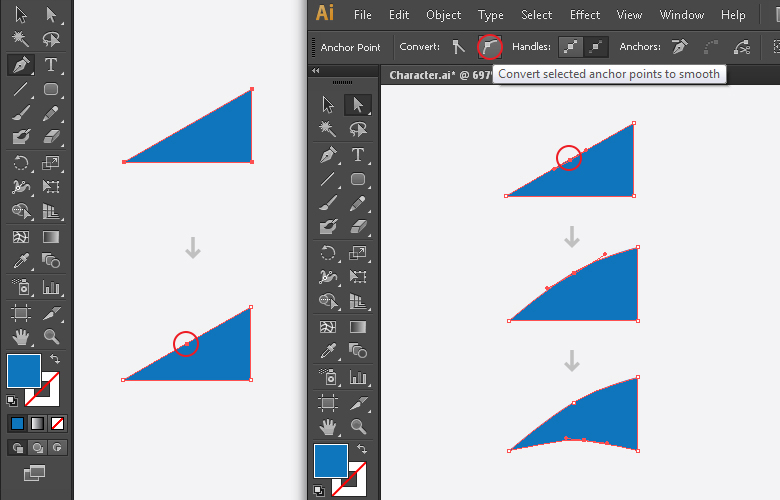
You can make these spikes by drawing a triangle using Pen Tool (“P”). Now click the center of top border using Pen Tool (“P”) to add an anchor point and hit the option of “Convert selected anchor points to smooth” in the top control bar.
Now use Direct Selection Tool (“A”) to drag this anchor point upwards to make it curve. Similarly, add an anchor point along the lower border and curve it upwards.
Step 5:
Now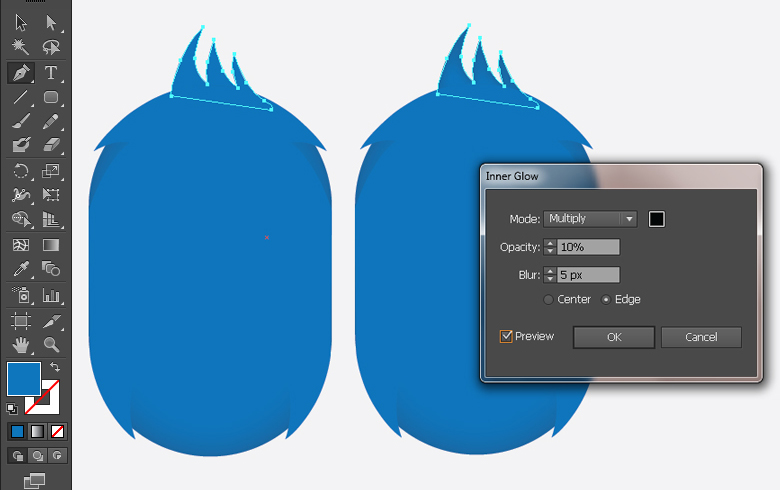 below rest of the shapes and draw few hair spikes using Pen Tool (“P”). Select them and apply given settings for Inner Glow.
Step 6:
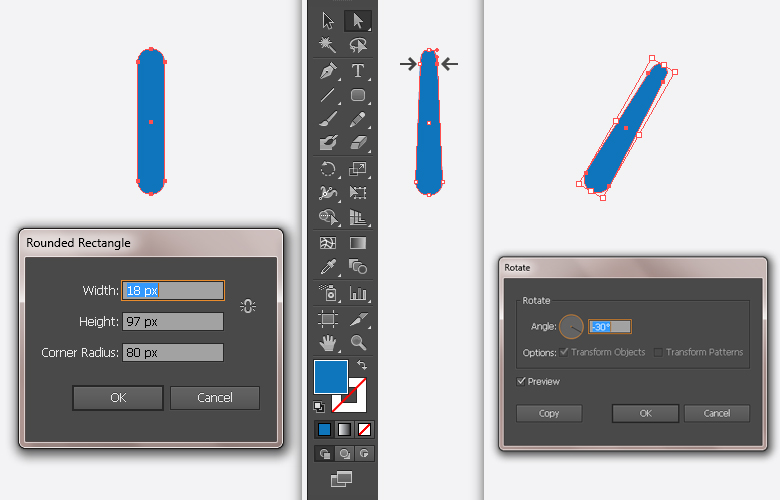
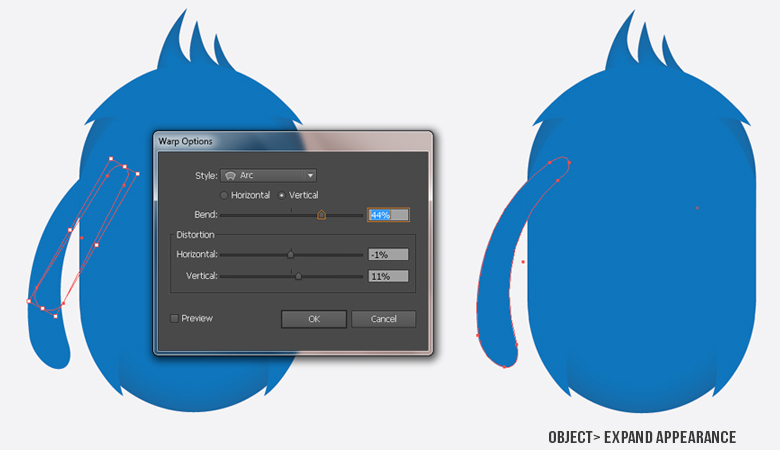
Next, we’ll draw our character’s arm. Pick the Rounded Rectangle Tool and draw a rectangle of 18px width, 97px height. Corner radius should be 80px. After that, select the Direct Selection Tool (“A”) and click and drag the top two anchor points inwards a bit as shown below. Now select the shape and go to “Object”> “Transform”> “Rotate”. Enter “-30” for the angle to rotate it. Once again, select the arm and go to “Effect”> “Warp”> “Arc”, apply given settings here. Once you are done, go to “Object”> “Expand Appearance” to modify the shape.
Step 7:
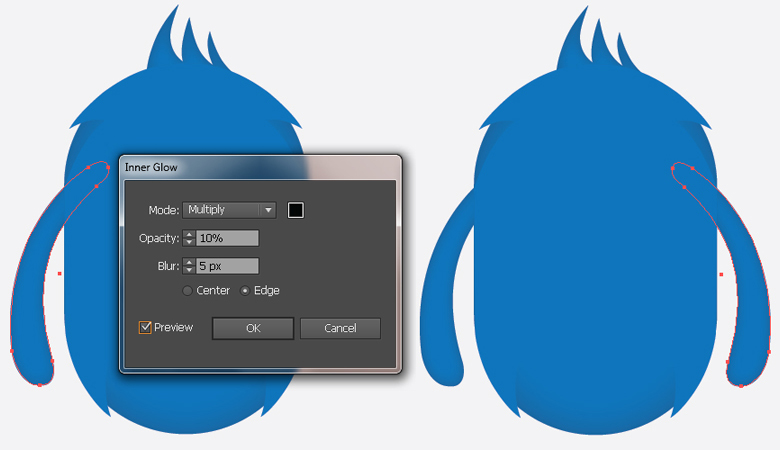
Select the arm and apply given settings for Inner Glow. And reflect it around a vertical axis as we reflected the body spikes in step4. Make sure to hit the “Copy” and drag it towards right side.
Step 8:
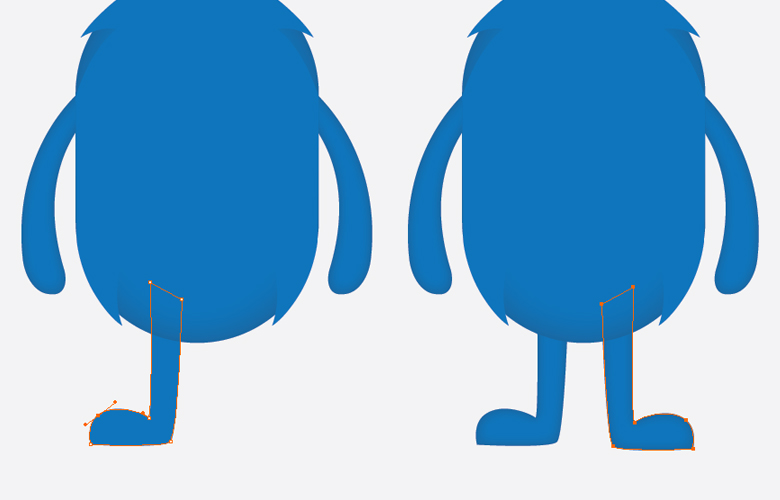
Next, we’ll draw its leg using Pen Tool (“P”). Select the shape and apply same settings for Inner Glow as applied for the arm and reflect its copy. Drag and position the copy over the right side as shown below.
Step 9:
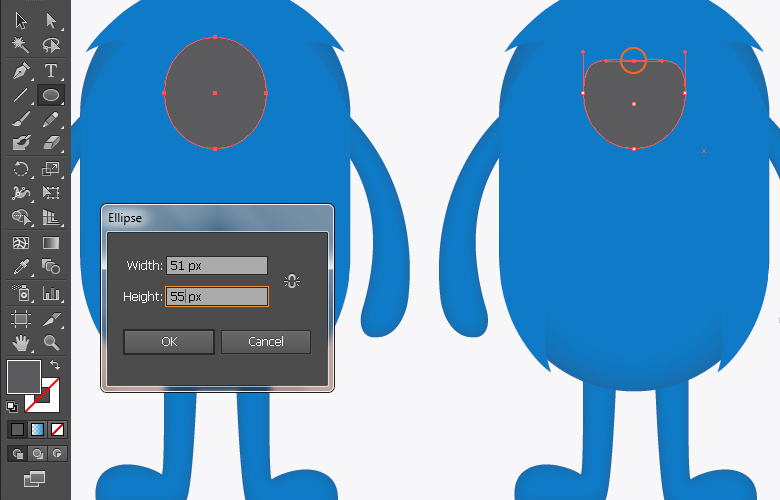
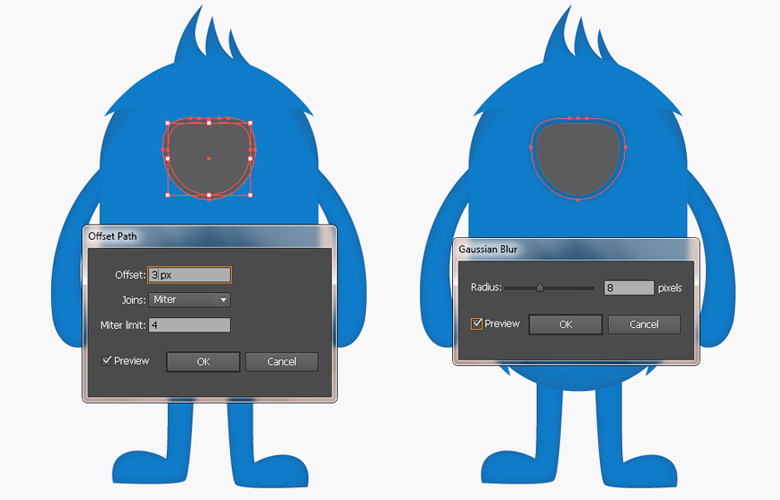
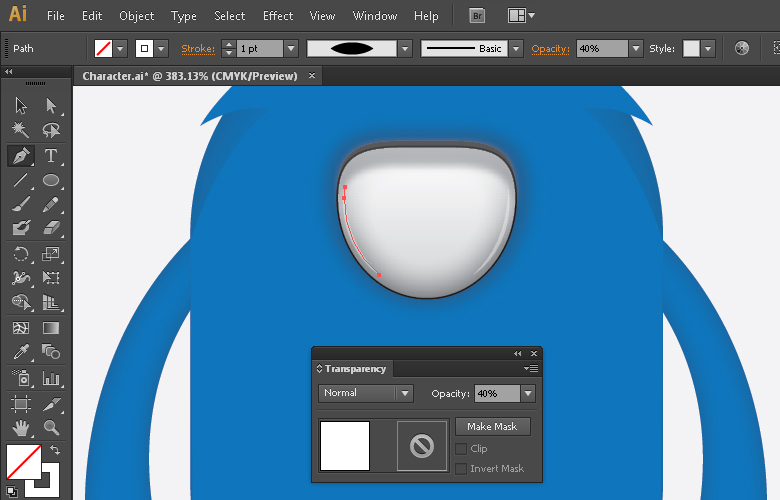
To draw the eye, pick #58585B fill color and select the Ellipse Tool (“L”). Click the canvas to view the ellipse window and enter 51px for width and 55px for height. Now click and drag the top anchor point downwards using Direct Selection Tool (“A”). Label it as “Base”.
Step 10:
Select the base and go to “Object”> “Path”> “Offset Path” and offset the path by 3px. Now change the new path fill color #146093, select it and go to “Effect”> “Blur”> “Gaussian Blur”. Apply 8px Gaussian blur effect on it.
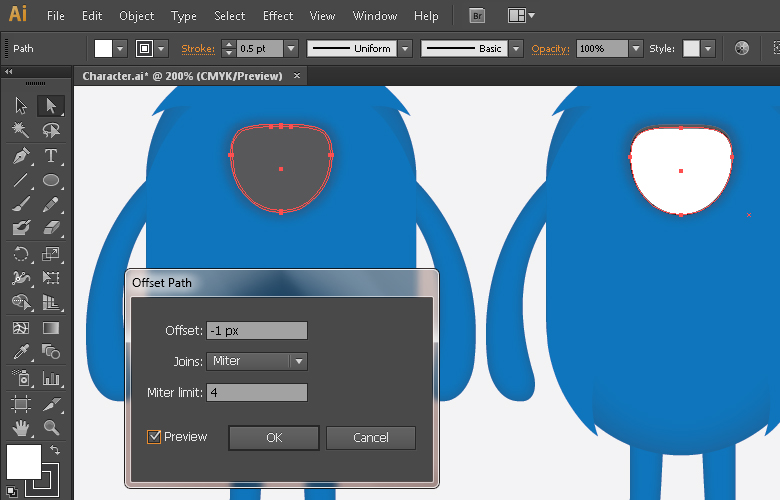
Step 11:
Once again, select the base shape and offset it by -1px. Drag it one-step downwards. Change its fill color to white and give it a 0.5pt dark gray stroke.
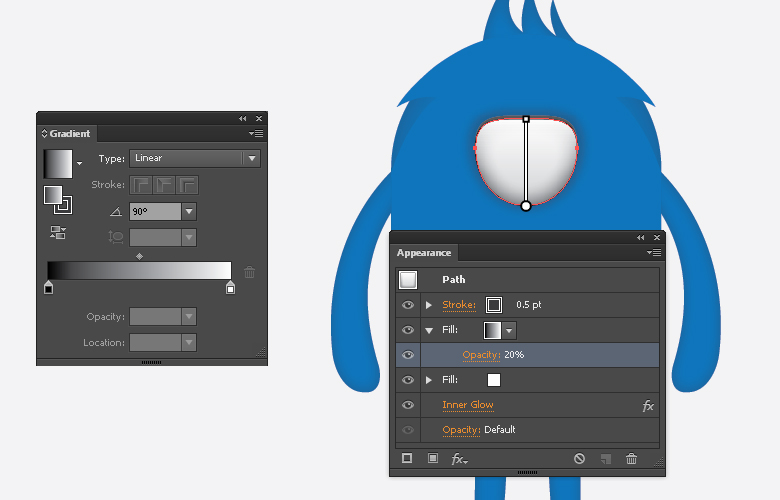
Select the shape and go to “Window”> “Appearance” (Shift + F6). Select the Fill attribute and click on the icon of “Duplicate Selected Item” at the bottom of appearance panel. Pick black & white gradient as the 2nd fill and decrease its opacity to 20%.
Step 12:
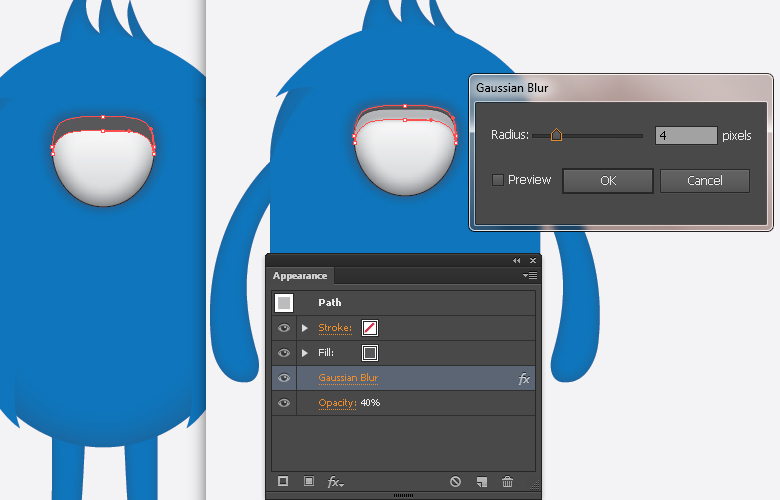
To make the shadow over the eyeball, select the base shape; press Ctrl + “C” to copy it and then press Ctrl+ “F” twice to make two copies in front. Now drag the top most copy 4-5 steps downwards, select both the copies and hit “Minus Front” in the pathfinder panel. Once you are done, apply 4px Gaussian blur effect on it and decrease its opacity to 40%.
To make highlights draw a curve path using Pen Tool (“P”), make fill to “none” and pick white stroke (1pt). Make sure to choose “width profile 1” for the stroke. Reflect the highlight for the other side.
Step 13:
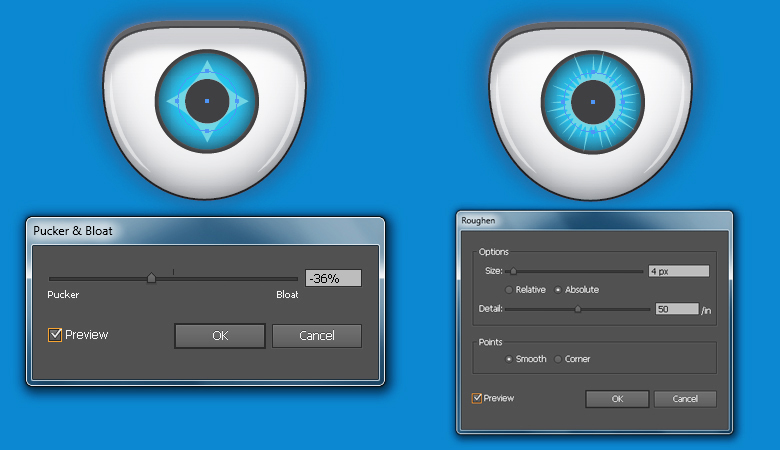
Pick #27A9E1 fill color with a black stroke (Stroke weight: 1pt) and draw a small ellipse using Ellipse Tool. Select the ellipse and apply given settings for the Inner Glow.
Draw two more ellipses as shown below.
Step 14:
Next, select the blue ellipse and go to “Distort & Transform”> “Pucker & Bloat” and apply given settings here. After that, go to “Distort & Transform”> “Roughen” and use following settings.
Step 15:
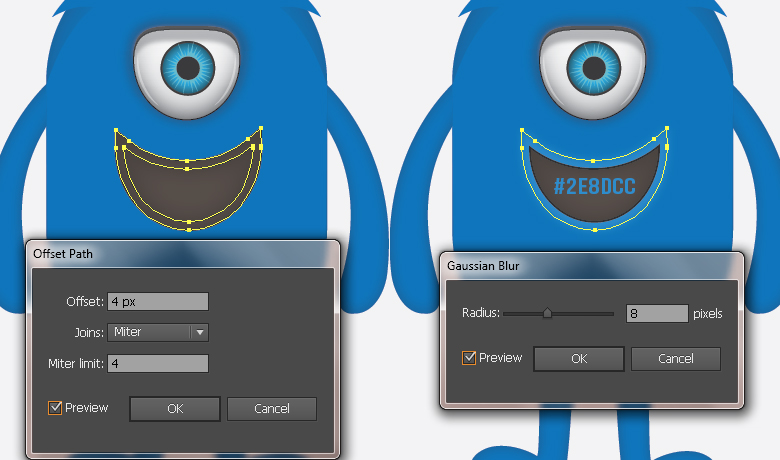
Now we’ll illustrate its mouth. Pick #564D49 fill color and #404041 color for the stroke and draw two ellipses as shown below. Select them and hit “Minus Front” in the Pathfinder panel. After that, select the mouth and apply given values for Inner Glow.
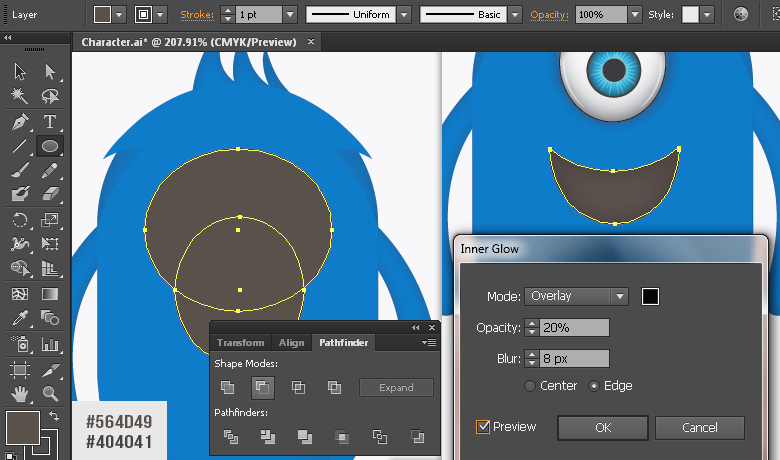
Select the mouth shape and offset it by 4px. After that, change its fill color to #2E8DCC, make stroke to “none” and apply 8x Gaussian blur effect on it.
Step 16:
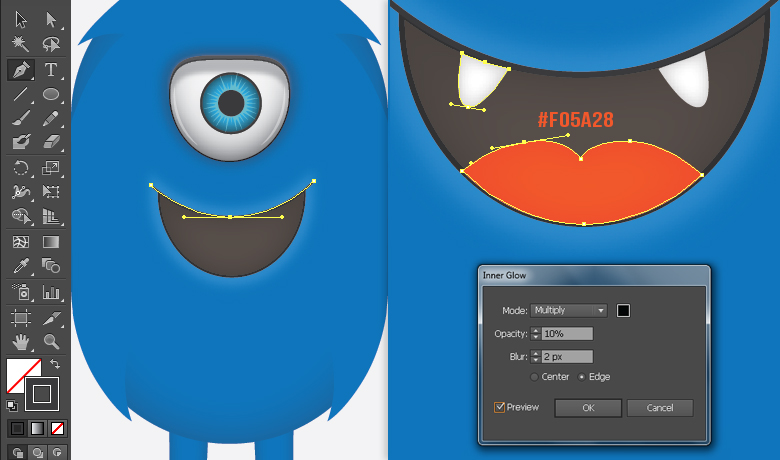
Next, draw a curve using Pen Tool (“P”) with #404041 stroke (1pt). After that, draw the tongue and teeth and apply given Inner Glow settings on them. You can try more pointy or rectangular teeth if you like.
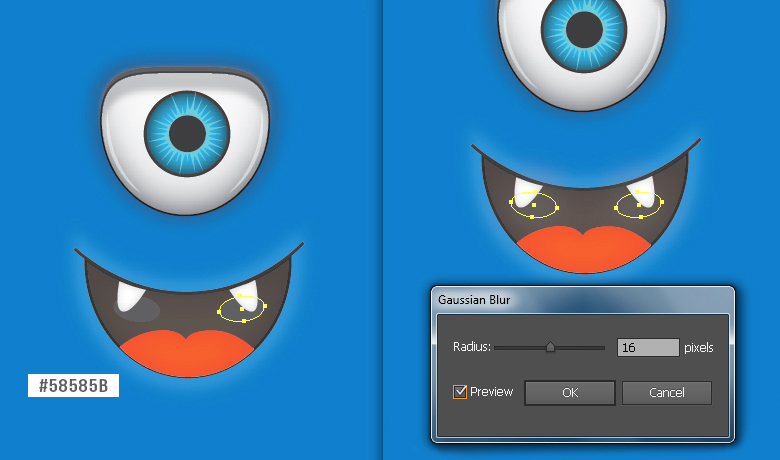
For the shading, draw a small ellipse using #58585B fill color and make its reflected copy. Select both ellipses and apply 16px Gaussian blur effect on it.
Step 17:
Now create highlights over the eye and tongue and shading over the body using the same technique as explained in step16. However, use “Overlay” blending mode for the shading shapes over the body with 40-60% opacity.
Step 18:
Next, make two curves over each other as shown below and apply 5px Gaussian blur effect on it.
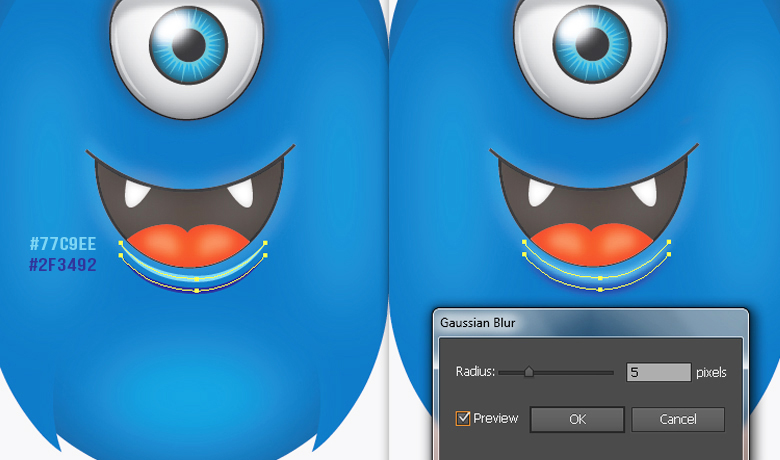
Step 19:
Duplicate the curves formed in step18 and position them below the eye ball.
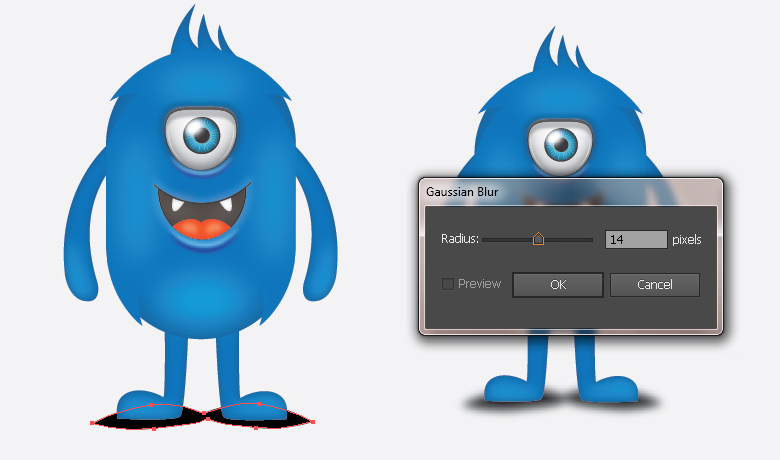
Step 20:
Next, draw a shape roughly below the rest of the layers to make shadow with black fill color and apply 14px Gaussian blur effect on it.
So, there it is!
Now obviously you’ll want to create your own unique design, but using these simple tips and techniques you can easily create your very own character.
I would love to see your results!
Frequently Asked Questions about Designing a Character Using Illustrator
How can I create a one-eyed character using Illustrator?
Creating a one-eyed character in Illustrator is a fun and creative process. Start by sketching your character on paper or directly in Illustrator using the Brush tool. Once you’re satisfied with the basic shape, you can add details like the eye, mouth, and any other features you want your character to have. For the eye, use the Ellipse tool to create a circle, then add color and shading to give it depth and dimension. Remember, practice makes perfect, so don’t be discouraged if your first few attempts don’t turn out exactly as you envisioned.
Can I design a blue alien character in Illustrator?
Absolutely! Illustrator is a versatile tool that allows you to create characters of all shapes, sizes, and colors. To design a blue alien, start by sketching out your character’s shape. Then, use the color picker to select the shade of blue you want for your alien’s skin. You can add details like eyes, antennae, and clothing using the various tools available in Illustrator. Don’t forget to save your work regularly to avoid losing any progress.
How can I make my character look cute and funny?
Making a character look cute and funny often involves exaggerating certain features. For example, you might give your character big, round eyes, a small nose, and a large, goofy smile. Using bright, cheerful colors can also help make your character look more appealing. Remember, the key to creating a successful character is to have fun and let your creativity shine.
Can I create a set of Halloween characters in Illustrator?
Yes, Illustrator is perfect for creating a set of Halloween characters. You can design classic characters like witches, ghosts, and vampires, or come up with your own unique creations. Use the various tools and features in Illustrator to add details like hats, capes, and broomsticks. You can also use the color picker to choose spooky colors like black, orange, and purple.
How can I add depth and dimension to my character?
Adding depth and dimension to your character can make it look more realistic and visually interesting. You can achieve this by using shading and gradients. For example, you might add a darker shade of color to the parts of your character that would naturally be in shadow, and a lighter shade to the parts that would be in light. You can also use the Gradient tool to create a smooth transition between different colors.
How can I create a monster character in Illustrator?
Creating a monster character in Illustrator is similar to creating any other character. Start by sketching out your monster’s shape, then add details like eyes, teeth, and claws. You can use the color picker to choose scary colors like green, purple, and black. Remember, the key to creating a successful monster character is to let your imagination run wild.
Can I design a character with big eyes in Illustrator?
Yes, you can design a character with big eyes in Illustrator. To do this, use the Ellipse tool to create two large circles for the eyes. Then, add smaller circles inside for the pupils. You can use the color picker to choose the colors for the eyes and pupils. Adding big eyes to your character can make it look more expressive and appealing.
How can I create a character with a large, goofy smile?
Creating a character with a large, goofy smile can make it look more friendly and approachable. To do this, use the Pen tool to draw the shape of the smile. Then, use the Brush tool to add details like teeth and a tongue. You can use the color picker to choose the colors for the smile and teeth. Remember, the key to creating a successful character is to have fun and let your creativity shine.
Can I design a character with a small nose in Illustrator?
Yes, you can design a character with a small nose in Illustrator. To do this, use the Pen tool to draw the shape of the nose. Then, use the color picker to choose the color for the nose. Adding a small nose to your character can make it look more cute and appealing.
How can I create a character with antennae in Illustrator?
Creating a character with antennae in Illustrator is a fun and creative process. To do this, use the Pen tool to draw the shape of the antennae. Then, use the color picker to choose the color for the antennae. Adding antennae to your character can make it look more unique and interesting.
 Anum Khan
Anum is Web and Graphic designer. Addicted to Photoshop and crazy for pixel perfection. She is also an active blogger, sharing her passions, skills and creative details on her blog Websoulz. She loves to connect with the community, sharing the latest design gossips and rolling her eyes on boring trends.