

You’ve just developed an awesome plugin for WordPress and you want to share it with as many people as possible. To do that, the WordPress.org platform seems to be the best choice as it’s the official WordPress plugins repository.
But submitting your plugin to WordPress.org is not enough to gain users: you must introduce your plugin in the best possible way to let WordPress users know what your plugin can do.
A complete WordPress.org page will make your plugin more attractive. You will gain more users and these users will know how to use your plugin.
Key Takeaways
- Creating a comprehensive WordPress.org page can make your plugin more attractive, leading to an increase in users who understand how to utilize your plugin.
- Essential information about your plugin, such as its name, description, version, author, and license, should be included in a formatted comment in the plugin’s main file. Additional fields for personalization, such as Text Domain and Domain Path, can also be added.
- The readme.txt file, located at the root of your plugin’s folder, is crucial for displaying information about your plugin on WordPress.org. This file should contain sections such as a header, description, installation guide, FAQ, Changelog, and Upgrade Notice.
- Screenshots and banners can be added to enhance your plugin page. Screenshots should be named in the format screenshot-n.ext and placed in the /assets directory or the one containing the current readme file. Banners should be 772 pixels wide and 250 pixels tall, named banner-772×250.png or banner-772×250.jpg, and placed in the /assets directory.
- WordPress provides a readme validator tool to ensure your readme file is complete and accurate. This tool can be used to help create an effective plugin page that attracts more users.
Why Create a Good Plugin Page?
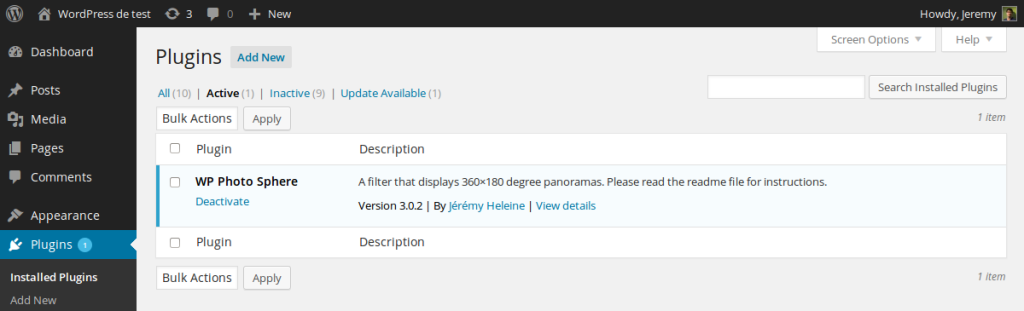
Once a WordPress plugin is installed, a short description can be displayed on the Installed Plugins page of the administration panel thanks to a correctly formatted comment, placed in the main file of the plugin. While this is a good way to help your users to remember what your plugin does, it doesn’t help you gain more users.
Before deciding to download your plugin, users generally check your plugin’s WordPress.org page in order to find out what it can do. Users will look at the description of your plugin, so you should describe precisely the features of your plugin (we will see how in a next part). But users will also want to know if your plugin is easy to use: several screenshots and a FAQ are useful for that. When you release an update, your users will want to know why they must download this update (does it fix known bugs or eradicate security risks?), so be sure to include this type of information as well.
Keep in mind that your plugin is not the only one: users have choice between several plugins, so you need to demonstrate why yours is better than others. A good plugin page can bring you more users, so it’s a good idea to make sure yours is as accurately and detailed as possible.
Adding Information to a Plugin Page
WordPress can’t guess the usefulness of your plugin. So, to display information about it, WordPress uses two sources: the comments in your plugin’s main file, and the readme.txt file located at the root of your plugin’s folder.
Both are important, so we will see how to correctly complete them in the two following subparts.
The Right Comment
Your plugin might include several files, but at the very least you’ll have one main file. This is the file loaded by WordPress, often with the same name as your plugin (for example, hello-world.php for the plugin Hello World). To be recognizable by WordPress, this main file must contain a ‘comment’, formatted in a specific way.
The ‘comment’ is where you fill in the basic information about your plugin. Not all the fields are not required; some are essential, while others are very useful.
Basically, here is the minimal comment to indicate at the beginning of your plugin’s main file.
<?php

/*

 * Plugin Name: My good plugin page

 * Plugin URI: http://mygoodpluginpage.com

 * Description: A test for correctly completing a plugin page.

 * Version: 1.0

 * Author: Jérémy Heleine

 * Author URI: http://jeremyheleine.me

 * License: MIT

 */

?>
The Plugin Name field is, as its name suggests, used to indicate the name of the plugin. It must be unique in order for WordPress to recognize it.
In the Plugin URI field, indicate a URI describing your plugin, if there is one. For example, if you have a page on your personal website which describes precisely your plugin, indicate its URL here.
The Description field is important, as its value is displayed in the Installed Plugins page of your users’ administration panel. It should be short.
Chances are, you will provide several versions of your plugin, with new features or bugs fixes. The current version number must be indicated in the Version field.
You can guess that the Author field must be filled with your name, while the Author URI field refers to your personal web page, where you present yourself and your projects, for example.
Finally, we find the License field in which you indicate a short name for the license under which you release your plugin. For example, you can indicate GPL3 or MIT.
Except for the License field, all these fields are read by WordPress to display information about your plugin, essentially in the Installed Plugins page. That’s why you should always indicate them.
To personalize your plugin even further, WordPress has added three other fields to this special comment. We can find, for example, the Network one which is a boolean indicating whether the plugin can be activated on all sites in a installation (when Multisite is enabled) or not. By default, Network is set to true.
If the usefulness of the Network field is limited, it is not the case of the last two ones: Text Domain and Domain Path in which you can indicate respectively your plugin’s text domain and the directory containing the .mo files to translate your work.
Thanks to these fields, you will be able to translate the other fields: in the Installed Plugins page, you will be able to display a description in several languages.
/*
 * Plugin Name: Plugin page
 * Plugin URI: http://jeremyheleine.me
 * Description: A test for correctly fill a plugin page.
 * Version: 1.0
 * Author: Jérémy Heleine
 * Author URI: http://jeremyheleine.me
 * Text Domain: myplugin-page
 * Domain Path: /lang/
 * License: MIT
 */
Note that the path indicated in the Domain Path field is relative to your plugin’s folder. For example, with the previous comment, WordPress will use the .mo files contained in the /lang/ subdirectory of my plugin’s folder. By default, WordPress will search for your .mo files in the root of this folder.
The Readme File
Now that our plugin is ready to be correctly displayed on your user’s administration panel, we need to attract these users with a good plugin page on WordPress.org. To do this, we only need one file: readme.txt which must be at the root of our plugin’s folder.
You can find an example of what WordPress accepts here, where you can see that a plugin’s readme.txt file is essentially a list of sections filled in with the right information.
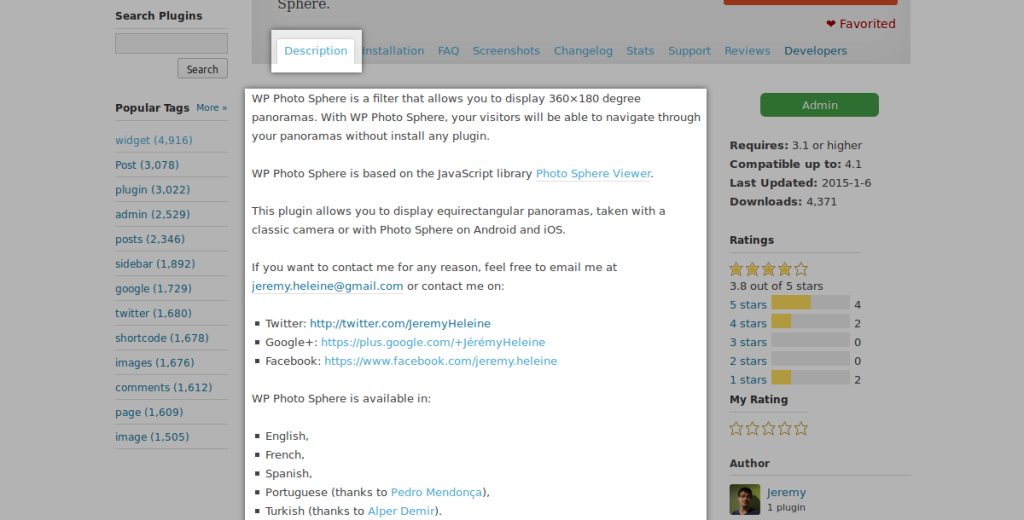
Most of these sections will be displayed on your plugin page as tabs. For example, with the readme file linked above, we will find several tabs like “Description“, “Installation“, “FAQ” or “Screenshots“.
Header
First we find a special section.
=== Plugin Name ===
Contributors: First author, second author
Donate link: http://link.for/allowing/users/give/you/money
Tags: tag 1, tag 2, tag 3
Requires at least: 3.7
Tested up to: 4.1
Stable tag: 3.0
License: GPLv2
License URI: http://www.gnu.org/licenses/gpl-2.0.html
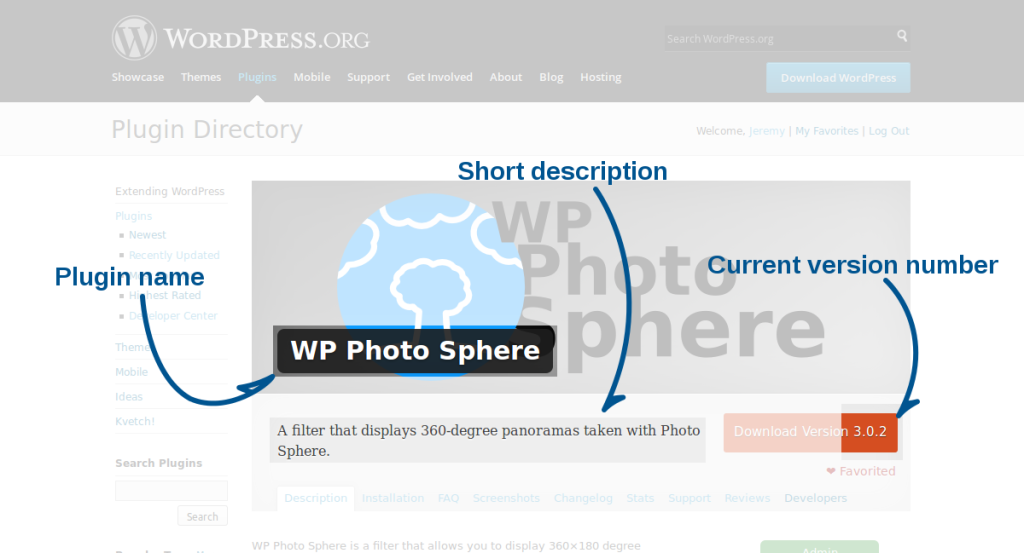
A short description of your plugin.As you might have guessed, this replaces Plugin Name with the full name of your plugin. It will be displayed in the header of your plugin’s page, above the short description indicated at the end of this section.
Fill out the Contributors field using the list of the plugin’s authors and contributors. This list must contain WordPress.org identifiers.
The Donate link is here to indicate the link of a web page where users can donate to support your work. Then, the Tags field is a list of keywords associated with your plugin. They won’t be displayed on your plugin page but they will be used by WordPress users to find your plugin.
The Requires at least and Tested up to fields are important. In the former, indicate the minimal version your users must use to have your plugin working: for example, if your plugin is entirely based on a function appearing in WordPress 3.7, indicate 3.7. In the latter, indicate the highest version number of WordPress on which you have tested your plugin: if you know that your plugin works on the latest version of the CMS, you should indicate it.
The Stable tag field is here to indicate the current version number of your plugin. It is important, as WordPress reads this field to know if an update is available or not.
The License and License URI tags are used to indicate the license under which you release your plugin: indicate a short name in the former and indicate a link where we can find more information about the license in the latter.
Description
Right after this essential information, we find the Description section. In this section, you should precisely describe your plugin. For example, you can indicate what it can do, in which languages it is available, where users can contact you, and any other information your users might find useful: WordPress does not limit the size of the description, so you are free to write what you want.
As in the rest of the sections in the readme file, you can use Markdown in the description to format your text.
Installation
In the Installation section, you should describe how users can install your plugin. Most of the time, this section is a short list like the one below.
== Installation ==

1. Upload the `myplugin` folder to the `/wp-content/plugins` directory
2. Activate the plugin through the 'Plugins' menu in WordPress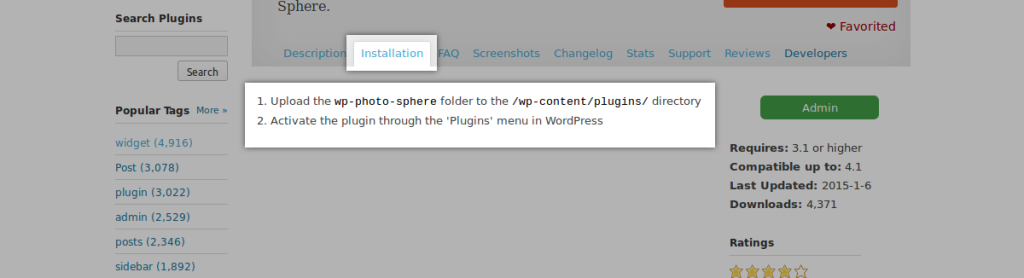
Frequently Asked Questions
This section consists of a list of questions your users frequently ask you. You can also use this section to describe how to use your plugin, how to configure an option, or how to personalize a widget, for example.
Below is an example of an FAQ section (using two irrelevant questions), but you can add as many questions as you want. Useful questions are preferred.
== Frequently Asked Questions ==

= What's the name of this plugin? =

The name of the plugin is the one displayed on this page.

= Do you love kittens? =

Of course.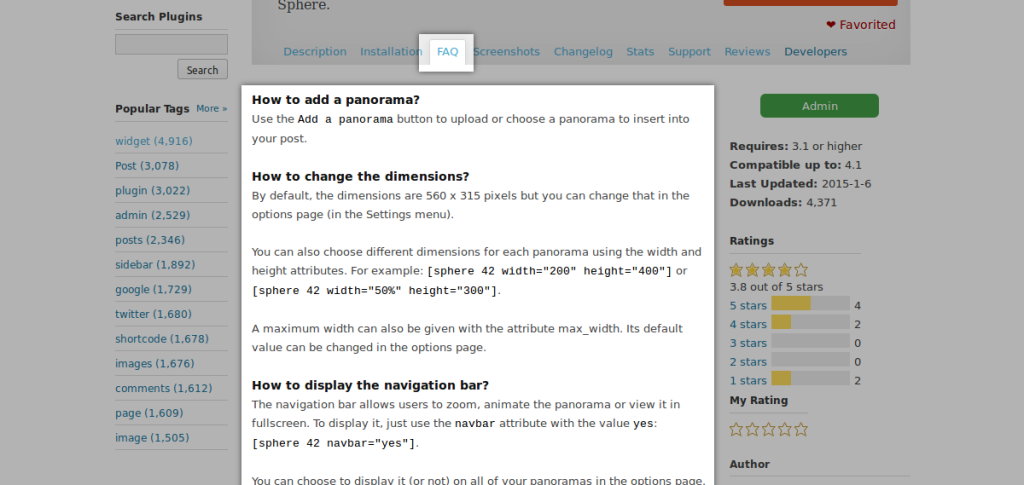
Changelog and Upgrade Notice
As a project evolves, new ideas are generated and, with them, new versions of your plugin. In the header of the readme file, you need to indicate the current stable version, so that your (future) users know how your plugin has evolved, or simply what they are likely to find in the latest version. This way, they will know if a feature they have been waiting on has finally been released.
That’s the aim of the Changelog section. In this part, you list all the versions you have released for your plugin, listing for each of them the features they include. Most of the time, we prefer listing our versions in a reverse chronological order but you are free to do what you want.
== Changelog ==

= 2.0 =
* Awesome new feature
* A brand new button

= 1.0.1 =
* Oops. Bug fixed.

= 1.0 =
* A beautiful button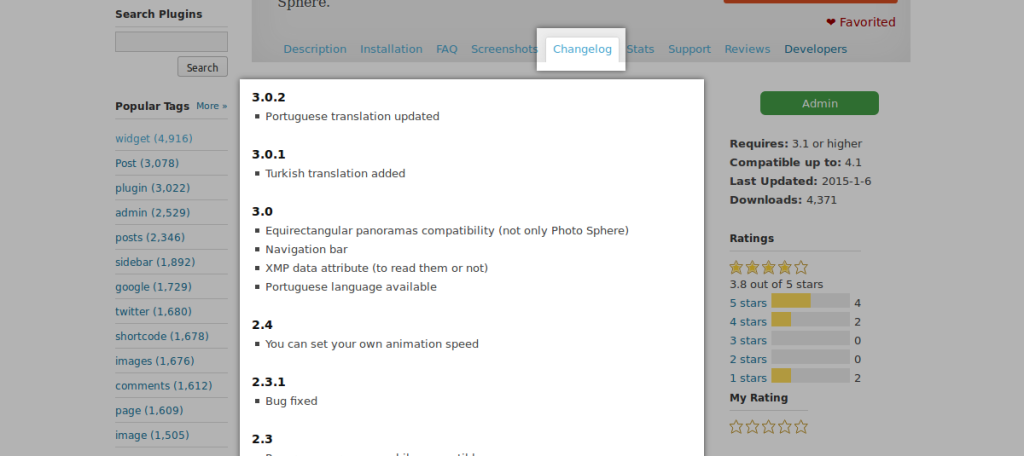
The next section is also ‘new-features-related’, and is called Upgrade Notice. It is principally here for users who have already installed your plugin: when a new version of your plugin is available, you can display a particular message to indicate what’s new, and why your users should upgrade.
For example, with the section below, your users will be notified that version 2.0 is available, and they will see the message “Upgrade for awesome new features!“.
== Upgrade Notice ==

= 2.0 =
Upgrade for awesome new features!

= 1.0.1 =
This version fixes an important bug.

= 1.0 =
Hello, this is the first version.
Another Idea?
The sections above should always be present in your readme file as they are essential for users to understand what your plugin can do and how. But if you have other ideas of sections, you can add your own as any other ‘classic’ section.
== My Section ==

This section is unique, my plugin is the only one in the world to use it!

== Another Section ==

Sections are **cool**.
Adding Images to a Plugin Page
Screenshots
If you read the example of the readme file provided by WordPress and linked above, you might have noticed that we forgot a section: Screenshots. Its name is clear enough: in this section, you should include some screenshots describing the interface of our plugin.
As a simple readme file can’t contain images, it is necessary to know where to upload them. First, you should know that WordPress accepts several formats; you can use PNG (*.png), JPEG (*.jpg or *.jpeg) and GIF (*.gif) files for your screenshots.
Name them in the format screenshot-n.ext where n is a number and ext is the extension of the file. For example, if we have three PNG screenshots, we name them screenshot-1.png, screenshot-2.png and screenshot-3.png.
You now have two choices to place your files: in the /assets directory or in the one containing the current readme file (for example in the /tag/2.0 directory if your current version is 2.0). Note that WordPress will first search for your screenshots in the /assets directory: for example, if you have the files /assets/screenshot-1.png and /tags/2.0/screenshot-1.png, the one in the /assets directory will be displayed and not the one in the /tags/2.0 directory.
Once you have placed your screenshots in the right directory, return to your readme file and complete the Screenshots section with an ordered list. The first item will describe the first screenshot (named screenshot-1.png for example), the second item will describe the second screenshot, and so on.
== Screenshots ==

1. This is the administration page of this plugin.
2. The button is beautiful, isn't it?
3. This is what your visitors will see.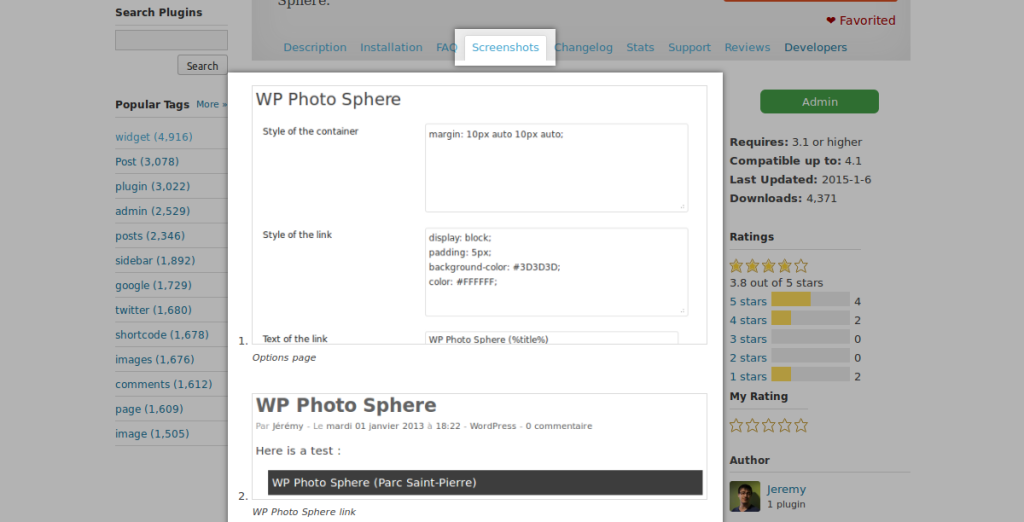
Banner
In a WordPress.org plugin page, we can see the name of the plugin in the foreground of a big banner. This banner is optional but you can add it to enhance the look of your page.
Your banner must be 772 pixels wide and 250 pixels tall and named banner-772x250.png or banner-772x250.jpg. Note that the GIF format is not allowed here. Place this banner in the /assets directory, and that is it: WordPress will display it in your plugin page.
With a width of 772 pixels, your image can be blurry on high-DPI displays. To fix this problem, you can add another optional image which must be 1544 wide and 500 pixels tall and named banner-1544x500.png (or .jpg). Place it in the /assets directory and WordPress will use it on high-DPI displays in the place of the small banner.
In Conclusion
Just like many other developers, you love your plugin and want to have as many users as possible. But providing a good plugin is not enough: users won’t know that your plugin is awesome if you don’t correctly describe it.
A good plugin page can bring you more users and, to do that, the readme file will be your best friend. To help you make the best readme file, WordPress provides you a tool: the readme validator, which will tell you if an information is missing.
If you want to retrieve the readme file that we’ve written about in this article, you can find a very small example plugin here.
Frequently Asked Questions about Creating an Awesome WordPress.org Page Plugin
What are the key features to look for in a WordPress.org page plugin?
When choosing a WordPress.org page plugin, there are several key features to consider. Firstly, it should be user-friendly, allowing you to easily create and manage your pages. Secondly, it should offer a variety of design options, including templates and customization features, to help you create a unique and attractive page. Thirdly, it should be compatible with your WordPress theme and other plugins. Lastly, it should offer responsive design, ensuring your pages look great on all devices.
How can I ensure my WordPress.org page plugin is compatible with my theme?
To ensure compatibility, you should first check the plugin’s documentation and reviews for any reported issues with your specific theme. You can also test the plugin on a staging site before installing it on your live site. If you encounter any issues, you can reach out to the plugin’s support team for assistance.
Can I use multiple page plugins on my WordPress.org site?
While it’s technically possible to use multiple page plugins, it’s generally not recommended as it can lead to compatibility issues and slow down your site. Instead, it’s best to choose one versatile plugin that meets all your needs.
How can I optimize my WordPress.org page for SEO?
To optimize your page for SEO, you should use a plugin that includes SEO features, such as meta tags and keyword optimization. You should also create high-quality, original content and use relevant keywords in your page title, headings, and body text.
How can I make my WordPress.org page mobile-friendly?
To make your page mobile-friendly, you should choose a plugin that offers responsive design. This ensures your page will automatically adjust to fit any screen size. You can also use Google’s Mobile-Friendly Test tool to check how your page looks on mobile devices.
How can I increase the loading speed of my WordPress.org page?
To increase your page’s loading speed, you can use a caching plugin, which stores a static version of your page to reduce server load. You should also optimize your images and limit the number of plugins and scripts on your page.
How can I add custom CSS to my WordPress.org page?
Most page plugins allow you to add custom CSS to your page. You can usually find this option in the plugin’s settings or in the WordPress Customizer. Simply paste your CSS code into the provided field and save your changes.
Can I use a WordPress.org page plugin on a WordPress.com site?
WordPress.com has its own set of plugins and does not support third-party plugins, including those for WordPress.org. However, if you upgrade to a Business or eCommerce plan, you can install third-party plugins.
How can I update my WordPress.org page plugin?
You can update your plugin from your WordPress dashboard. Go to the ‘Plugins’ section, find your plugin, and click ‘Update Now’. Always backup your site before updating a plugin to prevent any potential issues.
What should I do if my WordPress.org page plugin is causing issues?
If your plugin is causing issues, you can try deactivating and reactivating it, or reinstalling it. If the issue persists, you can contact the plugin’s support team or seek help from the WordPress community.

