If you want your messaging to be truly distinctive, there’s no more direct and effective approach than crafting your own custom lettering. Modern viewers are barraged with information, and their attention span has tapered sharply as a result. Custom typography can separate your value proposition from the “noise” of more typical advertising, and it allows you to thematically integrate the look of your type with the content of your message. If your offer involves leather, for example, there’s no better way to reinforce your message than with stitched, leathery type that embodies the appeal of your products.
So today, we are going to create a hanging leather text effect in Photoshop. In this tutorial, I’ll walk you through the process of creating this text effect by using some interesting techniques, patterns, and tools. Let’s get started.
Resources:
Leather Textures
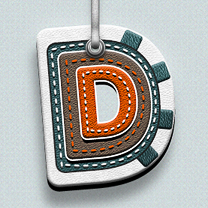
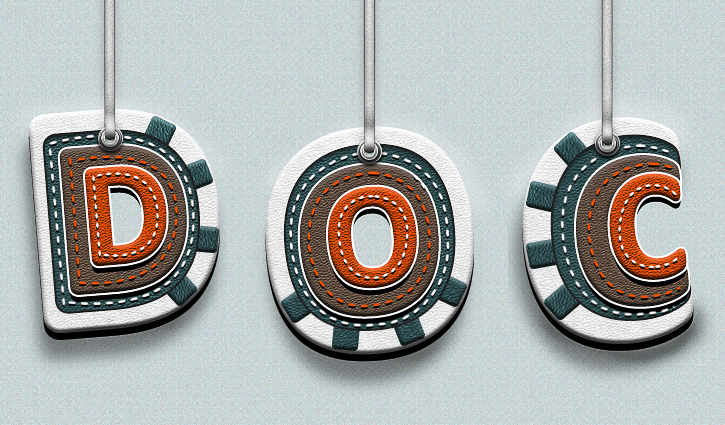
Final result:
 (Download the finished, layered PSD file.)
Step 1:
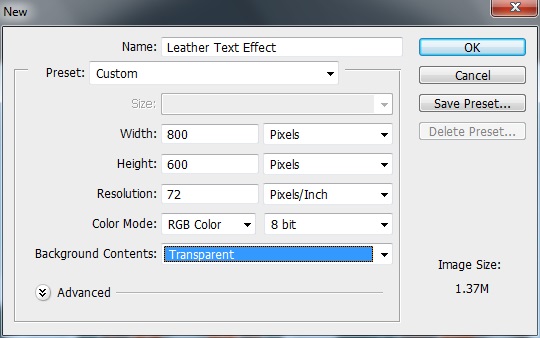
Open Photoshop and create a new file with an 800px width and a 600px height.
(Download the finished, layered PSD file.)
Step 1:
Open Photoshop and create a new file with an 800px width and a 600px height.
 Step 2:
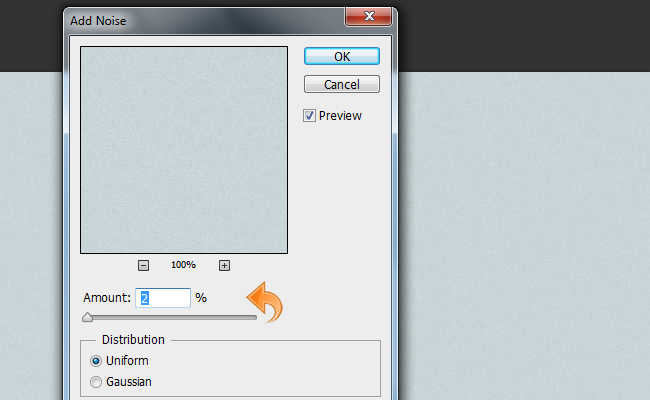
First, create a new layer, then fill it with color #c8d4d7 using the paint bucket tool. Add a little “noise” to the background by clicking on on “Filter” > “Noise”. Add 2% noise.
Step 2:
First, create a new layer, then fill it with color #c8d4d7 using the paint bucket tool. Add a little “noise” to the background by clicking on on “Filter” > “Noise”. Add 2% noise.
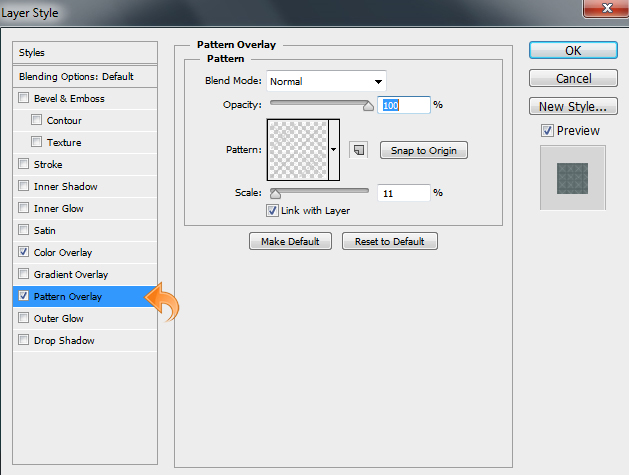
 After the noise, select the background layer and click on “Layer” > “Layer style” > “Pattern overlay” and a light, subtle pattern.
 Step 3:
Now, let’s start with the text. First, select the text tool and add the first letter using color #ffffff. Rotate it a bit using “Edit” > “Free Transform”.
Step 3:
Now, let’s start with the text. First, select the text tool and add the first letter using color #ffffff. Rotate it a bit using “Edit” > “Free Transform”.
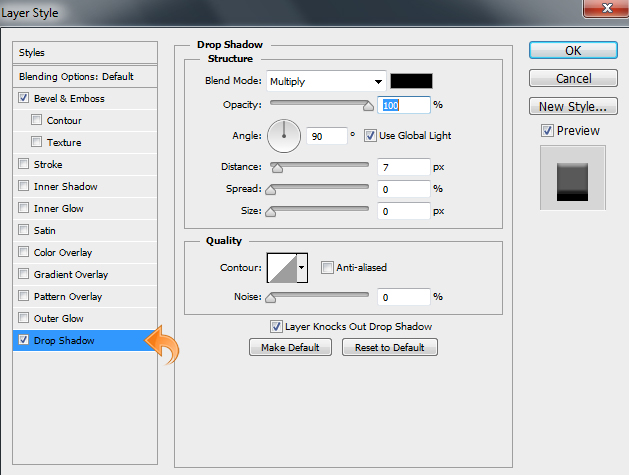
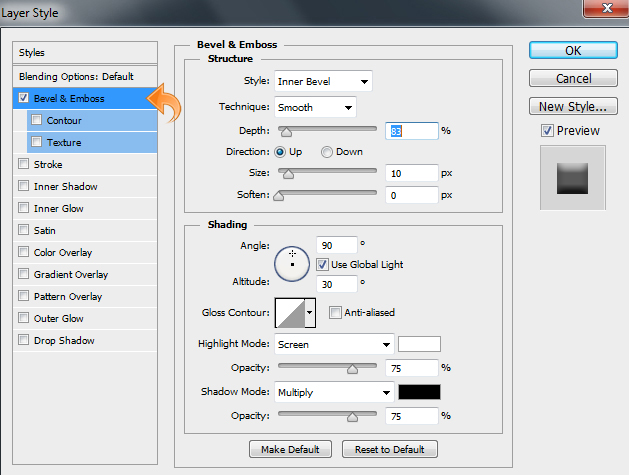
 Step 4:
Select the text layer we created above and click on “Layer styles” to add some Bevel & Emboss and Drop Shadow. Use the settings below.
Step 4:
Select the text layer we created above and click on “Layer styles” to add some Bevel & Emboss and Drop Shadow. Use the settings below.

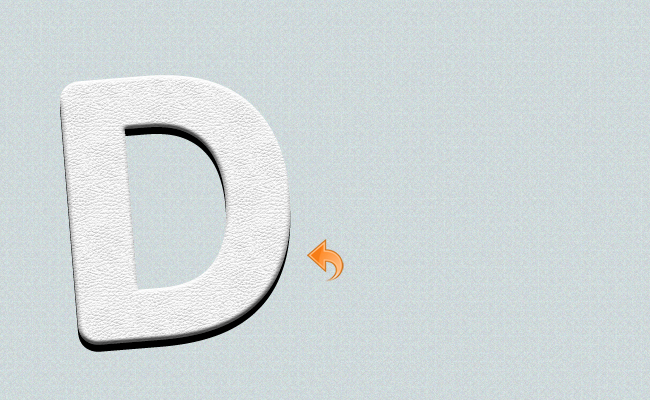
 Step 5:
Open the white leather texture and paste it on the text, then click on “Layer” > “Create Clipping Mask”.
Step 5:
Open the white leather texture and paste it on the text, then click on “Layer” > “Create Clipping Mask”.
 Step 6:
Select the rounded rectangle tool and create a very small rectangle. Rotate the small rectangle using free transform (“Edit” > “Free Transform” or Cmd/Ctrl + “T”). Then, select the rectangle layer and click on “Layer Styles” to add Bevel & Emboss once again. Use the settings shown below.
Step 6:
Select the rounded rectangle tool and create a very small rectangle. Rotate the small rectangle using free transform (“Edit” > “Free Transform” or Cmd/Ctrl + “T”). Then, select the rectangle layer and click on “Layer Styles” to add Bevel & Emboss once again. Use the settings shown below.
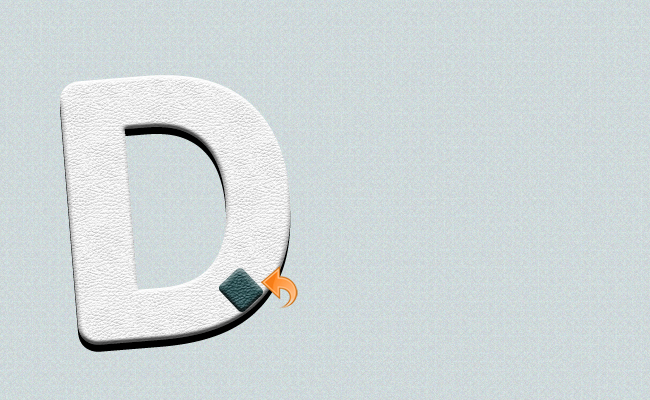
 Step 7:
Open the bluish leather texture and paste it on the small rectangle we have created above. Scale it down and click on “Layer” > “Create Clipping Mask”.
Step 7:
Open the bluish leather texture and paste it on the small rectangle we have created above. Scale it down and click on “Layer” > “Create Clipping Mask”.
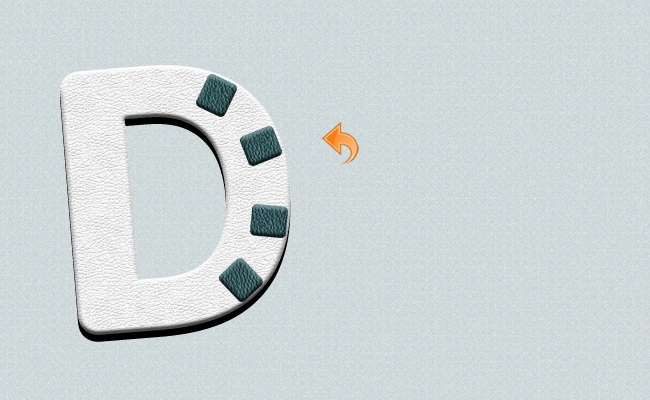
 Step 8:
Now, repeat the same process to create three small rectangles and add Texture and Bevel & Emboss using the same settings shown above.
Step 8:
Now, repeat the same process to create three small rectangles and add Texture and Bevel & Emboss using the same settings shown above.
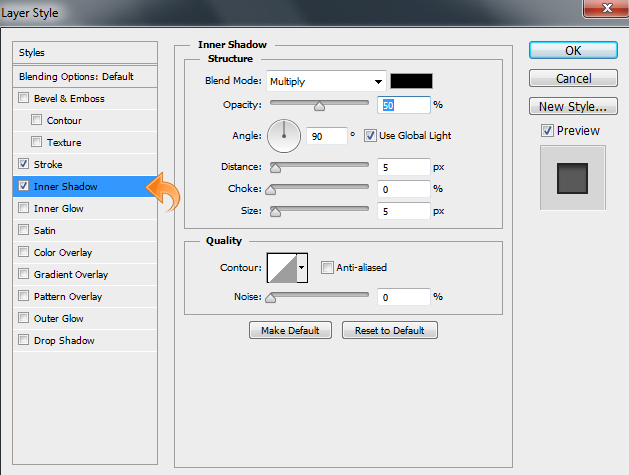
 Step 9:
Select the type tool and add another letter; this time, it should be smaller than the previous one. Place it in the middle and then click on “Layer Styles” to add some Stroke and Inner Shadow. Use the following values.
Step 9:
Select the type tool and add another letter; this time, it should be smaller than the previous one. Place it in the middle and then click on “Layer Styles” to add some Stroke and Inner Shadow. Use the following values.

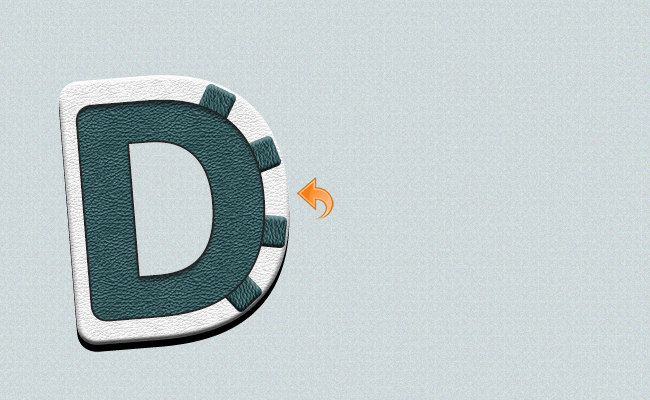
 Step 10:
Now, open the blue leather texture, paste it on the text, and click on “Layer” > “Create Clipping Mask”.
Step 10:
Now, open the blue leather texture, paste it on the text, and click on “Layer” > “Create Clipping Mask”.
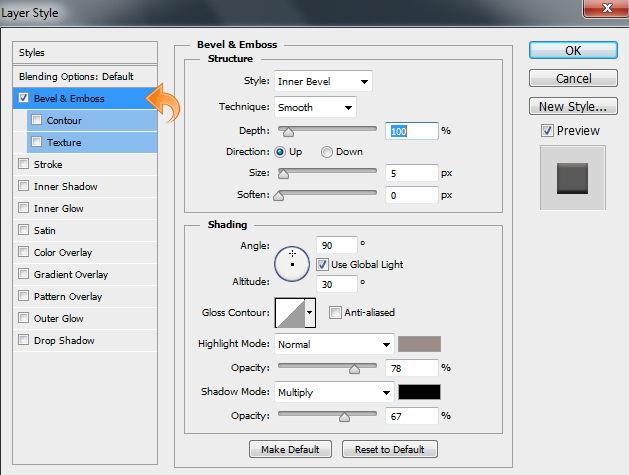
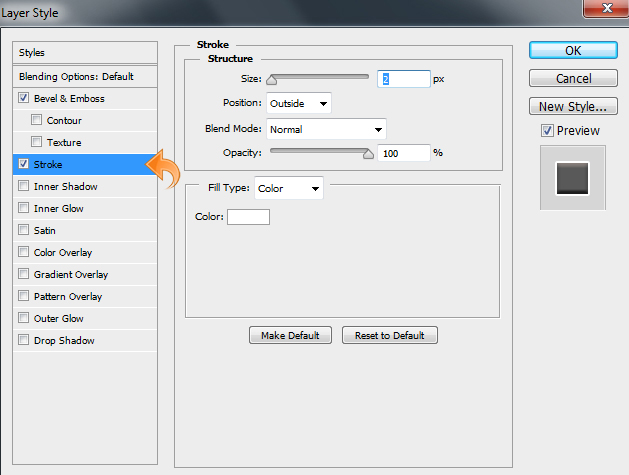
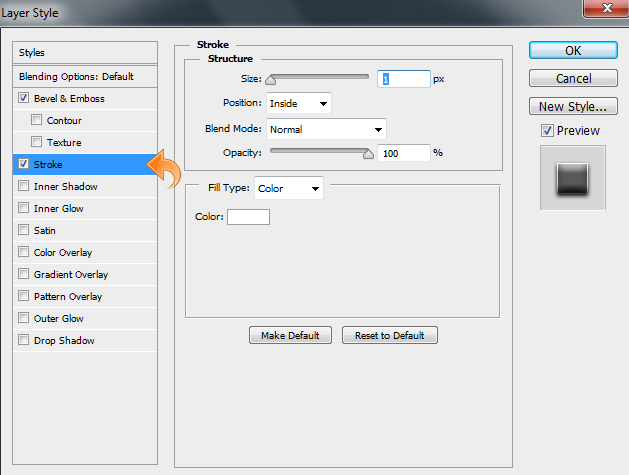
 Step 11:
Select the type tool again and add another “D” in the middle. Now, click on “Layer styles” to add Bevel & Emboss, Stroke, and Drop Shadow. Use the settings shown below for all three effects.
Step 11:
Select the type tool again and add another “D” in the middle. Now, click on “Layer styles” to add Bevel & Emboss, Stroke, and Drop Shadow. Use the settings shown below for all three effects.
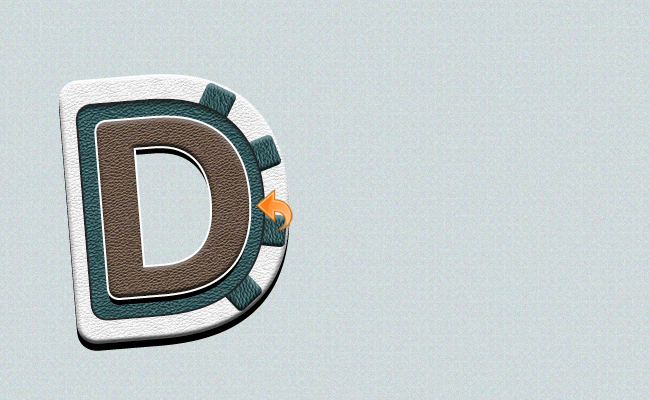
 Step 12:
Open the brown leather texture. Now, scale it down using the free transform tool and paste it on the text. Then, click on “Layers” > “Create Clipping Mask.”
Step 12:
Open the brown leather texture. Now, scale it down using the free transform tool and paste it on the text. Then, click on “Layers” > “Create Clipping Mask.”
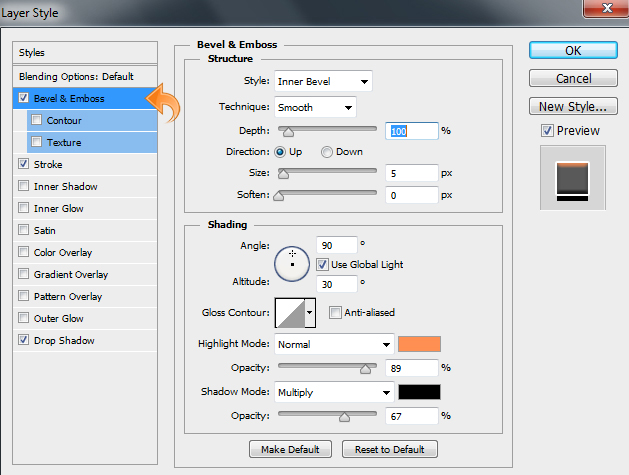
 Step 13:
Repeat the same process and add another letter using the type tool. Then, click on “Layer Styles” to add the Bevel & Emboss, Stroke, and Drop Shadow. Use the same settings for these effects from the last step, but adjust the Bevel & Emboss settings to match the image below.
Step 13:
Repeat the same process and add another letter using the type tool. Then, click on “Layer Styles” to add the Bevel & Emboss, Stroke, and Drop Shadow. Use the same settings for these effects from the last step, but adjust the Bevel & Emboss settings to match the image below.
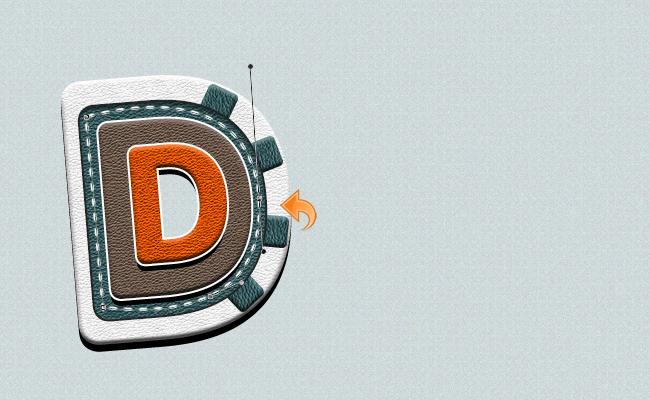
 Step 14:
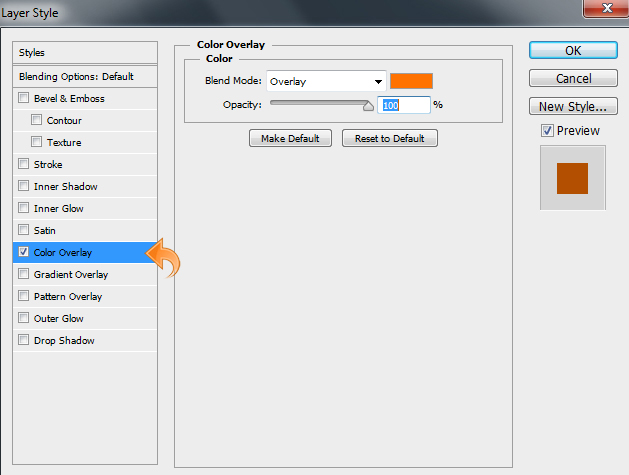
Now, take the brown leather texture and paste it onto the letter, scale it down, and click on “Layer” > “Create Clipping Mask”. We need to adjust the color for this one, so select the leather layer and click on “Layer” > “Layer style” > “Color overlay”. Use color #ff7200 with blending mode set to “Overlay”.
Step 14:
Now, take the brown leather texture and paste it onto the letter, scale it down, and click on “Layer” > “Create Clipping Mask”. We need to adjust the color for this one, so select the leather layer and click on “Layer” > “Layer style” > “Color overlay”. Use color #ff7200 with blending mode set to “Overlay”.
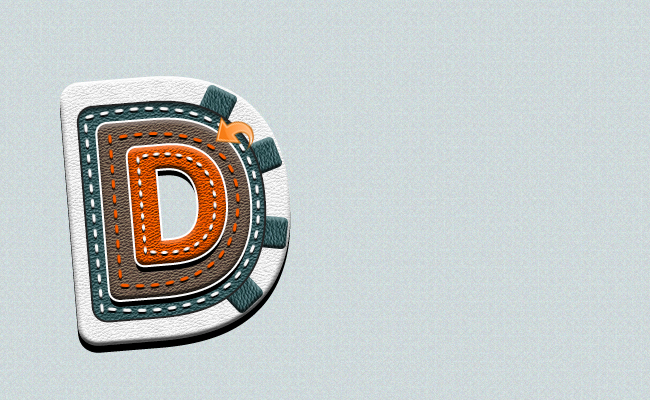
 Step 15:
Now, let’s start with the stitches. We’ll first set the foreground color to #f8f8f8. Select a hard round brush and then click on the brush panel to adjust its size and spacing to appear as stitches. After this, create a new layer, select the pen tool, and create a path on the text. Finally, right-click on it and select “Stroke path”.
Step 15:
Now, let’s start with the stitches. We’ll first set the foreground color to #f8f8f8. Select a hard round brush and then click on the brush panel to adjust its size and spacing to appear as stitches. After this, create a new layer, select the pen tool, and create a path on the text. Finally, right-click on it and select “Stroke path”.
 Select the above layer with the stitches and click on “Layer styles” to add some Drop Shadow using the settings below.
 Step 16:
Repeat the same process to create more stitches while adjusting the size and color. Continue to add the some drop shadow with the same settings as above for all stitches.
Step 16:
Repeat the same process to create more stitches while adjusting the size and color. Continue to add the some drop shadow with the same settings as above for all stitches.
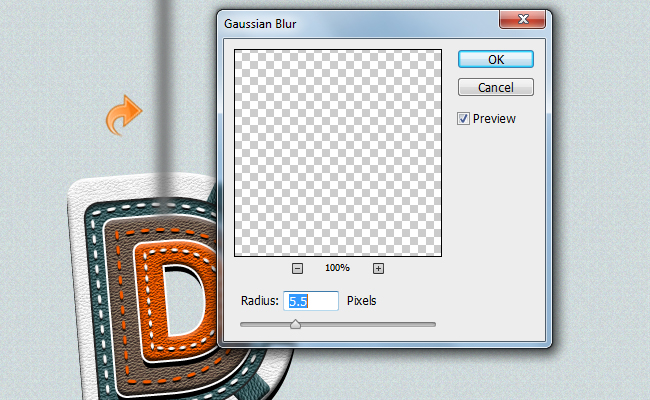
 Step 17:
Now we will start with the hanging leather strap. Select the hard round brush to create a vertical line using color #4b4b4b. Then, click on “Filter” > “Blur” > “Gaussian Blur”.
Step 17:
Now we will start with the hanging leather strap. Select the hard round brush to create a vertical line using color #4b4b4b. Then, click on “Filter” > “Blur” > “Gaussian Blur”.
 Step 18:
For the embedded metal ring, select the hard round brush and apply it using color #363636. Then, select the eraser tool to erase the middle creating a ring. Then, click on “Layer Styles” from the layer panel and add Bevel & Emboss, Stroke, and Drop shadow using the following settings.
Step 18:
For the embedded metal ring, select the hard round brush and apply it using color #363636. Then, select the eraser tool to erase the middle creating a ring. Then, click on “Layer Styles” from the layer panel and add Bevel & Emboss, Stroke, and Drop shadow using the following settings.
 Repeat the same process to create new rings as needed, this time using color #9d9d9d. Now, simply copy the layer styles from the first ring and paste them onto new ring layers.
Step 19:
Create a new layer and select the hard round brush to create a vertical line using color #d8d8d8. Then, select the layer and click on “Layer Styles” to add Bevel & Emboss and Drop Shadow using the following values.
Repeat the same process to create new rings as needed, this time using color #9d9d9d. Now, simply copy the layer styles from the first ring and paste them onto new ring layers.
Step 19:
Create a new layer and select the hard round brush to create a vertical line using color #d8d8d8. Then, select the layer and click on “Layer Styles” to add Bevel & Emboss and Drop Shadow using the following values.

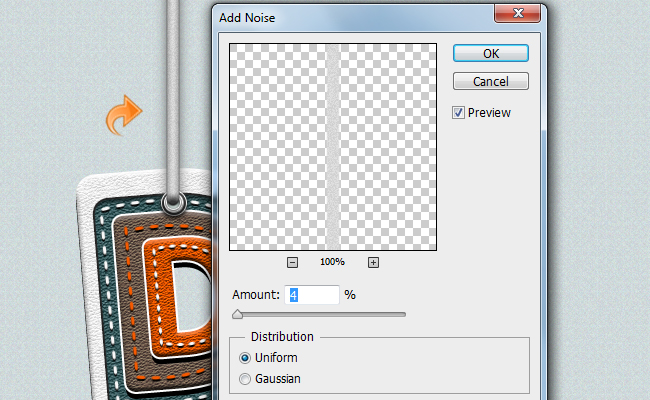
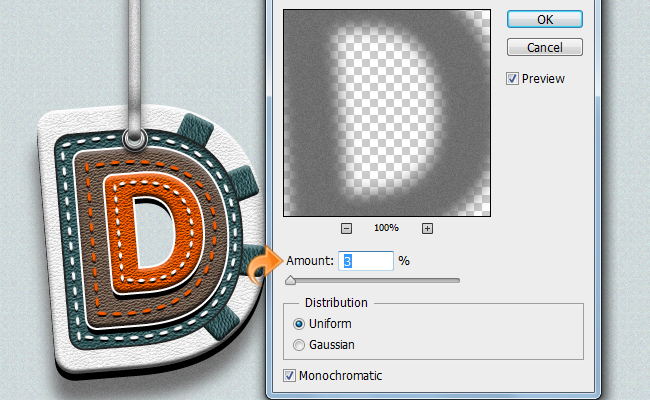
 Step 20:
Select the above layer and click on “Filter” > “Noise” > “Add Noise”. Now, to finish it off, use some burn and dodge delicately over the hanging leather straps, and our straps are done.
Step 20:
Select the above layer and click on “Filter” > “Noise” > “Add Noise”. Now, to finish it off, use some burn and dodge delicately over the hanging leather straps, and our straps are done.
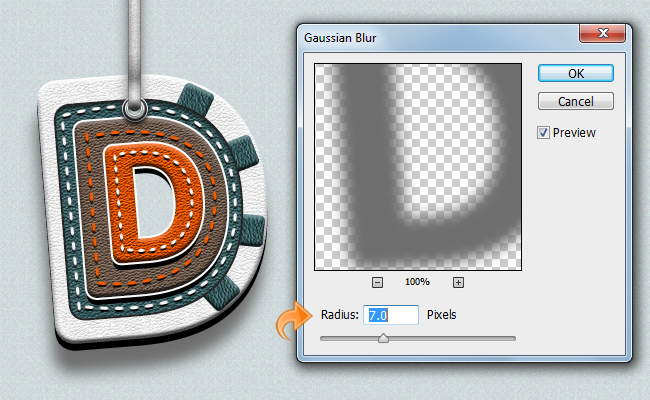
 Step 21:
Now, let’s add the final shadow to the text. Select the type tool and add another letter, this time using color #949494. Then, right-click on the layer and select “Rasterize Layer”. Place this layer just above the background layer. Now, click on “Filter” > “Blur” > “Gaussian Blur”.
Step 21:
Now, let’s add the final shadow to the text. Select the type tool and add another letter, this time using color #949494. Then, right-click on the layer and select “Rasterize Layer”. Place this layer just above the background layer. Now, click on “Filter” > “Blur” > “Gaussian Blur”.
 Once again, click on “Filter” but this time add some noise by choosing “Filter” > “Noise” > “Add Noise”.
 Step 22:
Simply repeat the same process to add additional text.
Step 22:
Simply repeat the same process to add additional text.
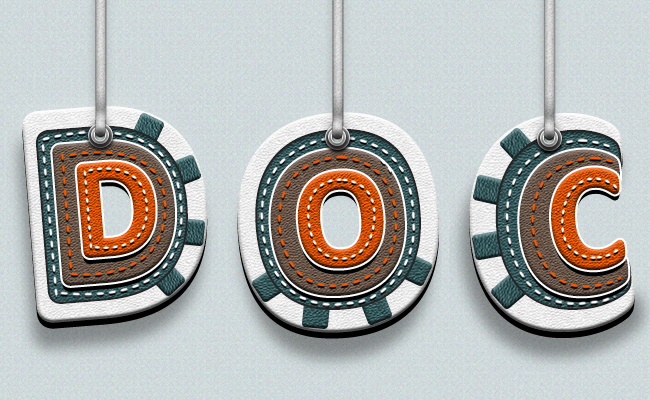 We are done! I hope you enjoyed the leathery text tutorial. I’ll be back with more; let me know your thoughts.
Frequently Asked Questions about Crafting a Leathery Text Effect in Photoshop
What are the best settings to use for the leather texture effect in Photoshop?
The settings for creating a leather texture effect in Photoshop can vary depending on the desired outcome. However, a good starting point is to use the “Texturizer” filter. Set the scaling to around 100%, the relief to 4, and the light direction to top. You can then adjust these settings to achieve the desired effect. Remember, experimentation is key in Photoshop, so don’t be afraid to try different settings.
Can I use this technique to create other textures?
Absolutely! The technique used to create a leather texture can be applied to create a variety of other textures. By adjusting the settings in the “Texturizer” filter, you can create effects that mimic a wide range of materials, from fabric to metal. The key is to experiment with different settings and observe the results.
How can I make the leather texture look more realistic?
To make the leather texture look more realistic, you can add a layer of noise. This can be done by creating a new layer, filling it with white, and then applying the “Add Noise” filter. Adjust the amount of noise to your liking. You can also experiment with the blending modes to achieve different effects.
Can I apply the leather texture effect to an image?
Yes, you can apply the leather texture effect to an image. Simply open the image in Photoshop, create a new layer, and then follow the steps to create the leather texture. Once done, you can use the blending modes to blend the texture with the image.
What if I want a different color for my leather texture?
If you want a different color for your leather texture, you can use the “Hue/Saturation” adjustment. This allows you to change the color of the texture to any color you want. Simply select the layer with the texture, go to Image > Adjustments > Hue/Saturation, and then adjust the hue slider.
How can I save my leather texture for future use?
To save your leather texture for future use, you can save it as a pattern. To do this, select the area of the texture you want to save, go to Edit > Define Pattern, give your pattern a name, and then click OK. You can then use this pattern in future projects by selecting it from the pattern library.
Can I use this technique in other versions of Photoshop?
Yes, this technique can be used in most versions of Photoshop. The steps may vary slightly depending on the version, but the basic principles remain the same.
What other filters can I use to enhance my leather texture?
There are many filters you can use to enhance your leather texture. Some popular ones include the “Emboss” filter, which can give your texture a 3D effect, and the “Gaussian Blur” filter, which can soften the texture. Experiment with different filters to see what works best for your project.
How can I add text to my leather texture?
To add text to your leather texture, simply select the Text tool, click on the area where you want the text to appear, and then start typing. You can adjust the font, size, and color of the text in the options bar at the top of the screen.
Can I use this technique to create a leather texture in other software?
While this tutorial is specifically for Photoshop, the basic principles can be applied in other graphic design software. The steps may vary, but the concept of using filters and adjustments to create a texture should be similar.
 Anum Khan
Anum is Web and Graphic designer. Addicted to Photoshop and crazy for pixel perfection. She is also an active blogger, sharing her passions, skills and creative details on her blog Websoulz. She loves to connect with the community, sharing the latest design gossips and rolling her eyes on boring trends.


