- What You’ll Need
- Creating a PouchDB Database
- Planning our application
- Designing a Schema (of sorts)
- Adding and Updating Notes
- Saving Attachments
- Retrieving All Notes
- Retrieving Individual Notes
- Making Notes Searchable
- Working Offline with Application Cache
- Conclusion
- Frequently Asked Questions (FAQs) on Building Offline-First App with PouchDB
Client-side databases remain a sore spot in cross browser offline application development. In one corner, are Safari and Opera ≤ 12. Both of these browsers support Web SQL exclusively. In the other corner, we have Firefox and Internet Explorer (10+), which support IndexedDB exclusively. Chrome (and Opera 15+), for what it’s worth, supports both. Now this split wouldn’t be so terrible if Web SQL and IndexedDB weren’t radically dissimilar databases with different models for storing data. Supporting both is a nontrivial task. Luckily for us, PouchDB exists. PouchDB is a client-side database API. It’s written in JavaScript and modeled after the CouchDB API. It’s even capable of synching with a CouchDB instance. We’re interested in PouchDB, however, because it abstracts the differences between Web SQL and IndexedDB, and wraps them in a single interface. In this article, we’ll get to know PouchDB by building a simple note taking application that works offline. Only portions of the code will be covered here. Many of the functions have been simplified for readability. You can download the entire thing from GitHub.
What You’ll Need
For this project, you will need the following.- A copy of the PouchDB script
- A web browser that supports IndexedDB or Web SQL. Current versions of Opera, Safari, Internet Explorer, Chrome, and Firefox fit the bill.
- An HTTP server such as Nginx, Lighttpd, or Apache HTTP.
 Because of the origin restrictions baked into IndexedDB and Web SQL, you will also need to use an HTTP server for development. Use whichever server you’d like — Apache, Nginx and Lighttpd are three solid options. Or you can use packages such as MAMP for Mac OS X, WAMP for Windows, or XAMPP for Mac, Windows, and Linux.
Add PouchDB to your HTML document as you would any other JavaScript file:
Because of the origin restrictions baked into IndexedDB and Web SQL, you will also need to use an HTTP server for development. Use whichever server you’d like — Apache, Nginx and Lighttpd are three solid options. Or you can use packages such as MAMP for Mac OS X, WAMP for Windows, or XAMPP for Mac, Windows, and Linux.
Add PouchDB to your HTML document as you would any other JavaScript file:
<script src="pouchdb-nightly.min.js"></script>Creating a PouchDB Database
All PouchDB databases or database connections are created with thePouchDB constructor:
var pdb = new PouchDB('pouchnotes');_pouch_pouchnotes. PouchDB prefixes each database name with _pouch_. If you’re also using “raw” IndexedDB or Web SQL for other areas of your web site, avoid using the _pouch_ prefix for those databases.
Planning our application
So what might a note-taking application look like? Well, we probably want each note to have a title. Each note will also have text that makes up the note’s body. We might want to tag our notes too, so we’ll have a field for that. And wouldn’t it be nice if we were able to attach a file? We’ll use an HTML form such as the one below.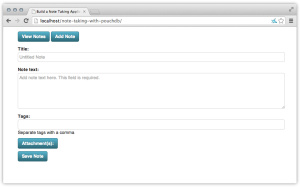 We’ll base our database structure on this form.
Designing a Schema (of sorts)
What’s fun about PouchDB is that it has a flexible schema. Each object in the database is really a self-contained document. PouchDB doesn’t use a relational model of data organization, so we can just add fields or properties to a document as we need them. Rather than theSELECT * FROM tablename syntax of SQL/relational databases, PouchDB queries use MapReduce. You write functions to filter and sort your data. It requires a bit of a mental shift when compared to SQL, but it’s easy once you get the hang of it. We’ll see an example of this a little later.
Adding and Updating Notes
We’ll add our note to the database when our form is submitted. PouchDB offers two methods for saving a document:post and put. Each method accepts two arguments.
document(required): An object containing properties and their values. In this case, it will be form fields and their values.callback(optional): A function to call when the operation completes. It accepts two parameters:errorandresponse.
post adds a new document and generates an identifier (_id); with put, we need to supply one. This means you can use put to add or update documents. But post is strictly for adding new documents to the database. Now, let’s take a look at an example using put.
var form, savenote;

form = document.getElementById('addnote');

savenote = function(event) {
  var o = {};

  o.notetitle = form.notetitle.value;
  o.note = form.note.value;
  o.tags = form.tags.value;

  /* Generate an _id if we don't have one.
     It should be a string, which is why we're
     adding '' to it. */

  if (event.target._id.value == '') {
    o._id = new Date().getTime() + '';
  } else {
    o._id = event.target._id.value;
  }

  pdb.put(o, function(error, response) {
    if (error) {
      console.log(error);
      return;
    } else if(response && response.ok) {
      /* Do something with the response. */
    }
  });
}

/* Add the event handler */
form.addEventListener('submit', savenote);_id value in our form, we’ll generate a timestamp to use for it. Otherwise, we’ll use the value of form._id. Our other form fields will become properties and values for our document object. By using put rather than post, we can use our savenote function both to add and update notes.
If all goes well, our callback will receive a JSON-formatted response. An example of a successful response is shown below.
{ok: true, id: "1391406871281", rev: "1-1d95025598a94304a87ef14c108db7be"}Saving Attachments
Saving an attachment is little more complicated than saving text. We can’t just query thevalue attribute of the input type="file" field. Instead, we have to read the file data using the File API, then save it using PouchDB’s putAttachment method. Let’s add to our savenote method from the previous section.
savenote = function(event) {
  var o = {};

  o.notetitle = form.notetitle.value;
  o.note = form.note.value;
  o.tags = form.tags.value;

  /* Generate an _id if we don't have one.
     It should be a string, which is why we're
     adding '' to it. */

  if (event.target._id.value == '') {
    o._id = new Date().getTime() + '';
  } else {
    o._id = event.target._id.value;
  }

  pdb.put(o, function(error, response) {
    if (error) {
      console.log(error);
      return;
    }

    /* New code for saving attachments */
    if (response && response.ok) {
      if (form.attachment.files.length) {
        var reader = new FileReader();

        /* Using a closure so that we can extract the
           File's attributes in the function. */
        reader.onload = (function(file) {
          return function(e) {
            pdb.putAttachment(response.id, file.name, response.rev, e.target.result, file.type);
          };
        })(form.attachment.files.item(0));
        reader.readAsDataURL(form.attachment.files.item(0));
      }
    }
  });
}files attribute that returns a FileList object. In this case, that’s form.attachment.files. As its name suggests, a FileList object is an array containing the file or files submitted using that field. We can determine the number of files in the list with the length property. Each file in the list can be referenced using its index and the item method, as we’ve done here (form.attachment.files.item(0)). Alternatively, you can use square bracket syntax (form.attachment.files[0]).
If the note is added successfully, we’ll get a response.id. Then, we can check to see whether or not there’s also a file to save as an attachment. If there is, we will read it using a FileReader object (var reader = new FileReader()). PouchDB attachments must be base64-encoded. The easiest way to encode files is to use the readAsDataURL(). Once the file loads, we can save it to the database using putAttachment.
PouchDB’s putAttachment method accepts up to six arguments. Five are required, one is optional.
docID(required): The identifier for the document that this attachment will be associated with. In this case, it’sresponse.id.Attachment ID(required): The name of the attachment. Here we’re using the file’s name.rev(required): The parent document’s revision number.attachment_doc(required): The base64-encoded file data. In this case theresultproperty of ourFileReaderobject.type(required): The MIME type for this data. For example,image/pngorapplication/pdf.callback(optional): the function to invoke when the operation completes. As with all PouchDB callback functions, it accepts two arguments,errorandresponse. We’ve left it out in our example.
onload event handler within a closure. The closure makes it possible to access our file properties from within our event handler (for example, with file.name and file.type).
Now that we’ve looked at saving notes and attachments, let’s look at retrieving records, both individually and in sets.
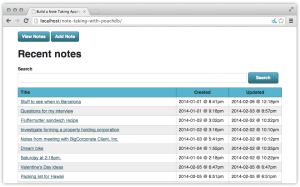
Retrieving All Notes
What if we want to view a list of the notes in our database? This is where PouchDB’sallDocs is useful. PouchDB.allDocs lets us retrieve a batch of documents at a time.
 The name
 allDocs is a bit misleading. We certainly can use it to retrieve all of our documents. However, we can also use it to retrieve documents that fall within a certain range, or retrieve documents that match particular keys. This method accepts two arguments, neither of which are required.
options(optional): An object containing one or more of the following properties.include_docs(Boolean): Include the entire document for each row. Whenfalse, will only return the document’sidandrevnumber. *conflicts(Boolean): Include conflicts.startkeyandendkey: Include documents with keys within this range.descending(boolean): Sort the results in descending order instead. *options.keys(array): Return only documents matching the specified keys. *options.attachments(Boolean): Return attachments with documents. *callback(optional): A function to call when when the retrieval completes. As with other PouchDB callbacks, it receives anerrorargument, and aresponseargument.
include_docs to true. Here’s our viewnoteset function.
var viewnoteset = function() {
  var df = document.createDocumentFragment(),
           options = {},
           nl = document.querySelector('#notelist tbody');

  options.include_docs = true;

  this.pdb.allDocs(options, function(error, response) {
    var row = response.rows.map(addrow); // Calls an addrow() function

    row.map(function(f) {
      if (f) {
        df.appendChild(f);
      }
    });
    nl.appendChild(df);
  });
};response is an object containing three properties: total_rows, offset, and rows. We’re most interested in response.rows, since it is an array of document objects. Here we’ve used map, one of JavaScript’s built-in array methods, on response.rows. Using map invokes our addrow function for every note, and adds it to the table that lists our notes.
Retrieving Individual Notes
Retrieving an individual note is a bit easier, as we can use PouchDB’sget method. The only required argument is the document ID. We can, however, include an options argument and a callback function to handle the results.
Our options argument, {attachments: true} ensures that if a particular note has any attachments, it will be shown with the note when viewed. Here, our callback function takes our note data and uses it to fill in our form fields and show any attachment.
var viewnote = function(noteid) {
  var noteform = document.querySelector('#noteform');

  pdb.get(noteid, {attachments: true}, function(error, response) {
    var fields = Object.keys(response), o, link, attachments, li;

    if (error) {
      return;
    } else {
      /* Since our note field names and form field names match,
         We can just iterate over them. */

      fields.map(function(f) {
        if (noteform[f] !== undefined && noteform[f].type != 'file') {
          noteform[f].value = response[f];
        }

        if (f == '_attachments') {
          attachments = response[f];

          for (o in attachments) {
            li = document.createElement('li');
            link = document.createElement('a');
            link.href = 'data:' + attachments[o].content_type + ';base64,' + attachments[o].data;
            link.target = "_blank";
            link.appendChild(document.createTextNode(o));
            li.appendChild(link);
          }

          document.getElementById('attachmentlist').appendChild(li);
        }
      });
    }
  });
}id for each note using a link. Each href points to /#/view/xxxxx where xxxxx is the note id. Clicking a link triggers a hashchange event, and the hashchange event handler (shown below) is where we pass the id to viewnote.
window.addEventListener('hashchange', function(e) {
  var noteid;

  /* Replacing # for compatibility with IE */
  if (window.location.hash.replace(/#/,'')) {
    noteid = window.location.hash.match(/\d/g).join('');
    viewnote(noteid);
  }
});
Making Notes Searchable
Notes are especially useful when they are searchable. So, let’s add a search feature to our application. We will take input from our search form, and use it as the basis for our search query. The following figure shows what our application will look like when we use the search feature.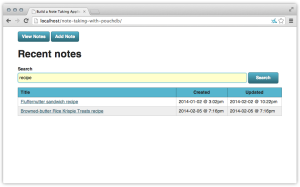 PouchDB queries look very different from SQL. With SQL, you specify what to select, from which table, and according to what criteria. For example, a simple note search query might look like this:
 SELECT * FROM notes WHERE title, text, tags LIKE %interview%. But with PouchDB we run queries using functions.
To run a query, we’ll use PouchDB’s query method. It accepts three arguments.
fun(required): The name of a function.options(optional): An object containing options for the search results. You can specify a reduce function or restrict results to a specific key or range of keys.callback(optional): A function to call when the query completes.
var search = function(searchkey) {
  var map = function(doc) {
    var searchkey, regex;

    /* Escape characters with special RegExp meaning */
    searchkey = document.getElementById('q').value.replace(/[$-\/?[-^{|}]/g, '\\$&');
    regex = new RegExp(searchkey,'i');

    /* If the notetitle, note, or tags fields match,
       return only the fields we need to create the result list. */
    if (doc.notetitle.match(regex) ||
        doc.note.match(regex) ||
        doc.tags.match(regex)) {
      emit(doc._id, {notetitle: doc.notetitle, note: doc.note, tags: doc.tags});
    }
  }

  db.query(map, function(err, response) {
    if (err) {
      console.log(err);
    }

    if (response) {
      var df, rows, nl, results;

      /* Rewrite the response so that our object has the
         correct structure for our addrow function. */
      results = response.rows.map(function(r) {
        r.doc = r.value;
        delete r.value;
        return r;
      });

      nl = document.querySelector('#notelist tbody');
      df = document.createDocumentFragment(),
      rows = results.map(addrow, that);
      rows.map(function(f) {
        if (f) {
          df.appendChild(f);
        }
      });

      nl.innerHTML = '';
      nl.appendChild(df);
    }
  });
}map function which is how we find and filter our records. The map function always receives a PouchDB document as its sole argument. We don’t have to name this function map, but it must be the first argument.
Within map, we’ve created a regular expression object from our search form input. We’ll test our notetitle, note, and tags fields, to see if any of these fields match our regular expression. If they do, we’ll return the notetitle, id (which is a time stamp), and modified properties using the emit method. The emit method is built into PouchDB. As its name suggests, it selects and returns the properties specified, in the format specified. The first argument of emit becomes the key for our results.
Our map function becomes the first argument for query. And the second argument for query is — as you’ve probably guessed — a callback function. Assuming everything went okay, our response argument will be an object containing three properties: total_rows, offset, and rows. We want rows. It’s an array containing the notes that match our search term. The following code sample shows what a response might look like.
[{
  value: {
    id: "1388703769529",
    modified: 1391742787884,
    notetitle: "Fluffernutter sandwich recipe"
  },
  id:"1388703769529",
  key:"1388703769529"
},
{
  value: {
    id: "1391656570611",
    modified: 1391656570611,
    notetitle: "Browned-butter Rice Krispie Treats recipe"
  },
  id:"1391656570611",
  key:"1391656570611"
}]Array.prototype methods to manipulate the results. In this case, we’ve used Array.prototype.map to rewrite each note object so that our value property becomes doc instead, and again to invoke addrow for every result.
Working Offline with Application Cache
To make this application work completely off-line, we also need to save the HTML, CSS, and JavaScript offline using Application Cache. Application Cache is a plain text file, served with aContent-type: text/cache-manifest header that tells the browser which assets to store locally. We won’t do a “deep-dive” on Application Cache here, but let’s look at the manifest file, pouchnotes.cache, for our demo application.
CACHE MANIFEST
# Version 2014.02.10.01

CACHE:
index.html
css/style.css
js/pouchdb-nightly.min.js
js/application.jsCACHE MANIFEST, which is how all cache manifests must begin. The second line tells us what version of the file this is. Browsers will only update the cache when the cache manifest changes. Changing the version number is the easiest way to trigger an update should we modify our CSS, JavaScript, or HTML files.
We still need to do one more thing, though. We need to add our manifest to our HTML document. That requires adding a manifest attribute to our <html> tag, like this:
<html lang="en-us" manifest="pouchnotes.manifest">Conclusion
There’s more to PouchDB that we haven’t covered here. For example, you can synchronize PouchDB with a CouchDB server. Synchronizing with a database server lets us build applications that can easily share data and files across multiple browsers and computers. I hope this article has left you with an understanding of what PouchDB is and how you can use it to build software that works even when our Internet connection does not.Frequently Asked Questions (FAQs) on Building Offline-First App with PouchDB
What are the benefits of using PouchDB for building offline-first apps?
PouchDB is a JavaScript database that allows you to store and retrieve data while offline. It has a simple API that makes it easy to use, and it syncs with a server-side database when the device is online. This makes it ideal for building offline-first apps, as it ensures data is always available, even when the device is not connected to the internet. PouchDB also supports a wide range of browsers and platforms, making it a versatile choice for developers.
How does PouchDB handle data synchronization?
PouchDB uses a replication model to handle data synchronization. When the device is online, it syncs with a server-side database, such as CouchDB. This ensures that the data on the device is always up-to-date. The replication process is bidirectional, meaning changes made on the device are also synced back to the server. This allows for real-time updates and ensures data consistency across multiple devices.
Can I use PouchDB with other databases besides CouchDB?
Yes, PouchDB is compatible with any database that implements the CouchDB Replication Protocol. This includes databases like IBM Cloudant and Apache CouchDB. However, it’s important to note that some features may not be available when using PouchDB with databases other than CouchDB.
How secure is PouchDB?
PouchDB uses the same security model as the server-side database it syncs with. This means that if your server-side database is secure, so is your PouchDB database. However, it’s important to implement additional security measures, such as encryption and user authentication, to ensure your data is protected.
How do I handle conflicts in PouchDB?
PouchDB handles conflicts by keeping multiple versions of a document. When a conflict occurs, you can choose which version to keep. This is done using the ‘rev’ property, which keeps track of the revision history of a document. You can also use the ‘conflicts’ option to fetch all conflicting revisions of a document.
Can I use PouchDB on mobile devices?
Yes, PouchDB is designed to work on a wide range of platforms, including mobile devices. It supports both Android and iOS, and it can be used with popular mobile development frameworks like Cordova and PhoneGap.
How do I query data in PouchDB?
PouchDB provides several methods for querying data, including ‘get’, ‘allDocs’, and ‘query’. The ‘get’ method retrieves a single document by its ID, while ‘allDocs’ retrieves all documents in the database. The ‘query’ method allows you to perform complex queries using map-reduce functions.
How do I handle errors in PouchDB?
PouchDB uses promises for error handling. When an operation fails, a promise is rejected with an error object. You can catch this error using the ‘catch’ method and handle it accordingly.
Can I use PouchDB with AngularJS?
Yes, PouchDB can be used with AngularJS. There are several libraries available that make it easy to integrate PouchDB with AngularJS, such as angular-pouchdb.
How do I test my PouchDB application?
PouchDB provides a ‘destroy’ method that deletes the database, making it easy to reset the state of your application for testing. You can also use testing frameworks like Mocha and Chai to write unit tests for your PouchDB application.
 Tiffany Brown
Tiffany B. Brown is a freelance web developer and technical writer based in Los Angeles. Brown offers web development and consulting services to larger agencies and small businesses. A former member of the Opera Software developer relations team, Brown is also co-author of SitePoint's JumpStart HTML5 book. She sporadically writes about web development technology on her blog. You can follow her on Twitter at @webinista.