If you’re looking to add some pizzazz to your PHP application, look no further – Adobe’s Flex is here to give your interface some polish. In this article Lennart Steinke shows us how to make a Flex widget with a PHP back end. Read carefully, because there’s a quiz at the end: for a limited time, every entrant scores a free Flex reference just for doing the quiz, plus three lucky winners will each receive a free copy of Adobe’s Flex Builder 3!
Flex is Adobe’s open source web application framework designed for speedy development of web or desktop applications. It allows you to build software that’s then compiled into a Flash (SWF) file, and can be run in any browser with the Flash plugin installed. Best of all, it’s fun to use. You can create great looking applications easily: eye candy and pleasing effects are built in, and can be added to your app with just a few lines of additional code. This allows you to create a cool application in a short amount of time. Oh, and did I mention that it’s fun to use?
If you’re brand new to Flex, take a look at our earlier Flex tutorial. It’ll walk you through the process of installing the Flex Builder development environment, and introduce you to some of the key concepts of Flex development.
In this article, we’ll go a step further and learn how to use Flex alongside PHP, by creating a product information widget in Flex that uses PHP to retrieve the product information. Before you start, grab a copy of the Flex Builder 3 demo from Adobe – we’ll be using it to create our widget.
The Example Widget
The small widget we’re going to build shows a product image with a description and a link to a product information page. It will consist of these basic components:
- a Flex application to display the widget
- an HTML page that contains the Flash
- and later, a PHP script to present product data as XML or JSON
To start out, we’ll embed the product information in the Flex application while we build our widget. Once we’ve sorted out the Flex part, we’ll change the code to learn how to retrieve our data from an XML file.
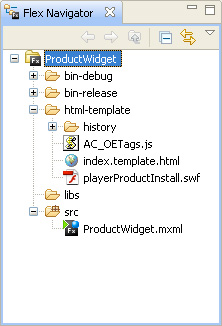
Let’s start by creating a new Flex project using Flex Builder. Enter ProductWidget as the project name, make sure that the Application Type is set to Web application, and then hit the Finish button.
This will create a basic project, including a template HTML file to load and display the application, as well as a bare-bones application – ProductWidget.mxml. Unless you changed your Flex Builder layout, the main application file will be visible in the text editor on the right side of the screen. Make sure that the ProductWidget.mxml file is displayed in the editor. If you’re unsure, look for a file named ProductWidget.mxml in the file tree on the left and double-click it. This will ensure that the correct file is loaded.
Inside the file, you’ll see the beginnings of a Flex application, contained in mx:Application tags. We’re going to add a box to contain our widget, a placeholder for an image, and a button which will contain a link. Between the mx:Application tags, add the following code:
<mx:VBox top="0" left="0" right="0" bottom="0">
<mx:Image id="image" width="150"/>
<mx:LinkButton label="LinkButton" id="link" width="150"/>
</mx:VBox>The
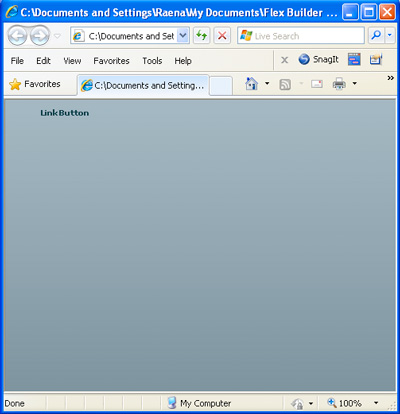
mx:VBoxis a layout component and it will make sure that the image and the link button are displayed below each other. Both items are also 150 pixels wide.Hit the Run button in the toolbar (the green button with the white arrow in it) to make sure everything works. Your browser should open and display a rather empty looking page, with the
LinkButtonwe created earlier sitting in the corner.
In the next step, we'll tell our Flex app about our product image, button text, and button link.
Passing Parameters
The most basic way to pass parameters to a Flex application is by adding the parameters to the HTML template which contains our widget. For our example we'll need to supply three values:
- the URL to an image to be displayed (
imageURL) - a product description (
productTitle) - a link to detailed information about the product (
productLink)
We’ll do this by changing the HTML template, which is located in the html-template folder. By default this file contains code to detect the Flash plugin and a link to an installation site in case the client needs to install a Flash plugin. And once we’re finished, it’ll also contain code to pass parameters to our Flex application.
There are two calls to a function, AC_FL_RunContent, in the file. Make sure you use the one that’s used to call your SWF file (the other one is to update the Flash Player if an outdated version was detected). It was around line 77 in my template. This call contains all the parameters passed to the Flex application. In order to pass data to your Flex application, you need to add an additional parameter named flashVars; this parameter can contain several other parameters encoded with HTML URL encoding, like the variables in a GET call. I’m using a free image from stock.xchng by nitewind23, and the image’s detail screen will serve as a product for this demonstration:
} else if (hasRequestedVersion) {

  // if we've detected an acceptable version

  // embed the Flash Content SWF when all tests are passed

  AC_FL_RunContent(

    "src", "${swf}",

    "width", "${width}",

    "height", "${height}",

    "align", "middle",

    "id", "${application}",

    "quality", "high",

    "bgcolor", "${bgcolor}",

    "name", "${application}",

    "allowScriptAccess","sameDomain",

    "type", "application/x-shockwave-flash",

    "pluginspage", "http://www.adobe.com/go/getflashplayer",

    "flashVars", "imageURL=http://www.sxc.hu/pic/m/n/ni/nitewind23/638995_dead_rubber_ducky.jpg&productTitle=Rubber%20duck&productLink=http://www.sxc.hu/photo/638995"

  );

  // ...

}
This is enough to make it work if the user has JavaScript enabled in the browser. For users browsing without JavaScript, you’ll also need to add the parameters in the noscript block of the template.
Our application will receive parameters from the HTML template – now we need to tell the application how to use them.
Code in .mxml files has to be placed in a mx:Script block. We’ll add the block after the closing bracket of the mx:VBox:
<mx:Script>

  <![CDATA[

    private var linkURL: String ="";


    private function onCreationComplete() : void

    {

      setData(

        application.parameters.imageURL,

        application.parameters.productTitle,

        application.parameters.productLink

      );

    }

    private function setData(imageURL: String, productTitle:String, productLink:String) : void

    {

      image.source = imageURL;

      link.label = productTitle;

      linkURL = productLink;

    }

    private function onLinkClicked():void

    {

      navigateToURL(new URLRequest(linkURL));

    }

  ]]>

</mx:Script>
The onCreationComplete method reads the parameters that were passed from the HTML file and calls another function, setData, which will populate variables for our code with the parameters we received from the HTML template. Since this method is called as soon as the application is created, we can be sure that our data will be set right at the beginning.
The setData function takes three parameters: imageURL, productTitle, and productLink. We’ll use the imageURL to set the source of the image, and the productTitle can be used to set the label displayed on the link button. The productLink needs to be saved in the linkURL variable we just defined, so we can use it as soon as the user clicks the link.
Finally, the onLinkClicked function will navigate to the link defined in the variable linkURL. We’ll attach that function to the button in the next step.
Let’s go back to the mx:VBox tag we created earlier, and look for the link button. We’ll add a click handler like so:
<mx:LinkButton label="LinkButton" id="link" click="onLinkClicked()"/>And finally, we need to make all of this happen as soon as the application is loaded. We’ll add a handler to the application, creationComplete, to run our onCreationComplete function just as soon as – you guessed it – the creation of the element is complete. Look for the mx:Application tag at the top, and add the handler:
<mx:Application xmlns:mx="http://www.adobe.com/2006/mxml"

  layout="absolute"

  creationComplete="onCreationComplete()" >
Your complete .mxml file should look like the code in Listing 1.
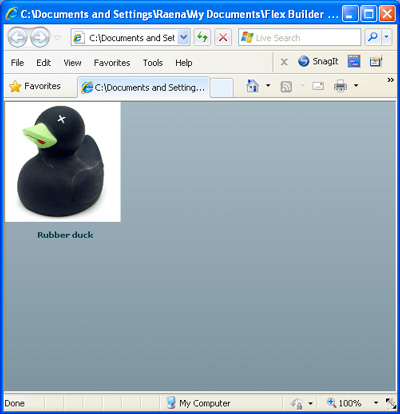
All done. Hit the Run button and give it a try! The result should look a little like the following:
Spicing It Up
Because it’s so easy, let’s add a small piece of eye candy to the application and fade in the image. This is as simple as adding completeEffect="Fade" to the mx:Image tag:
<mx:Image id="image" height="150" completeEffect="Fade"/>Now, run the application again – you should see that the duck image will fade in gently. There are a lot of predefined effects in Flex, and it’s very easy to customize them or to create your own. For more information take a look at Working with effects in the Adobe LiveDocs.
So, now we have the basic framework to provide the Flex application with data. Next, it’s time to provide that data in some more exciting ways: let’s use PHP to create some XML for our application to consume.
Working with XML Data
If your app can produce XML data, the next part of this tutorial will show you how to process that data in Flex. XML can be easily created, is readable by humans, and the Flex support for XML is neat. These are all good reasons to use it, so let’s have a look at the work involved to do so.
Before we start: It’s important to remember that Flash is extremely strict about accessing data from a different domain to the one where the SWF is kept. You’ll either need to run your Flex app from the same domain as your PHP scripts, or create a cross-domain policy file on the server where your PHP lives. For more information about cross-domain policy files and the Flash security model, check out this Adobe Developer Connection article.
Since we’re going to use HTTP to retrieve the data, we’ll use a Flex class called HTTPService, which will handle all the heavy lifting for us. We’ll tell the HTTPService where to connect to and what to do with the returned data.
To try it out, we’ll need to code up a simple PHP data provider. In a real-world situation, you’d be pulling the information from a database, but for this example we’ll keep it simple and hard-code these values. Here’s a PHP script that uses a function to fetch the data, creates a variable to hold that data, and then outputs the data in XML format:
<?php

  header("Content-type: text/xml");

  function getData() {

    $data["productLabel"] = "Rubber duck";

    $data["productLink"] = "http://www.sxc.hu/photo/638995";

    $data["imageURL"] = "http://www.sxc.hu/pic/m/n/ni/nitewind23/638995_dead_rubber_ducky.jpg";

    return $data;

    }


  $product = getData();

?>

<?php echo '<?xml version="1.0"?>'; ?>

<data>

  <product>

     <label><?php echo $product["productLabel"] ?></label>

     <link><?php echo $product["productLink"] ?></link>

     <imageURL><?php echo $product["imageURL"] ?></imageURL>

  </product>

</data>
In our Flex app, we’ll define an HTTPService pointing to our PHP page by adding an HTTPService block to our code. Inside this block we need to define a unique name for our service (id) so that we can refer to it in our ActionScript code, the URL to call (url), and the result format (resultFormat).
One point to keep in mind is that the call will be asynchronous: the send method will return immediately and the service will be called in the background. So, how do we access the data? The HTTPService provides two callback methods for this purpose: one for when the result is successful (result), and one for when it fails (fault).
Here’s the code we’ll use to define our HTTPService block, which we’ll place before the mx:Script block:
<mx:HTTPService

  id="productService"

  url="http://www.example.com/service.php"

  resultFormat="e4x"

  result="serviceLoaded(event)"

  fault="serviceError(event)"

/>
When an HTTPService will retrieve XML, you should set the expected format, resultFormat, to e4x – ECMAScript for XML. Using this result type allows us to employ a lot of convenient JavaScript functions when working with the returned XML.
If you’re wondering why it’s called ECMAScript instead of JavaScript, well, the Ecma International group defines the JavaScript language standards. The idea is that different implementations of JavaScript (for example, different browsers) ought to define at least the functionality defined by the Ecma International group. This core scripting language is also called ECMAScript.
Next, we need to define what we’ll do with the data we receive from the HTTPService. We know the result format, so we simply treat the event result as XML. This allows us to access the data in the XML like a normal object. The top level element (data in our example) will be mapped to be the actual XML object (xmlData in our example), so we can access the product level by using xmlData.product. Since the XML could contain several product elements, we need to specify which one we want – in this example, it will always be the first one (xmlData.product[0]). The elements below the product can then be accessed via their element directly. Just passing the data to our existing setData function will do the trick for us. We’ll do all this in a function, serviceLoaded:
private function serviceLoaded(event: ResultEvent) : void

{

  var xmlData: XML = event.result as XML;

  setData(

    xmlData.product[0].imageURL,

    xmlData.product[0].label,

    xmlData.product[0].link

    );

}
We also need to define another function, serviceError, for when there is a problem with the HTTPService. Normally, you would want to retry or specify some other, more meaningful action, but for now we’ll simply add a trace:
private function serviceError(event: FaultEvent) : void

{

  trace("Unable to get XML:" + event.fault.message);

}
Listing 2 shows the complete source for the XML version, with our HTTPService and the related functions.
Next, we’ll investigate how to consume data provided in the JSON format.
Using JSON
We’ll now change our example to work with data provided in JSON – the JavaScript Object Notation format. If you’re new to the idea, there’s a good explanation of the JSON from the JSON web site:
JSON (JavaScript Object Notation) is a lightweight data-interchange format. It is easy for humans to read and write. It is easy for machines to parse and generate. It is based on a subset of the JavaScript Programming Language, Standard ECMA-262 3rd Edition – December 1999. JSON is a text format that is completely language independent but uses conventions that are familiar to programmers of the C-family of languages, including C, C++, C#, Java, JavaScript, Perl, Python, and many others. These properties make JSON an ideal data-interchange language.
To use JSON in Flex, we’ll need to incorporate a library called ActionScript 3 Corelib, which contains JSON support, MD5 hashing, and some other useful functionality that’s currently missing from Flex. You can download the library from its Google Code project page. Unzip the file, and note where you placed it. We need to tell Flex Builder where to find it in the next step.
Back in Flex Builder, right-click your ProductWidget project, and choose Properties from the context menu. Now click on the Flex Build Path item, and choose the Library Path tab. You should be in a window that looks like this:
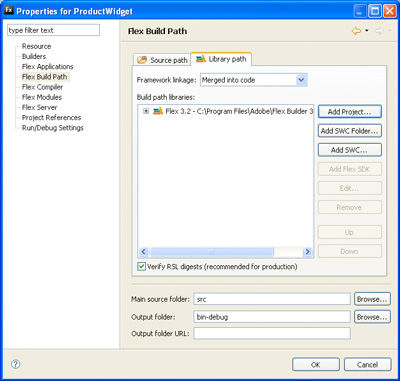
Click on Add SWC and navigate to the place where you unzipped the file. The SWC file needed can be found in the library’s lib/ subfolder, and it should be called as3corelib.swc. After selecting that file, click OK, and Flex Builder will now happily work with JSON encoded data.
Let’s now examine the code we’ll use to create JSON-formatted data in PHP. PHP5 has integrated JSON support, but for older versions you’ll need an additional PHP library – I’d suggest you download and use the Services_JSON library from PEAR.
The PHP code for outputting JSON text is quite similar to the XML example. This time, we’ll define a class to hold the data first, then our getData function will create a new instance of this class and fill it with dummy data. Finally, we’ll output the JSON-encoded object:
<?php

  class Data

  {

    public $imageURL;

    public $productTitle;

    public $productLink;

  }


  function getData()

  {

    $data = new Data();

    $data->imageURL = "http://www.sxc.hu/pic/m/n/ni/nitewind23/638995_dead_rubber_ducky.jpg";

    $data->productTitle = "Rubber duck";

    $data->productLink = "http://www.sxc.hu/photo/638995";


    return $data;

  }


  echo json_encode(getData());

?>
Fairly straightforward!
On the Flex side, we need to complete a few important steps: first, we must include the JSON class from the library we added; next, we’ll change the HTTPService block to point to the new service; finally, we’ll alter the serviceLoaded method to decode the JSON text.
First, at the top of our mx:Script block, we’ll instruct Flex to use the JSON class from the ActionScript 3 Corelib library:
import com.adobe.serialization.json.JSON;We’ll also tell the HTTPService about the location of the JSON service. JSON results are returned as text, so we’ll also need to change the resultFormat to text:
<mx:HTTPService

  id="productService"

  url="http://www.example.com/service.php"

  resultFormat="text"

  result="serviceLoaded(event)"

  fault="serviceError(event)"

/>
Finally, we need to alter the serviceLoaded method so that it can decode the JSON text and turn it into a Flex object. Here’s a new version of serviceLoaded:
private function serviceLoaded(event: ResultEvent) : void

{

  var rawData:String = String(event.result);

  var data:Object = JSON.decode(rawData);


  setData(

      data.imageURL,

      data.productTitle,

      data.productLink

    );

}
The complete source of our final example can be seen in Listing 3.
Using Parameters in HTTPRequests
So far, all of our examples requested data directly. In real-world examples, chances are that you’ll need to pass parameters to the services in question, such as a search term or a tag. To set parameters in the HTTPService you add a mx:Request tag containing the parameters to pass, and a method to use for the request. If we want to pass a parameter named search it would look like this:
<mx:HTTPService

  id="personRequest"

  url="http://www.example.com/service_json.php"

  resultFormat="text"

  result="serviceLoaded(event)"

  fault="serviceError(event)"

  method="GET"

  >

  <mx:Request>

    <search>duck</search>

  </mx:Request>

</mx:HTTPService>
Start Pimpin’
As you can see, connecting Flex with PHP is quite easy. If your PHP app exposes a service returning XML or JSON data, Flex can grab this data in almost no time. Happy coding!
Quiz
Feeling confident? Test your knowledge of this article and take our quiz. Just for answering the quiz, you’ll be able to download Tour de Flex, a unique desktop application that lets you explore resources such as core Flex components, Adobe AIR documentation and data integration, and third-party plugins.
What’s more, everyone who submits their details by the 6th of May 2009 will go in the draw to win a copy of Adobe Flex Builder 3. There are three copies to give away, so give it a try!
 Lennart Steinke
Lennart Steinke has a black belt in jujutsu, is a book author and a general all-round geek. He has a C++ and Java background, and spends his time building large scale Flex applications.


