In the first part of this series, you learned enough JavaScript and CSS to make an animated character move around your browser. In this article, I will explore some computer game techniques that will allow us to animate multiple sprites, as well as have them interact with each other.
If you’d like to experiment with this code at home, feel free to download the code archive for this article.
Looping the Loop
The demo shown in the previous article had a simple timer that fired twice a second; this moved a background graphic position, enabling us to animate the sprite. This timer is what game developers call the loop, and makes things happen. Obviously, we could give each sprite that we render a timer of its own, but this can cause some synchronization issues, and when we start testing for collisions we need to have all game objects in sync.
First, we will need a master object that will manage our loop. In this example, the object is called GameCanvas. As well as the main timer, this object will be responsible for managing the game screen, and handle things like scoring in a complete game. The basic code for an example game loop will be as follows:
var GameCanvas = Class.create({

   sprites: null,

   loopTimer: null,


   initialize: function(element) {

     this.sprites = new Array();

     this.element = $(element);

     this.start();

  },


  loop: function() {

    this.checkCollisions();

    for(var i = 0; i < this.sprites.length; i++) {

      sprite = this.sprites[i];

      sprite.render();

    }

  },


  checkCollisions: function() {

    // This will be implemented soon.

  },


  start: function() {

    this.loopTimer = setInterval(this.loop.bind(this), 1);

  }

});
Basically, the loop runs the checkCollisions function, which we’ll talk about shortly. Then it iterates over the sprites array and calls the render function for each sprite. Some of you may have noticed that the loopTimer is fired 1000 times per second, which, if JavaScript was threaded, would cause everything to run really quickly. As I alluded to in the previous article, JavaScript isn’t threaded, so the code in the loop will effectively block execution until it completes, introducing a longer delay than we asked for. We set the interval to 1 to ensure the code runs as quickly as possible.
Time to Bring Out the Math
I’ve held off for long enough. Unfortunately, you may have to pull out those geometry and trigonometry school books for the next task: the collision engine. The idea is to check whether any of the sprites on screen are overlapping; if they are, we have a collision. When this happens, we can run some code to address the situation. This might include stopping the sprite from moving further in its current direction, starting an animation sequence, or removing the sprite completely.
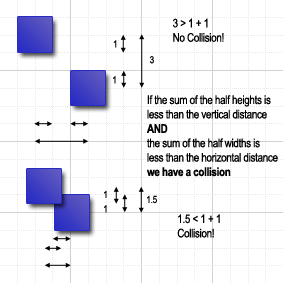
The system we’ll look at is based on rectangular elements, as most of the sprites we are working with are rectangular. If we know the coordinates of the two elements, we can easily work out how far away they are from each other. We do this by checking that the distance from the center of two sprites is less then the sum of half the width and less than half the height of each sprite.
Pardon? I think a diagram is needed to make this easier to understand:
The pseudo-code for collision detection is:
 distance_x = absolute_value_of(centre_x_coordinate_of_obj_1 - centre_x_coordinate_of_obj_2)

 distance_y = absolute_value_of(centre_y_coordinate_of_obj_1 - centre_y_coordinate_of_obj_2)


 if(distance_x is <= width_of_obj_1 / 2 + width_of_obj_2 / 2 and distance_y <= height_of_obj_1 / 2 + height_of_obj_2 / 2)

   // Collision!

 }
So, this formula lets us know if there is a collision, but we really need to know the direction as well. That’s because the action that would be performed on a top collision may need to be different from a left collision. For those of you who remember vector arithmetic, you’ll know that if we subtract two vectors, we can get a magnitude (or distance) and an angle; this is exactly what we need. The vector.js file contains the classes that will allow us to perform some basic vector arithmetic, including conversion to polar coordinates, which will become important when we need to work out some angles later on.
The Math.atan2 function will give us the angle value we need. This is also known as the arc tangent, which, according to the Mozilla reference:
This is the counterclockwise angle, measured in radians, between the positive x axis, and the point (x,y).
If we have two vectors representing the center points of the two sprites, we subtract one from the other for a single vector representing the displacement from the two center points. Once you’ve established that, calculating the angle in radians is a simple matter:
angle = Math.atan2(vector.y, vector.x);For those who can’t recall how to convert from radians to degrees, you multiple by 180 and divide by pi. To perform the reverse you multiply by pi and divide by 180, so:
degrees = radians * 180 / pi

radians = degrees * pi / 180
If we split each sprite (as if they were square) into quarters from corner to corner, like our sandwiches were cut for school, we have bounds for each direction.
| Degrees | Direction of collision |
|---|---|
| 45-135 degrees | Top |
| 135-225 degrees | Left |
| 225-315 degrees | Bottom |
| 315-45 degrees | Right |
The collision_engine.js file contains the CollisionEngine classes used to check for a collision condition and to determine the angle of a collision. There is a base CollisionEngine class and two child classes: SquareCollisionEngine and CircleCollisionEngine. These have different ways to calculate the center coordinates and collision angles for different-shaped sprites.
It’s probably a good time to explain a feature of this system. Each sprite has a number of custom event handlers: onTopCollision, onRightCollision, onBottomCollision, and onLeftCollision. If you go through the code, you’ll notice that CharacterSprite has a collision engine that doesn’t do anything! As a result, it relies on the objects around it to send it collision events. This may sound counter-intuitive at first, but if we look at the math, it makes sense. Here’s a figure that illustrates the problem:

As you can see, if the sprites are different in size, the angles would report the wrong direction unless we flip it around.
It’s difficult to explain all the intricacies of vector mathematics in an article like this, so if you’re interested and want to do some further reading, there’s a great tutorial called “Vector Math for 3D Computer Graphics“.
We’ve Done the Math, Now Some Physics
Working in web development, I hope to avoid physics wherever possible, but occasionally it comes in handy. If we are moving a character around the screen, jumping and falling will make things look a bit more realistic – and here’s where physics can help us out. Given a constant acceleration (gravity), an initial velocity, and a time unit, we can work out a final velocity.
final_velocity = initial_velocity - gravity * timeWe can simplify the formula by setting time to the value 1 (an arbitrary time unit):
final_velocity = initial_velocity - gravityIn the game, the velocity figure becomes the amount to add to the sprite’s current y coordinate to calculate a new y coordinate. We also need to include the direction as the value 1, 0, or -1 depending on whether the sprite is moving up, stationary, or moving down. The initial velocity is then multiplied by this direction value. For every cycle of the loop we can plot the sprite’s new position on the y axis.
This will be clearer if you think of how the Mario sprite jumps. If the sprite jumps, the velocity figure is initially set to a high number and then is gradually reduced; this means that the amount the sprite is moved along the y axis is reduced each cycle by the gravity constant. Visually, the sprite appears to be slowing down as it approaches the apex of its jump. When the velocity reaches 0, the top of the jump has been reached and the direction is reversed. In the reverse direction, the amount deducted from the sprite’s y coordinate increases with each cycle, simulating the speedup as the sprite falls. A bottom collision with another appropriate sprite, like bricks for example, will immediately halt the fall.
All the physics code can be found in the various sprite classes in sprite.js. Have a good look at the CharacterSprite class and the render function to see how the Mario sprite moves.
Scrolling the Screen
The last part to the game is scrolling the window. We have a background image that is tiled across from left to right. In fact, the whole “level” is over 6,000px wide. To get the side scroll effect, we need to use the window.scrollTo JavaScript function to center the screen around the sprite. Simply put, we check the current x value of the sprite and set the scroller to this value, plus half the screen width:
window.scrollTo(this.getX() - (window.innerWidth / 2), 0);When I first used this technique, there was a horrendous flicker on the screen. I traced it back to the left and right arrow keys firing an event, causing the screen to scroll–which makes sense; unfortunately it was scrolling the WRONG WAY! Luckily there was an easy fix: simply capture the event and ignore it. Unfortunately, I couldn’t work out how to apply the event listener dynamically, so I had to do it the old school way. Don’t hate me:
 <script type="text/javascript">

 function stopScroll(e) {

   keynum = window.event ? e.keyCode : e.which;

   return keynum != Event.KEY_LEFT && keynum != Event.KEY_RIGHT;

 }

 </script>

 <body onkeydown="return stopScroll(event);">
Well, that basically covers this grand overview of building a side-scrolling platform game in JavaScript. We’ve covered a great deal and some of it was only glossed over, however you should now be able to go through the full source code and understand what’s going on. We’ve looked at animation, the game loop, a basic collision engine and physics engine, as well as some browser tricks to make everything move smoothly. So the challenge to you now is to take the code and make your own 80s-style sidescrolling game.
In the meantime, go and play the game. Note that despite Prototype doing a reasonable job of ironing out browser incompatibilities, it’s not guaranteed to work perfectly in all browsers. What can I say – you can’t win em all. Welcome to the bleeding edge!
 Myles Eftos
Myles a Perth-based web developer who has worked in all the major web languages, his weapon of choice being Ruby on Rails—although he’s found himself doing more and more front-end development in JavaScript, HTML, and CSS.