Changing the Default Fieldset Layout
Although fieldset and legend elements are the most accessible means of marking up form groups, in the past a lot of people haven’t used them because they don’t like the default styling that browsers impose on these elements — the border around the fieldset, the legend intersecting the edge of the box. But it is possible to change this default layout and make your forms a little less boxy.
Our first step is to push the fieldset elements together, eliminating the whitespace between them. To do this, we could make the margin on the bottom of the fieldset elements zero, but that actually ends up looking like Figure 19.
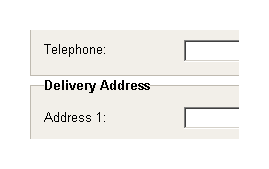 Figure 19: legend adding extra height so fieldset elements cannot touch
The legend at the top of the fieldset elements prevents the two fieldset elements from joining.To circumvent this problem we can use some negative margin on the bottom of each fieldset. This will “pull” up the lower fieldset so that it overlaps the upper fieldset, making it look like they’re touching.
To prevent the bottom fieldset from overlapping any form elements, we should also add a bit of padding to the bottom of the fieldset elements so that they’ve got some space to move into:
fieldset {
float: left;
clear: both;
width: 100%;
margin: 0 0 -1em 0;
padding: 0 0 1em 0;
border: 1px solid #BFBAB0;
background-color: #F2EFE9;
}
Moving the fieldsets up by 1em is enough to cover the gap between them, and the bottom-padding of 1em counteracts the movement, making sure no form elements disappear beneath fieldset elements.
A couple of visual tweaks are necessary when removing the whitespace. Without contact between the fieldset background color and the normal page background color, we no longer need the gradient background image, so this has been left out.
The border-style has also been changed — we’re removing all borders, then replacing only the top border:
fieldset {
float: left;
clear: both;
width: 100%;
margin: 0 0 -1em 0;
padding: 0 0 1em 0;
border-style: none;
border-top: 1px solid #BFBAB0;
background-color: #F2EFE9;
}
With all the fieldset elements being joined together, the extra borders on the left and right make the form look cluttered. With just a top border, we’ve created a much cleaner look, as shown in Figure 20.
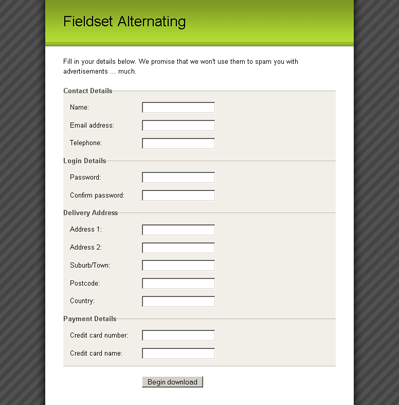 Figure 20: Joined fieldset elements
The other side effect of joining the fieldset elements together is that the legend now looks out of place, balancing in between either fieldset. The way to solve this problem is to bring the legend fully within the boundaries of its fieldset.
Instinctively, you might use relative or absolute positioning on the legend to move it down into the fieldset. However, Firefox resists any attempt to reposition the legend — it just doesn’t move.
Unfortunately, the only way around this issue is to add a tiny bit more markup to our form. By inserting a superfluous span into each of our legend elements, Firefox allows us to style this and move the text down into the fieldset:
fieldset-alternating.html (excerpt)
<legend>
<span>Contact Details</span>

</legend>
That span can be positioned absolutely and moved down into the fieldset using margin-top. While we’re at it, let’s also increase the font-size of the legend text, to give it a bit more prominence:
fieldset-alternating.css (excerpt)
legend span {
position: absolute;
margin-top: 0.5em;

font-size: 135%;
}
There’s actually an esoteric bug in some point releases of Firefox (Firefox 1.5.0.6 on Windows XP, but not OSX, from what I’ve seen) that makes the absolutely positioned span elements behave as if they were all positioned at the top of the form element. Giving the legend elements a position of relative doesn’t seem to affect the span elements, so we actually need to relatively position each of the fieldset elements and give the span elements some explicit coordinates to sidestep this bug:
fieldset-alternating.css (excerpt)
fieldset {
position: relative;
float: left;

clear: both;
width: 100%;
margin: 0 0 -1em 0;
padding: 0 0 1em 0;
border-style: none;

border-top: 1px solid #BFBAB0;
background-color: #F2EFE9;
}
legend span {
position: absolute;

left: 0.74em;
top: 0;
margin-top: 0.5em;
font-size: 135%;
}
The 0.74em value of left actually matches the 1em padding we gave to the ordered list, due to the fact that the span has a larger font-size.
Because we’re now specifying a left ordinate for the span, we also have to take the margin-left off its parent legend, so that we don’t get a doubling of the spacing. Simply omit the margin rule that we used previously:
fieldset-alternating.css (excerpt)
legend {
padding: 0;
color: #545351;
font-weight: bold;

}
That bug’s now squashed!
As we’re moving the legend down into the fieldset, we need to make sure that the legend won’t overlap any of the form elements, so let’s add a bit more padding to the top of our ordered list:
fieldset-alternating.css (excerpt)
fieldset ol {
padding: 3.5em 1em 0 1em;
list-style: none;

}
Don’t forget to change the matching value inside our Internet Explorer-only style sheet:
fieldset-alternating-ie.css (excerpt)
legend span {
margin-top: 1.25em;

}
fieldset ol {
padding-top: 3.25em;
}
Internet Explorer has slightly different spacing on the legend element’s span, so let’s tweak the margin-top value for that as well.
After all these changes, there’s one fieldset that looks a little out-of-place: the submit fieldset. Because the submit fieldset doesn’t have a legend, the submit button will be moved up too high, so we need to push it down a bit. This is done most easily by adding some padding to the top of this fieldset only. Also, because the submit fieldset will overlap the fieldset above it, we need to provide a solid background-color for the submit fieldset, otherwise the previous fieldset’s background-color will show through. This means changing the background-color value from transparent to whatever your normal page background-color is:
fieldset-alternating.css (excerpt)
fieldset.submit {
float: none;
width: auto;

padding-top: 1.5em;
padding-left: 12em;
background-color: #FFFFFF;
}
Previously, we also removed borders from the submit fieldset, but for this adjoining layout we need the submit fieldset to retain the top border that’s applied to all fieldset elements. We’ll just let that rule cascade into the submit fieldset without interference.
Once we’ve implemented all those changes, the layout of the form is complete. The form appears as shown in Figure 21, but it requires some slight aesthetic tweaks.
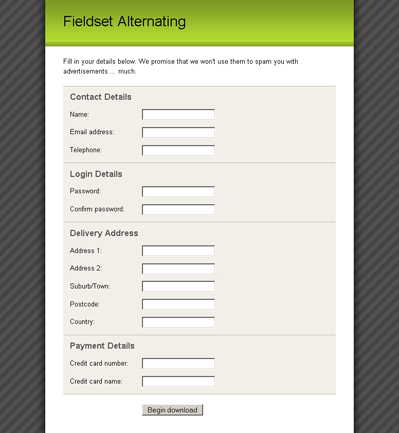 Figure 21: All fieldset elements joined and legend elements moved inside boxes
Because we’ve pushed all the fieldset elements together, they tend to run into one another visually. Better distinction can be created between each fieldset by subtle alternation of the background-color elements in odd and even fieldset elements. The only cross-browser method for achieving this is to add in a new class for every second fieldset. This allows us to use a CSS selector to give those fieldset elements a different background-color. I normally use a class of alt, but you can use whatever you think is logical:
<fieldset>
...
</fieldset>
<fieldset class="alt">

...
</fieldset>
<fieldset>
...

</fieldset>
<fieldset class="alt">
...
</fieldset>

...
Then all you have to do is think of a different background-color:
fieldset-alternating.css (excerpt)
fieldset.alt {
background-color: #E6E3DD;

}
And our final form with alternating fieldset elements looks like Figure 22!
Frequently Asked Questions about Fancy Form Design with CSS
How can I add a border to my form using CSS?
Adding a border to your form can be done using the CSS ‘border’ property. You can specify the width, style, and color of the border. For example, to add a 1px solid black border, you would use the following code:form {
border: 1px solid black;}
This code will apply a border to all form elements on your page. If you want to target a specific form, you can use a class or id.
How can I style individual form fields?
You can style individual form fields by targeting the specific input type in your CSS. For example, to style text input fields, you can use the following code:input[type="text"] {
/* your styles here */}
You can replace “text” with the type of input field you want to style (e.g., “email”, “password”, etc.).
How can I change the border color when a form field is focused?
You can change the border color of a form field when it’s focused using the ‘:focus’ pseudo-class. Here’s an example:input:focus {
border-color: blue;}
This code will change the border color to blue when an input field is focused.
How can I add padding to my form fields?
You can add padding to your form fields using the ‘padding’ property in CSS. For example, to add 10px of padding, you can use the following code:input {
padding: 10px;}
This will add 10px of padding to all sides of your input fields.
How can I style the submit button in my form?
You can style the submit button by targeting ‘input[type=”submit”]’ in your CSS. You can then apply any styles you want, such as changing the background color, adding a border, changing the font color, etc. Here’s an example:input[type="submit"] {
background-color: blue;
color: white;
border: none;
padding: 10px 20px;}
This code will make the submit button blue with white text, remove the default border, and add some padding.
How can I align my form fields horizontally?
You can align your form fields horizontally by using the ‘display’ property in CSS. By setting this property to ‘flex’, your form fields will be displayed in a row instead of a column. Here’s an example:form {
display: flex;}
This code will align all form fields in a row.
How can I add a background color to my form?
You can add a background color to your form using the ‘background-color’ property in CSS. For example, to make the background color of your form light grey, you can use the following code:form {
background-color: #f2f2f2;}
This code will apply a light grey background color to your form.
How can I add a border radius to my form fields?
You can add a border radius to your form fields using the ‘border-radius’ property in CSS. This will make the corners of your form fields rounded. Here’s an example:input {
border-radius: 5px;}
This code will apply a 5px border radius to all input fields, making the corners slightly rounded.
How can I change the font size in my form fields?
You can change the font size in your form fields using the ‘font-size’ property in CSS. For example, to set the font size to 16px, you can use the following code:input {
font-size: 16px;}
This code will set the font size of all input fields to 16px.
How can I add a hover effect to my submit button?
You can add a hover effect to your submit button using the ‘:hover’ pseudo-class in CSS. For example, to change the background color of the button when it’s hovered over, you can use the following code:input[type="submit"]:hover {
background-color: darkblue;}
This code will change the background color of the submit button to dark blue when it’s hovered over.
 Cameron Adams
Cameron has been adding to the Internet for over seven years and now runs his own design and development business: www.themaninblue.com. He likes to combine the aesthetic with the technological on his Weblog, which contains equal parts of JavaScript, design and CSS.