jQuery was built to animate. Whether it’s fading out a warning message after a failed login, sliding down a menu control, or even powering a complete side-scrolling, “shoot ’em up” game—it’s all a snap with some powerful built-in methods, augmented with an extensive array of plugins.
Animating CSS Properties
We have mastered some valuable examples of animation so far—sliding, fading, and some fancy hiding and showing—but we haven’t had a lot of control over what exactly is animated and exactly how it happens. It’s time to introduce a very exciting jQuery function, helpfully called animate, which lets you animate a whole host of CSS properties to fashion some striking effects of your own. Let’s have a look at an example of animate in action:
$('p').animate({
  padding: '20px',
  fontSize: '30px'
}, 2000);animate, we pass an object literal containing the properties we would like to animate specified as key/value pairs—much the same as when you assign multiple properties with the css function. There’s one caveat that you’ll need to remember: property names must be camel-cased in order to be used by the animate function; that is to say, you’ll need to write backgroundColor instead of background-color, and marginLeft instead of margin-left. Any property name made up of multiple words needs to be modified in this way.
You can pass a number of milliseconds, or one of the strings slow, fast, or normal. Values for CSS properties can be set in pixels, ems, percentages, or points. For example, you could write 100px, 10em, 50%, or 16pt.
Even more excitingly, the values you define can be relative to the element’s current values: all you need to do is specify += or -= in front of the value, and that value will be added to or subtracted from the element’s current property. Let’s use this ability to make our navigation menu swing as we pass our mouse over the menu items using the hover function:
$('#navigation li').hover(function() {
  $(this).animate({paddingLeft: '+=15px'}, 200);
}, function() {
  $(this).animate({paddingLeft: '-=15px'}, 200);
});animate to achieve fine-grained control over showing, hiding, and toggling functions. We simply specify a property’s animation value as show, hide, or toggle rather than a numeric amount:
$('#disclaimer').animate({
  opacity: 'hide',
  height: 'hide'
}, 'slow');animate function also has some powerful advanced options, which we’ll examine in detail over the course of this chapter.
Color Animation
Once you realize how cool the animate function is, you’ll probably want to animate an element’s color. However, animating color is a little bit tricky, because the color values “in between” the start and end colors need to be calculated in a special way. Unlike a height or width value that moves from one value to another in a simple, linear manner, jQuery needs to do some extra math to figure out what color is, say, three-quarters of the way between light blue and orange.
This color-calculating functionality is omitted from the core library. This makes sense when you think about it: most projects have no need for this functionality, so jQuery can keep the size of the core library to a minimum. If you want to animate color, you’re going to need to download the Color Animations plugin.
Using Plugins
The official jQuery plugin repository contains an ever-increasing number of plugins—some more useful than others. You can search for plugins by name, category (such as effects or utilities), or by the rating it’s received from the jQuery community.
Once you’ve found a plugin you’re interested in, download it to a suitable location for your project (most likely the same place as your jQuery source file). It’s a good idea to peruse the readme file or related documentation before you use a plugin, but generally all you need to do is include it in your HTML files, in much the same way as we’ve been including our custom JavaScript file.
How you make use of your newfound functionality varies from plugin to plugin, so you’ll have to consult each plugin’s documentation to put it to the best use.
After downloading and including the Color Animations plugin, you can now animate color properties in your jQuery animation code, just as you would other CSS properties. Let’s gradually highlight our disclaimer message over a period of two seconds as the page loads, to make sure no one misses it:
$('#disclaimer').animate({'backgroundColor':'#ff9f5f'}, 2000);linear and swing. Any time you use an animation function in jQuery, you can specify either of these parameters to control the animation’s easing. The difference between them can be seen in the figure below, which shows how a property is adjusted over the period of an animation depending on which easing option you select.
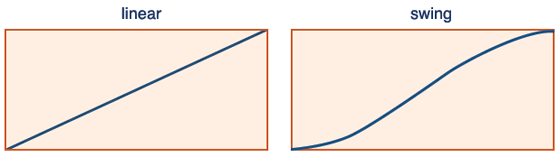
swing easing starts off slowly before gaining speed, then towards the end of the animation it slows down again, nice and gently. Visually, swing easing looks far more natural than linear easing, and jQuery uses it by default if no easing parameter is specified.
The linear easing method has no acceleration or deceleration: animations occur at a constant rate. It looks fairly boring and a bit rigid in most circumstances, but it’s worth giving it a try—it might just be appropriate for your purposes.
As an example, we’ll animate the first paragraph tag so that when clicked, it grows and shrinks; we’ll use linear easing as it grows, and swing easing as it shrinks. The difference is quite subtle, but if you repeat the animations a few times you should be able to distinguish between them; the shrinking animation feels a little bit more natural:
$('p:first').toggle(function() {
  $(this).animate({'height':'+=150px'}, 1000, 'linear');
}, function() {
  $(this).animate({'height':'-=150px'}, 1000, 'swing');
});- We use a filter with a selector to grab only the first paragraph tag.
- A toggle event handler (which executes each passed function on successive clicks) is attached to the paragraph.
- Inside the handlers we select
this, which refers to the element that triggered the event (in our example, it’s the paragraph itself). - The first handler uses the += format to grow the paragraph’s height by 150 pixels, using the
lineareasing function. - The second handler uses the -= format to shrink the paragraph’s height by 150 pixels, using the
swingeasing function.
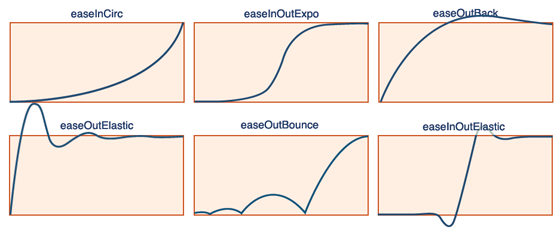 To use one of the new algorithms, we just need to pass its name to our
 animate function. There are lots to choose from, so we might as well jump straight into it and try a few different ones:
$('p:first').animate({height: '+=300px'}, 2000, 'easeOutBounce');
$('p:first').animate({height: '-=300px'}, 2000, 'easeInOutExpo');
$('p:first').animate({height: 'hide'}, 2000, 'easeOutCirc');
$('p:first').animate({height: 'show'}, 2000, 'easeOutElastic');animate function will cement your knowledge of it: it’s an important part of a jQuery ninja’s arsenal!
Bouncy Content Panes
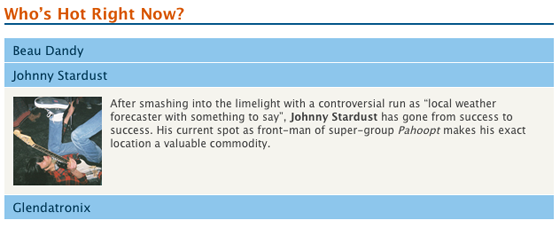
Now that we’ve learned a bit about how the animate function works, let’s have a look at a client’s latest round of requests. Today’s to-do list includes the addition of a vitally important page component: the StarTrackr! Daily “Who’s Hot Right Now?” List (or the SDWHRNL for short). The list consists of the latest celebrities to fall in or out of favor, along with an accompanying photo and brief bio. We’ll apply some of the animation and easing techniques we’ve just learned to implement the list as panes that can be opened and closed independently.
The appearance of the widget in the page is shown below.
 In our HTML, we’ll implement the section as a
 div element containing all of our celebrities. Each celebrity’s pane will be marked up as an h3, followed by another div containing an image and a short paragraph:
<div id="bio">
  <h2>Who’s Hot Right Now?</h2>

  <h3>Beau Dandy</h3>
  <div>
    <img src="../images/beau_100.jpg" width="100"
      height="100" alt="Beau Dandy"/>
    <p>Content about Beau Dandy</p>
  </div>

  <h3>Johnny Stardust</h3>
  <div>
    <img src="../images/johnny_100.jpg" width="100"
      height="100" alt="Johny Stardust"/>
    <p>Content about Johny Stardust</p>
  </div>

  <h3>Glendatronix</h3>
  <div>
    <img src="../images/glenda_100.jpg" width="100"
      height="100" alt="Glendatronix"/>
    <p>Content about Glendatronix</p>
  </div>
</div>$('#bio > div').hide();:first filter and call the show action to reveal only the first pane:
$('#bio > div:first').show();div elements underneath the bio div element, even if they were nested inside other elements. For more details and code examples using this selector, feel free to look it up in the jQuery API documentation.
Now that our content is marked up the way we want it, we simply need to add some jQuery interaction magic to it. To reveal our secret content we’ll take the familiar approach of capturing the click event, finding the next element (which contains our content), and showing it. But this time, we’ll employ a touch of “bounce,” easing to the content’s height so that the panes bounce in and out of view:
$('#bio h3').click(function() {
  $(this).next().animate(
    {'height':'toggle'}, 'slow', 'easeOutBounce'
  );
});Frequently Asked Questions (FAQs) about Animating with jQuery
How can I add an easing effect to my animation in jQuery?
Easing effects can be added to animations in jQuery to make them more visually appealing. To add an easing effect, you need to specify it as a parameter in the .animate() method. jQuery comes with two built-in easing methods: ‘swing’ and ‘linear’. However, you can add more easing effects by including the jQuery UI library in your project. Here’s an example of how to add an easing effect:$("div").animate({left: '250px'}, 500, 'swing');
In this example, ‘swing’ is the easing effect applied to the animation.
What is the difference between ‘swing’ and ‘linear’ easing in jQuery?
The ‘swing’ and ‘linear’ easing methods in jQuery define the speed at which an animation progresses at different points. In ‘linear’ easing, the animation progresses at a constant speed from start to end. On the other hand, ‘swing’ easing starts and ends slowly but accelerates in the middle. The choice between ‘swing’ and ‘linear’ depends on the visual effect you want to achieve.
How can I stop an animation in jQuery?
You can stop an animation in jQuery using the .stop() method. This method stops the currently running animation on the selected element. Here’s an example:$("div").stop();
In this example, the animation on the div element will be stopped.
Can I animate multiple CSS properties at once in jQuery?
Yes, you can animate multiple CSS properties at once in jQuery. You just need to include them in the properties object passed to the .animate() method. Here’s an example:$("div").animate({
left: '250px',
opacity: '0.5',
height: '150px',
width: '150px'});
In this example, the div element will move to the left, its opacity will decrease, and its height and width will increase simultaneously.
How can I chain multiple animations in jQuery?
You can chain multiple animations in jQuery by simply calling multiple .animate() methods one after the other. Here’s an example:$("div").animate({left: '250px'}).animate({top: '250px'});
In this example, the div element will first move to the left and then move down.
Can I use jQuery to animate colors?
By default, jQuery does not support color animations. However, you can use the jQuery Color plugin to animate colors. Once you’ve included the plugin in your project, you can animate colors just like any other CSS property.
How can I make an animation repeat indefinitely in jQuery?
To make an animation repeat indefinitely in jQuery, you can use a recursive function that calls itself at the end of the animation. Here’s an example:function animateDiv() {
$("div").animate({left: '250px'}, "slow", function() {
$("div").animate({left: '0px'}, "slow", animateDiv);
});}animateDiv();
In this example, the div element will move to the left and then back to its original position repeatedly.
Can I animate elements in a specific order in jQuery?
Yes, you can animate elements in a specific order in jQuery using the .queue() method. This method allows you to create a queue of functions that will be executed in order on the selected element.
How can I delay an animation in jQuery?
You can delay an animation in jQuery using the .delay() method. This method delays the execution of subsequent items in the queue. Here’s an example:$("div").delay(500).animate({left: '250px'});
In this example, the animation will start after a delay of 500 milliseconds.
Can I use jQuery to animate a background image?
By default, jQuery does not support background image animations. However, you can use plugins like jQuery Backstretch to achieve this. Once you’ve included the plugin in your project, you can animate background images just like any other CSS property.
 Earle Castledine
Sporting a Masters in Information Technology and a lifetime of experience on the Web of Hard Knocks, Earle Castledine (aka Mr Speaker) holds an interest in everything computery. Raised in the wild by various 8-bit home computers, he settled in the Internet during the mid-nineties and has been living and working there ever since. As co-creator of the client-side opus TurnTubelist, as well as countless web-based experiments, Earle recognizes the Internet not as a lubricant for social change but as a vehicle for unleashing frivolous ECMAScript gadgets and interesting time-wasting technologies.