
SvelteKit is an officially supported framework, built around Svelte. It adds key features to a Svelte app — such as routing, layouts and server-side rendering — and makes frontend development outrageously simple.
In this tutorial, we’ll take a beginner-friendly look at both Svelte and SvelteKit and build out a simple web app showing profile pages of imaginary users. Along the way, we’ll look at all the main features that SvelteKit has to offer.
Key Takeaways
The Benefits of Working with Svelte
Svelte is growing in popularity, and that’s for a good reason. Developing apps with Svelte is based on writing reusable and self-contained components — similar to other popular JavaScript frameworks such as React.
The big difference comes with its build-time compilation — as opposed to a run-time interpretation of the code. In other words, Svelte already compiles our code during the build process and the final bundle only contains JavaScript that our application actually needs. This results in fast web apps with small bundle sizes.
Other frameworks only parse and bundle up the code we’ve written, essentially taking the component tree as is and shipping it to the client. In order for the browser to be able to interpret it and update the UI, a lot more code needs to be delivered and additional work is done on the client side. (You can read here how React handles this process under the hood.)
Other than that, Svelte is an ideal framework for beginners. Everyone who knows how to write HTML and how to include <style> and <script> tags with basic JavaScript and CSS can already start writing Svelte components.
So, Why Do I Need SvelteKit?
While Svelte alone gives us a very good development experience, we still have to decide how we want to ship our application to the user. The classical approach would be to take our favorite module bundler like webpack or Rollup and bundle our code into one big, fat JavaScript file. Then, we’d call it from a very basic HTML document, like so:
<!DOCTYPE html>
<html>
  <head>
    <meta charset="UTF-8" />
    ...
  </head>

  <body>
    <!-- the entry point of our application -->
    <div id="app" />
    <!-- load the JavaScript that takes care of the rest -->
    <script src="dist/bundle.js"></script>
  </body>
</html>
While this is absolutely legit, the user’s experience might not be ideal. There are many touchpoints for improvement and this is where SvelteKit comes into play.
First of all, instead of serving an almost empty HTML file to the client, SvelteKit already comes with all the HTML elements we need for the first page view. The benefits are faster page loads and SEO boosts. There are two ways SvelteKit does this: prerendering and server-side rendering. I’ll explain both in more detail below. What stays the same is that, once the JavaScript has been loaded, it takes over and enables typical features of a single page application, like client-side routing. It’s worth noting that we can also tell SvelteKit to omit the first render on the server and behave like a classical single page application. The framework is very versatile.
The second obvious difference between SvelteKit and a classical single JavaScript bundle is code-splitting. Instead of serving the entire app in one single JavaScript file, SvelteKit splits the code into separate, smaller chunks. Each chunk represents a route of our application. For example, everything that needs to be fetched for the /home and for the /about routes will be loaded once the user actually needs it — or a little bit earlier if we make use of SvelteKit’s prefetching functionality (like we’ll do below).
Another outstanding benefit of SvelteKit is that we can decide which deployment environment our app is going to run in. Nowadays, frontend developers have a variety of different platforms where applications can run. There are hosting providers for simple static files, more advanced serverless options such as Vercel, or server environments where Node servers can be executed, and so on. With tiny plugins called adapters, we tell SvelteKit to optimize our output for a specific platform. This greatly facilitates app deployment.
However, the biggest advantage SvelteKit has to offer is its ease of use. Of course, we can manually set up our build process from scratch with all these features, but this can be tedious and frustrating. SvelteKit makes it as easy as possible for us, and the best way to experience this is by actually using it.
This is why we’ll create a simple web app showing profile pages of made-up users. And along the way, we’ll look at all the features I’ve mentioned above in more detail.
Prerequisites
No previous knowledge is required, although some experience with Svelte might be helpful. The article Meet Svelte 3, a Powerful, Even Radical JavaScript Framework provides a good introduction.
To work with SvelteKit, we’ll need a working version of Node on our system. We can install it using the Node Version Manager (nvm). (You can find some setup instructions here.)
You can find all the code for this tutorial on GitHub.
Getting Started
To begin with, we initiate a new SvelteKit project. Execute the following commands in the terminal:
npm init svelte@latest svelteKit-example-app
We’ll be asked a few questions so that we can customize our project. For our purposes, answer the following:
- Which Svelte app template? -> SvelteKit demo app
- Use TypeScript components -> no
- Anything else? -> no
This will load a SvelteKit development environment, including a functional example application.
In our project route there are now some configuration files: our package.json, the static folder, and the src folder. We’ll be working mainly inside the src folder. It has the following structure:
src
├── app.html
├── lib
│   ├── images
│   │   └── (various images ..)
└── routes
    ├── +layout.svelte
    ├── +page.js
    ├── +page.svelte
    ├── Counter.svelte
    ├── Header.svelte
    ├── styles.css
    ├── about
    │   ├── +page.js
    │   └── +page.svelte
    └── sverdle
        ├── +page.server.js
        ├── +page.svelte
        ├── game.js
        ├── reduced-motion.js
        ├── words.server.js
        └── how-to-play
            ├── +page.js
            └── +page.svelte
The /src/app.html file is our app-shell — a minimal HTML page where our rendered HTML will be inserted and our bundle files linked from. Usually we don’t have to touch this file. We can insert some app-wide meta tags if we want to, but this isn’t necessary — as we’ll see in a moment.
The /src/routes folder is the heart of our application. Any files inside that have a + prefix are special to SvelteKit. To create a new page, we create a Svelte component named +page.svelte. The folders leading up to this file make up the URL path. For example, /src/routes/test/+page.svelte would be served under the URL /test.
Svelte components can have child components. For example, the route component /src/routes/test/+page.svelte might import a component named Button.svelte. Because all files without a + prefix have no meaning to SvelteKit, we can place these components right next to their routes, resulting in nice colocation. If we have components or utilities that are reused in a lot of places, we should put them in the /src/lib folder.
Let’s see how all this works in action. Change into the newly created directory, then install the dependencies and start the app in development mode:
cd svelteKit-example-app
npm install
npm run dev -- --open
This will open the preexisting example app in a new browser tab. Click through the app and assure yourself it’s working.
Some preparation
As polished as the demo app is, it contains a bunch of files that we won’t need. Let’s get rid of those.
Delete the contents of the lib folder:
rm src/lib/*
Delete the routes/sverdle folder:
rm -rf src/routes/sverdle
Delete the counter and header component:
rm -rf src/routes/Counter.svelte
rm -rf src/routes/Header.svelte
We can do without the demo app’s styling. In the root of the routes folder, open styles.css and replace the contents with the following:
:root {
  font-family: -apple-system, BlinkMacSystemFont, 'Segoe UI', Roboto, Oxygen, Ubuntu, Cantarell,
    'Open Sans', 'Helvetica Neue', sans-serif;
}
body {
  margin: 0;
}
Finally, open src/routes/+page.svelte and replace the contents with the following:
<main>
  <h1>HOME</h1>
</main>
With that done, let’s get to building out our demo.
Layouts and Client-side Routing
As mentioned above, every +page.svelte component in the routes folder defines one route. But what about code that should apply to many pages at once? For this, we have the layout component, named +layout.svelte. This component contains code that applies to every page next to it and below it.
Let’s open the existing /src/routes/+layout.svelte file. All it does for now is import some app-wide CSS code, provide navigation and a <slot> element that wraps the rest of the application. Let’s replace the content with the following:
<script>
  import './styles.css';
</script>

<svelte:head>
  <meta name="robots" content="noindex" />
</svelte:head>

<nav>
  <a href=".">HOME</a>
  <a href="/about">ABOUT</a>
</nav>

<slot />

<style>
  nav {
    padding: 1rem;
    box-shadow: -1px 1px 11px 4px #898989;
  }
  a {
    text-decoration: none;
    color: gray;
    margin-right: 1rem;
  }
</style>
Note: if you want to have syntax highlighting for Svelte files, there are extensions you can install. This one is good for VS Code.
In this example, we used the <svelte:head> element to define meta tags that will be inserted in the <head> of our document. Since we did this in the layout component at the root, it will be applied to the entire app. The robots tag is just an example.
Furthermore, we created a navbar. This is a typical use case for the layout component, as it’s usually intended to be shown on every page of our application.
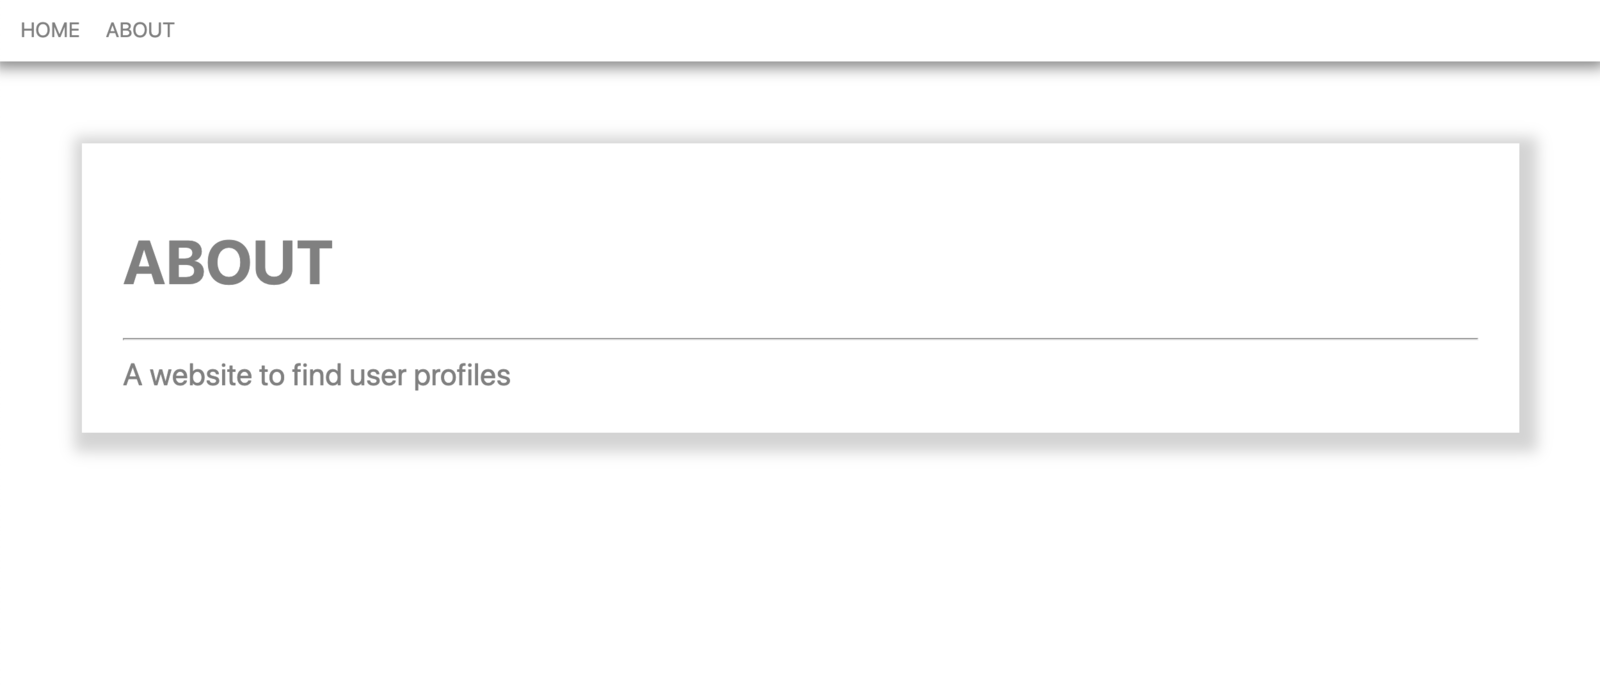
The navbar has two links: one to the root of the application — which already has content served by the /src/routes/+page.svelte component — and one to the about page. The about page was also created by the demo app. Open it and replace its content with the following:
<main>
  <h1>ABOUT</h1>
  <hr />
  <div>A website to find user profiles</div>
</main>

<style>
  main {
    font-size: 1.5rem;
    margin: 4rem;
    padding: 2rem;
    color: gray;
    justify-content: center;
    box-shadow: 4px 5px 11px 10px lightgray;
  }
</style>
This page is pretty basic. We included some HTML and applied some styling.
Let’s go back to the browser and navigate to the new page. Our modifications should already be visible and we should see something like what’s pictured below.
Let’s navigate between the landing page and the about page. We’ll see that changing the page doesn’t refresh the entire application. The navigation feels smooth and instant. This is because SvelteKit applies Client-Side Routing out of the box. Although we used normal <a> tags in our navbar, SvelteKit identifies those as internal links and intercepts them using its built-in client router.
Static Pages and Prerendering
As noted above, SvelteKit uses the concept of adapters to build apps for different environments. Adapters are imported in the svelte.config.js file.
When we open this configuration file, we can see that our application currently uses the auto adapter. This will optimize the build output for certain deployment targets such as Vercel or Netlify and, by default, every page of our application will be rendered upon request by a Node server. However, this seems a little bit too much, considering the current state of our app. Also, we might not want to run a server for our application.
As our app doesn’t currently depend on any dynamic data, it could consist entirely of static files. And there’s an adapter-static that we can install, which turns SvelteKit into a static site generator. It would render our entire app into a collection of static files during the build process. However, this would prevent us from creating additional pages that depend on server-side rendering.
As we don’t want to turn all our pages into static files, we’ll make use of another SvelteKit feature which enables us to prerender individual files of our application. In our case, we’d like the about page to be prerendered, since it consists of static content and rendering the page on every request would be unnecessary. We can achieve this by adding the following code snippet to our /src/routes/about/+page.svelte page:
export const prerender = true;
We can test this out by switching the adapter to adapter-node. For this, we replace @sveltejs/adapter-auto with @sveltejs/adapter-node both in our package.json (also change the version to ^1.0.0) and our svelte.config.js. After installing it with npm install, run npm run build. This will generate a functioning Node server inside the /build folder. As you can see, there’s an HTML file /build/prerendered/about.html containing the prerendered HTML for the about page.
We can run the generated Node server with node build/index.js.
Endpoints
Now it’s time to fill our page with some dynamic content. We’ll adjust the landing page such that it shows a list of user avatars. To do so, we need to fetch a list of user information from an API endpoint. Most developing teams have a separate backend. That would be the place to go. However, SvelteKit makes it easy to turn our application full stack using endpoints by creating +server.js files. Since we have no backend, we’ll create such an endpoint.
Instead of using a real database, we’ll generate some mock user data. To do so, we’ll use the faker library. Let’s install it with npm install -D faker.
Now, create a file /src/routes/api/+server.js in a new /api folder. Since the file is called +server.js, it will be treated as an endpoint. The endpoint will become available under /api. Insert the following code:
import faker from 'faker';
import { json } from '@sveltejs/kit';

const generateCovers = () =>
  [...Array(50)].map(() => {
    const lastName = faker.name.lastName();
    return { avatar: `https://avatars.dicebear.com/api/human/${lastName}.svg`, lastName };
  });

export function GET() {
  return json(generateCovers());
}
This file exports a GET function. As you might already have guessed, it corresponds to the HTTP method GET. All it does is return a JSON object that holds an array of user data created with generateUsers.
The function generateUsers returns an array of 50 objects with properties lastName and avatar. lastName is generated using faker. avatar stores a URL that points to the free DiceBear Avatar API. It generates random avatars using a seed value, which in our case is lastName.
If we had a real database, we could replace generateUsers with something like findUsers and access the database inside this function.
That’s all it needs. Go back to the browser (make sure the app is still running in dev mode npm run dev) and navigate to http://localhost:5173/api. This will load the raw data. Note that creating an endpoint like we did is only necessary if we don’t have a separate backend API to fetch data.
Fetching Data with the load Function
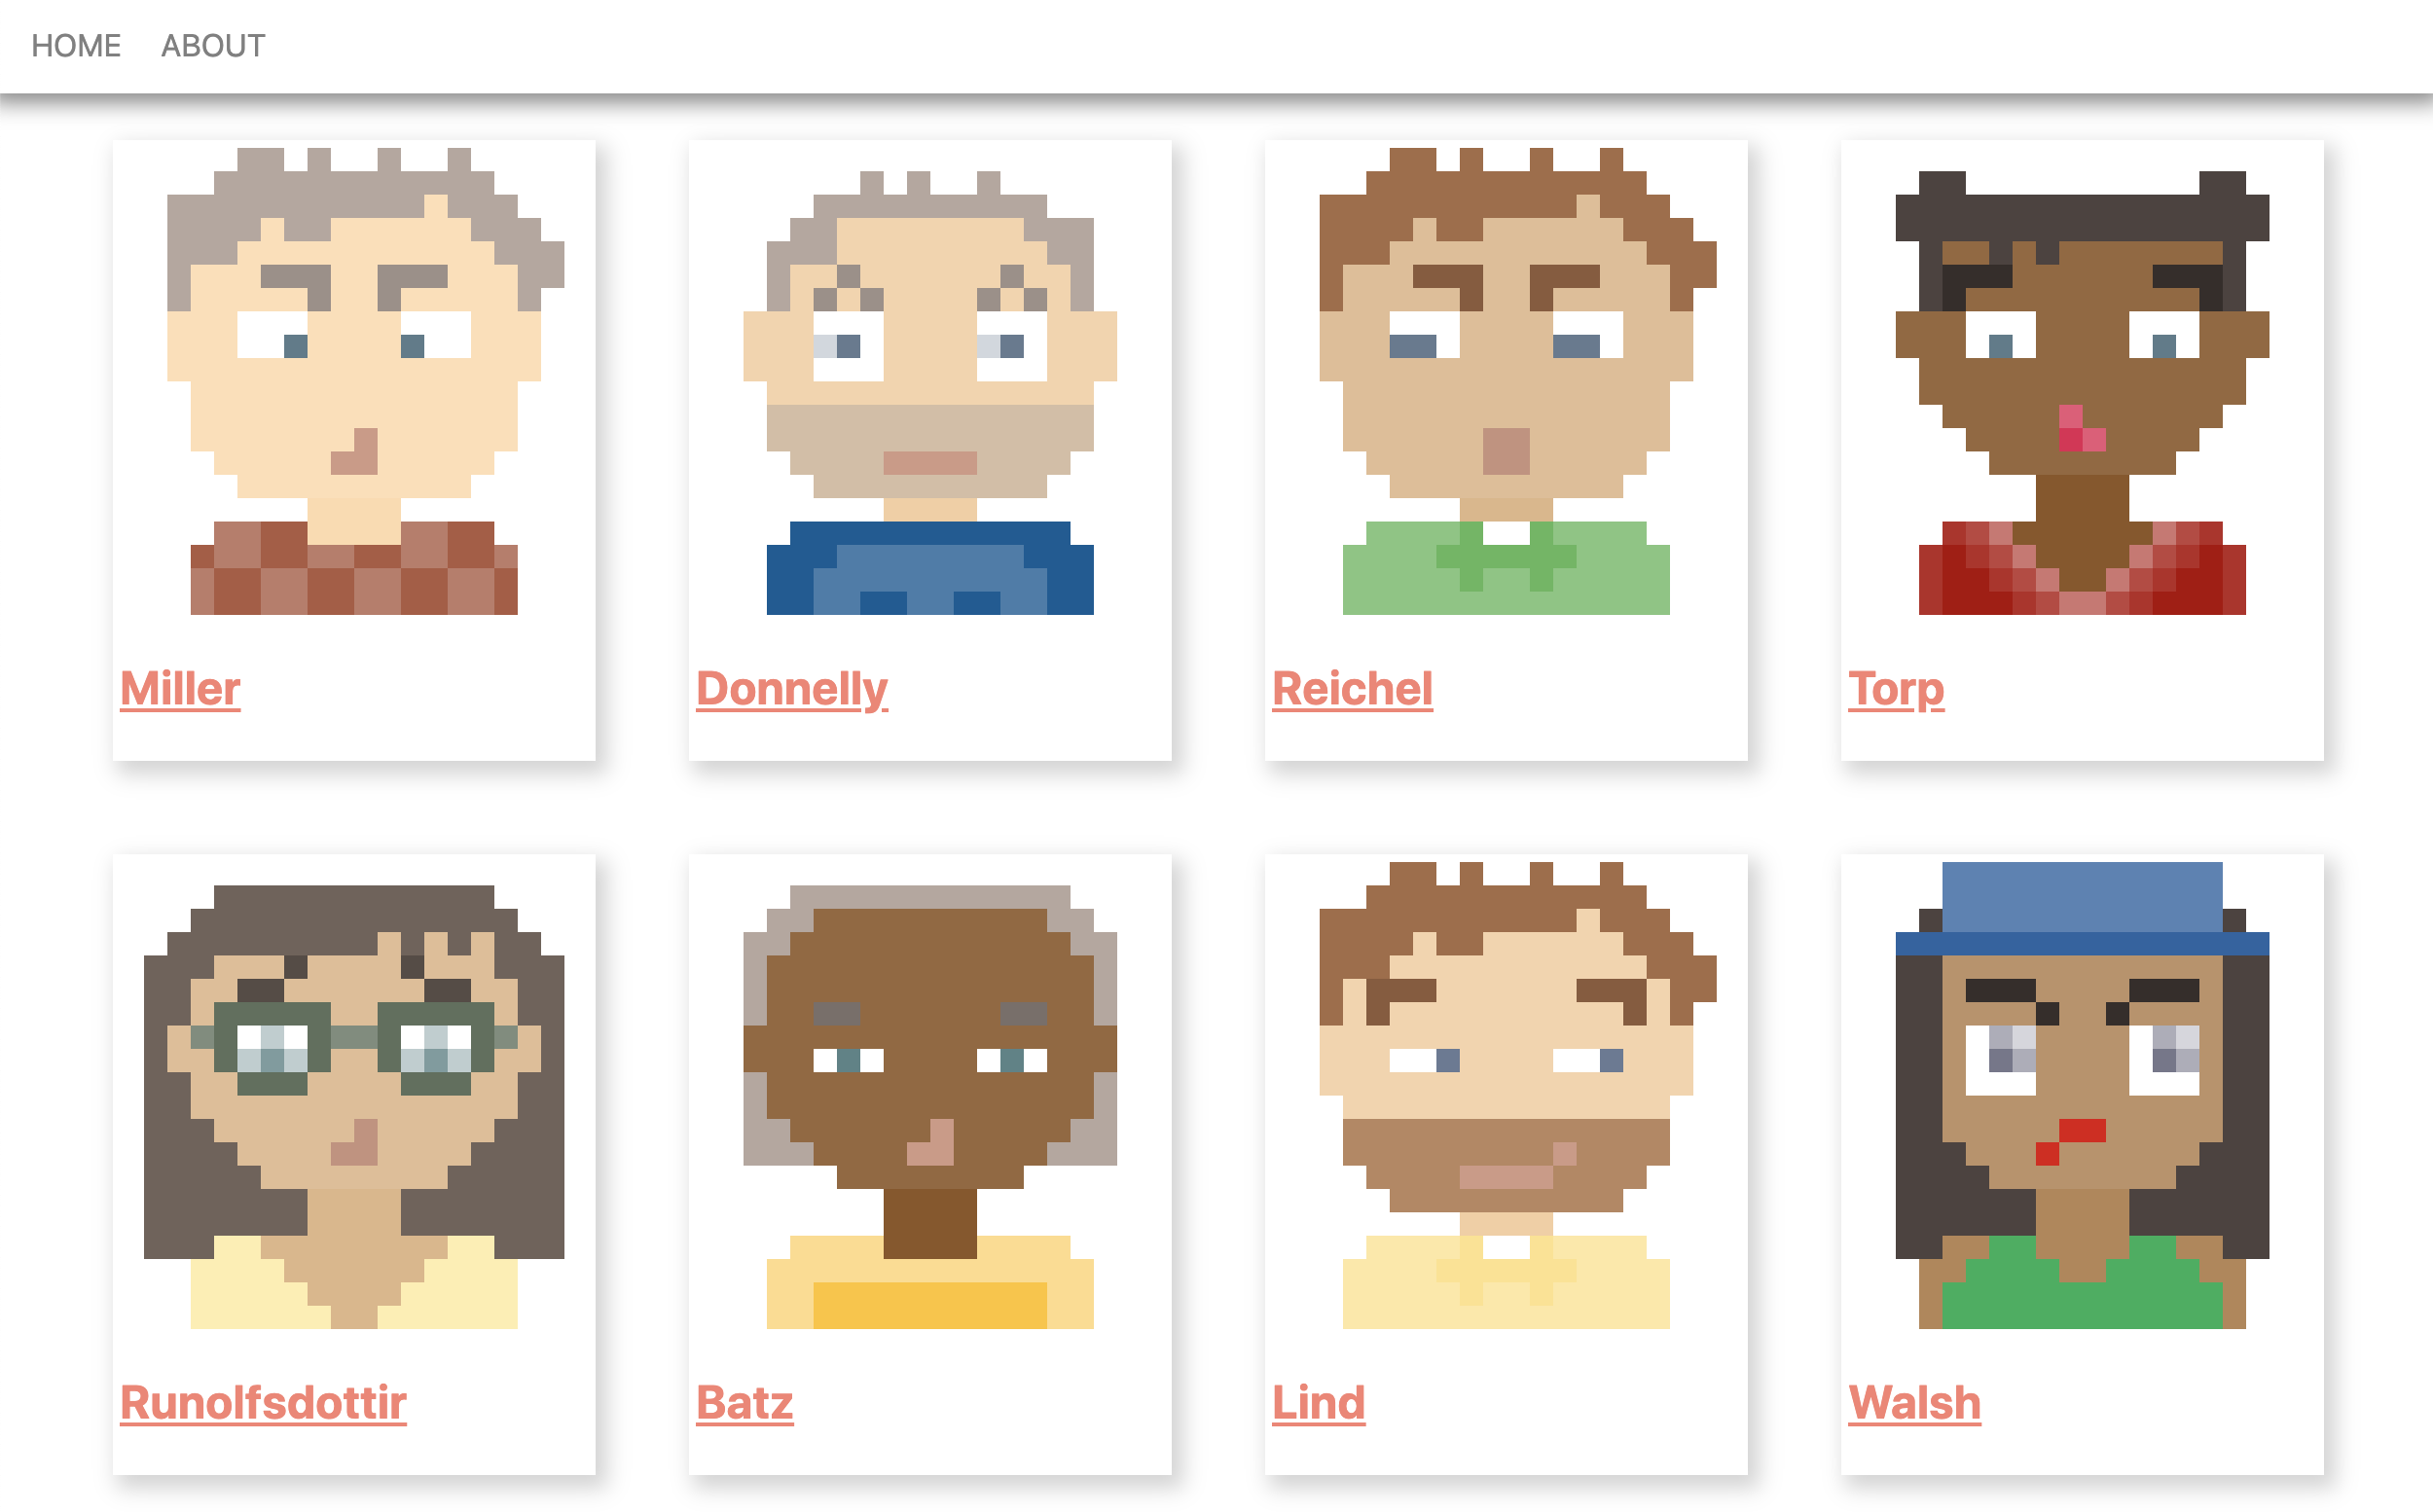
Next, we’ll use the new endpoint to display user data on our landing page. Open the existing /src/routes/+page.svelte page and replace its content with the following:
<script>
  export let data;
</script>

<main>
  {#each data.users as { avatar, lastName }}
    <a href={`/${lastName}`} class="box">
      <img src={avatar} alt={lastName} />
      <h2>{lastName}</h2>
    </a>
  {/each}
</main>

<style>
  main {
    display: flex;
    flex-wrap: wrap;
    justify-content: center;
  }
  .box {
    padding: 0.25rem;
    margin: 1.5rem;
    color: salmon;
    box-shadow: 4px 5px 11px 2px lightgray;
  }
  .box:hover {
    box-shadow: 4px 5px 11px 10px lightgray;
  }
  img {
    width: 15rem;
    object-fit: contain;
  }
</style>
The data property that the page receives is filled from the load function inside the sibling +page.js, which we’ll create next. Copy the following code into it:
import { error } from '@sveltejs/kit';

export async function load({ fetch }) {
  const res = await fetch('/api');

  if (res.ok) return { users: await res.json() };
  throw error(500);
}
The key challenge to fetching data for dynamic content on a page is that there are two ways a user can navigate to it. The first way is from external sources or after a page refresh. This would cause the application to be loaded from scratch and the page to be served by the server. The second way is from internal navigation, in which case the page would be served by the JavaScript bundle on the client side. In the former, the data is fetched by the server, while in the latter, it’s fetched by the client.
SvelteKit offers a very elegant solution for this — the load function. The load function inside a +page.js can run both on the client and on the server, and in both cases will be executed before the component renders.
load receives an object with a fetch property that we can use to fetch data. It behaves identically to the native fetch API. In this example, we use our new endpoint /api to fetch the array of user objects. To pass this data to our component, we return an object with the users property, which stores our user array.
If we had a separate backend API, instead of fetching data from our /api endpoint, we would fetch it within the load function from the backend.
In case load runs on the server, the client will realize that the data has already been fetched and will not make an additional request.
We’ve returned an object from the load function; now we need to retrieve it inside +page.svelte somehow. SvelteKit hands this object to the data prop, so we can access it with export let data inside a <script> tag. This is what we do to access our users.
Next, we visualize all our 50 users using the #each syntax that we know from Svelte. Inside the each block, we have access to a user’s avatar and lastName properties. We use avatar as the value for the src attribute of an <img> tag.
Now our landing page should look like the image below.
So far, we’ve created an endpoint to simulate a database and used load in +page.js to retrieve data from it. The advantage is that we now have an API to access directly through /api, and we can also use the data from it within our same app to visualize it on our landing page. What if we don’t need a standalone /api endpoint, though? What if that data from the server is only meant to be used on that landing page?
In this case, SvelteKit can simplify things greatly for us by providing the data for a page through a load function, inside a +page.server.js file instead of a +page.js file. The additional .server in the file means that this load function always runs on the server. This means we can access our database or similar directly inside it. SvelteKit will wire everything up so that we don’t need to change anything on the consumer side in +page.svelte. On initial server-side rendering, it will execute the load function before returning the HTML, and on client navigation it will do a fetch request under the hood. Let’s use this approach for our next page!
Dynamic Parameters
Each user box on our landing page is an internal link with a /[lastName] route. This is where dynamic parameters come into play. Under the /[lastName] route, we’ll display additional information for the respective user.
Create a new /src/routes/[lastName]/+page.server.js file with the following content:
import faker from 'faker';

export async function load({ params }) {
  const { lastName } = params;

  return {
    user: {
      lastName,
      firstName: faker.name.firstName(),
      avatar: `https://avatars.dicebear.com/api/human/${lastName}.svg`,
      title: faker.name.title(),
      phone: faker.phone.phoneNumber(),
      email: faker.internet.email()
    }
  };
}
Notice the dynamic parameter [lastName] in the folder name. We can access this parameter from the params property of the load function. We use it to return the correct values for lastName and avatar in the response. Since we’re inside a +page.server.js file that always runs on the server, we generate some additional mock data for this user with faker directly inside the load function; no need for an additional API endpoint!
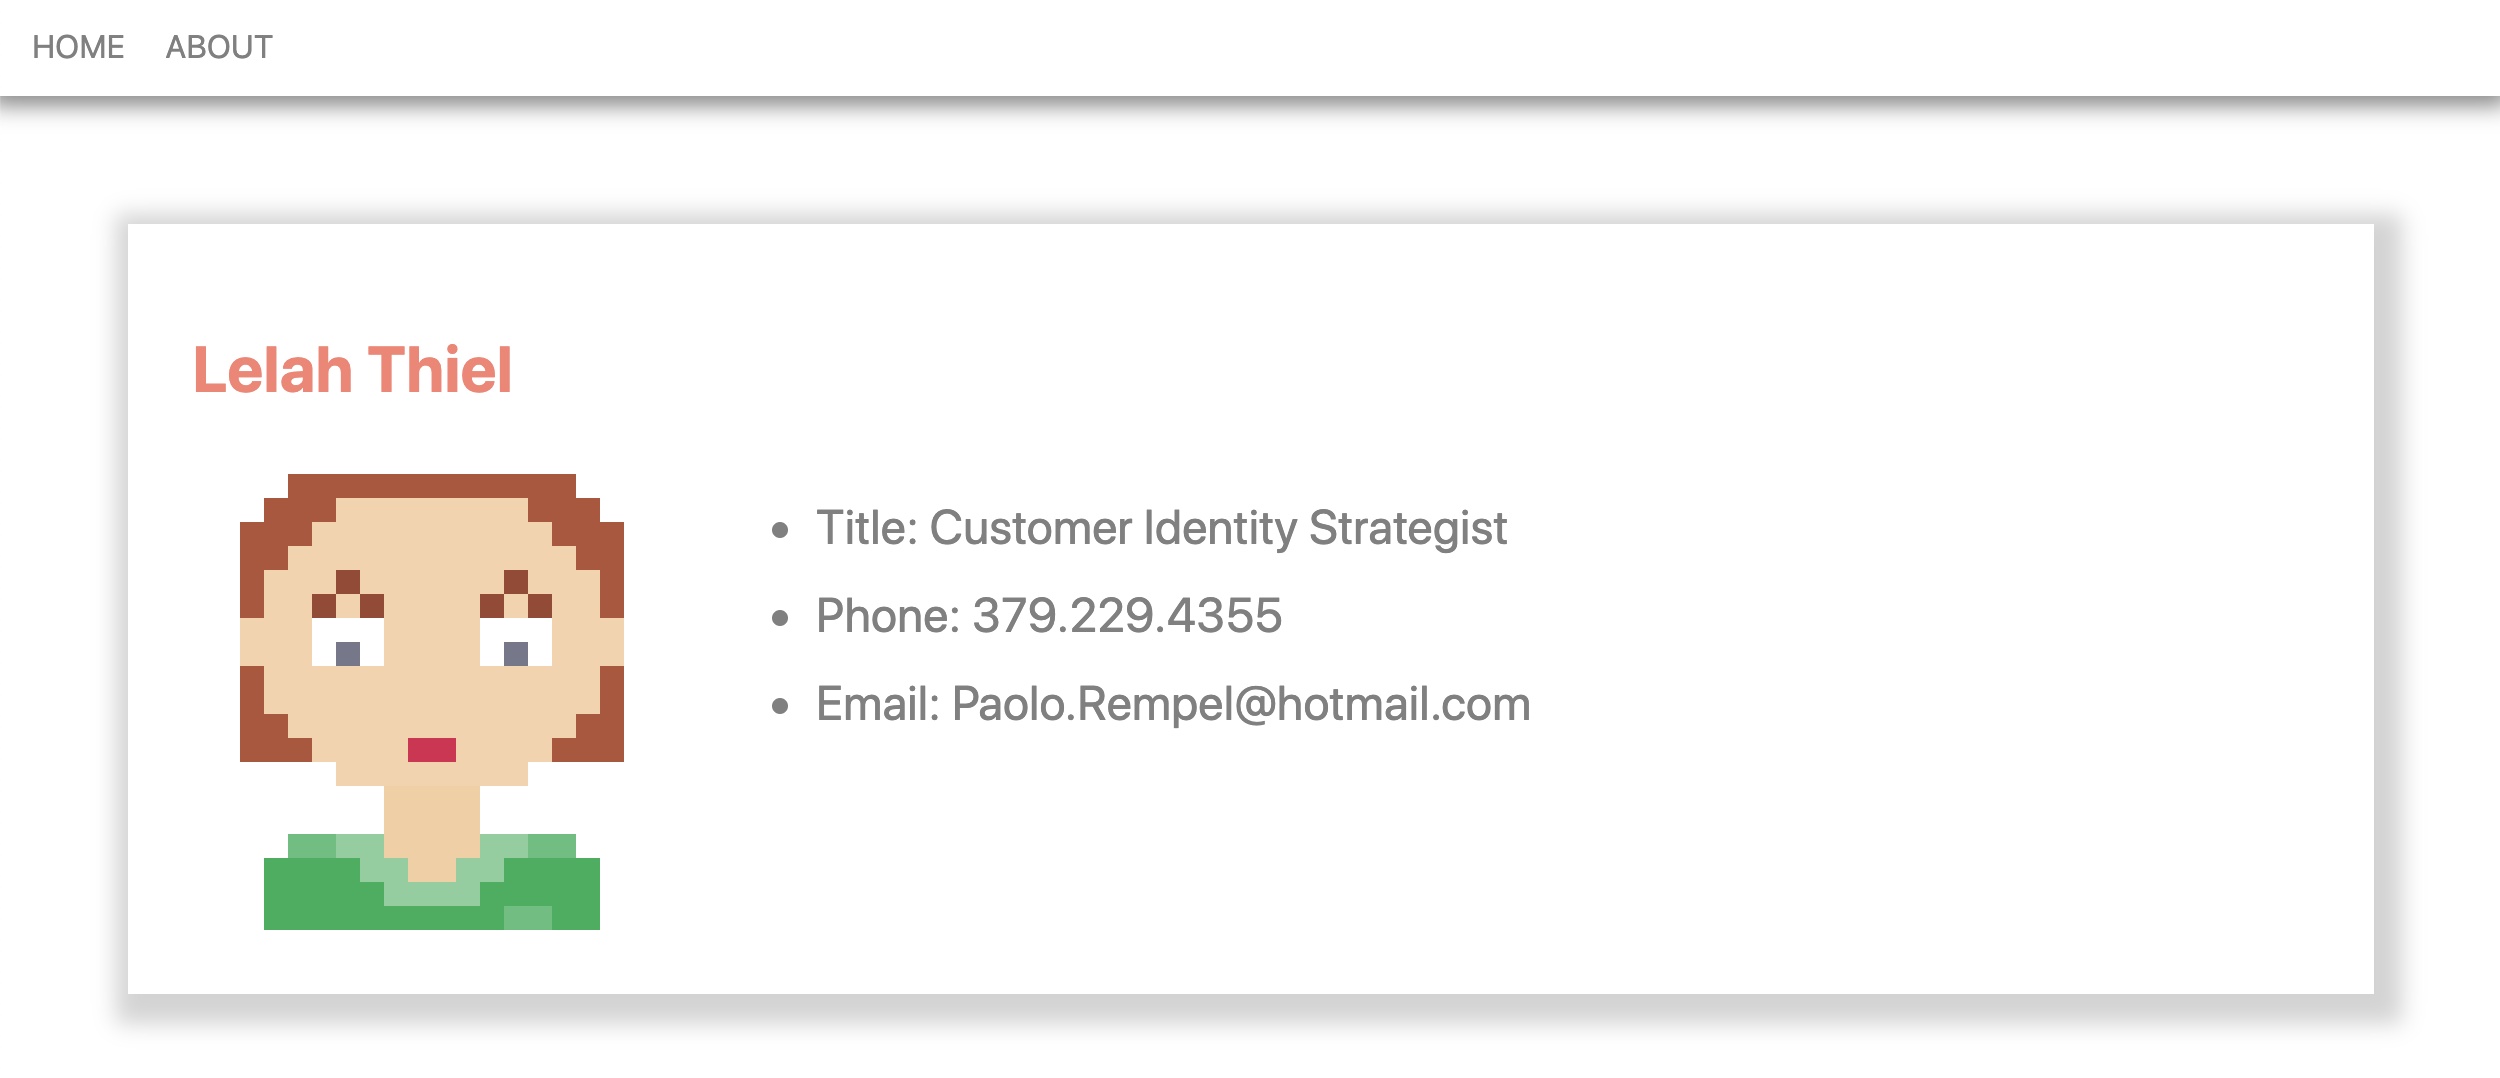
Next, we create the UI for that page — /src/routes/[lastName]/+page.svelte — with the following content:
<script>
  export let data;
</script>

<main>
  <h1>{data.user.firstName} {data.user.lastName}</h1>
  <div class="box">
    <img src="{data.user.avatar}" alt="{data.user.astName}" />
    <ul>
      <li>Title: {data.user.title}</li>
      <li>Phone: {data.user.phone}</li>
      <li>Email: {data.user.email}</li>
    </ul>
  </div>
</main>

<style>
  main {
    margin: 4rem;
    padding: 2rem;
    color: gray;
    justify-content: center;
    box-shadow: 4px 5px 11px 10px lightgray;
  }
  h1 {
    color: salmon;
  }
  .box {
    display: flex;
    font-size: 1.5rem;
  }
  img {
    width: 15rem;
    object-fit: contain;
    margin-right: 2rem;
  }
  li {
    margin-bottom: 1rem;
  }
</style>
Like on the home page, we access the return value of the load function with export let data and visualize the data with some basic Svelte syntax.
Now we should be able to navigate back to the landing page and click on any user box. This will open the corresponding user page. We should see something like what’s pictured below.
Prefetching
There’s one last feature that I’d like to show, and I’m really excited about it. SvelteKit offers the ability to prefetch data for individual pages.
Let’s go back to our /src/routes/+page.svelte page and add the data-sveltekit-preload-data="hover" attribute to the <a> tag, like so:
<a data-sveltekit-preload-data="hover" href={`/${lastName}`} class="box">
This tells SvelteKit to execute the load function of the corresponding page upon hovering the <a> element.
Try it out by opening the network tab in your browser (see below). Every time you hover over one of the user boxes, a request to /api/[lastName] is made and the data for the corresponding user page is fetched. This saves additional milliseconds and ensures a better user experience.
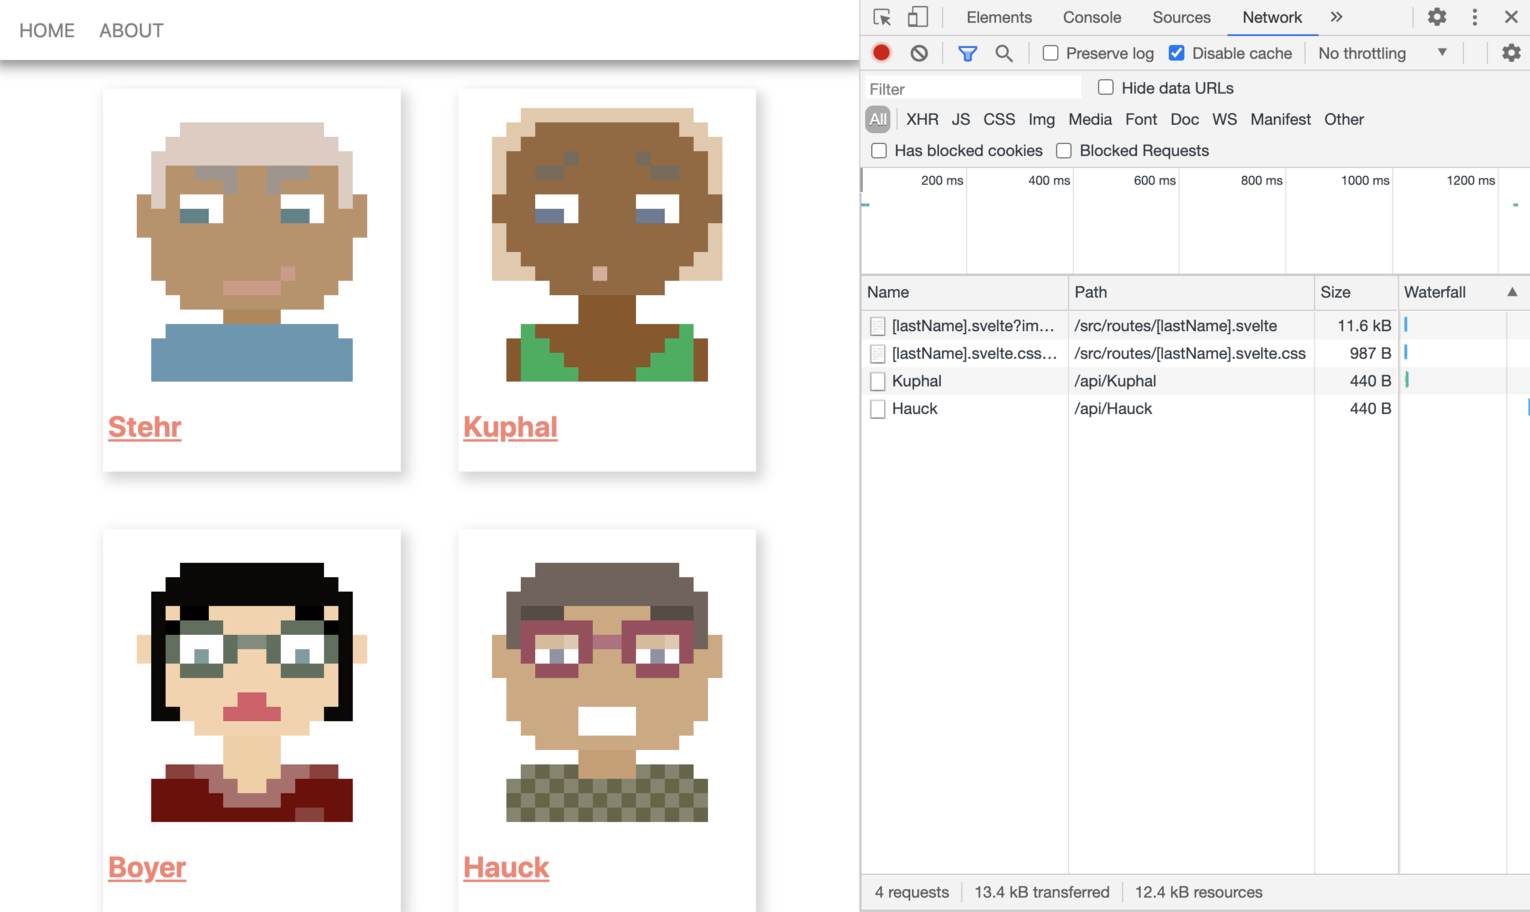
By the way, this is also a great way to see how SvelteKit applies code splitting out of the box. Reload the page and clear the Network log. Note that the very first time you hover over an avatar, one JavaScript and one CSS file is being loaded. This is the code chunk corresponding to our /src/routes/[lastName]/+page.svelte page. It gets loaded only once per page session. If you hover over another avatar, only the corresponding data gets loaded, but not again the JavaScript and CSS.
We don’t have to necessarily apply the prefetching attribute to the <a> tag. We could also place this attribute on a parent element or even the body element in app.html to prefetch all routes in the app like this. In fact, the Svelte demo app already did it this way! If we prefer, we can also do the prefetching programmatically using the preloadData function of SvelteKit’s $app/navigation module.
Conclusion
Working with SvelteKit feels very intuitive. All in all, it took me only about an hour to learn all the main features and the results are absolutely astonishing. We get blazing-fast, SEO-optimized web apps that provide the best user experience that modern build tools can possibly deliver.
By default, SvelteKit renders our page on the server. On the client it gets progressively enhanced by a highly optimized JavaScript bundle to enable client-side routing. With a few lines of code we can prerender individual pages or prefetch data to enable instant page load and navigation. Features like code splitting ensure that Svelte’s advantage of small compilation output doesn’t get mitigated by large, app-wide bundles.
Last but not least, SvelteKit gives us complete freedom with respect to all its features. There’s always a way to exclude a feature if we prefer to. We could, for example, opt out of server-side rendering entirely and create a classic single page application.
SvelteKit together with Svelte itself is a real game changer to me. And I believe it could be so for many others.
The author has donated his fee for this article to the Svelte Open Collective.
FAQs about SvelteKit
SvelteKit is a web framework for building applications and websites with Svelte, a JavaScript framework for building user interfaces. It provides a set of tools and conventions to streamline the development process.
While Svelte focuses on building user interfaces, SvelteKit is a more comprehensive framework that includes routing, server-side rendering, and other features needed for building complete web applications.
SvelteKit offers features such as automatic code splitting, server-side rendering, file-based routing, adapters for different deployment targets (e.g., Node.js, Vercel, and more), and easy integration with Svelte components.
SvelteKit aims to be as compatible as possible with existing Svelte applications. You can often migrate or incorporate Svelte components into SvelteKit projects seamlessly.
File-based routing is a feature of SvelteKit that allows you to define routes by creating files and folders in your project’s directory structure. The file’s location corresponds to the route, making it easy to organize and manage routes.
Yes, SvelteKit supports server-side rendering (SSR) out of the box, enabling you to build applications that render content on the server before sending it to the client.
SvelteKit uses a combination of HTML, CSS, and JavaScript to define components. It allows you to use standard HTML and JavaScript, making it accessible and familiar to developers.
SvelteKit provides easy ways to fetch data using the $session object or by using server endpoints. For state management, you can use stores, which are reactive data structures.
 Erik Kückelheim
Self-taught developer living in Konstanz, Germany. Creator of JSchallenger.
 Simon Holthausen
Simon is passionate about web frontends. He has expert knowledge in Angular and Svelte and is also proficient in other frameworks, leading several projects to success. He is also part of the Svelte maintainer team, his most significant contribution being the VS Code extension.