
Remote development is simply development on a remote server. An SSH connection is made from your local machine to a server in the cloud. SSH stands for secure shell or secure socket shell — a protocol for securely communicating between two computers via a terminal.
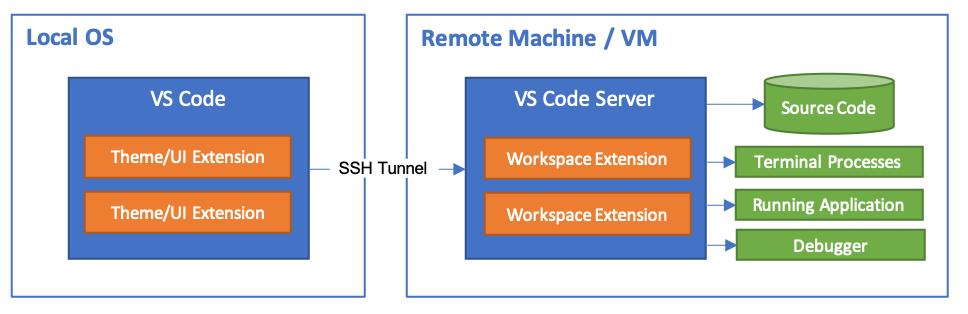 Image source: code.visualstudio.com
Amazon Elastic Compute Cloud (EC2) provides scalable computing resources to build applications (servers) without needing to handle the responsibilities of managing a physical computer. In our case, we’ll be using the Visual Studio Code editor and connecting it via an SSH connection to the EC2 instance.
In this article, we’ll create an AWS EC2 free tier instance and connect it to the VS Code editor via the Remote SSH plugin.
Prerequisites
To follow along with this tutorial, you’ll need the following:
- A Linux-based OS or Windows 10 with WSL2 installed.
- An SSH client installed on your machine. This should come as standard on most Linux machines. If not, please consult this list of supported clients.
- An activated AWS account. If you don’t have one, follow the official tutorial.
Pros and Cons of Remote Development
But before we get into the how, let’s look at the why. Here are some pros and cons of developing on the server.
Firstly, the pros:
Portability: you can code from any device with internet access. Your code isn’t tied to your local machine, as such, you can code from anywhere using any device available at the moment.
Power: you can easily scale up your remote server based on your workloads. It’s pretty straightforward to boot up a 32GB RAM AMD EPYC instance for some data science workloads.
Prod-Dev Synchrony: by having a remote dev environment similar to your production environment you can minimize any deployment issues.
Seamless Development: remote coding gives you the ability to create environments specially tailored to the project at hand. For example, a project might require different versions of MySQL, C++, and system libraries like LibPng and ImageMagick. Managing different versions of these might prove rather hectic, as any bugs that crop up because of this can’t be easily replicated.
Reliability: a cloud server is far more reliable than your local machine can ever be. Depending on your configurations, your server data can be replicated to servers in different parts of the world.
Now let’s look at the cons.
The main reason to avoid coding on a remote environment is the internet connection requirement to access your remote server. With a fast internet connection, the remote development experience feels native when opening, creating and typing in files, and interacting with the remote server’s command line. But with a slow 3G network, you might have disconnections to the server, which could potentially lead to lost work ranging from a few seconds to a few minutes.
With that out of the way, let’s get to the meat of the article — setting up a free tier EC2 instance and connecting it to our local VS Code editor.
Creating and Configuring the AWS server
Let’s go through the steps for creating and configuring your cloud instance.
Log into the AWS Management console.
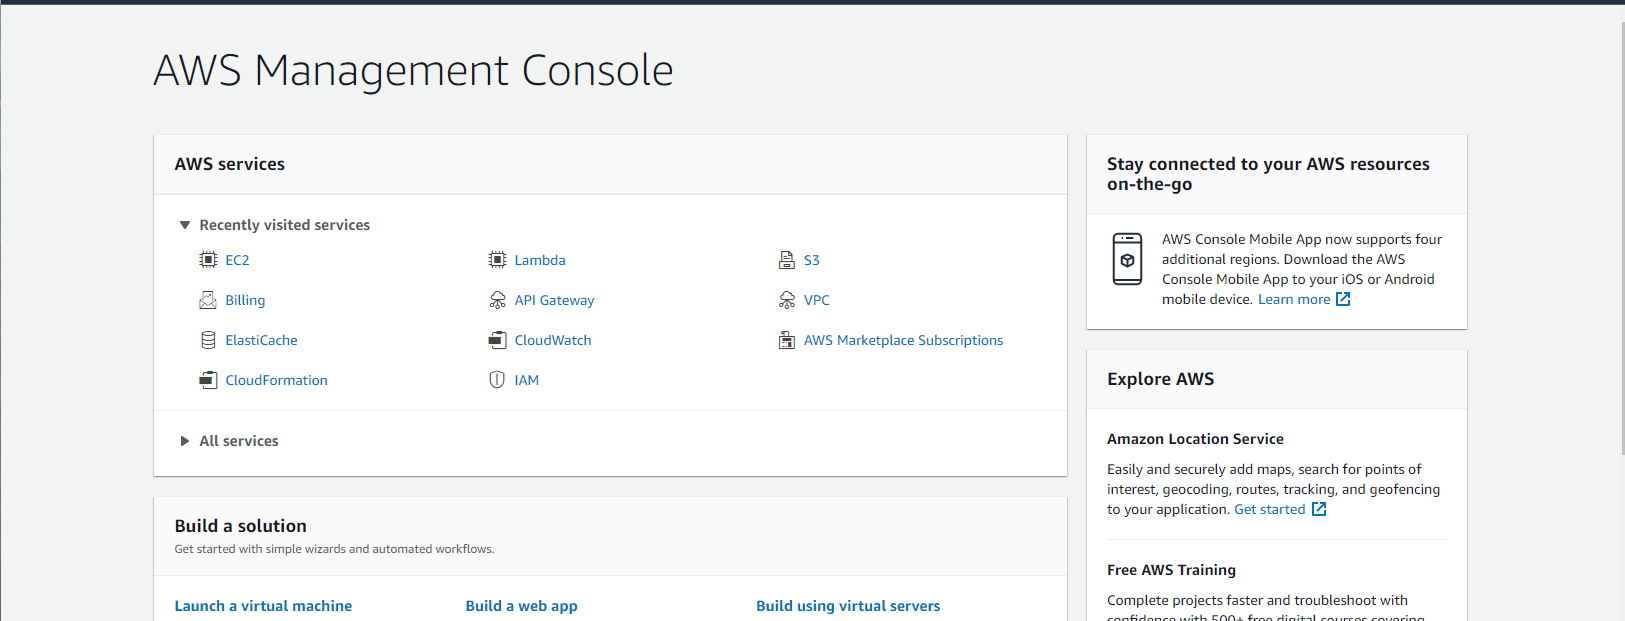
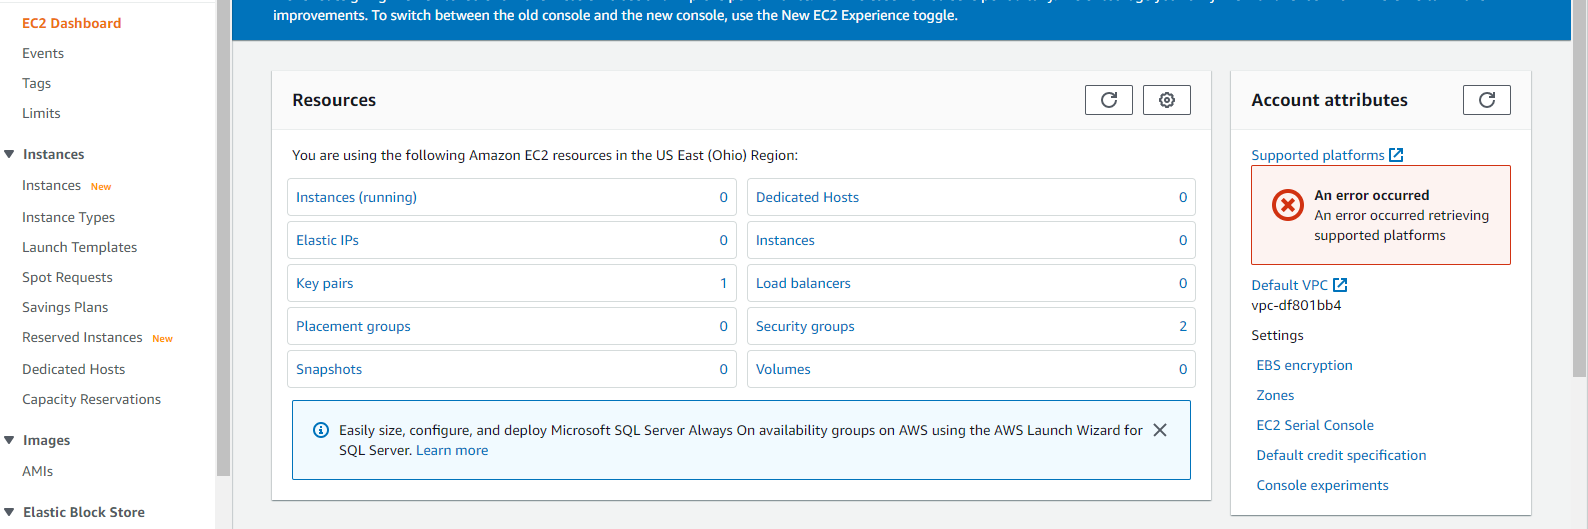
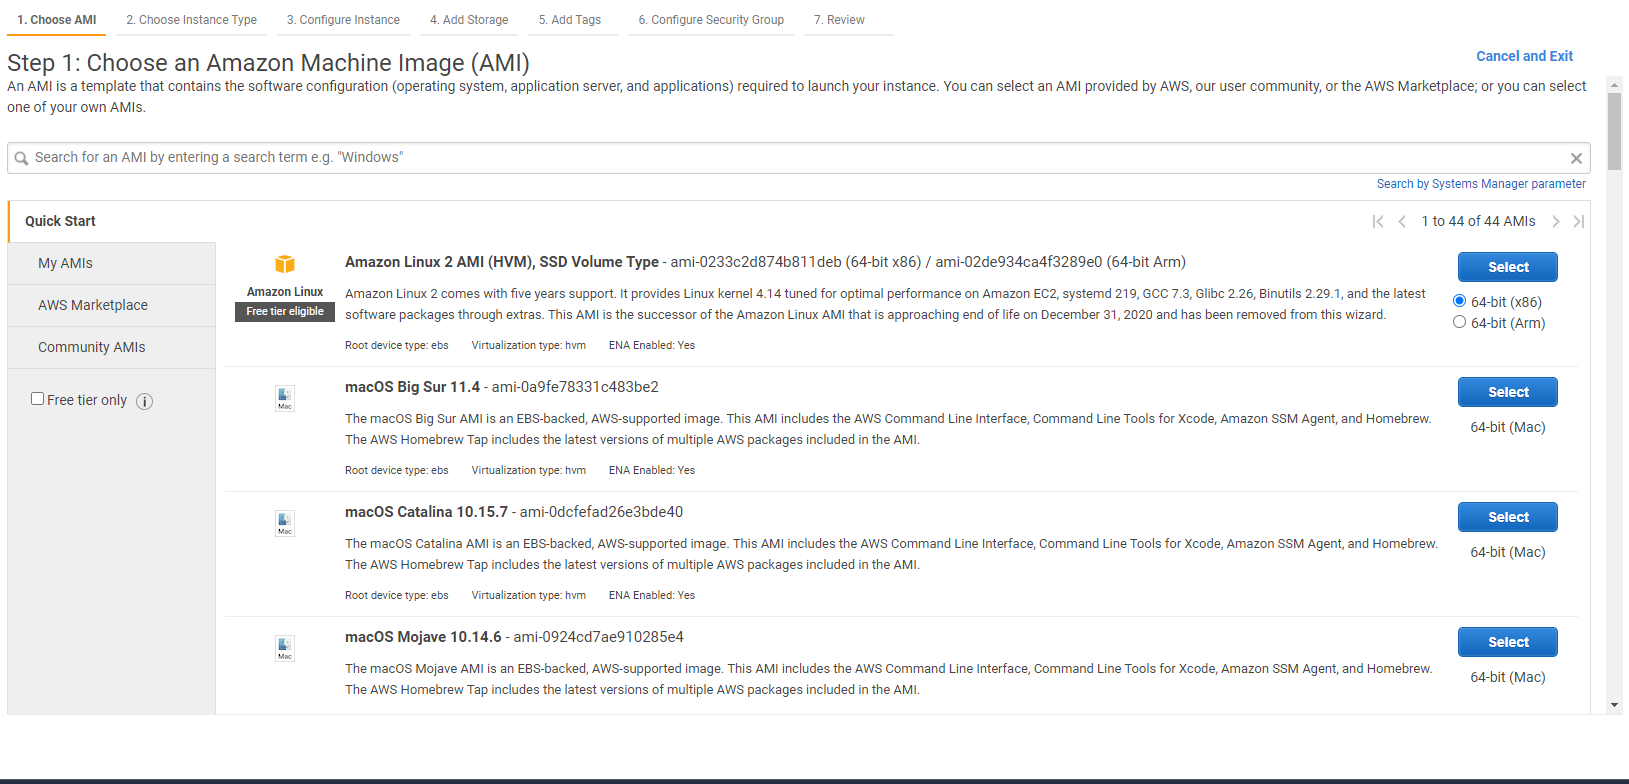
Click EC2 to head over to the EC2 dashboard. Click the Launch Instance button. You’ll be directed to the AMI choosing page.
On the AMI choosing page, search for Ubuntu and select your preferred version. Make sure the architecture is set to x86. We’ll be using the x86 architecture because it has the wider range of software support compared to ARM.
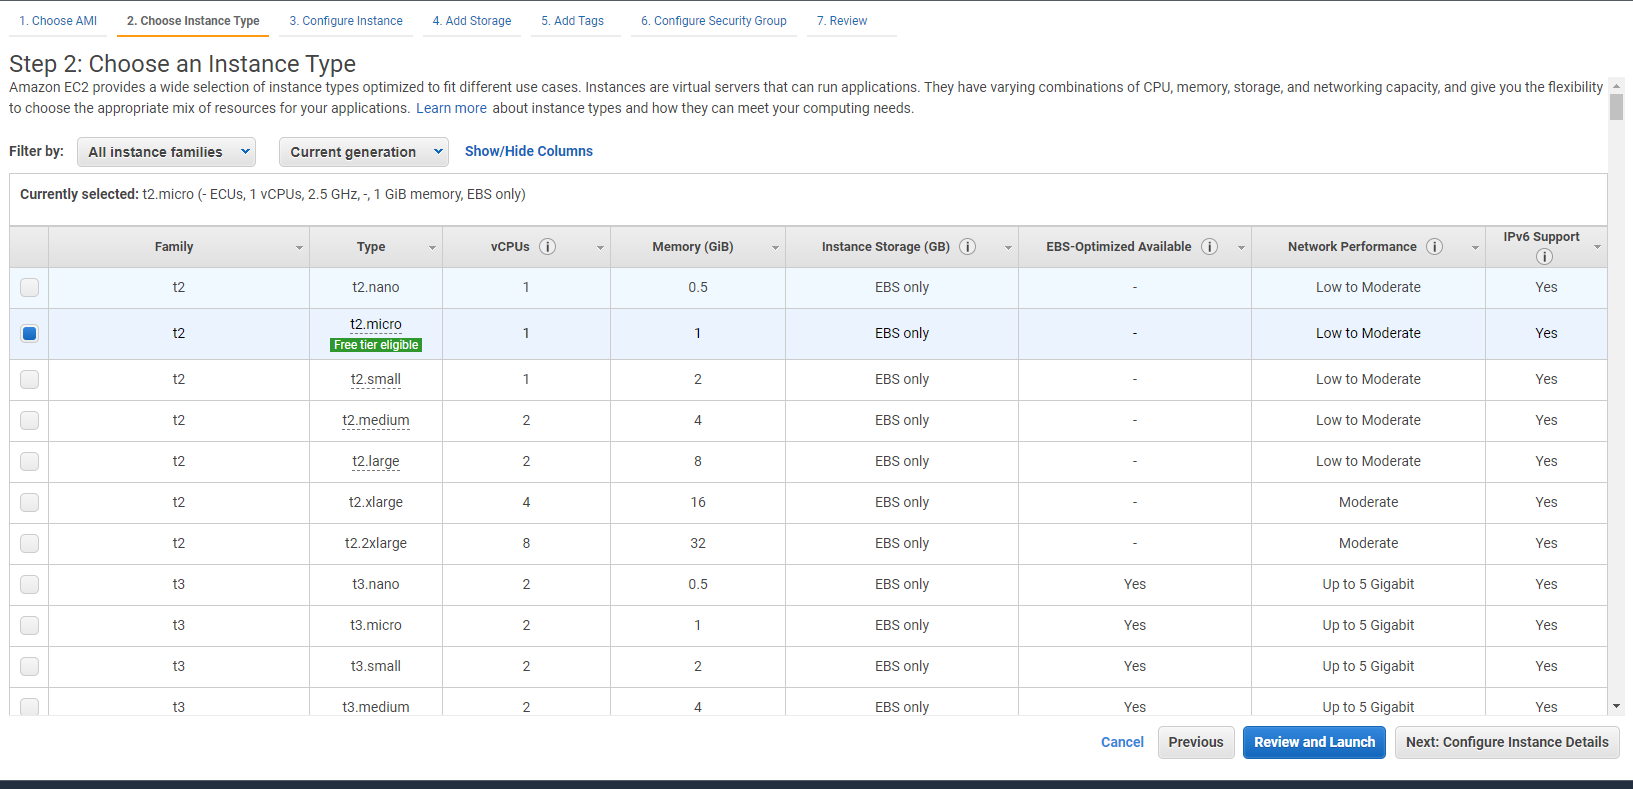
Select t2.micro as the instance type.
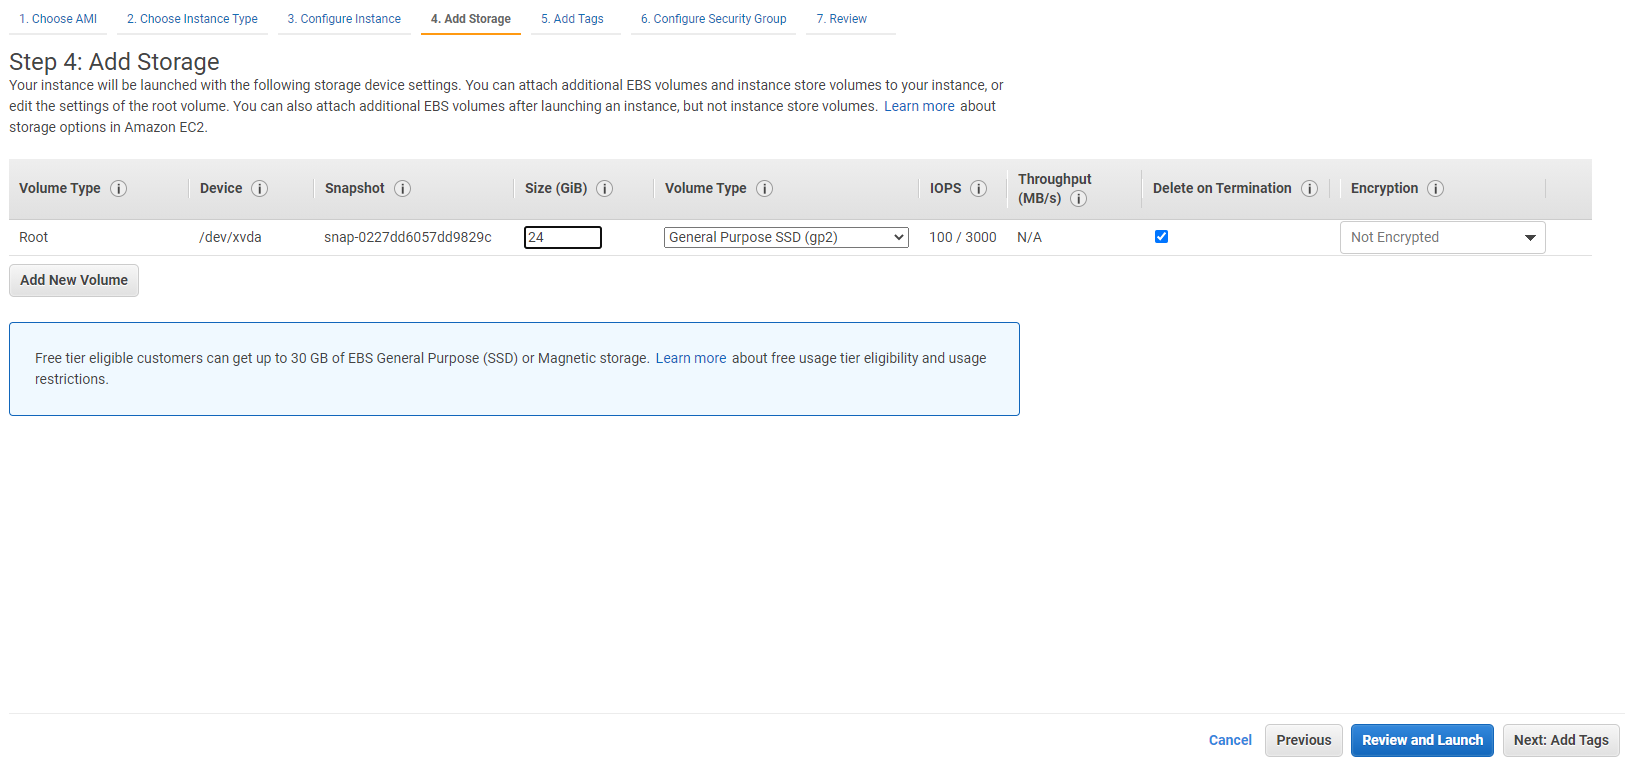
Leave the rest of the steps on their default settings until you get to the add storage step. I recommend you use a minimum of 24GB. If you’re developing for Node.js, npm libraries take quite some space, and using less could put you in a difficult position, so it’s safer to err on the side of caution.
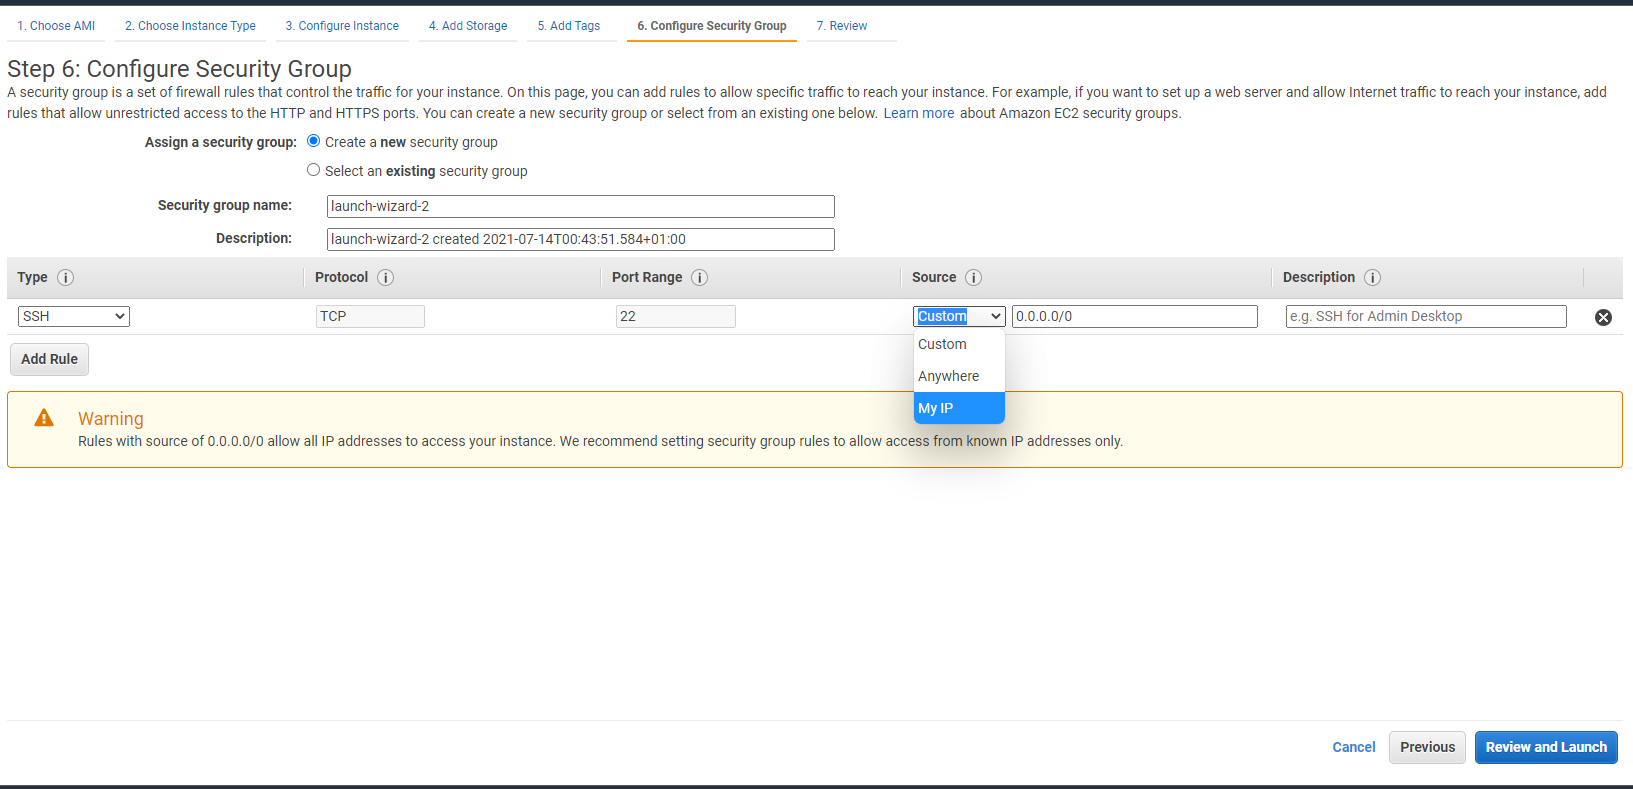
Once you get to the Configure Security Group step, you’ll need to allow incoming SSH connections, you have two options:
Enable all incoming IP addresses: selecting this will allow any IP address to access your SSH port, if your situation calls for convenience over security choose this.
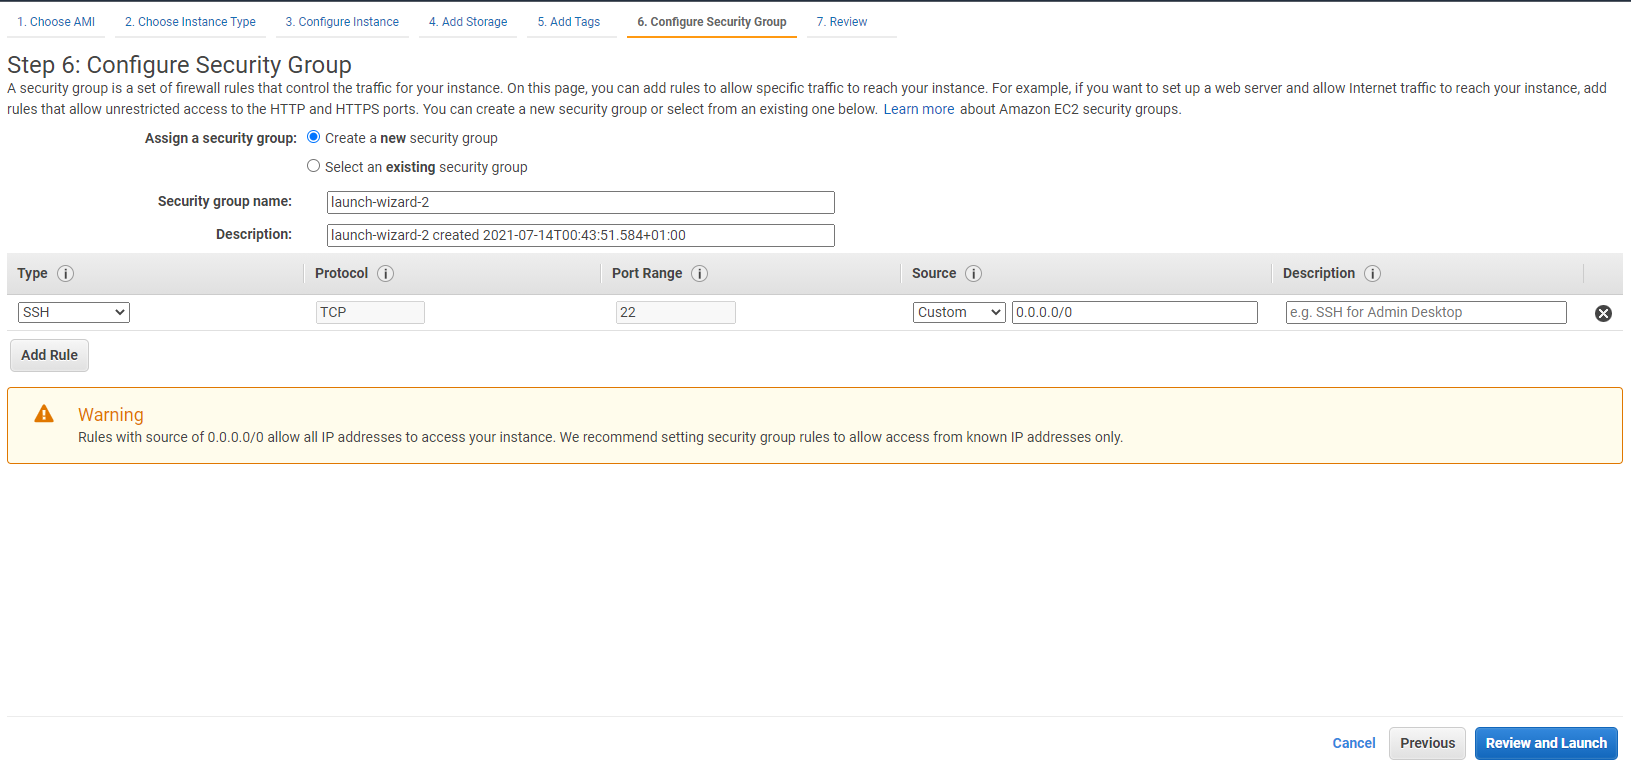
My IP: if security is more important, choose this option from the dropdown to restrict the IP address to yours only.
Once you click launch, you’ll be asked to either select or create an SSH key pair. Select Create a new key pair. Name the key pair.
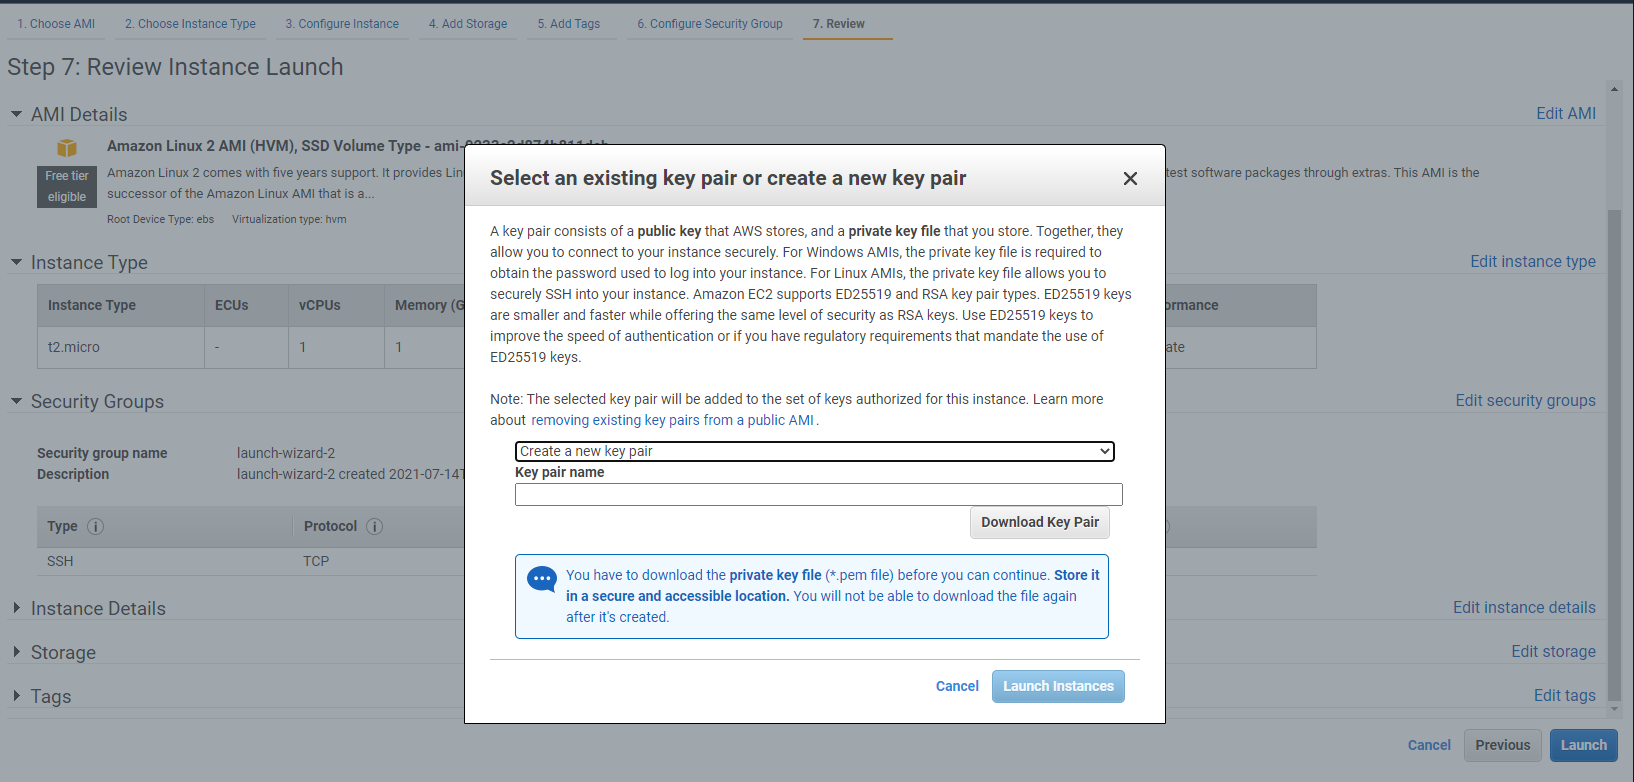
Clicking the Download Key Pair button will obtain you the private key file. This will download a pem file, which you should store in a convenient directory and take note of its directory path.
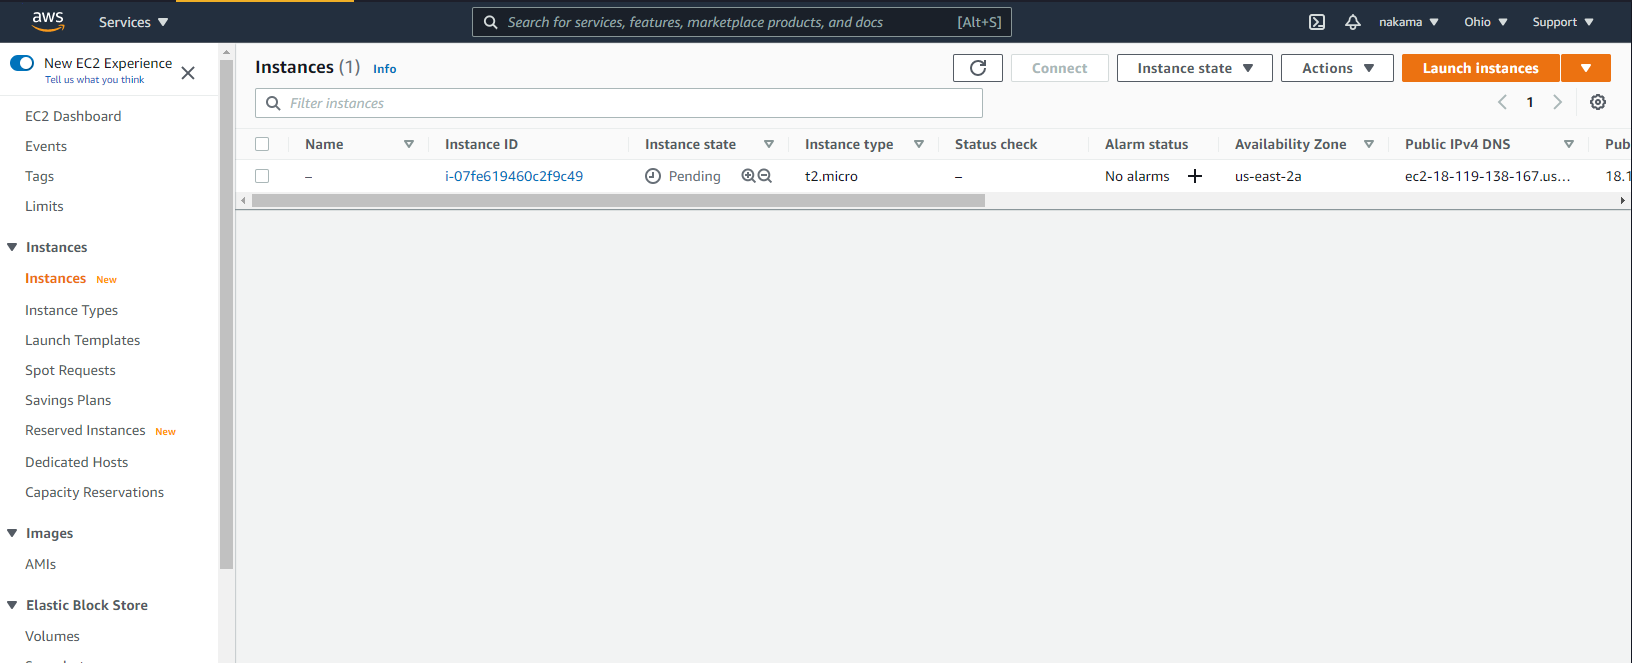
Next, click Launch Instances button and your EC2 instance will start the creation process. Head to the instances page and you should find your newly created instance.
Lastly, click the instance to navigate to its details page and take note of its public IPv4 DNS address.
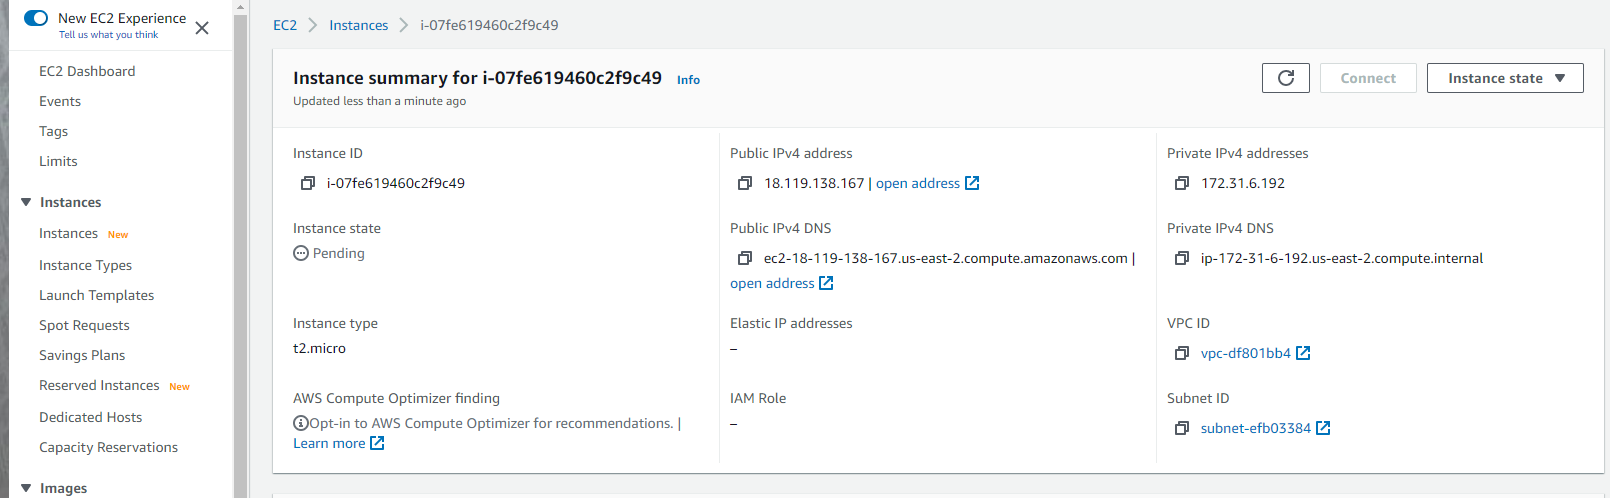
We’ll refer to this address as the instance’s “hostname”.
Installing and Configuring the Visual Studio Code Extension
Now that we’ve successfully created an EC2 instance, let’s look at what we need to do in Visual Studio Code. If you don’t have Visual Studio Code installed on your machine, head over to their download page and grab the correct package for your system.
Install the remote SSH VS Code extension
Once VS Code is installed, open the Extension tab in the editor (you can optionally use the shortcut Ctrl + Shift + X) and search for “remote ssh” in the extensions marketplace.
Locate and install the Remote-SSH extension, ensuring that it’s the correct extension (authored by Microsoft with 4.3 million installs at the time of writing).
Configuring the remote SSH extension
Click the new button in the bottom left corner of the editor. This will open the command palette, where you should select Remote-SSH: Open Configuration File.
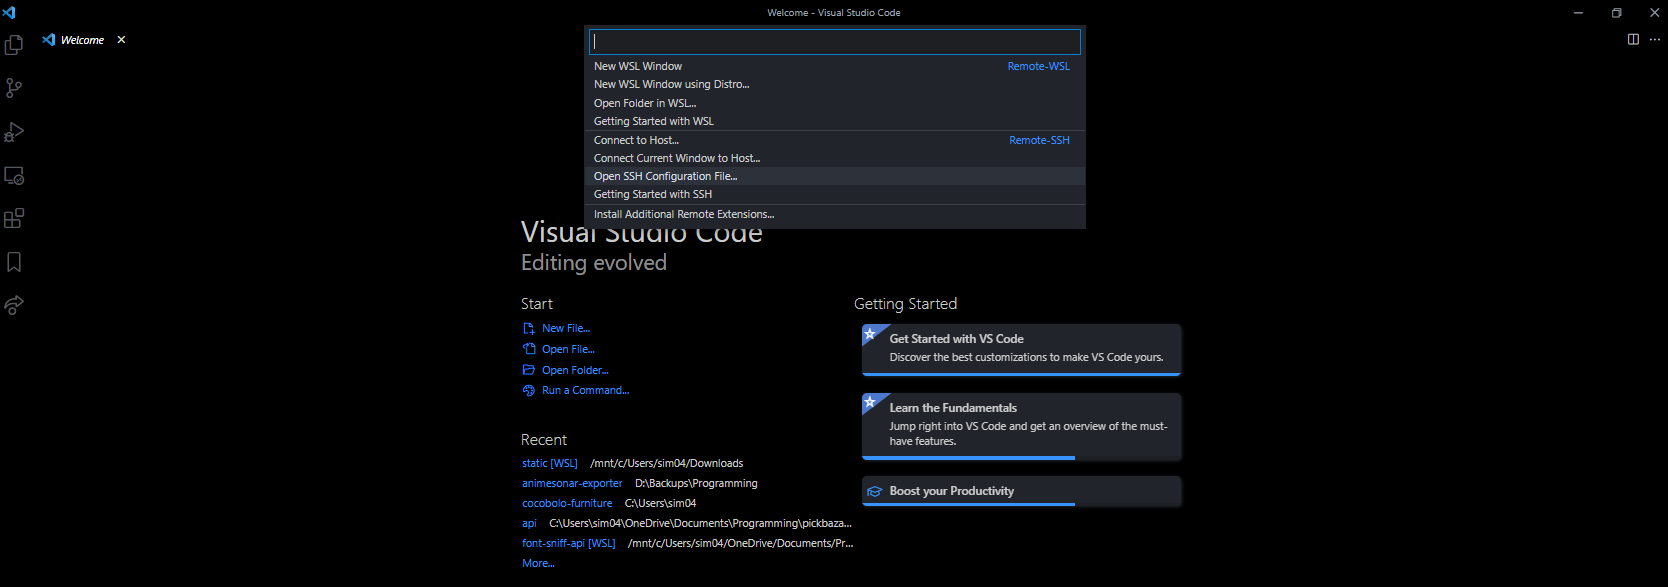
An SSH config file will pop up (select the one for the current user if the extension recognizes multiple config files), into which you can enter the following configuration:
Host VS Code-ssh-tutorial
HostName <HOSTNAME>
User ubuntu
IdentityFile <PATH TO IDENTITY FILE> Hostcan be any name. This will appear in VS Code.HostNameis the server’s IP address. We noted this when creating the EC2 instance.Useris the default Ubuntu username (ubuntuin this case).IdentityFileis the complete path to the private key (thepemfile) that we downloaded previously.
Testing the Setup
Click the remote-ssh button in the bottom-left corner and click Connect to Host from the dropdown which appears.
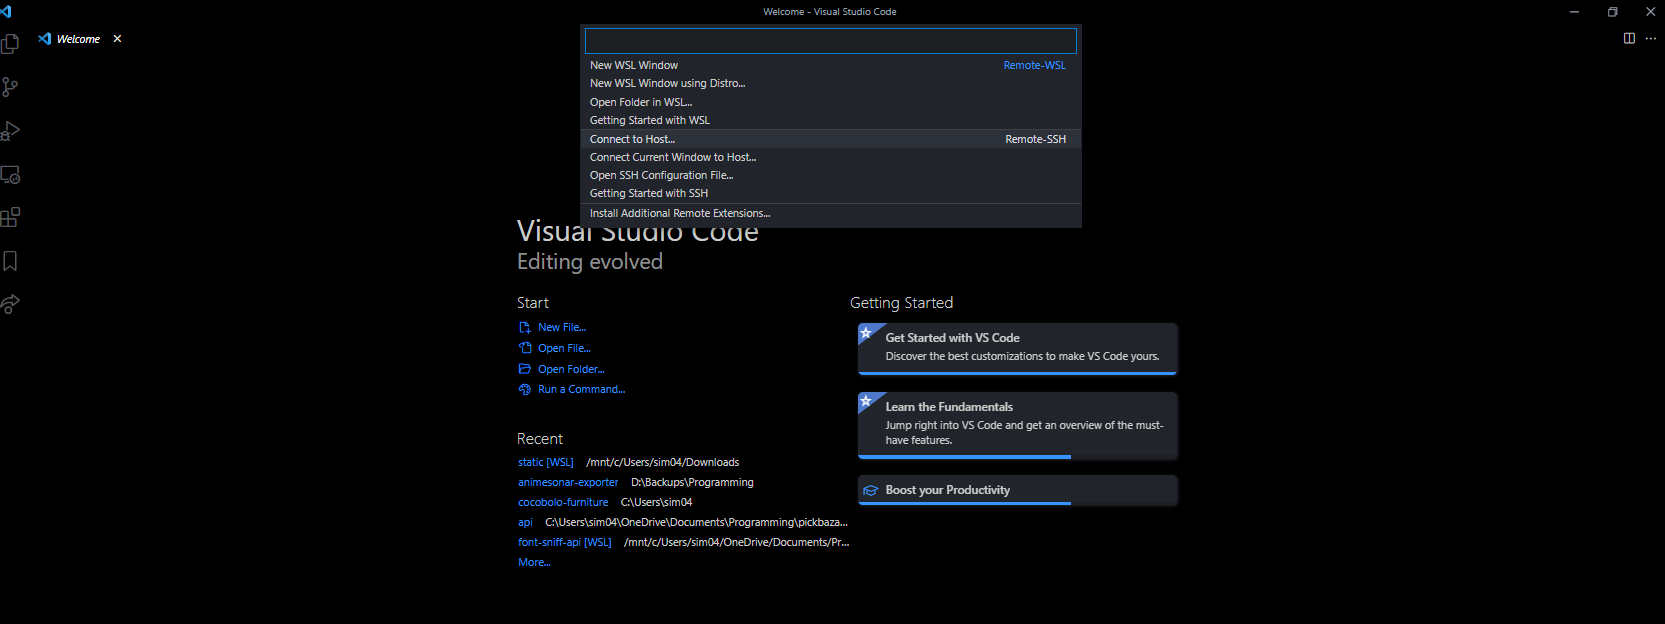
Another dropdown will appear. Select the host configuration you created in the previous step (VS Code-ssh-tutorial). If all’s well, you should be presented with a new editor window asking you to select your working directory.
With that, you’ve set up your remote development environment. Now let’s create a simple demo application using Node.js.
Create a demo Node server
Open the terminal with the shortcut: Ctrl + Shift + `, then install Node.js with the commands below:
sudo apt update
sudo apt install nodejs
Next, create an index.js file in a new directory test:
mkdir test && cd test && touch index.js
Put the following contents into the index.js file:
//index.js
const http = require('http');

const hostname = '127.0.0.1';
const port = 3000;

const server = http.createServer((req, res) => {
  res.statusCode = 200;
  res.setHeader('Content-Type', 'text/plain');
  res.end('Hello World');
});

server.listen(port, hostname, () => {
  console.log(`Server running at http://${hostname}:${port}/`);
});
Run this test server with the following command in the server’s terminal:
node index.js
Once you run this code, a small popup will come up at the bottom-right corner of your VS Code editor, shown below.
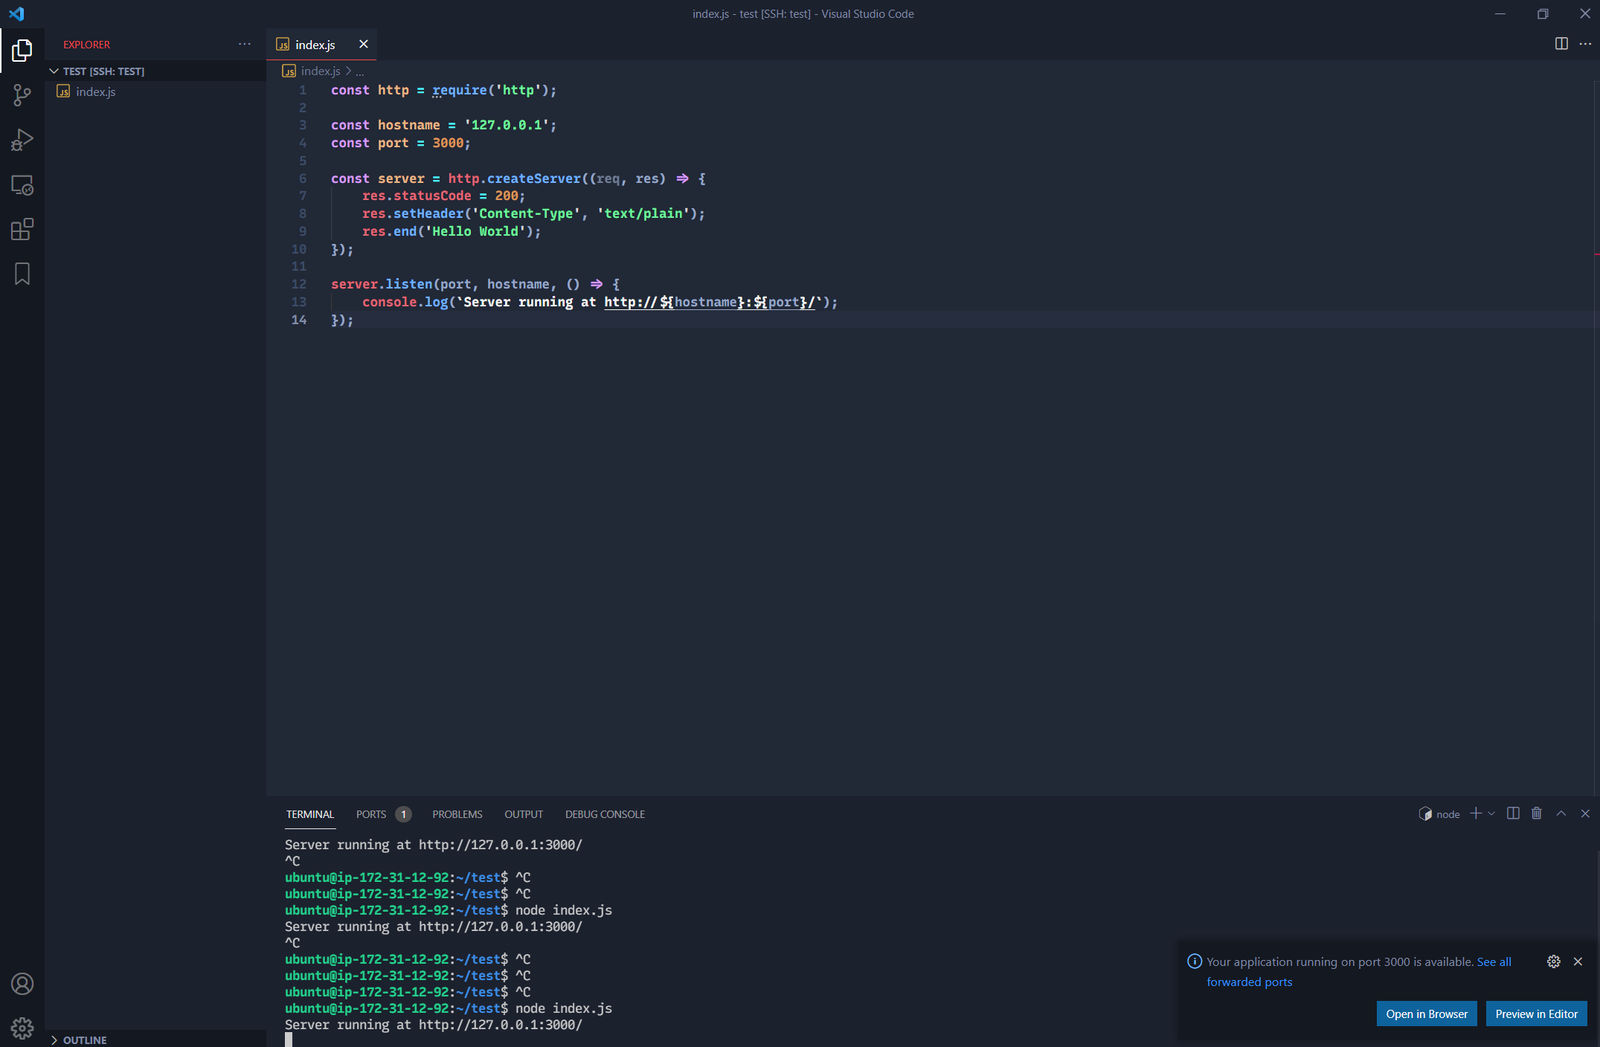
You’ve got two options, Open in Browser and Preview in Editor. Regardless of which you pick, you’ll find that the server’s port has been forwarded to your localhost and can be accessed with localhost:3000.

Troubleshooting
If you’ve had any issues so far connecting to your created instance, here are some troubleshooting tips:
- Check the configuration file and make sure the private key file path is correct.
- Make sure the hostname is correct.
- Check your AWS instance firewall settings. If you set it to allow a specific IP, make sure that your current IP hasn’t changed.
- If you restarted the AWS instance, its IP address would change, so remember to update the configuration file with the new IP address.
Conclusion
In this tutorial, we created a free tier AWS t2.micro instance. We set it up for allowing SSH connections from our local machine, and connected to it via the remote SSH extension. Lastly, we were able to access the port forwarded server we created on the remote environment.
Frequently Asked Questions (FAQs) on VS Code Remote Development on Amazon EC2
How can I set up VS Code for remote development on Amazon EC2?
Setting up VS Code for remote development on Amazon EC2 involves several steps. First, you need to install the Remote Development extension pack in your VS Code. This pack includes three extensions that enable you to use a container, remote machine, or the Windows Subsystem for Linux as a full-featured development environment. Next, you need to set up an Amazon EC2 instance. Once your instance is ready, connect to it using the Remote-SSH extension in VS Code. You can then open any folder on the remote machine and start coding.
What are the benefits of using VS Code for remote development on Amazon EC2?
Using VS Code for remote development on Amazon EC2 offers several benefits. First, it allows you to develop in a consistent environment, ensuring that your application works smoothly in the production environment. Second, it enables you to leverage the computing power of Amazon EC2, which is particularly useful when working on resource-intensive tasks. Third, it allows you to work from anywhere, as your code and development environment are stored in the cloud.
Can I use VS Code’s debugging features when working remotely on Amazon EC2?
Yes, you can use all of VS Code’s features, including debugging, when working remotely on Amazon EC2. The Remote-SSH extension in the Remote Development extension pack allows you to run commands and debug applications on the remote machine just like you would on your local machine.
How can I troubleshoot connection issues between VS Code and Amazon EC2?
If you’re having trouble connecting VS Code to your Amazon EC2 instance, there are several things you can try. First, check your network connection and make sure that your EC2 instance is running. Next, verify that you have the correct permissions to access the EC2 instance. If you’re still having trouble, check the output of the Remote-SSH extension for any error messages.
How can I secure my remote development environment on Amazon EC2?
There are several ways to secure your remote development environment on Amazon EC2. First, always use secure connections, such as SSH, to connect to your EC2 instance. Second, regularly update your EC2 instance and installed software to protect against vulnerabilities. Third, restrict access to your EC2 instance to only trusted IP addresses. Finally, regularly backup your code and data to protect against data loss.
Can I use other IDEs for remote development on Amazon EC2?
Yes, you can use other IDEs for remote development on Amazon EC2. However, VS Code offers a seamless remote development experience with its Remote Development extension pack. This pack includes extensions that enable you to use a container, remote machine, or the Windows Subsystem for Linux as a full-featured development environment.
How can I optimize the performance of VS Code when working remotely on Amazon EC2?
To optimize the performance of VS Code when working remotely on Amazon EC2, you can do several things. First, choose an EC2 instance type that provides the necessary resources for your development tasks. Second, close any unnecessary applications on your local machine to free up resources. Finally, use VS Code’s performance profiling features to identify and resolve performance issues.
Can I collaborate with others when using VS Code for remote development on Amazon EC2?
Yes, you can collaborate with others when using VS Code for remote development on Amazon EC2. VS Code’s Live Share extension allows you to share your development environment with others, enabling real-time collaboration.
How can I automate the setup of my remote development environment on Amazon EC2?
You can automate the setup of your remote development environment on Amazon EC2 using infrastructure as code (IaC) tools like AWS CloudFormation or Terraform. These tools allow you to define your infrastructure in code, making it easy to set up and tear down your development environment as needed.
Can I use VS Code for remote development on other cloud platforms?
Yes, you can use VS Code for remote development on other cloud platforms. The Remote Development extension pack supports any remote machine that can run VS Code’s server component, including machines on Azure, Google Cloud, and others.
 Chisimdiri Ejinkeonye
Simdi is a writer, coder, artist currently exploring the intersection between art and code while writing about technologies he's excited about. Creator of fontofweb.com