Learn more on ruby with our tutorial Setting Up Automated Testing with RSpec on SitePoint.
A few times a year, I find something that transforms or enhances my development environment. Examples in the past few years are: Github , vim, and zsh (more specifically, on-my-zsh .) Sometime in the last year or so, I started using another development transformer: Tmux . What is tmux? According to its site:tmux is a terminal multiplexer. What is a terminal multiplexer? It lets you switch easily between several programs in one terminal, detach them (they keep running in the background) and reattach them to a different terminal. And do a lot more.I first learned about tmux from Evan Light (@elight) when I engaged him topair program with me eons ago. I was stunned at how easy tmux made it for Evan and I to collaborate in real-time. My reaction was a bit like an unfrozen caveman. I marvelled at the technology, presuming only advanced beings, like Evan, could wield such power. I put it on my “Someday” list and went back to my stone tablets. In all likelihood, you’ve probably already heard of tmux. However, you may not be using it everyday. If tmux is on your “Someday” list because you think it is too complicated (I mean, c’mon, the word “multiplexer” is just plain scary), then I am here to show you just how easy it is to put tmux into your workflow.
Simple Install
To start, you’ll need tmux (DERP). Depending on your platform, there are various (easy) ways to perform the install:Mac OSX
Use Homebrew.brew install tmux and you’re done.
Ubuntu/Debian
There is a Ubuntu package so,sudo apt-get install tmux will work, but the installed package is 1.7 and we really want 1.8. To get 1.8, do the following (thanks to this article):
$ sudo add-apt-repository ppa:pi-rho/dev
$ sudo apt-get update
$ sudo apt-get install tmuxWindows
No dice, unless you use Cygwin or install a VM with a *nix distrubution and then follow the instructions for Ubuntu. Type the following to make sure all is well.$ tmux -V
tmux 1.8Simple Usage
Using tmux is as easy as typingtmux. When you do that, it just looks like your screen clears and you’re back at the same terminal prompt. A bit anti-climatic, maybe, but you’ve just stepped through the looking glass.
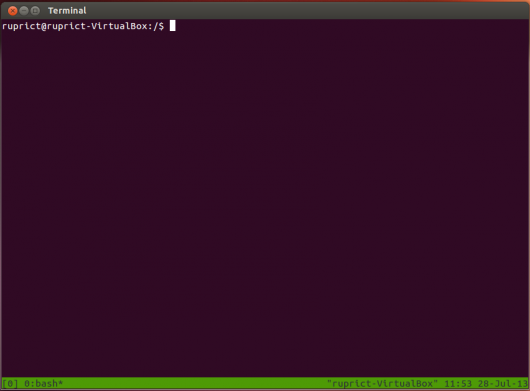 The more observant among you will notice that the terminal how has a green bar along the bottom.
No Pane, No Gain
I’ve already mentioned words like “session”, “window”, and “pane”. When you run tmux, it creates a new tmux session. A tmux session is, put simply, and container for windows and panes. A window contains one or more panes.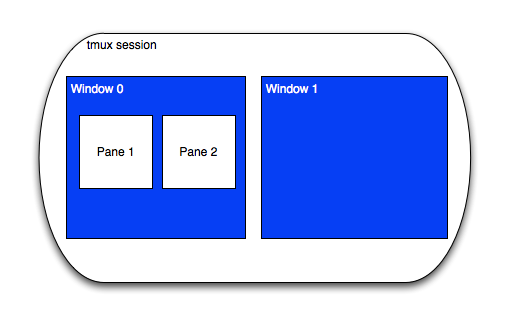 Each pane and each window are a virtual terminal, it just happens to be that windows can contain panes. Panes and windows can swap places, as well, so a pane can be made a window and window can be made a pane.
When starting life with tmux, I’d recommend you split your terminal into 1-3 panes for an “edit” window, and run other processes (like a rails console or tailing a log file) in their own windows. That is what we will walkthough today.
Each pane and each window are a virtual terminal, it just happens to be that windows can contain panes. Panes and windows can swap places, as well, so a pane can be made a window and window can be made a pane.
When starting life with tmux, I’d recommend you split your terminal into 1-3 panes for an “edit” window, and run other processes (like a rails console or tailing a log file) in their own windows. That is what we will walkthough today.
Windows into Your Application
Let’s do this. Fire up a terminal andcd into the root of your application. I am using a Rails app here, but that is not important.
Now, type tmux.
This is the first window, which will be the “edit” window for our session. I want to see the editor, my tests, and what top(1) has to say about current affairs. Split the current window into two panes by typing:
CTRL+B %
CTRL+B portion of that macro is called “the prefix”. CTRL+B is the default prefix for tmux, but you won’t be surprised to know that most people change it.
Your terminal should now look like:
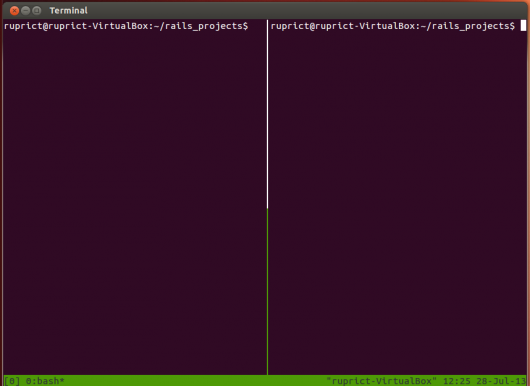 Now, we want to split the right-hand pane into 2 panes that are stacked vertically. Your cursor should be in the right-side pane. Type:
CTRL+B "
 With the panes setup, the commands for each pane need to be launched. Since your cursor is now in the bottom, right-side pane, type
 top and watch top fire up. OK, switch to the top, right-side pane and type a command. For me, I’ll use rake test, but I would generally make this pane run the automated tests using guard or something similar.
Before you can do that, though, you need to know how to switch panes, don’t you? To move from the bottom, right-side pane to the top, right-side pane:
CTRL+B <UP ARROW>
vim.
Here is my edit pane:
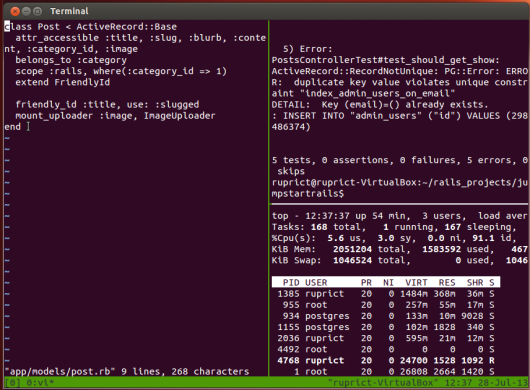 OK, the edit pane is done. Pro tip: If you are using tmux 1.8, you can toggle the curent pane into full-screen by typing:
CTRL+B z
CTRL+B c
 Add as many windows as you like using that same key combination. When you want to switch between windows 0 and 1, type:
CTRL+B <window number>
The End is Near
The last thing I’ll mention is how you detach from and end a session. When you are in a session, you are “attached” to it. Thetmux command creates a new session and attaches the current terminal. To detach, type:
CTRL+B d
[detached] and you’ll be back at your no-status-bar, regular, old terminal. If you type tmux ls, you will see a list of sessions:
 All the stuff you had running in that session is still cruising right along. You can reattach to it by typing:
tmux attach -t 0-t stands for “target” and 0 is the session name. Now, go ahead and detach again.
To end/kill the session, type
tmux kill-session -t 0tmux ls, you will see zero sessions running. By the way, if you exit out of all the windows in a session, the session will exit as well.
Next Steps
This article just skims the surface of what tmux can do for you. However, you can apply what you learned today and be more productive in your development environment without investing another second of time learning about tmux. But, you aren’t that kind of person, are you? Once you get comfy with what you’ve learned here, this is what I recommend you do next:- Buy the Tmux Book and read it. It’s great.
- Create your .tmux.conf file and start changing tmux to suit your needs. There are LOADS of examples and it makes tmux even better.
- Check out tmuxinator for setting up named tmux environments that fire up a bunch of panes and windows in a new session with a simple command.
- Pair program with someone using tmux as the way to collaborate in real-time. It’s mind-blowing.
Wrap Up
The goal of this article was to get you going with tmux in as simple a way as possible. I am now at the point where I start tmux up to do just about everything. I love convenience of splitting a window into panes and running a quick command without leaving my current window. I think you’ll find it just as useful.Learn more on ruby with our tutorial Setting Up Automated Testing with RSpec on SitePoint.
Frequently Asked Questions (FAQs) about Tmux
How can I access a Tmux session after I leave it?
To access a Tmux session after you leave it, you need to use the ‘tmux attach’ command. This command allows you to reattach to a previous session. If you have multiple sessions running, you can specify which one to reattach to by adding the session ID or name after the ‘attach’ command, like ‘tmux attach -t 0’.
How can I move a Tmux pane to a new window?
To move a Tmux pane to a new window, you can use the ‘break-pane’ command. This command will take the current pane and create a new window with it. The command is ‘prefix + !’. After executing this command, the pane will be moved to a new window.
How can I get started with Tmux on Linux?
To get started with Tmux on Linux, you first need to install it. You can do this by using the command ‘sudo apt-get install tmux’ on Debian-based systems or ‘sudo yum install tmux’ on RedHat-based systems. After installation, you can start a new session by simply typing ‘tmux’ in the terminal.
How can I move a pane to a new window in Tmux?
To move a pane to a new window in Tmux, you can use the ‘break-pane’ command. This command will take the current pane and create a new window with it. The command is ‘prefix + !’. After executing this command, the pane will be moved to a new window.
What are some useful Tmux shortcuts?
Tmux has a variety of shortcuts that can help you navigate and manage your sessions more efficiently. Some of the most useful ones include ‘prefix + c’ to create a new window, ‘prefix + n’ to move to the next window, ‘prefix + p’ to move to the previous window, and ‘prefix + l’ to move to the last window you were in.
How can I customize my Tmux configuration?
Tmux allows you to customize your configuration by editing the ‘.tmux.conf’ file in your home directory. You can change the prefix key, set default window options, customize the status line, and more. After making changes, you can reload the configuration file with the command ‘tmux source-file ~/.tmux.conf’.
How can I split windows in Tmux?
In Tmux, you can split windows into multiple panes using the ‘split-window’ command. The command ‘prefix + %’ will split the window vertically, creating a new pane to the right of the current one. The command ‘prefix + “‘ will split the window horizontally, creating a new pane below the current one.
How can I resize panes in Tmux?
To resize panes in Tmux, you can use the ‘resize-pane’ command. This command allows you to adjust the size of the current pane. You can add ‘-U’, ‘-D’, ‘-L’, or ‘-R’ to the command to resize the pane in the up, down, left, or right direction, respectively.
How can I switch between panes in Tmux?
To switch between panes in Tmux, you can use the ‘select-pane’ command. This command allows you to move the focus to another pane. You can add ‘-U’, ‘-D’, ‘-L’, or ‘-R’ to the command to move the focus in the up, down, left, or right direction, respectively.
How can I close a pane or window in Tmux?
To close a pane or window in Tmux, you can use the ‘kill-pane’ or ‘kill-window’ command. The ‘kill-pane’ command will close the current pane, while the ‘kill-window’ command will close the current window. If you want to close all panes or windows, you can add ‘-a’ to the command.
 Glenn Goodrich
Glenn works for Skookum Digital Works by day and manages the SitePoint Ruby channel at night. He likes to pretend he has a secret identity, but can't come up with a good superhero name. He's settling for "Roob", for now.