In the second part of this series, we prepared simple admin facing functionality for our plugin. We provided the users with an options page where they can tweak the plugin according to their preferences.
If you missed part 1 and 2, please find them below:
- The WordPress Plugin Boilerplate Part 1: Speed up Development Using the WordPress Plugin Boilerplate
- The WordPress Plugin Boilerplate Part 2: Developing a WordPress Plugin
For this article, we’re going to implement the public facing functionality of the plugin. This means that we’re going to retrieve the user preferences, determine whether that specific post is outdated or not, and display the notice accordingly on its single post view. Let’s get started!
Preparing the Theme
We need to prepare our theme so that we can test it out later. We are going to use the Twenty Fifteen theme that is shipped by default with WordPress. Rather than populating the posts manually, we are going to use the theme unit test data provided by the Theme Review team to populate the posts.
We need to download the theme-unit-test-data.xml provided on the above Codex page and import it into our WordPress installation. The WordPress built-in import functionality can be found by navigating to Tools > Import from the sidebar.
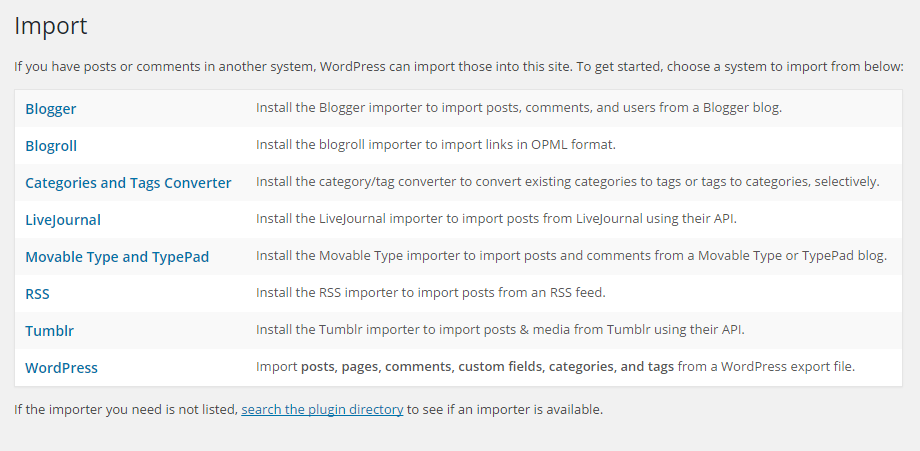
We will be presented with various choices, and since we are importing the WordPress export file, we are going to choose WordPress. Depending on the WordPress installation, a plugin popup will be displayed if we do not have the WordPress Importer plugin installed. Just go ahead and install the plugin first if you do not have it and we will proceed with the actual importing process once it is done.

This is the default WordPress import page, so we will need to choose the theme-unit-test-data.xml downloaded previously and click on the “Upload file and import” button.
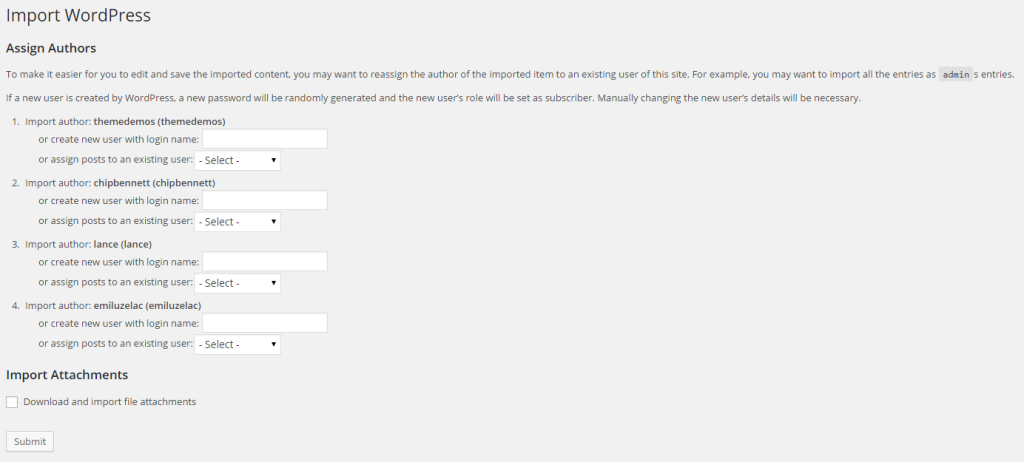
A second screen will then be presented. Don’t worry much about the “Assign Authors” section as we can leave it as default. In the “Import Attachments” section, make sure to tick the checkbox “Download and import file attachments” so that all the external attachments will be downloaded and imported into the media library.
Press the “Submit” button and wait until the importing process is done successfully.
Now we are ready to write the code that displays our notice.
Hooking into the_content Filter
Using the_content filter is the perfect way to alter the content of the posts displayed to the user. As per the previous tutorial, we are going to add the hook to the Boilerplate class loader, with the only difference being that the define_public_hooks method will be used instead of define_admin_hooks.
Add this line of code into the method:
$this->loader->add_action( 'the_content', $plugin_public, 'the_content' );This means, we are going to need to implement a public the_content method into our Outdated_Notice_Public class. Open up public/class-outdated-notice-public.php and modify it accordingly.
Conditionally Modifying the Content
Because the the_content filter is used by various plugins, and the internal WordPress core, we need to be cautious in inserting our custom content into it.
We need to make sure that we are only inserting the outdated notice text whenever a single post is displayed, not on the blog post index. In order to do that, we can filter it by using the is_main_query function. This function is useful whenever we need to determine whether the running query is the main one or a secondary/custom query.
Another thing that we need to consider is that we are only going to display the notice text for a single view of post type post, so is_singular( 'post' ) validation will be perfect for the job.
This is the updated the_content method contained inside the Outdated_Notice_Public class.
public function the_content( $post_content ) {

		if ( is_main_query() && is_singular('post') ) {
			// do something
		}

        return $post_content;
	}
Calculating the Days Difference
Before we begin, let’s set our position for the notice to appear as “before” the post, and the number of days threshold to 30.
First, we need to retrieve the stored settings of our plugin. The get_option function will do the job, and as a safe measure, we are going to pass a default value as a second argument to get_option.
$position  = get_option( 'outdated_notice_position', 'before' );
	$days      = (int) get_option( 'outdated_notice_day', 0 );
To calculate the days difference between current time and the post last modified time, we are going to instantiate two DateTime objects. We can get an accurate measurement of time difference using the diff method that is built in to the DateTime class. Note that the DateTime class is only available on PHP >= 5.3.0.
$date_now  = new DateTime( current_time('mysql') );
	$date_old  = new DateTime( get_the_modified_time('Y-m-d H:i:s') );
	$date_diff = $date_old->diff( $date_now );
$date_diff is an instance of the DateInterval class so we are going to have a range of data available with regards to time differences. If we are to var_dump the $date_diff variable, this is what we should get, depending on the post that you are currently viewing.
object(DateInterval)#286 (8) {
	  ["y"]=>
	  int(0)
	  ["m"]=>
	  int(0)
	  ["d"]=>
	  int(12)
	  ["h"]=>
	  int(23)
	  ["i"]=>
	  int(17)
	  ["s"]=>
	  int(22)
	  ["invert"]=>
	  int(0)
	  ["days"]=>
	  int(12)
	}
We are only interested in the days value as it will be used as a comparison against our days threshold. As I said before, we are going to compare them so that we can apply the specific class to our notice div element to style it differently between posts.
if ( $date_diff->days > $days ) {
		$class = 'is-outdated';
	} else {
		$class = 'is-fresh';
	}
This simple comparison block is enough to determine which class to use for our div. The only thing left now is to actually construct the HTML to be added to the post content.
For better translation ready text, we are going to use the _n function to selectively choose the proper text to be used depending of the number of days since the post was last updated. Then, we are going to wrap the notice text in its own div so that we can style it later. Feel free to tweak the notice text to your own liking.
// Filter the text
	$notice = sprintf(
				_n(
					'This post was last updated %s day ago.',
					'This post was last updated %s days ago.',
					$date_diff->days,
					'outdated-notice'
				),
				$date_diff->days
			);

	// Add the class
	$notice = '<div class="outdated-notice %s">' . $notice . '</div>';
	$notice = sprintf( $notice, $class );
The $notice variable should now contain the markup that we are going to be inserting in to our post content. The only thing left to do is to add it in.
if ( 'after' == $position ) {
		$post_content .= $notice;
	} else {
		$post_content = $notice . $post_content;
	}
As a recap, this is how the the_content method inside Outdated_Notice_Public should finally look.
public function the_content( $post_content ) {
if ( is_main_query() && is_singular('post') ) {
$position = get_option( 'outdated_notice_position', 'before' );
$days = (int) get_option( 'outdated_notice_day', 0 );
$date_now = new DateTime( current_time('mysql') );
$date_old = new DateTime( get_the_modified_time('Y-m-d H:i:s') );
$date_diff = $date_old->diff( $date_now );
if ( $date_diff->days > $days ) {
$class = 'is-outdated';
} else {
$class = 'is-fresh';
}
// Filter the text
$notice = sprintf(
_n(
'This post was last updated %s day ago.',
'This post was last updated %s days ago.',
$date_diff->days,
'outdated-notice'
),
$date_diff->days
);
// Add the class
$notice = '<div class="outdated-notice %s">' . $notice . '</div>';
$notice = sprintf( $notice, $class );
if ( 'after' == $position ) {
$post_content .= $notice;
} else {
$post_content = $notice . $post_content;
}
}
return $post_content;
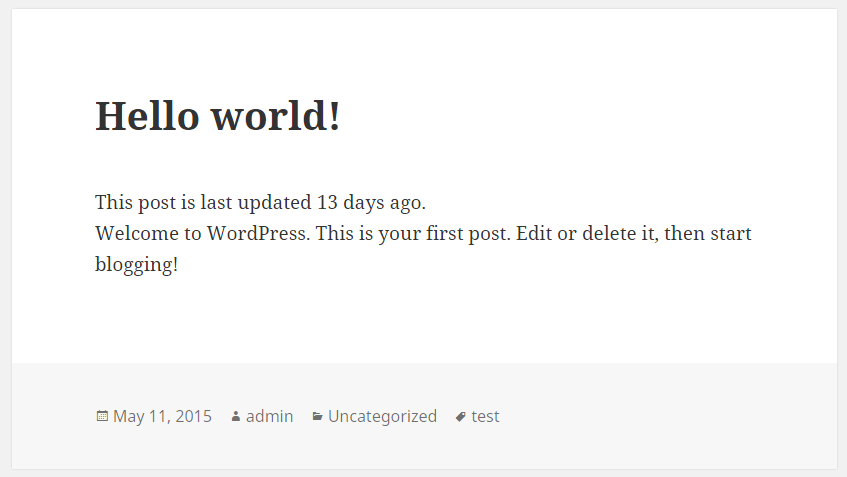
}Try browsing to a few pages to see if our plugin is working as intended. This is what I’m seeing when browsing to the “Hello World” post on url <site-url>/2015/05/11/hello-world/.
Styling the Notice Text
We are going to apply some simple styling to the .outdated-notice div that is going to match well with the overall theme design without being intrusive. In order to do that, we are not going to change anything with regards to the font size or font family that is already used. Plus, we are going to borrow the Bootstrap color scheme and styling for now.
Open up the outdated-notice-public.css file contained inside the public/css folder and add this rule.
.outdated-notice {
	    border: 1px solid transparent;
	    border-radius: 4px;
	    margin-bottom: 20px;
	    padding: 15px;
	}
We also need two different styles to represent the post-freshness, which is one style for .is-fresh and another one for .is-outdated. This snippet should do the trick, giving us a nice green color scheme for a fresh post, and red color scheme for an outdated post.
.outdated-notice.is-fresh {
background-color: #dff0d8;
border-color: #d6e9c6;
color: #3c763d;
}
.outdated-notice.is-outdated {
background-color: #f2dede;
border-color: #ebccd1;
color: #a94442;
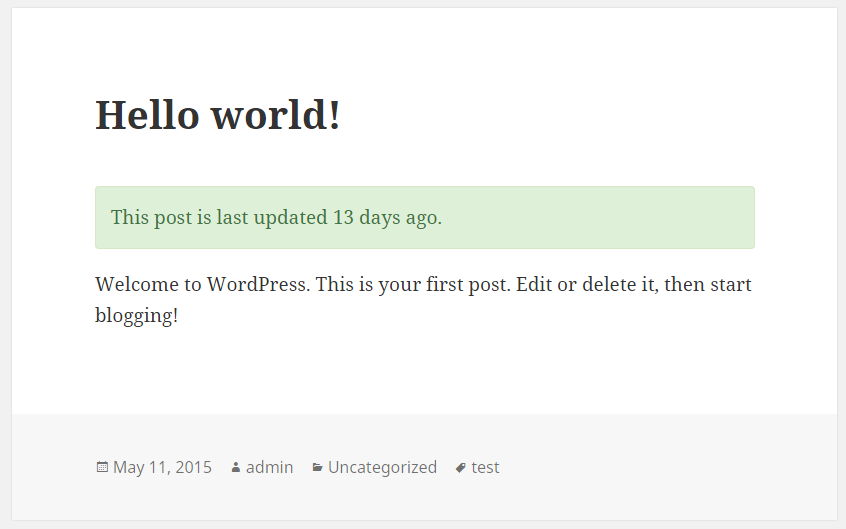
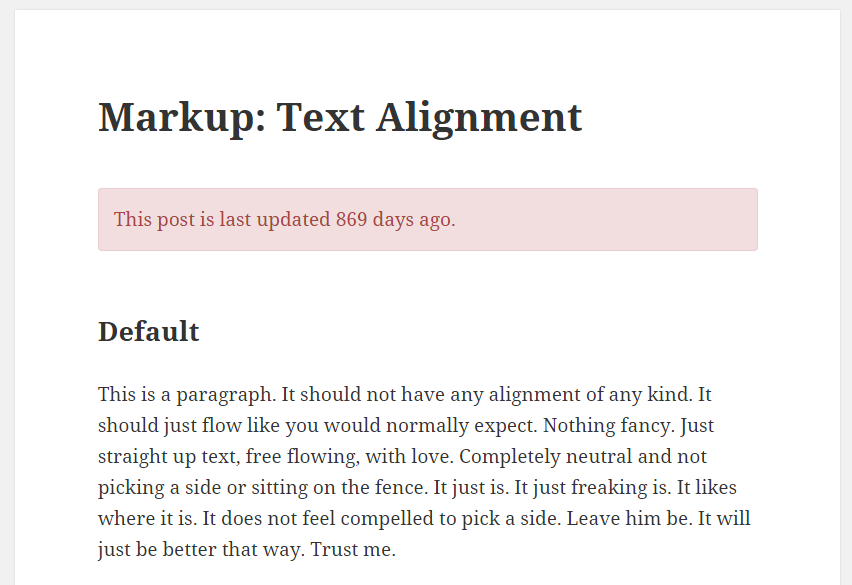
}Let’s refresh the post view and see how it is styled. Examples of a fresh and an outdated post:
That is it! We now have our fully functional plugin developed based on the WordPress Plugin Boilerplate.
Improvements
There are various things that can be improved based on what we’ve done so far. Among them are:
- Dynamic text for different contexts, where we can use different text for the outdated notice.
- Remove the enqueuing of
outdated-notice-public.jsscript since it is not used. - Dismissible notice so that it won’t interrupt the user experience when reading the post.
Conclusion
The WordPress Plugin Boilerplate provides a perfect starting point to develop any plugin from scratch. In this last part of the series, we finished up by developing the public facing functionality of our plugin. The modifications though quite simple, are done in little time, while still maintaining the OOP pattern established by the Boilerplate itself and adhering to standards and best practices.
A full copy of the code is available as usual at GitHub on the part-3 branch.
Frequently Asked Questions (FAQs) about WordPress Plugin Boilerplate
What is the WordPress Plugin Boilerplate and why is it important?
The WordPress Plugin Boilerplate is a standardized, organized, and object-oriented foundation for building high-quality WordPress plugins. It provides a clear and consistent structure that is easy to understand and work with, especially for developers who are new to WordPress plugin development. It’s important because it saves time and effort by providing a solid starting point, reducing the need to write common code from scratch. It also promotes best practices in coding, enhancing the performance, security, and maintainability of your plugins.
How do I start using the WordPress Plugin Boilerplate?
To start using the WordPress Plugin Boilerplate, you need to first download it from its GitHub repository. Once downloaded, you can rename the boilerplate’s directory and files to match the specifics of your plugin. The boilerplate’s code is well-commented, guiding you on where to place your custom code. Remember to update the plugin headers in the main plugin file to reflect your plugin’s details.
Can I use the WordPress Plugin Boilerplate for commercial projects?
Yes, the WordPress Plugin Boilerplate is open-source and licensed under the GPL, which means you can use it for both personal and commercial projects. However, it’s good practice to acknowledge the boilerplate in your plugin’s documentation or credits.
How can I contribute to the WordPress Plugin Boilerplate project?
The WordPress Plugin Boilerplate is a community-driven project, and contributions are always welcome. You can contribute by reporting bugs, suggesting improvements, or submitting pull requests on its GitHub repository. Before contributing, make sure to read and understand the project’s contribution guidelines.
What is the structure of the WordPress Plugin Boilerplate?
The WordPress Plugin Boilerplate follows a specific structure designed to keep your code organized and manageable. It consists of three main directories: ‘admin’, ‘includes’, and ‘public’. The ‘admin’ directory contains the CSS, JavaScript, and PHP files for the admin-specific side of the plugin. The ‘includes’ directory is used to define the core plugin class and other shared functions. The ‘public’ directory contains the files for the public-facing side of the plugin.
How do I add a new feature to my plugin using the WordPress Plugin Boilerplate?
To add a new feature to your plugin, you would typically create a new class for that feature in the ‘includes’ directory. This class should define all the hooks that your feature needs to run. Then, you instantiate this class in the main plugin class and add it to the ‘run’ function. This modular approach makes it easy to add, remove, or modify features in your plugin.
How do I handle plugin options with the WordPress Plugin Boilerplate?
The WordPress Plugin Boilerplate provides a class for handling plugin options in the ‘admin’ directory. This class includes functions for registering settings, defining sections and fields, and rendering the settings page. You can extend this class to handle your plugin’s specific options.
How do I internationalize my plugin with the WordPress Plugin Boilerplate?
The WordPress Plugin Boilerplate includes a class for internationalization in the ‘includes’ directory. This class loads the text domain of your plugin, allowing it to be translated into other languages. You just need to replace the placeholder text domain in the boilerplate with your plugin’s text domain.
How do I enqueue scripts and styles with the WordPress Plugin Boilerplate?
The WordPress Plugin Boilerplate provides separate classes for enqueuing scripts and styles in the ‘admin’ and ‘public’ directories. These classes include functions for registering and enqueuing your scripts and styles, ensuring they are loaded in the right place and at the right time.
How do I uninstall my plugin cleanly with the WordPress Plugin Boilerplate?
The WordPress Plugin Boilerplate includes an uninstall.php file that is run when your plugin is uninstalled from the WordPress dashboard. This file should contain any cleanup code, such as removing plugin options or database tables. This ensures that your plugin leaves no traces behind when it’s uninstalled.
 Firdaus Zahari
Firdaus Zahari is a web developer who comes all the way from Malaysia. His passion revolves around (but is not limited to) WordPress and front-end development.