 In the previous part of this series, we’ve covered the LinkedIn gem and created a simple application that covered authentication and APIs queries. We are going to build a similar application with the Twitter gem for the same purposes.
The Twitter gem, in contrast with the LinkedIn gem, doesn’t provide authentication. As such, we’ll have to use the oauth-ruby gem to do the authentication.
The Demo Application
The application we are going to build with the Twitter gem is going to be the same a, what we built with LinkedIn. We will get all the user data from Twitter into our rails app models so we can display it in whatever format we want.
Starting with the application:
You can download the full source code of the tutorial form github here
Create a new rails app:
rails new rsg_twitter_gem
Add the twitter, oauth, devise, bootstrap gems in path/to/project/Gemfile
[gist id=”4166501″]
And then run
bundle install
We are going to use bootstrap for the UI component.
Initializing
Before we start we need to run few commands to initialize the project.
Create the User Model and Bootstrap styling
The following commands are found on the github page of the devise project and the twitter bootstrap project
To install devise
rails generate devise:install
To create the user model
rails generate devise user
rake db:migrate
To configure views
rails generate devise:views
To install bootstrap
rails g bootstrap:install
To set a layout bootstrap
rails g bootstrap:layout application fixed
Remove the index file from
path/to/project/public/index.html
Application Structure
Controllers
We will need only to create one controller, which will handle the connection to Twitter. The controller will pull the data from the API and push it to our models.
rails g controller twitter
Add the following line to the beginning of the TwitterController
[gist id=”3926307″]
Create the application on Twitter developer site
You should specifiy the domain in Callback URL when you create the application on Twitter. For example, you should set the domain as http://0.0.0.0:3000 for development. After deployment you should change it to your domain name.
Now we can add a few helper methods to handle the authentication and APIs queries.
Authentication with OAuth gem is really simple. Let’s go through the authentication actions.
generate_twitter_oauth_url
* Specify the oauth_callback url, which the user will be redirected to after the user authorizes the application.
* Create a consumer object with your consumer key and secret.
* Store the @request_token object for later use and redirect the user to the authorization url. Don’t forget to pass the callback url.
[gist id=”56e1f5f2c77e8e92bb44″]
oauth_account
* The TwitterOauthSetting object is used to store the access token and secret. We’ll go through this model in more detail later.
* Search to see if the current user has already authenticated the application.
* Retrieve the @request_token again, and get the @access_token object, with the :oauth_verifier parameter sent back from Twitter.
* Create a TwitterOauthSetting to store the Access token, and Access token secret.
* Call update_user_account to update the user object with their twitter account info.
[gist id=”ddcb280370af4b19c5bb”]
index
This is the root action, which checks if this user has a twitter oauth setting object or not. If true, redirect to the twitter_profile action.
[gist id=”e317bbbaaaaedb224e26″]
get_client
The configuration for this gem can be done in two different ways. The first way is the global configuration for single user. The other way, which we are going to use, is to configure each client with their token and secret, returning the client object to use.
[gist id=”9a9a43223d68d397025e”]
twitter_profile
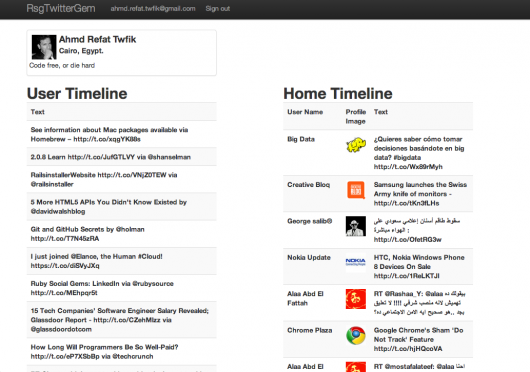
This action displays the user info, their timeline, and the home timeline.
[gist id=”b932de5757be754eb061″]
update_user_account
Updating the user profile with their twitter account info. We’ll add these fields to the user model later.
[gist id=”f272bac62ab8d7cd54bd”]
Routes
Add the following to path/to/project/config/routes.rb
[gist id=”2e8911428e658dc06288″]
Views
We should make few changes before running the server.
Modify the layout view path/to/project/app/views/layouts/application.html.erb by removing lines 65-74. Replace lines 50-52 with this:
[gist id=”8cb9a527349bffd14664″]
Modify the index view [path/to/project/app/views/twitter/index.html.erb] as follows:
[gist id=”08301e18c27586c57144″]
Models
We should stop here, and take a look at the Twitter APIs and what we are going to cover here. Also, we need to know the specification of the models to create in our application.
Twitter provides the developer with A field guide to Twitter Platform objects. There is four main objects you’ll deal with: Tweets, Users, Entities, Places. We are going to focus on the Tweet object.
This is how Twitter define Tweet, from the guide
Also known as a Status Update, Tweets are the basic atomic unit of all things Twitter. Users create Tweets. Tweets can be embedded, replied to, favorited, unfavorited, retweeted, unretweeted and deleted. A retweet contains an embedded Tweet object within the “retweeted_status” attribute.
In the Tweets page, you’ll find a Field Guide, which lists the fields of the Tweet object and the related objects.
Here is a few selected fields:
- Coordinates
- Represents the geographic location of this Tweet as reported by the user or client application. The inner coordinates array is formatted as geoJSON (longitude first, then latitude).
- Object
- Only surfaces on methods supporting the include_my_retweet parameter, when set to true. Details the Tweet ID of the user’s own retweet (if existent) of this Tweet.
- Boolean
- Indicates whether this Tweet has been favorited by the authenticating user.
- Int
- Number of times this Tweet has been retweeted. This field is no longer capped at 99 and will not turn into a String for “100+”
- String
- The actual UTF-8 text of the status update. See twitter-text for details on what is currently considered valid characters.
- Users
- The user who posted this Tweet. Perspectival attributes embedded within this object are unreliable.
User
Now we can add a few fields to the user model from his/her twitter account. Run the following command to update the user model.
[gist id=”2b22846fdcea278f740f”]
Go to /path/to/project/db/migrate/20121112110442_add_fields_to_user_model.rb, and add the following and run rake db:migrate:
[gist id=”daea9311875fda313847″]
Go to /path/to/project/app/models/user.rb and change line 9 to the following:
[gist id=”1bbbe10d66b7ce4da6d8″]
TwitterOauthSetting
This is an important model which will store two values for each user. These values are used later to access their account without asking for permission each time.
Run the following command to create the above model:
rails g model twitter_oauth_setting atoken:string asecret:string user_id:integer
rake db:migrate
Add the association between the user model and the twitteroauthsetting model:
path/to/project/app/models/twitter_oauth_setting.rb
[gist id=”4166532″]
Twitter APIs Inquiries
There are a couple of examples on the gem repo on Github, for example:
[gist id=”4903e5d7780349be3811″]
Let’s put it all together and build a simple view to display the stored data.
Create a new file twitter_profile.html.erb at path/to/project/app/views/twitter/
[gist id=”4059372″]

Wrapping up
Well, I hope this tutorial was useful and a good introduction to using the Twitter gem and the APIs. If you would like to suggest the next gem to cover, do so in the comments. Thanks for reading!
I'm enthusiastic for Open Web, Open Source, Linux, writing code, and I do love Ruby on Rails, and JavaScript, and I am member of the Ubuntu-EG LoCo team.

