Getting Started with React, GraphQL and Relay (Part 2 of 2)

This article is part of a web development series from Microsoft. Thank you for supporting the partners who make SitePoint possible.
Key Takeaways
- Relay applications are essentially React components wrapped in Relay Containers. The Relay Containers describe the data needed by the components, and Relay Root Containers connect with the GraphQL-Relay server to query and mutate data.
- Querying data from a Relay-enabled GraphQL server is relatively simple, especially when compared to mutations. Once the component that will consume the data has been created, a Relay container describing the data needed by the component is created.
- Setting up mutations requires creating a new class which inherits from Relay.Mutation. The fragments property lists the mutation’s data dependencies. The getMutation function specifies the name of the GraphQL mutation to be executed, and should match the name of the mutation on the GraphQL server.
- The second mutation, update, is similar to the insert mutation, although there are a few changes. First, the name of mutation needs to be updated to call the updateWidget mutation. Secondly, the getConfigs needs to be configured to update fields of an existing widget using the FIELDS_CHANGE operation.
- The third mutation, delete, is similar to the updateWidget mutation. The range operation for deleting a widget is the NODE_DELETE operation. The data required are the parent field name, the parent ID, the connection from which the widget is to be deleted, and the field name of the ID field used to specify the widget being deleted.
Introduction
The previous article explored the overall development process of working with Relay as well as the conversion of a GraphQL server. With the backend prepared, the second half of a React/GraphQL/Relay application is to consume it with the React-Relay web browser application. Consuming GraphQL services with React via Relay is tricky to setup. The technology is quite new, and therefore the number of examples, the clarity of the documentation, as well as a number of technical challenges (not bugs) have to be smoothed over. The example reviewed here will be a full blown CRUD (Create, Read, Update, and Delete) application. In addition to querying data, there will be an example of three kinds of mutations which will be helpful to new Relay developers because online examples of mutations are, at the time of this writing, few and far between.
Widget Tool Application
This simple application allows the user to manage a table of widgets. Widgets can be added, removed, and updated. The application does not use any kind of view routing which results in the Widget table being replaced with another view. Instead, it’s a simplistic version of an editable grid. For each widget the following information is collected:
- Name
- Description
- Color
- Size
- Quantity
- Owner
The drop-down list for the owner is populated from a distinct list of all owners who currently own widgets.
React and Relay
Relay applications are nothing more than React components wrapped in Relay Containers. The Relay Containers describe the data needed by the components, and Relay Root Containers connect with the GraphQL-Relay server to query and mutate data. The description of the data needs is accomplished via GraphQL fragments, while the root schema type for the connection is specified through a Relay Route. Conceptually, it’s a relatively simple setup. The challenge is in the details of the setup, and understanding exactly what Relay needs to know in order to perform the various operations.

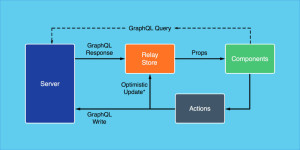
Source: React – Facebook Code
The above image from this blog post depicts the way in which Relay works with React. Components trigger actions through Relay’s Store API, and the Relay Store handles the responses from the GraphQL server. Interestingly, Relay supports the concept of optimistic updates, which allow the mutation to be recorded in the store pending final confirmation from the server. Optimistic updates allow the UI to signal the user that the update has occurred, even though it has not. Should the update fail, the user will have to be notified, and the UI updated.
Querying Data
Querying data from a Relay-enabled GraphQL server is relatively simple, especially when compared to mutations. Once the component that will consume the data has been created, a Relay container describing the data needed by the component is created. To set up the container, the component being wrapped by it needs to be specified along with a query fragment which defines the data being queried.
import Relay from 'react-relay';
import WidgetToolComponent from '../components/widget-tool';

export default Relay.createContainer(WidgetToolComponent, {
  fragments: {
    colors: () => Relay.QL'fragment on __Type { enumValues { name description } }',
    sizes: () => Relay.QL'fragment on __Type { enumValues { name description } }',
    viewer: () => Relay.QL'
      fragment on Viewer {
        id
        users(first: 1000) {
          edges {
            node {
              id
              firstName
              lastName
            }
          }
        }
        widgets(first: 1000) {
          edges {
            node {
              id
              name
              description
              color
              size
              quantity
              owner {
                id
                firstName
                lastName
              }
            }
          }
        }
      }
    '
  }
});
For this application, three fragments are needed. Two of the fragments are used for introspection queries, in order to load the possible values for two enums which are defined: colors and sizes. The third fragment is for querying application data for the specific viewer. In this application, there is only one unauthenticated viewer. In an application where authentication and authorization are implemented, the viewer would represent the authenticated user, and the data queried under the viewer would typically be limited to data accessible to the user. This limitation would need to be implemented in the GraphQL server.
The parameters passed into users and widgets are the GraphQL-Relay connection pagination arguments: first, after, last, before. first indicates how many edges to return from the beginning, or after the cursor if after is specified. last indicates how many edges to return up to the number of edges before the specified cursor. The cursor is used by Relay to determine the starting location.
Once the fragments are defined, the Relay route is used to specify the queries and fields to execute queries (including the fragments) against.
import Relay from 'react-relay';

export default class extends Relay.Route {
  static queries = {
    colors: () => Relay.QL'query { __type(name:"Color") }',
    sizes: () => Relay.QL'query { __type(name:"Size") }',
    viewer: () => Relay.QL'query { viewer }'
  };
  static routeName = 'ViewerRoute';
}
Once the Relay container and route, as well as the React component, are coded, they need to be configured with a Relay root container. The root container will query the GraphQL server for the data needed to fulfill the requirements of the Relay container. The query is formed using the Relay route and the Relay container fragments. Once the data is received, the root container will pass the data to the container, which will set the properties of the React component and render it.
import React from 'react';
import Relay from 'react-relay';
import ReactDOM from 'react-dom';
import WidgetToolContainer from './containers/widget-tool-container';
import ViewerRoute from './routes/viewer-route';

ReactDOM.render(
  <Relay.RootContainer Component={WidgetToolContainer} route={new ViewerRoute()} />,
  document.querySelector('main')
);
In this application, the root container will fill the WidgetToolContainer using data specified by the ViewerRoute and fragments defined within the WidgetToolContainer.
First Mutation: Insert
Setting up mutations requires creating a new class which inherits from Relay.Mutation, provided by the react-relay module.
import Relay from 'react-relay';

export default class extends Relay.Mutation {

  static fragments = {
    viewer: () => Relay.QL'fragment on Viewer { id }'
  }

  getMutation() {
    return Relay.QL'mutation { insertWidget }';
  }

  // more code here...

}
A static property named fragments needs to be configured in this new class. The fragments property lists the mutation’s data dependencies. In this case, the mutation of the widget is dependent upon the viewer ID. The mutation is dependent upon the viewer ID because all data retrieved in the application is retrieved through the context of the current viewer. Therefore, when the mutation is performed, Relay will ensure the viewer ID is always available.
With the fragments configured, the getMutation function needs to be configured for the mutation. The getMutation function specifies the name of the GraphQL mutation to be executed, and should match the name of the mutation on the GraphQL server.
The getVariables function transforms data passed into the constructor of the mutation into the structure needed by the GraphQL server to perform the mutation. The data passed into the constructor are made available on the props of the Relay mutation object. In this case, the widget fields on the props are used to construct a new widget object as a property of the input data object sent to the mutation on the GraphQL server. This widget object must conform to the InputInsertWidget type as defined by the GraphQL server.
  getVariables() {
    return {
      widget: {
        name: this.props.name,
        description: this.props.description,
        color: this.props.color,
        size: this.props.size,
        quantity: this.props.quantity,
        ownerId: this.props.ownerId
      }
    };
  }
The props values are passed via the constructor for the mutation as shown here. The viewer must be set to the original viewer retrieved using Relay. The widget property must be set to null since this will be a new widget rather than an existing widget. Finally, using Object.assign, the properties from the widget object (which contains the data to be inserted) are copied on to the object being passed into the constructor.
Relay.Store.commitUpdate(new InsertWidgetMutation(
  Object.assign({ viewer: this.props.viewer, widget: null }, widget)
));
When commitUpdate is called, a new InsertWidgetMutation object is created and passed in. The function commitUpdate will use getConfigs and getFatQuery to determine which data needs to be updated to accomplish the mutation. While not shown here, it’s possible to configure optimistic updates and handle collisions between multiple mutations. These features really show the true power of Relay to handle data mutations intelligently.
For the insert widget mutation, the configuration type is RANGE_ADD, where a new widget is being added to the range of widget edges. The connection name identifies to which range of edges the widget is being added, and identifies the name of the GraphQL field which will contain the data for the new widget edge. The range behavior identifies how the widget will be added to the range–single or multiple range behaviors can be configured. For the widget connection, the default and only behavior is the append behavior. Other range operations are prepend, ignore, refetch, and remove.
getConfigs() {
  return [{
    type: 'RANGE_ADD',
    parentName: 'viewer',
    parentID: this.props.viewer.id,
    connectionName: 'widgets',
    edgeName: 'widgetEdge',
    rangeBehaviors: {
      '': 'append'
    }
  }];
}
getFatQuery is used to retrieve all of the data needed to update the application once the mutation has been completed. The name InsertWidgetPayload is simply ‘Payload’ appended to end of a camel case version of the mutation name. All GraphQL fields impacted by the mutation should be included in the fragment.
getFatQuery() {
  return Relay.QL'
    fragment on InsertWidgetPayload @relay(pattern: true) {
      viewer {
        widgets {
          edges {
            node {
              id
              name
              description
              color
              size
              quantity
              owner {
                id
                firstName
                lastName
              }
            }
          }
        }
      }
      widgetEdge
    }
  ';
}
Once the mutation is complete, Relay will update the Store, triggering React to render the component attached to the container. View the full source code of the insert widget mutation file on GitHub.
Second Mutation: Update
The next two mutations are similar to the insert mutation, although there are a few changes. First, the name of mutation needs to be updated to call the updateWidget mutation.
getMutation() {
  return Relay.QL'mutation { updateWidget }';
}
Secondly, the getConfigs needs to be configured to update fields of an existing widget using the FIELDS_CHANGE operation.
getConfigs() {
  return [{
    type: 'FIELDS_CHANGE',
    fieldIDs: {
      viewer: this.props.viewer.id
    }
  }];
}
The FIELDS_CHANGE operation needs to know the ID of the viewer for the fat query, and the data returned from the fat query will be used to update the local store.
Finally, the getVariables function needs to be updated to include the ID of the widget since this will be an update operation, and the ID is needed to identify which widget to update.
getVariables() {
  return {
    widget: {
      id: this.props.id,
      name: this.props.name,
      description: this.props.description,
      color: this.props.color,
      size: this.props.size,
      quantity: this.props.quantity,
      ownerId: this.props.ownerId
    }
  };
}
View the full source code for the update widget mutation on GitHub.
Third Mutation: Delete
Similar to the updateWidget mutation, the deleteWidget mutation needs to be specified as follows:
getMutation() {
  return Relay.QL'mutation { deleteWidget }';
}
The range operation for deleting a widget is the NODE_DELETE operation. The data required are the parent field name, the parent ID, the connection from which the widget is to be deleted, and the field name of the ID field used to specify the widget being deleted:
getConfigs() {
  return [{
    type: 'NODE_DELETE',
    parentName: 'viewer',
    parentID: this.props.viewer.id,
    connectionName: 'widgets',
    deletedIDFieldName: 'widgetId'
  }];
}
The fat query is modified to specify the widget ID, not the widget edge:
getFatQuery() {
  return Relay.QL'
    fragment on DeleteWidgetPayload @relay(pattern: true) {
      viewer {
        widgets {
          edges {
            node {
              id
              name
              description
              color
              size
              quantity
              owner {
                id
                firstName
                lastName
              }
            }
          }
        }
      }
      widgetId
    }
  ';
}
Finally, the only value being sent to the GraphQL server is the ID of the widget to be deleted.
getVariables() {
  return {
    widgetId: this.props.widgetId
  };
}
View the full source code for the delete widget mutation on GitHub.
Conclusion
React and GraphQL combined with Relay is quite powerful, once the setup is mastered. As time progresses, there will be many enhancements to Relay, and plenty of real-world examples, which should greatly reduce the learning curve. With React being used for native applications, the ecosystem of React and its related technologies will continue to grow and become pervasive throughout the programming world.
Facebook will become a dominant player in the open-source JavaScript programming community, and more of its homegrown technologies will find their way into the solutions of the rest of the software development world.
This article is part of the web development series from Microsoft tech evangelists and DevelopIntelligence on practical JavaScript learning, open source projects, and interoperability best practices including Microsoft Edge browser and the new EdgeHTML rendering engine. DevelopIntelligence offers JavaScript Training and React Training Courses through appendTo, their front-end focused blog and course site.
We encourage you to test across browsers and devices including Microsoft Edge – the default browser for Windows 10 – with free tools on dev.microsoftedge.com, including virtual machines to test Microsoft Edge and versions of IE6 through IE11. Also, visit the Edge blog to stay updated and informed from Microsoft developers and experts.
Frequently Asked Questions (FAQs) about React, GraphQL, and Relay
What is the main difference between Relay and Apollo?
Both Relay and Apollo are popular libraries for managing data with GraphQL in React applications. However, they differ in their approach and complexity. Relay is more opinionated and prescriptive, providing a set of conventions for structuring your application. This can make it more complex to learn, but it also provides a lot of power and flexibility once you understand its principles. On the other hand, Apollo is more flexible and easier to get started with, but it may require more manual configuration and decision-making as your application grows.
How does Relay handle caching?
Relay uses a normalized cache to store data. This means that each object is stored once, by its ID, and any references to that object elsewhere in the cache are simply pointers to the original. This approach helps to ensure consistency across your application, as any changes to an object are immediately reflected everywhere that object is used.
Can I use Relay without React?
Relay is specifically designed to work with React and relies on many of React’s features, such as the component lifecycle and the context API. Therefore, it’s not possible to use Relay without React. If you’re not using React, there are other libraries available for managing GraphQL data, such as Apollo Client, which can be used with any JavaScript framework.
How does Relay handle pagination?
Relay provides built-in support for pagination through the use of connections. Connections are a standard way of representing lists of data in GraphQL, and Relay’s connection model provides a consistent way of fetching and updating paginated data.
What is the role of GraphQL in Relay?
GraphQL is a query language for APIs and a runtime for executing those queries with your existing data. Relay uses GraphQL to declare the data requirements of your components and to fetch that data from your server. This allows you to write declarative, component-centric data dependencies, which Relay can efficiently fetch and manage for you.
How does Relay handle mutations?
Relay provides a framework for declaring mutations at the component level, similar to how it handles data fetching. This allows you to specify exactly what data should be updated when a mutation occurs, ensuring that your components always have the most up-to-date data.
Is Relay suitable for small projects?
While Relay provides a lot of power and flexibility, it can be overkill for small, simple projects. The learning curve and setup time may not be justified for a small project with simple data needs. However, for larger projects with complex data requirements, Relay can provide significant benefits in terms of performance and maintainability.
How does Relay compare to Redux?
Both Relay and Redux are state management libraries, but they serve different purposes. Redux is a general-purpose state management library that can be used with any JavaScript application. Relay, on the other hand, is specifically designed for managing data in React applications using GraphQL. If you’re using GraphQL, Relay can provide a more integrated and efficient solution for data management.
Can I use Relay with TypeScript?
Yes, Relay provides full support for TypeScript. You can use TypeScript to add static typing to your Relay components and queries, providing additional safety and tooling benefits.
How does Relay handle server-side rendering (SSR)?
Relay provides built-in support for server-side rendering, allowing you to render your React components on the server and send the resulting HTML to the client. This can improve initial load performance and SEO. Relay’s SSR support includes the ability to prefetch data on the server, so that your components have all the data they need to render immediately when they reach the client.
Eric Greene is a professional software developer specializing in HTML, CSS, and JavaScript technologies. Right now he is focused on Node.js, React, GraphQL, Relay, Angular (1 and 2), Backbone, and jQuery. He has been developing software and delivering training classes for nearly 19 years. He holds the MCSD Certification for ASP.Net Web Applications, and is a Microsoft Certified Trainer. Eric has worked with companies of all sizes in the insurance, nuclear engineering, publishing and communications industries. Among his many professional endeavors, Eric is a Technical Instructor at DevelopIntelligence.


Published in
·Docker·Open Source·Programming·Software Development·Web·Web Hosting & Domains·January 15, 2016


