Learn symfony: a Beginner’s Tutorial

With the release of symfony 1.0, it’s time for those who haven’t tried it yet to see what’s inside this beautiful framework. Stable, fully documented, and released under the open-source MIT license, symfony is used by hundreds of web sites, including some very large ones (Yahoo! Bookmarks, with its 20 million-strong user base, is built with symfony). If you haven’t taken the time to look at the introductory screencasts on the symfony project website, this simple tutorial will lead you through the basics.
The best way to learn and understand symfony is to use it, so this article will lead you through the creation of a photo album application with this framework. You already know the basic features such an application should offer: the ability to upload photos, to describe and tag them, and the ability for visitors to browse and comment on your photos.
Symfony is a Model-View-Controller (MVC) framework written in PHP that’s aimed at building web applications. If you’re already familiar with the MVC paradigm, you won’t be surprised by the way symfony organizes scripts. If you aren’t familiar with MVC, you just need to understand that separating the code into three parts — the logic code (called the Model), the presentation code (the View), and the request handling code (the Controller) — is a good way to ensure the maintainability and reusability of code.
Not only is Symfony an MVC implementation in PHP, it also integrates a lot of objects that facilitate the development of web applications — and integrates them all with a coherent syntax. Smart URLs, code generation, easy templating, internationalization, caching, automated form validation, and Ajax, are among the most appreciated symfony features. Developing an application with symfony is slightly different than building it with any other framework, or without any framework at all. It’s faster, more productive, and just plain fun. But enough talk, let’s see some code.
Initializing an Application
First, you need to get the symfony files. Fortunately, one of the distributions of the framework comes packaged with an empty application and an SQLite database already configured and working straight out of the box. A working web server with PHP5, and shell access, is all that symfony requires to work.
To install symfony, simply download the sf_sandbox.tgz file.
Unpack it under the web root of your server directory. You can check for yourself that the installation went smoothly by browsing to this URL (note that it may vary depending on your individual setup): http://localhost/sf_sandbox/web/frontend_dev.php.
The directory structure of this new project is quite easy to understand:
sf_sandbox/      // project directory
apps/      // application files
batch/     // batch process scripts
cache/     // cache files
config/    // configuration files
data/      // data files and scripts
doc/       // documentation files
lib/       // vendor libraries and general purpose scripts
log/       // log files
plugins/   // plugins
test/      // unit and functional tests
web/       // public web directory
Many of these directories are empty for a new application; this directory structure can be regarded as a guideline to organize the files of a project effectively. The good news is that as soon as you understand how this directory structure works, you’ll be able to understand any symfony project: they’re all structured in the same way.
In most situations, web applications store data in relational databases, so the data structure has to be described as a set of columns grouped in tables that are linked via foreign keys. For the photo album application, the data schema consists of three tables: photo, tag, and comment. To describe their columns and relationships, we use a simple format called YAML (pronounced “yamel”), which looks like this:
propel: photo: id: ~ file_path: varchar(50) description: longvarchar created_at: ~ tag: photo_id: ~ name: varchar(50) comment: photo_id: ~ author: varchar(50) body: varchar(50) created_at: ~YAML is an alternative to XML for representing data structures. The syntax is pretty simple: structure is shown through indentation, and key/value pairs are separated by colons. The first line represents the name of the database connection for this schema. Propel is the default name in this sandbox — it refers to the included SQLite database. Propel may sound like a strange name to use as a default, but in fact, the name comes from a third-party component that’s integrated into symfony.
In this schema, tildes (~) are used instead of the explicit declaration of a data type, because symfony can induce the data type from the name of the key. For instance, the id column of the photo table is most obviously a primary key, so its type should be integer, and it should be auto-incremented. The created_at name obviously refers to a date, so it should be typed as a timestamp. And the two photo_id columns look very much like foreign keys to the id column of the photo table.
Symfony knows YAML, and understands this schema exactly as we described it. Open the schema.yml file under the main config/ directory of the sf_sandbox directory (sf_sandbox/config/schema.yml), and place the above YAML code in that file. Symfony is now ready to generate the Object-Relational Mapping (ORM) for that schema.
What is Object-Relational Mapping? Well-designed web applications don’t access data directly using SQL; instead, they use objects to interact with the database. Symfony uses an internal code generator to create the objects that correspond to the photo, tag, and comment tables, based on the object-relational mapping defined in the schema.yml file. To generate those objects, you just need to call one command from the shell. And that’s our cue to meet the symfony command line interface (CLI)!
Here’s the symfony script that lies at the root of your project:
$ cd sf_sandbox $ php symfony propel-build-allThe propel-build-all command (there’s that propel name again) generates the model classes under the lib/model/ directory (and creates the related tables in the SQLite database of the project). The classes are named Photo, Tag, and Comment, because symfony’s convention for class names is CamelCase. Like most classes in symfony, the model classes are autoloaded, which means that you can use them without manually “requiring” their files in the code (with include or require statements). Just remember to call the clear-cache symfony script each time you add a new class so that the symfony autoloading system can take it into account. Since you just created some classes, go ahead and call that script now:
$ php symfony clear-cacheWe’ll get back to these classes later, but first let’s look at the photo publishing interface.
Generating a Site Administration Panel
We’ll use a great feature of the symfony framework called the administration generator to create a site administration panel. The administration generator uses the relational schema as a guideline to create a data manipulation interface. Our site administrator will need to edit data from the Photo class, so let’s generate an admin panel for this class:
$ php symfony propel-init-admin frontend photo PhotoSymfony organizes the pages of a project within a hierarchy of applications and modules. Although this structure adds directories to a project’s structure, it makes maintenance easier, especially for large sites. So a module contains several pages, an application contains several modules, and a project can contain more than one application. The sandbox that you installed is a symfony project packaged with an empty application called frontend. This means that the command of the above listing reads as: “Create a site administration in the application frontend, in a module called photo, based on the model class Photo”. To see what the new module looks like, browse to http://localhost/sf_sandbox/web/frontend_dev.php/photo.
One of the advantages of a generated administration is that it allows you to add data to your database early in the project — even before coding. A generated administration consists of two pages that we’ll call the list view and the edit view. Symfony uses the schema to build tables, forms, and form-handling scripts. Although all the code is generated, you can override it as you like. However, the best way to customize a generated administration is not to write PHP code, but to use the generator.yml file. That’s a configuration file that controls the generated module, and adding parameters in this file transforms the list and edit views accordingly. Let’s see an example.
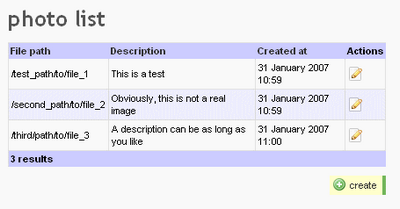
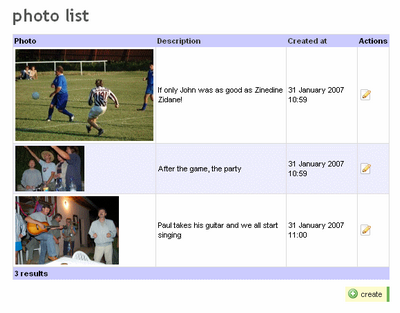
By default, the columns of the list view correspond to the columns defined in the schema. The column that corresponds to the primary key (id in this example) bears the hyperlink to the Edit view. But the id column is of no use for an administrator, so we should remove it from the list view. To do so, open the generator.yml file located in apps/frontend/modules/photo/config/ and add at the end the following code:
generator: class: sfPropelAdminGenerator param: model_class: Photo theme: default list: display: [file_path, description, created_at] object_actions: _edit: name: Edit picture propertiesBe aware that indentation is meaningful in YAML files, so try to respect the indentation shown here. One important piece of advice is to never use tab characters in YAML files — always use a double space to indent lines. The display line tells symfony which columns to show in the list, in which order. As for the object_actions key, it manages the buttons that will be shown for each line. The _edit button is predefined, so you don’t need to worry about the script it calls. We just customized the button’s name here. To see the result, browse to the photo module again and see how the list view changed.
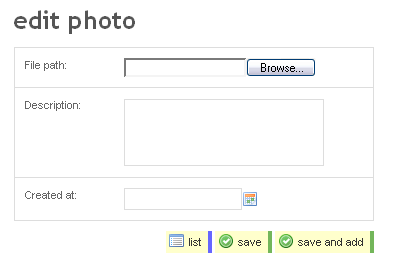
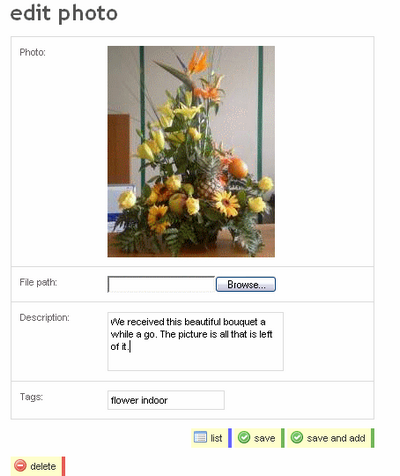
Entering a file path to upload photos is not very useful. The ideal for this photo administration module would be that users would be able to browse their file system to point to a picture file. This is quite easy to do, and requires no code. Modify your generator.yml as follows:
generator: class: sfPropelAdminGenerator param: model_class: Photo theme: default list: display: [file_path, description, created_at] object_actions: _edit: name: Edit picture properties edit: display: [file_path, description] fields: file_path: type: admin_input_file_tagYou already know the display key: it controls which fields are displayed in the view. In the Edit view, it controls which fields appear in the form. We got rid of the created_at column in this view for a good reason: symfony handles it on its own. Because of its name, symfony will give to this field the value of the record creation date. If you were to add an updated_at column, symfony would also handle it on its own, updating it every time you change a record.
The second thing to notice in this listing is the fields key, and the fact that the file_path column is set to show an input of type admin_input_file_tag. This tells symfony to use a file input for this column, but also to upload the related file to its web/uploads/ directory. Try using the Edit view to add a few pictures to the photo album.
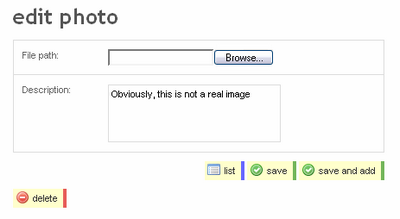
It would be nice if the module could display the uploaded photos, so you can check whether your uploads succeeded. To do so, we’ll use a partial column. A partial column is a piece of PHP code that can be used as a column in a generated administration. Here’s how it works. First, edit the generator.yml to add the _photo column to the display key in both views:
generator: class: sfPropelAdminGenerator param: model_class: Photo theme: default list: display: [_photo, description, created_at] object_actions: _edit: name: Edit picture properties edit: display: [_photo, file_path, description] fields: file_path: type: admin_input_file_tagSymfony recognizes the underscore and, instead of using the methods of the Photo object to get the column value, it tries to include a file called _photo.php in the column. Create _photo.php in the /apps/frontend/modules/photo/templates directory, and within the file place only the following line:
<?php echo image_tag('/uploads/'.$photo->getFilePath()) ?>Before loading this file, symfony puts the current Photo object into the $photo variable. The getFilePath method is among the methods that were automatically generated by symfony based on the schema.yml when you called the propel-build-model command. As you might have guessed, it returns the value of the file_path column that corresponds to the $photo object. Every other column has a corresponding getter and setter method in the generated Photo class. The image_tag function is a symfony helper — a function that returns HTML code and is meant to be used in templates. This one returns an <img> tag, which is just what we want. Its first parameter must be a file path that’s relative to the web/ directory. Check that the images now show up properly by browsing the photo module again.
Modifying the Model
So far, there hasn’t been much PHP code in this tutorial. That’s one of the strengths of symfony: it doesn’t force you to write code that symfony can generate itself based on simple data. However, you will need to write a few lines of PHP for the tags in the model. First, let’s explore the model’s structure.
The propel-build-all command generated two files for each table in the lib/model/ directory. For instance, for the photo table, the generated model files are Photo.php and PhotoPeer.php. If you look at their code, they actually contain empty classes that inherit from other classes (BasePhoto and BasePhotoPeer) located in the lib/model/om/ directory. For instance, the generated lib/model/Photo.php content is as follows:
<?php /** * Subclass for representing a row from the 'photo' table. * * * * @package lib.model */ class Photo extends BasePhoto { }When you build the model with the command line, only the classes in the lib/model/om/ directory are modified. Have a look at them to see the amount of code that’s been generated. The classes in lib/model/ are never altered by the code generator (which just creates their empty shell the first time); to extend the model, you should write your methods in these empty classes. This mechanism allows you to extend the model classes without risking the loss of your modifications should you decide to change the relational schema and build the model again. The model class system is both extensible and scalable.
We split the generated code into two classes (Photo and PhotoPeer) to differentiate between the methods linked to individual objects, and the methods linked to the class, but not its objects — or, if you prefer, to differentiate between object and static methods. The PhotoPeer class contains only static methods that are used to retrieve objects of class Photo. You will soon understand how it works.
We want to have the ability to add tags to, or delete tags from, a photo. The foreign key between the photo and tag tables (the photo_id column in the tag structure) is instantiated in the Photo object by a generated getTags method. Symfony generated this method automatically and placed it in the BasePhoto class so that the Photo class can use it as well. So, if you have a Photo object, you can get its related tags like this:
$tags = $photo->getTags();That’s right, there’s no need to call an SQL query with a WHERE clause — the generated Base classes do it automatically. We’ll use the same principle to add new methods to the Photo class. Open the Photo.php file and add the following methods:
// in lib/model/Photo.php class Photo extends BasePhoto { public function getTagsString() { $tags = array(); foreach ($this->getTags() as $tag) { $tags[] = $tag->__toString(); } return implode(' ', $tags); } public function setTagsString($tagPhrase) { // remove old tags $this->deleteTags(); // set new tags $tagNames = explode(' ', $tagPhrase); foreach($tagNames as $tagName) { $tag = new Tag(); $tag->setPhoto($this); $tag->setName($tagName); $tag->save(); } } public function deleteTags() { $c = new Criteria(); $c->add(TagPeer::PHOTO_ID, $this->getId()); TagPeer::doDelete($c); } }There’s a lot to explain in these three methods. First, as you saw previously, the generated getTags method returns an array of Tag objects. Returning the tags of a photo as a string is no harder than calling the implode function.
Second, the setTagsString method creates Tag objects from a string, and relates them to the current Photo object. This is a good illustration of how to manipulate the fields of a record in a related object using the dynamic setter methods, which were also generated by the propel-build-all command. The call to the save method triggers an INSERT query to the database to create a record based on the properties of the object. Last, the deleteTags method calls static constants and methods in the TagPeer class, as well as the add method in the Criteria object. We won’t describe these methods now — you just need to understand that the doDelete call triggers a DELETE query in the database to remove all tags related to the current Photo.
One last thing: for the getTagsString method to work, an object of class Tag must be able to be output as a string. We can achieve this by adding a magic __toString method to the Tag class, as follows:
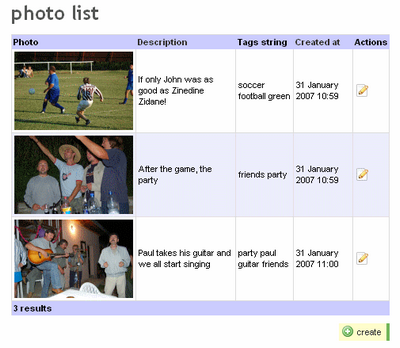
// in lib/model/Tag.php class Tag extends BaseTag { public function __toString() { return $this->getName(); } }Adding a new getter and a new setter is enough to simulate a new column. This means that we can add the tags_string column in the display arrays of our generator.yml as if it were an actual field. That’s the beauty of an object model:
// in apps/frontend/modules/photo/config/generator.yml generator: class: sfPropelAdminGenerator param: model_class: Photo theme: default list: display: [_photo, description, tags_string, created_at] object_actions: _edit: name: Edit picture properties edit: display: [_photo, file_path, description, tags_string] fields: file_path: type: admin_input_file_tag tags_string: name: Tags type: input_tagWe need to define the type of input to use for the mock tags_string column because symfony does not have any data that it can use to determine what type of input it should use for tags (it was not defined in the schema.yml). The standard input_tag is used for this purpose. You can check that the photo module now handles tags properly by adding tags to the test photos. Just make sure you separate the tags with a blank space.
Using Plugins
The current photo upload feature suffers from one major drawback: large pictures don’t render well in the list and edit views. We need to save a thumbnail of the picture when it’s uploaded. Fortunately, symfony can generate thumbnails thanks to the sfThumbnail plugin. Plugins are extensions to the framework that are installed for a given application. To install a plugin, just call the plugin-install task with the symfony command, as follows:
$ php symfony plugin-install http://plugins.symfony-project.com/sfThumbnailPluginThis command uses PEAR to download and install a symfony plugin package. If you don’t have PEAR installed, you can download the sfThumbnailPlugin package and unpack it under the plugins/ folder. Clear the cache (to enable the autoloading system to find the classes located in the new sfThumbnailPlugin/ directory), and the plugin is ready to be used.
$ php symfony clear-cacheWe’ll use the sfThumbnail class provided by the plugin to create a thumbnail of each uploaded file. The best place to do this is in the setFilePath() method of the Photo class. Add the following to the Photo.php file:
// in lib/model/Photo.php public function setFilePath($value) { parent::setFilePath($value); $this->generateThumbnail($value); } public function generateThumbnail($value) { parent::setFilePath($value); $uploadDir = sfConfig::get('sf_upload_dir'); $thumbnail = new sfThumbnail(150, 150); $thumbnail->loadFile($uploadDir.'/'.$this->getFilePath()); $thumbnail->save($uploadDir.'/thumbnail/'.$this->getFilePath(), 'image/png'); }The setFilePath method above first calls the setFilePath method defined in the BasePhoto class from which the Photo class inherits. Then it creates a 150x150px thumbnail based on the original file, and saves it under the uploads/thumbnail/ directory. In the generateThumbnail class, we used the sfConfig class to retrieve the path to the upload directory. The upload directory of the current application is accessible via the sf_upload_dir parameter. Note that the sfThumbnail plugin uses the GD extension, so you must enable it in your php.ini if it’s not enabled yet. Also, in order for the save method to work, the uploads/thumbnail/ directory must exist, so don’t forget to create it before you try to upload a new picture:
$ cd web/uploads $ mkdir thumbnail $ chmod 777 thumbnailWe also want the _photo partial column to use the thumbnail instead of the original picture, so edit the _photo.php as follows:
// in apps/frontend/modules/photo/templates/_photo.php <?php echo image_tag('/uploads/thumbnail/'.$photo->getFilePath()) ?>Now try uploading new pictures, and you’ll see that the generated photo module displays the thumbnail instead of the full-sized picture.
We will also use a plugin to make the photo module secure. Symfony already has built-in security features to allow only authenticated users with special credentials to access a module, but the sfGuard plugin automates all the user management. Install it just like the sfThumbnail plugin, with the plugin-install command (remember to return to the root project directory first):
$ php symfony plugin-install http://plugins.symfony-project.com/sfGuardPluginThe plugin comes with a module, but you can’t access the module unless it’s enabled in the application settings. Also, this module can replace the default login page that’s bundled with symfony. Open the apps/frontend/config/settings.yml file, and add the following before the commented lines (comments in YAML start with #):
// in apps/frontend/config/settings.yml all: .actions: login_module: sfGuardAuth login_action: signin .settings: enabled_modules: [default, sfGuardAuth, sfGuardUser]You also need to tell symfony to use the sfGuardPlugin for all the user security features. To do this, just change the parent class that the class myUser extends. myUser is the class that handles user sessions in symfony. It usually extends sfBasicSecurityUser, so change the myUser.class.php file as follows:
// in apps/frontend/lib/myUser.class.php class myUser extends sfGuardSecurityUser { }You must also tell symfony that all the actions of the photo module now require authentication. To do so, create a file named security.yml in the modules/photo/config/ directory and write in:
// in apps/frontend/modules/photo/config/security.yml all: is_secure: onWe’re almost there! The sfGuardPlugin comes with a user management module, which allows the addition of new users, and the changing of their ids and passwords. Of course, the password is not stored in clear view in the database, as this would pose serious security risks. The user management module relies on a few database tables and model classes. A schema is included in the plugin, so all we need is the propel-build-all task to upgrade the model classes and the database with it. But be careful — this task rebuilds the database from scratch, erasing all existing data. You probably already have data in the database (at least from the previous tests), so type the three following commands to dump the data into a YML file, clear the cache, build the model and database, and load the data into the database again:
> php symfony propel-dump-data frontend testdata.yml > php symfony cc > php symfony propel-build-all-load frontendTip: If, at this point, the command line throws a fatal error saying, “Call to undefined function imagecreatefromjpeg()“, it means that the gd extension is activated in the php.ini used by the web server, but not in the php.ini used by the command line (usually in the php/ directory). Activate it in both, and the problem should go away.
That’s it; the user security features are ready. Try to browse to http://localhost/sf_sandbox/web/frontend_dev.php/photo.
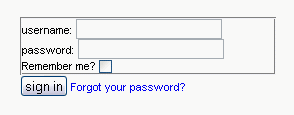
You’ll see an authentication screen asking for a login and a password. The sfGuardPlugin comes with a test user (id: admin, password: admin) so you can reach your module’s pages even if you haven’t created any users. Use these two values, and you can get to the photo module again.
If you want to add more users, or change the default id and password, make a request to the sfGuardUser module by entering the following URL: http://localhost/sf_sandbox/web/frontend_dev.php/sfGuardUser.
One last word before we focus on the end user interface. Every URL that we’ve explored so far has contained the filename frontend_dev.php. This is called the development environment front controller. Symfony has the ability to provide several environments for each application. In the development environment, for instance, the configuration is checked at every request, a lot of details are logged during the processing of the request, and these details are made available in the web debug toolbar (the grey line on the top-right corner of the window). Try clicking on its icons to see how useful this tool can be as you try to debug an application.
By default, the front-end application comes with another environment: the production environment. This environment is optimized for speed, so symfony skips all the logging and debugging work and proceeds directly to the rendering of the page. The production environment front controller is called index.php, so you can access it with the URL http://localhost/sf_sandbox/web/index.php/photo.
If you tried browsing the production environment before making any changes to this section, you will probably need to clear the cache by issuing the php symfony cc command. If you have mod_rewrite enabled on your server, take advantage of the rewrite rules bundled in the default project to call the following URL, which is equivalent to the previous one http://localhost/sf_sandbox/web/photo.
Try browsing the generated application in the production environment — it will feel faster and more responsive. Environments are a great feature, giving you what you need when you need it: development tools when you’re developing, and speed when your application needs to respond to real requests.
Adding Pages
That’s it for the administration interface. Now we can focus on the end-user pages. This time, the pages will not be created by a generator — we’ll code them by hand so that you understand how to add pages to your application.
First of all, we’ll group the end user pages into a public module. The symfony command line offers a useful task to initiate the files and directories of an empty module:
$ php symfony init-module frontend publicThis creates a new public/ directory in apps/frontend/modules/, with the following subdirectories:
actions/ config/ lib/ template/ validate/The file structure follows the code separation proposed by the MVC paradigm. In actions/, you will find the code that deals with handling requests — the controller code. templates/ contains the code dedicated to presentation — the view code. The config/ directory is meant to contain configuration files, but it is empty when modules are initially created. You can put the classes that you want to use in this module into the lib/ directory (placing them there will provide the benefit of autoloading). Finally, the validate/ directory is for form validation files, which we won’t cover in this tutorial.
How do we add a new page? A page in symfony is made up of two parts: an action and a template. The action code is executed before the template code. In fact, the action prepares data for the template. The template uses very little PHP code, and stays maintainable since it is used strictly for presentation, not application logic. An action is a method that’s placed in the module actions.class.php with a name prefixed by ‘execute.’ A template is a file with the same name as the action, but with the suffix ‘success.’ Let’s see how it all works together with an example. Let’s add a page that will display thumbnails of all the uploaded pictures, ordered by date.
Open the apps/frontend/modules/public/actions/actions.class.php file. It contains an empty index action (the method called executeIndex()).The executeIndex() method is called when a user requests the URL public/index (the full URL, with the current configuration, would be http://localhost/sf_sandbox/web/frontend_dev.php/public/index).
At the moment, this action shows a default welcome page, so replace it with the following action:
// in apps/frontend/actions/actions.class.php public function executeIndex() { $c = new Criteria(); $c->addDescendingOrderByColumn(PhotoPeer::CREATED_AT); $this->photos = PhotoPeer::doSelect($c); }The Criteria object probably reminds you of the deleteTags() method we saw earlier in the model. Indeed, it is the same object that model uses to build a database query. These three lines are synonymous with the following SQL code:
SELECT * FROM photo ORDER BY created_at;Here, the ORDER BY clause determines what we pass to the addDescendingByColumn method. The name of the class that’s assigned the result of the function doSelect comes from the FROM clause. You may think that replacing the SQL with something else is a waste of time, because it forces you to learn a new syntax. But this assumption is incorrect for two reasons.
First, not writing actual SQL code protects your application from SQL injection attacks and keeps your code database-independent. If you ever choose to move the application from SQLite to an Oracle database, all you’ll need is a parameter in a configuration file, despite the syntactic differences between the two databases. Second, the doSelect() call does much more than send a query to the database — it actually creates Photo objects based on the resultset. That’s right, the content of $this->photo is an array of objects of class Photo. You can use all the methods we defined previously, as well as the generated methods, on these objects. That’s the greatest benefit of an ORM.
executeIndex does more than query the database and build objects based on the resultset. It actually passes the $photo array to the template. That’s the purpose of the $this-> call in an action. Let’s see how we can retrieve this data in the template.
When the action finishes, symfony looks for a template for this action. The template’s name should comprise the action name suffixed with the action termination status. The default action termination is a ‘Success‘, so symfony looks for an indexSuccess.php file located in the module templates/directory. It exists, but it’s empty, so edit it as follows:
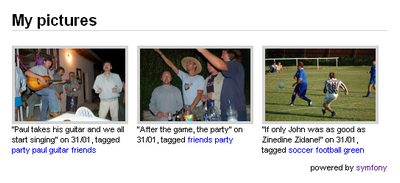
// in apps/frontend/modules/public/templates/indexSuccess.php <div id="main"> <h1>My pictures</h1> <?php foreach($photos as $photo): ?> <div class="photo"> <?php echo link_to( image_tag('/uploads/thumbnail/'.$photo->getFilePath()), 'public/photo?id='.$photo->getId(), 'class=image title='.$photo->getDescription() ) ?> "<?php echo $photo->getDescription() ?>" on <?php echo $photo->getCreatedAt('d/m') ?>, tagged <?php echo $photo->getTagsString() ?> </div> <?php endforeach; ?> <div id="footer"> powered by <?php echo link_to('symfony', 'http://www.symfony-project.com') ?> </div> </div>Now you see how to use the data prepared in the action: the template iterates through the $photos array with a foreach, and calls methods of the Photo class on each of the $photo objects. You already know the image_tag() helper, so it’s time to meet the link_to() helper, which outputs a hyperlink to another action. It expects at least two parameters: the bearer of the link (here, an <img> tag), and the target of the link, expressed as an internal URI. An internal URI is the combination of a module name and an action name (separated by a slash) and a set of parameters, written in the same way as normal URLs. The third (optional) parameter to the link_to() helper and most other helpers is a string of additional tag attributes, in old HTML 4.0 style. But don’t worry — all the HTML code output by symfony helpers is XHTML-compliant. And that’s actually the best way to understand how helpers work: by looking at their output.
The output of the first link_to() of the template is as follows:
<a class="image" title="title" href="/frontend_dev.php/public/photo/id/3"> <img src="https://www.sitepoint.com/wp-content/uploads/thumbnail/68eda1eaf5a8eac4d4529fa85298c7de.jpg" /> </a>Notice that the template uses the alternative PHP syntax (<?php foreach(): ?><?php endforeach; ?>) instead of the classical one (<?php foreach() {} ?>). This helps to prevent the mixing of PHP code with HTML code, and to keep the template readable by non-developers. If you end up writing curly braces or echoing HTML in a template, it’s generally a good sign that you should refactor your code and move part of it to the action.
The result of the overall template code is that the public/index action displays a list of all thumbnails, each thumbnail bearing a link to a public/photo action (which is yet to be written — patience!). But before we take a look at it, we should give it some style. We designed a simple Cascading Style Sheet for this tutorial. We won’t reproduce it in this article, but you can download it here. You should place it in the project’s web/css/ directory so that symfony to find it. And of course, you must also tell symfony to include the relevant <link> tag in the response. The Response object has a method just for that: it’s called addStylesheet. The Actions object has direct access to the Response object, thanks to its getResponse method. However, since we need to use the stylesheet on every page, not just the one for this specific action, we’ll call it in a preExecute method in the action. This method is called before every action of the module, and is very convenient for avoiding code repetition. So add this method to the actions.class.php:
// in apps/frontend/actions/actions.class.php public function preExecute() { $this->getResponse()->addStylesheet('frontend'); }That’s it; the photo list is ready to be seen. Make a request to the URL http://localhost/sf_sandbox/web/frontend_dev.php/public/index.
So creating pages in symfony is as easy as creating one action (for the controller code) and one template (for the presentation code). To make sure you understand the idea, let’s create a new page — the photo detail page. It will be accessible via the internal URI public/photo, so its action should be called executePhoto(). Add it to the actions file with the following code:
// in apps/frontend/actions/actions.class.php public function executePhoto() { $photo = PhotoPeer::retrieveByPk($this->getRequestParameter('id')); $this->forward404unless($photo); $this->photo = $photo; }There is something new in this action: the getRequestParameter method call. That’s actually the way to retrieve a request parameter by name from the action. The retrieveByPk static method of the PhotoPeer model class is used to retrieve a Photo object based on its primary key. But we don’t want this action to be called with erroneous parameters. If a user types the URL with a non-existent id, then instead of an error page, he or she will see a 404 error page. That’s the purpose of the forward404unless call, which is equivalent to:
if(!$photo) { $this->forward404(); }Now, how do we pass the $photo object to the template? You already saw this in the index action, so let’s switch to the template. Create a photoSuccess.php template in the templates/ directory of the module and within it, write:
// in apps/frontend/modules/public/templates/photoSuccess.php <div id="main"> <?php echo link_to('back to the photo list', 'public/index', 'style=display:block;float:right;') ?> <h1>Picture details</h1> <a href="/uploads/<?php echo $photo->getFilePath() ?>" title="click for the full-size version"> <?php echo image_tag('/uploads/'.$photo->getFilePath(), 'width=100%') ?> </a><br/> <p> "<?php echo $photo->getDescription() ?>" published on <?php echo $photo->getCreatedAt('d/m') ?>, tagged <?php echo $photo->getTagsString() ?> </p> <div id="footer"> powered by <?php echo link_to('symfony', 'http://www.symfony-project.com') ?> </div> </div>There’s nothing new here, except that the link to the actual picture doesn’t use the link_to() helper. This is because, in this particular case (linking to an uploaded file), writing it without the helper is faster.

Refactoring
You probably noticed that both the photoSuccess.php and the indexSuccess.php templates contain the same portion of code that’s dedicated to displaying a photo detail. If you’re aware of the Don’t Repeat Yourself (D.R.Y.) principle, which is one of the pillars of agile programming, you’ll know that this means the code has to be refactored.
What we’ll do is move the common code into another script, and include that script in the two templates. At the same time, we’ll detail the tags a little bit, so that users can click on each tag to display the list of pictures that have this tag. So, create a file called _photo_description.php in the public/templates/ directory, containing the following code:
// in apps/frontend/modules/public/templates/_photo_description.php "<?php echo $photo->getDescription() ?>" published on <?php echo $photo->getCreatedAt('d/m') ?>, tagged <?php foreach($photo->getTags() as $tag): ?> <?php $tag=$tag->getName(); echo link_to($tag, 'public/tag?tag='.$tag) ?> <?php endforeach; ?>Here, we see again the link_to() helper (this time, pointing to a public/tag action with a tag parameter), and we use properties of the $photo object. But, wait — in order for this script to access the symfony helpers and the template variables, it must be smarter than a normal included script. That’s why we won’t use a simple include() to call it in indexSuccess.php and photoSuccess.php; instead, we’ll use an include_partial() as follows:
// in apps/frontend/modules/public/templates/photoSuccess.php <div id="main"> <?php echo link_to('back to the photo list', 'public/index', 'style=display:block;float:right;') ?> <h1>Picture details</h1> <a href="/uploads/<?php echo $photo->getFilePath() ?>" title="click for the full-size version"> <?php echo image_tag('/uploads/'.$photo->getFilePath(), 'width=100%') ?> </a><br/> <p> <?php echo include_partial('photo_description', array( 'photo' => $photo )) ?> </p> <div id="footer"> powered by <?php echo link_to('symfony', 'http://www.symfony-project.com') ?> </div> </div>Symfony calls this type of code fragment a partial. Partial names start with an underscore so that they can be distinguished clearly in the templates/ folders. Partials need to be explicitly passed the variables that they can access (to preserve encapsulation). The first parameter of the include_partial() call is a partial name, which is the partial file name without the leading underscore and the trailing .php. You now understand why the _photo.php script of the photo module was called a partial column when we were dealing with the generated administration: the column was just including a partial.
D.R.Y. extremists would probably say that the two templates still have some code in common — namely the main <div id="main"> surrounding the content and the footer. That’s quite true, and in fact this code should not be part of the template — it should be part of the layout. In the templates we wrote, there was no mention of <html> or <head> tags, yet they’re present in the response. That’s because the code resulting from each template execution is inserted into another template, called the global template or the layout. This is the container for the templates, or in design pattern language, the “decorator”. The layout is a good way to store global navigation, site header and footer, sidebars, and so on. Have a look at the default layout in apps/frontend/templates/layout.php. We will modify it slightly to include the <div id="main"> around the content and to add the footer div:
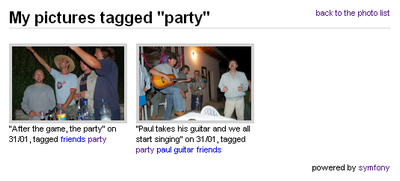
// in apps/frontend/templates/layout.php <!DOCTYPE html PUBLIC "-//W3C//DTD XHTML 1.0 Transitional//EN" "https://www.w3.org/TR/xhtml1/DTD/xhtml1-transitional.dtd"> <html xmlns="https://www.w3.org/1999/xhtml" xml:lang="en" lang="en"> <head> <?php echo include_http_metas() ?> <?php echo include_metas() ?> <?php echo include_title() ?> <link rel="shortcut icon" href="/favicon.ico" /> </head> <body> <div id="main"> <?php echo $sf_data->getRaw('sf_content') ?> <div id="footer"> powered by <?php echo link_to('symfony', 'http://www.symfony-project.com') ?> </div> </div> </body> </html>The result of the template execution is inserted in the $sf_data->getRaw() line; alternatively, we could also say that the layout “wraps around” the template code. Now you can remove the <div id="main"></div> and the <div id="footer"></div> from the two templates. And while we’re modifying the templates, we can think about the public/tag page, which is supposed to show a list of pictures that have a given tag. A list of pictures? But that’s exactly what the public/index action shows! So instead of creating a new template, we’ll reuse the existing indexSuccess.php for the tag action, as shown here:
// in apps/frontend/modules/public/actions/actions.class.php public function executeTag() { $this->forward404Unless($tag = $this->getRequestParameter('tag')); $c = new Criteria(); $c->addJoin(PhotoPeer::ID, TagPeer::PHOTO_ID); $c->add(TagPeer::NAME, $tag); $this->photos = PhotoPeer::doSelect($c); $this->setTemplate('Index'); }The first line of this code is a condensed version of the request parameter verification and variable initialization. It should remind you of the executePhoto() method. Then, we build a new Criteria, in order to retrieve all the Photo objects that are linked to a Tag object having the same name as the request parameter. This is equivalent to the following SQL query:
SELECT * FROM photo, tag WHERE tag.NAME='$tag' AND photo.ID=tag.PHOTO_ID;The Criteria syntax may still look a bit odd, but after a couple more tries, you’ll find it very natural. Anyway, the important part in this action is the last statement: the setTemplate() method tells symfony to use the indexSuccess.php template instead of the default template for this action (tagSuccess.php). We now have to modify the indexAction.php to handle the tag action. We’ll also remove the code that was refactored to the layout:
// in apps/frontend/modules/public/templates/indexSuccess.php <?php if($tag = $sf_params->get('tag')): ?> <?php echo link_to('back to the photo list', 'public/index', 'style=display:block;float:right;') ?> <?php endif; ?> <h1> My pictures <?php if($tag): ?> tagged "<?php echo $tag ?>" <?php endif; ?> </h1> <?php foreach($photos as $photo): ?> <div class="photo"> <?php echo link_to( image_tag('/uploads/thumbnail/'.$photo->getFilePath()), 'public/photo?id='.$photo->getId(), 'class=image title='.$photo->getDescription() ) ?> <?php echo include_partial('photo_description', array( 'photo' => $photo )) ?> </div> <?php endforeach; ?>In the action class, we have to use the getRequestParameter() method to retrieve a request parameter. In the template, the equivalent is $sf_params->get(). So the public/tag action now works fine — it even displays a link to the index action.
Don’t forget to remove the code that was refactored to the layout in the public/photo template as well. Agile development means a lot of code refactoring, and symfony offers you many tools (including layouts and partials) to do it right. In general, developing an application with symfony gives you the assurance that your code can change easily, even if you want to add a feature that was not designed in the first place.
Ajax
Almost every new web application that’s launched these days has its share of cool visual effects and XMLHttpRequests. If the Internet looks more and more like a desktop application, it’s not because this was impossible before. It’s because the task was horribly complicated. You had to write thousands of lines of JavaScript code, and duplicate it for IE, and then spend weeks in browser debugging your code. Today, building Ajax effects is incredibly simple once you have a framework that handles it for you. With symfony, and without even writing JavaScript code, you can create an Ajax form that’s compatible with all the main browsers, and with a single function call.
We’ll illustrate this technique as we deal with the comments for the photo album. The schema we created early in this tutorial already has a comment table for the storage of comments, but we need to create an interface to allow users to add comments when viewing a picture. Instead of doing it the traditional way, we’ll use an Ajax form in the public/photo page. Open the photoSuccess.php template again and add at its end the following code:
// in apps/frontend/modules/public/templates/photoSuccess.php
 ...
 <?php use_helper('Javascript'); ?>
 <div id="comments">
  <h2>Comments</h2>
  <?php foreach($photo->getComments() as $comment): ?>
    <?php include_partial('comment', array('comment' => $comment)) ?>
  <?php endforeach; ?>
  <div id="updateDiv">
    <?php echo link_to_function('Add a comment', visual_effect('toggle_blind', 'addComment')) ?>
    <?php echo form_remote_tag(array(
      'url'    => 'public/addComment',
      'update' => 'updateDiv',
      'complete' => visual_effect('highlight', 'updateDiv'),
    ), 'id=addComment style=display:none;') ?>
      <?php echo input_hidden_tag('photo_id', $photo->getId()) ?>
      <?php echo label_for('author', 'Your name') ?>
      <?php echo input_tag('author') ?><br />
      <?php echo label_for('body', 'Your comment') ?>
      <?php echo textarea_tag('body') ?><br />
      <?php echo submit_tag('submit') ?>
    </form>
  </div>
ho
Frequently Asked Questions (FAQs) about Symfony for Beginners
What is Symfony and why should I use it for web development?
Symfony is a PHP framework used for web application development. It provides a structured environment that facilitates the rapid development of complex applications. It’s highly flexible, allowing developers to select individual components they need for their projects. Symfony is also known for its stability, long-term support, and a large community of developers, which ensures that you can find solutions to your problems quickly.
How do I install Symfony on my system?
Installing Symfony is a straightforward process. You need to have PHP installed on your system. You can then use Composer, a dependency management tool in PHP, to install Symfony. The command ‘composer create-project symfony/website-skeleton myproject’ will create a new Symfony project in a directory named ‘myproject’.
What are Symfony bundles and how do they work?
Bundles in Symfony are similar to plugins in other software. They are a way to distribute and reuse Symfony code. Each bundle provides a specific functionality that can be reused across different applications. This modular approach allows developers to create flexible and efficient applications.
How does Symfony’s MVC architecture work?
Symfony follows the Model-View-Controller (MVC) architecture. The Model represents the data and the business logic, the View is responsible for rendering the user interface, and the Controller handles the user’s requests and manipulates data through the Model.
How can I create a new page in Symfony?
In Symfony, a page is the result of a route and a controller. The route defines the URL pattern for the page, and the controller generates the response. You can create a new page by defining a new route in the routing configuration file and creating a new controller action to generate the response for that route.
How does Symfony handle database operations?
Symfony uses Doctrine, a set of PHP libraries, to handle database operations. Doctrine provides a layer of abstraction over the database, allowing developers to work with objects instead of SQL queries. It supports a wide range of database systems, including MySQL, PostgreSQL, SQLite, and others.
How can I handle forms in Symfony?
Symfony provides a Form component that helps in creating forms, handling form submissions, and form data validation. You can create a form class, define the form fields, and then create a form instance in your controller. Symfony will automatically handle the form submission and data validation.
How can I handle user authentication in Symfony?
Symfony provides a Security component that handles common security tasks such as authentication and authorization. You can configure different authentication methods, such as form login or HTTP basic authentication, and define access control rules for different parts of your application.
How can I test my Symfony application?
Symfony provides a PHPUnit bridge to facilitate testing. You can write unit tests for your classes, functional tests for your controllers, and integration tests for your application. Symfony also provides a WebTestCase class that allows you to simulate HTTP requests and examine the response.
How can I deploy my Symfony application?
Deploying a Symfony application involves transferring your code to a production server, installing dependencies, and configuring the server. Symfony provides several tools to help with deployment, including a recipe for deploying with SymfonyCloud, a platform-as-a-service dedicated to Symfony.
Francois is a manager at Sensio Labs, the company sponsoring the symfony framework. He recently published "The Definitive Guide to symfony". (Apress).

Published in
·AngularJS·APIs·APIs·Authentication·CMS & Frameworks·Frameworks·JavaScript·Laravel·Patterns & Practices·PHP·Security·February 19, 2016


Published in
·CMS & Frameworks·Development Environment·Open Source·Patterns & Practices·Performance & Scaling·PHP·Programming·Software·Web·January 24, 2014