Enterprise developers approaching J2EE often have trouble grasping the character and practices of Enterprise JavaBeans (EJBs). Terms like home interfaces, message-driven, instance-management, and container-managed persistence are often cast about rather cavalierly with the assumption that we all understand how these terms apply to us.
In this article, I’ll begin to clarify these terms and identify some of the problems faced by enterprise application developers, and how EJBs help to solve these problems.
Key Takeaways
- EJB Technology Overview: Enterprise JavaBeans (EJB) technology is a Java-based framework designed for building distributed, server-side applications that can manage business logic centrally and handle declarative deployment efficiently.
- Types of Enterprise Beans: EJBs are categorized into three types: session beans, entity beans, and message-driven beans, each serving different purposes like handling client interactions, managing persistent data, and processing asynchronous messages respectively.
- EJB Container Role: The EJB container acts as a runtime environment that manages the enterprise beans, providing essential system-level services such as transaction management, security, and lifecycle management, which allows developers to focus on business logic rather than infrastructure.
- Persistence and Transaction Management: EJB supports two types of persistence—bean-managed and container-managed, with the latter allowing the container to handle database interactions. It also offers robust transaction support managed by the EJB container to ensure data integrity and consistency.
- Client-Location Transparency and Reusability: The EJB architecture is designed to abstract the bean’s location from the client, making it easier to develop client programs without knowledge of the physical locations of target EJBs. Additionally, EJBs promote reusability through their component-based design, allowing business logic to be reused across different applications.
What is EJB Technology?
EJB technology defines a Java-based, server-side, reusable component framework for distributed applications that facilitates centrally-managed business logic, and declarative deployment. Sounds quite important and technical, doesn’t it? Doesn’t help much, does it? Let’s see if I can put it another way:
- EJBs are written in Java
- EJBs are usually executed within an application server environment
- EJBs can be reused
- EJBs can be distributed across many machines and accessed almost as if they were on your local machine
- EJBs are centrally-managed by a container
That’s much better, isn’t it? No? Well, let’s assume that there are still some questions and let’s dig deeper to see how EJBs solve real problems.
The EJB specification and architecture are attempts to make remote, distributed, multi-tier development much easier. It has hoped to do this by introducing a concept known as an Enterprise Java Bean (EJB). The first thing to notice is that EJB, the component, is named the same as EJB, the specification. This is similar to the JavaBeans and Java Bean conundrum. The easiest way to get a grip around this puzzle is to put Java and Beans together when referring to the specifications and separate them when referring to the components. Thus, the remote specification becomes Enterprise JavaBeans and the remote component becomes an Enterprise Java Bean. The local specification becomes JavaBeans and the local component becomes a Java Bean.
The specification names and component names are very similar, but this is where the similarities end. The JavaBeans specification and component model and the Enterprise JavaBeans and component model have very little in common. To illustrate this, let’s take a look at the concept of EJB, the component, and the environment in which it lives and executes.
EJB Runtime Environment
An Enterprise JavaBean is a Java object exposing a number of interfaces and which lives and executes inside of a runtime environment known as an EJB container. An Enterprise JavaBean cannot live outside an EJB container. In fact, the relationship between and EJB container and an EJB is sometimes called Inversion of Control (IoC) or the “Hollywood Principle” (don’t call us, we’ll call you).
An EJB container is a runtime environment for managing enterprise beans. The container hosts and manages an enterprise bean in much the same manner that a Java servlet engine hosts a Java servlet. The EJB container instantiates and controls the enterprise beans and provides them with system-level services.
A client application wishing to interact with an enterprise bean does not have direct access to an enterprise bean. Rather, the bean is isolated from the client application by the container.
Services provided by an EJB container
A programmer of the classes and interfaces from which an enterprise bean object will be created can assume that the following system-level services will be available from the EJB container:
- Transaction management for the bean
- Security for the bean
- Persistence of the bean
- Remote access to the bean
- Lifecycle management of the bean
- Database-connection pooling
- Instance pooling for the bean
Since the EJB container handles the entire scope of infrastructure service-level services for an enterprise bean, a programmer can concentrate on programming the business-logic for the enterprise bean.
Types of Enterprise Beans
The EJB architecture defines three distinct types of enterprise beans; session beans, entity beans and message-driven beans. Session beans and entity beans are invoked synchronously by an enterprise bean client. Message-driven beans (MDBs) are invoked by a message container, such as a publish/subscribe topic.
Session Beans
A session bean represents a single client and is not shared across clients. A client invokes the session bean’s methods, which are directed through the EJB container to the enterprise bean. The session bean performs the business logic for the client and the container returns control to the client. A session bean is not persisted across multiple sessions. There are two types of session beans: stateful and stateless.
Stateful Session Beans
A stateful session bean maintains a conversational state with one client for the duration of a single session. This implies that the stateful session bean can maintain instance variables across multiple invocations from one client during a single session.
Once the client finishes interacting with the enterprise bean, and the EJB container removes the enterprise bean, the session for the bean ends and all state data for the bean is discarded.
Stateless Session Beans
A stateless session bean does not maintain a conversational state for each individual client. Each invocation of a stateless session bean should be considered as a request to a brand new object instance, since any instance-variable state will be lost between invocations.
Stateless session beans are not persisted to secondary storage by the EJB container; therefore a programmer must recognize that all data is transient between invocations for each client. The transient nature of stateless session beans allows an EJB container to reuse bean instances and therefore, usually optimize the performance of the beans.
Entity Beans
An entity bean is intended to represent the business logic for an entity existing in persistent storage. Entity beans share some of the same qualities that you would find in a relational database, for example:
- Entity beans are persistent – An entity bean’s state exists beyond the lifetime of the application in which it is created, or for that matter, the lifetime of the EJB container. This implies that the entity bean can be restored to its original state by the EJB container.
- Entity beans allow shared access – they may be shared by multiple clients. The concurrency is handled by the container.
- Entity beans have primary keys – primary-key classes exist to identify an instance of an entity bean. The primary key contains all the information needed to find a persistent entity.
- Entity beans may participate in relationships – local interfaces have been introduced to manage relationships between beans.
- Entity beans can participate in transactions – as data can be accessed and changed by multiple clients, it is important for entity beans to be able to specify the transactional properties for their interaction. Transaction properties are specified declaratively in deployment descriptors; transaction boundaries are handled by the container.
The object-relational mapping implied by entity beans requires that an entity bean be responsible for inserting, updating, selecting, and removing data within the data source. This process of managing the communication between the component and the data source is called persistence. In other words, persistence is this process of writing the information to an external data source. There are two types of persistence for entity beans: bean-managed persistence (BMP) and container-managed persistence (CMP). We discuss these in the next section.
Bean-Managed Persistence (BMP)
With bean-managed persistence (BMP), the programmer is responsible to write all of the code within the entity bean to access the data source. BMP allows more flexibility to the programmer because all access to the data source is controlled by the programmer.
Container-Managed Persistence (CMP)
With container-managed persistence the EJB container handles all database access required by the entity bean. As a result, the bean’s data-access code is not coupled to a specific data source. This frees the programmer from writing any of the data-access code and allows the entity bean to be deployed in different containers and/or against different data-sources.
Session Bean and Entity Bean Relationships
Figure 1 illustrates the relationships that exist between a client, an EJB container, session beans, and entity beans:
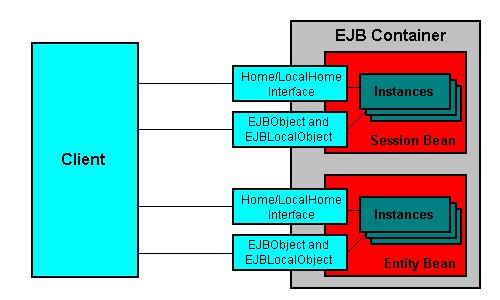
Figure 1
Message Driven Beans
A message-driven bean (MDB) is an enterprise bean that allows enterprise applications to handle messages asynchronously. An instance of an MDB is instantiated by an EJB container to act as a message listener. Messages received by an MDB may be sent by any JMS-compatible message transmitter, such as a JMS-enabled publish/subscribe topic.
Unlike session and entity beans, a client program does not direct invocations at an MDB. Instead, the MDB receives invocations from the message source through a standard callback method, onMessage.
The single parameter to the onMessage method is of type javax.jms.Message and it is up to the MDB programmer to cast the Message object to one of the five JMS message types: TextMessage, ObjectMessage, MapMessage, BytesMessage and StreamMessage.
An MDB can participate inside of a transaction context in that a message to the MDB can be rolled back and redelivered or purged, if necessary.
Figure 2 illustrates the relationships between a JMS message producer, an EJB container and a message-driven bean:
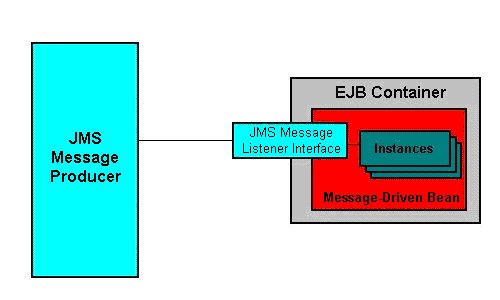
Figure 2
What Problems do EJBs Solve?
When considering the possible use of EJBs, you should take into account the following problems that EJBs can help to solve:
- Scalability – Enterprise beans are deployable across many different hardware platforms transparently, therefore they can be distributed as needed to take advantage of the available resources.
- Transaction Support – Enterprise beans support a declarative transaction model that is portable across operating systems. Transaction boundaries are handled by the EJB container and the transactions themselves can be handled by the EJB container.
- Client-Location Transparency – The EJB architecture is designed to hide the location of the EJBs from the client program. Therefore, EJB client programs can be developed without foreknowledge of the whereabouts of the target EJBs.
- Data Source Portability – Entity beans can be programmed in a way that leaves the data source-access specifics up to the EJB container.
- Reusability – Since the EJB architecture facilitates a high-degree of componentization, business logic can be written once and reused easily as needed.
- Asynchronous Messaging – In applications requiring asynchronous communications, message-driven beans can be employed.
Writing and Deploying an EJB
The following four steps illustrate the typical process to develop and deploy an EJB:
- Write the classes and interfaces for your enterprise bean
- Write a deployment descriptor
- Package the enterprise bean and associated files inside of a jar file
- Deploy the bean
A session bean and an entity bean are composed of a minimum of three classes/interfaces:
1. An interface that extends javax.ejb.EJBObject (referred to as the Component Interface), as the following example illustrates:
package com.jeffhanson.ejb;


import javax.ejb.EJBObject;

import java.rmi.RemoteException;


public interface SimpleMessenger extends EJBObject

{

  public String retrieveMessage() throws RemoteException;

}
2. An interface that extends javax.ejb.EJBHome (referred to as the Home Interface), as the following example illustrates:
package com.jeffhanson.ejb;


import java.rmi.RemoteException;

import javax.ejb.CreateException;

import javax.ejb.EJBHome;


public interface SimpleMessengerHome extends EJBHome

{

  SimpleMessenger create() throws RemoteException, CreateException;

}
3. A class that implements either javax.ejb.SessionBean or javax.ejb.EntityBean (referred to as the Enterprise Bean Class), as the following example illustrates:
package com.jeffhanson.ejb;


import java.rmi.RemoteException;

import javax.ejb.SessionBean;

import javax.ejb.SessionContext;


public class SimpleMessengerBean

  implements SessionBean

{

  private SessionContext sessionCtx = null;


  public String retrieveMessage()

  {

      return "Hello from SimpleMessengerBean ";

  }


  public void ejbCreate()

  {

  }


  public void ejbRemove()

  {

  }


  public void ejbActivate()

  {

  }


  public void ejbPassivate()

  {

  }


  public void setSessionContext(SessionContext sessionCtx)

  {

    this.sessionCtx = sessionCtx;

  }

}
The Deployment Descriptor
To deploy an EJB into an EJB container’s environment, you must supply a deployment descriptor file to the EJB container. A deployment descriptor file is an XML document, named ejb-jar.xml, which specifies information about the bean such as its persistence type and transaction attributes. You need to package the java classes and the deployment descriptor into a JAR or EAR file.
The following is an example of a typical deployment descriptor:
<?xml version="1.0" encoding="UTF-8"?>


<ejb-jar>

  <description>A sample EJB</description>

  <display-name>Simple Message EJB</display-name>

  <enterprise-beans>

    <session>

      <ejb-name>SimpleMessenger</ejb-name>

      <home>com.jeffhanson.ejb.SimpleMessengerHome</home>

      <remote>com.jeffhanson.ejb.SimpleMessenger</remote>

      <ejb-class>com.jeffhanson.ejb.SimpleMessengerBean</ejb-class>

      <session-type>Stateless</session-type>

      <transaction-type>Bean</transaction-type>

    </session>

  </enterprise-beans>

</ejb-jar>
Summary
Enterprise developers approaching J2EE often have to face such issues as transactions, remote access, database portability and instance pooling. EJBs help to solve these problems.
EJB technology defines a Java-based, server-side, reusable component framework for distributed applications that facilitates centrally-managed business logic, and declarative deployment.
The EJB specification and architecture are attempts to make remote, distributed, multi-tier development much easier. It has hoped to do this by introducing a concept known as an Enterprise Java Bean (EJB).
An Enterprise JavaBean is a Java object exposing a number of interfaces, which lives and executes inside of a runtime environment known as an EJB container.
An EJB container is a runtime environment for managing enterprise beans. The container hosts and manages an enterprise bean in much the same manner that a Java servlet engine hosts a Java servlet. The EJB container instantiates and controls the enterprise beans and provides them with system-level services.
The EJB architecture defines three distinct types of enterprise beans; session beans, entity beans and message-driven beans. Session beans and entity beans are invoked synchronously by an enterprise bean client. Message-driven beans (MDBs) are invoked by a message container, such as a publish/subscribe topic.
When considering the possible use of EJBs, you should take into account the following problems that EJBs can help to solve: scalability, transaction support, client-location transparency, data source portability, reusability and asynchronous messaging.
In our next article, we’ll try to assuage any fears you may have to overcome when building your first EJB. We will carefully step through installing a J2EE SDK, writing, compiling, and deploying a simple Entity and Session bean, and a client Web application that uses them.
Frequently Asked Questions (FAQs) about Enterprise JavaBeans
What is the difference between JavaBeans and Enterprise JavaBeans?
JavaBeans and Enterprise JavaBeans (EJB) are both components used in Java, but they serve different purposes. JavaBeans are simple reusable software components that can be manipulated visually in a builder tool. They are used for encapsulating many objects into a single object (the bean), so they can be passed around as a single bean object instead of multiple individual objects. On the other hand, EJB is a server-side software component that encapsulates the business logic of an application. EJBs are specifically designed to enable the rapid and simplified development of distributed, transactional, secure and portable applications based on Java technology.
How does Enterprise JavaBeans work?
Enterprise JavaBeans (EJB) is a managed, server-side component architecture for modular construction of enterprise applications. The EJB architecture handles transaction management, security, and remote object access, allowing developers to focus on the business logic. EJBs are deployed in an EJB container within the application server, which provides the runtime environment. The EJB container provides system-level services to EJBs, such as transaction management and security authorization, and takes care of the technical details.
What are the types of Enterprise JavaBeans?
There are three types of Enterprise JavaBeans: Session Beans, Entity Beans, and Message-Driven Beans. Session Beans represent a workflow on behalf of a client. They can be stateless, where they don’t maintain state across method calls, or stateful, where they do maintain state. Entity Beans represent persistent data and behavior of this data. Message-Driven Beans are beans that receive and process messages asynchronously, typically through Java Message Service (JMS).
What is the role of the EJB container?
The EJB container is a runtime environment that provides the necessary “plumbing” to execute Enterprise JavaBeans. It provides system-level services to EJBs, such as transaction management, security, lifecycle management, concurrency control, and dependency injection. The EJB container manages the execution of enterprise beans for Java EE applications. Enterprise beans and their clients access the container’s services via APIs provided by the container.
How does transaction management work in EJB?
Transaction management in EJB is handled by the EJB container. It provides a built-in transaction model that allows you to specify relationships among methods that make up a single transaction, so that all methods in one transaction are treated as a single unit. This means that if a method within a transaction fails, all other methods within the transaction will also fail, ensuring data integrity.
What is the difference between stateful and stateless session beans?
Stateful session beans maintain state across method calls and transactions. They are usually used when there is a need for a conversational state with the client. On the other hand, stateless session beans do not maintain any state. They are pooled by the container and can be used interchangeably to increase scalability.
What is the purpose of Entity Beans?
Entity Beans represent persistent data stored in a database. They provide an object-oriented interface to relational databases, allowing data to be accessed and updated without the need for SQL. Entity Beans can be either container-managed or bean-managed. In container-managed Entity Beans, the container automatically generates the necessary database access calls, whereas in bean-managed Entity Beans, the developer writes the database access calls.
How are Message-Driven Beans different from other EJBs?
Message-Driven Beans are different from other EJBs in that they are asynchronous and are triggered by the arrival of a message from a Java Message Service (JMS) provider, rather than by a method call. They are typically used for receiving and processing messages, such as email notifications or real-time information updates.
What is the role of the deployment descriptor in EJB?
The deployment descriptor is an XML file that describes how to deploy a module or application by defining its deployment settings. It includes configuration information like security role settings, transaction attributes for enterprise beans, and specifics about bean assembly and deployment.
How does EJB ensure security?
EJB uses the Java EE security model, which is declarative and can be customized. The EJB container is responsible for providing system-level security such as ensuring only authorized clients can access certain EJB methods. This is typically configured in the deployment descriptor.
Jeff has more than 18 years of experience in the software development industry, including almost 7 years experience with Java and J2EE. He's authored numerous articles and books, including NET versus J2EE Web Services: A Comparison of Approaches and Connecting JMX Clients and Servers: Understanding the Java Management Extensions.


Published in
·Design Patterns·Patterns & Practices·Performance·Performance & Scaling·PHP·Security·August 21, 2017