Generate .NET XML Documentation With NDoc

Systems documentation is one of those tasks that often suffers during the completion of a project. It’s frequently pushed to the end of the development cycle, if it appears at all, in order to minimize redundant work.
However, with XML Documentation support in C# and VB.NET, and the development of NDoc, there is absolutely no reason we cannot document our systems in a much better fashion than we might have in the past. The work no longer lies in generating the documentation files; just in the documenting process itself.
My aim here is to show you how to install NDoc, and to run through a demonstration of how to use it. This article will not teach you how to document your code. Rather, it explains how to get your documentation into a useable form anyone can use.
NDoc Installation
There are a few different installation scenarios for NDoc, depending upon whether you use Microsoft Visual Studio.NET. Most of the existing documentation assumes you use Visual Studio, however, as many people don’t, I’ll provide the installation instructions for both Visual Studio and non-Visual Studio users here.
If you use Visual Studio.NET:
- Verify you have the following directory:
C:Program FilesHTML Help Workshop - If you do not, you will have to download and install the
HTML Help Workshop. Make sure you install it atC:Program FilesHTML Help Workshop. You will find the code download at the HTML Help Workshop. - After ensuring the
HTML Help Workshopis installed, download and install NDoc from NDoc Download. I recommend using the Web installer version, as it contains the latest stable release. If you decide not to use the Web installer, you will have to build the project in Visual Studio.NET. Once it’s installed, you’re ready to go.
If you don’t use Visual Studio.NET:
- Ensure you have the .NET Framework installed.
- You must install the
HTML Help WorkshopatC:Program FilesHTML Help Workshop. You will find the code download here:
HTML Help Workshop - After correctly installing the
HTML Help Workshop, download and install Ndoc from NDoc Download. I recommend using the Web installer version, as it contains the latest stable release. If you decide not to use the Web installer, please see the note below. Once NDoc is installed, you are ready to go.
Note: If you decide to install using the “most recent release” or the “stable release” without using the Web installer, and you DO NOT use Visual Studio.NET, you will have to download and install NAnt, a .NET build tool, available at NAnt download. Refer to the NDoc ReadMe.txt for more information.
Usage
Now that you’ve installed NDoc, let’s use it to generate some documentation to ensure everything’s working correctly. First, we will generate some basic code with XML Documentation tags. For a thorough treatment of the XML Documentation tags, refer to this page.
Here’s the sample code, along with some comments:
// NDocSampleFile.cs

//


namespace NDocSample {

    using System;


   /**

        <summary>

            The NDocSample encapsulates some very rich functionality.

        </summary>

    */

    public class NDocSample {


        /**

            <summary>

                Default constructor for a new instance of NDocSample.

            </summary>

        */

        public NDocSample() {

        }

            /**

                <summary>

                    string someMethod(string string1, string string2, string string3)

                    Returns a string containing a concatenation of the values in string1

                    <param ref="string1" />, string2 <param ref="string2" />, and string3

                    <param ref="string3" />.

                </summary>

                <param name="string1">The first string.</param>

                <param name="string2">The second string.</param>

                <param name="string3">The third string.</param>

           */

            public static string someMethod(string string1, string string2, string string3) {

                // Perform some stuff here.

                return "somestuff";

            }

    }

}
This should be enough for us to test, make sure our installation was successful, and check that everything works.
NDoc needs both a compiled library, and the XML file generated when using XML Documentation, in order to process a build of the system documentation. So, we now have to compile the code and generate an XML Document. Since all we have here is one small file, I will simply compile this from the command-line. In order to generate the XML document, you have to use the /doc:filename.xml switch. Our command line syntax looks like this:
Dir>csc /debug /t:library /out:bin/NDocSample.dll NDocSample.cs /doc:NDocSample.xmlThis will generate an NDocSample.dll in the bin directory, and NDocSample.xml in the root directory. As I mentioned, you’ll need both these files in order to use NDoc.
NDoc in Action
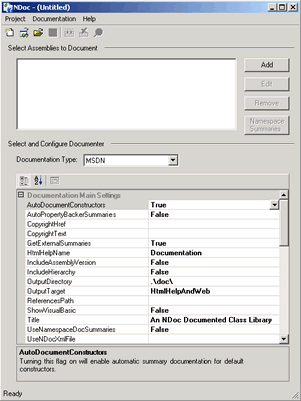
Now that we have those two files, we can fire up NDoc. You can use NDoc from the command line; however, in order to illustrate the features of NDoc, we will use the GUI in this case.
In order to get your documentation, click on the “Add” button. This brings up the “Add Assembly Filename and XML Documentation Filename” dialog. Click on each ellipses button, navigating to the bin directory to select the NDocSample.dll, and to the root directory to select the NDocSample.xml files, respectively.
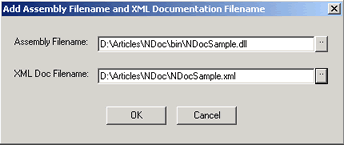
Once you click “OK”, NDocSample.dll will be listed under the header “Selected Assemblies to Document”.
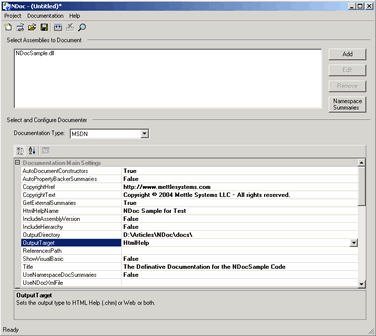
Moving on, we can now look at the “Select and Configure Documenter” section, which is where most of your work will occur. Under the Documentation Type, you are given the option of creating documentation in the following types: MSDN, JavaDoc, XML, LaTeX (Alpha), Linear HTML (Alpha). I’ll choose MSDN, as this is a widely accepted format for my work environment. For information on the other options, refer to the NDoc Website.
For the rest of the “Select and Configure Documenter” section, you can choose a series of properties that you may or may not wish to assign. Of special note are OutputDirectory and OutputTarget. You should set the OutputDirectory to the “docs” directory, which should be created under the root of the project. When you select OutputTarget, you’re given three choices:
- HtmlHelp – generates a
.chm file, as well as the supporting html files - Web – generates a series of html files, index.html being the starting file
- HtmlHelpAndWeb – generate both sets of documentation listed above
Below, you can see that we have filled in some of our properties. Now, we’re ready to build.
Simply click the “Build” button or Ctrl+Shift+B. You can watch the bottom of the NDocGui for feedback about what’s going on. When it’s complete, you will see “Ready” in the lower left corner.
Now, go into your docs directory to see the files that were generated. As I opted for the HtmlHelp version, I will locate the .chm file and fire it up.

Professional systems documentation in a matter of seconds!
Conclusions
You’re now ready to try documenting some existing projects. I will leave all the properties for you to investigate, as there are several, and providing a treatment for each is well beyond the scope of this article.
Systems documentation has never been so easy! This is one of those tools that will go a long way in providing professional solutions for your clients, as well as other in-house developers.
Happy documenting!
Frequently Asked Questions (FAQs) about .NET XML Documentation and NDoc
What is the purpose of XML documentation in .NET?
XML documentation in .NET is a powerful tool that developers use to create comprehensive, structured, and easily accessible documentation for their code. It allows developers to write comments directly in their code, which are then transformed into XML format. This makes it easier to generate documentation, share information with other developers, and maintain the code. XML documentation comments are particularly useful for large projects where it’s crucial to have a clear understanding of what each part of the code does.
How do I generate XML documentation in Visual Studio?
Generating XML documentation in Visual Studio is a straightforward process. First, you need to add XML comments to your code. These comments start with ‘///’ for C# or ”’ for Visual Basic. Then, go to the project’s properties, navigate to the ‘Build’ tab, and check the ‘XML documentation file’ box. When you build your project, Visual Studio will create an XML file containing your comments.
What is NDoc and how does it relate to .NET XML documentation?
NDoc is a free, open-source tool that developers use to create technical documentation from .NET XML comments. It takes the XML documentation file generated by Visual Studio and transforms it into various formats, such as HTML, CHM (Microsoft Compiled HTML Help), and MSDN-style documentation. This makes it easier to distribute and access the documentation.
How do I use NDoc to generate documentation?
To use NDoc, you first need to generate an XML documentation file from your .NET project. Then, you can open NDoc, select the XML file, and choose the output format you want. NDoc will then generate the documentation based on your XML comments.
Can I use XML documentation for other programming languages?
XML documentation is primarily used in .NET languages like C# and Visual Basic. However, other programming languages may have similar features. For example, Java has Javadoc, which serves a similar purpose. It’s always a good idea to check the documentation of the programming language you’re using to see what options are available.
What are the benefits of using NDoc over other documentation tools?
NDoc has several advantages over other documentation tools. It’s free and open-source, which means you can use it without any cost and even modify it to suit your needs. It also supports multiple output formats, making it versatile and adaptable to different needs. Furthermore, it integrates well with .NET and Visual Studio, making it a convenient choice for .NET developers.
How can I contribute to the NDoc project?
As an open-source project, NDoc welcomes contributions from the community. You can contribute by reporting bugs, suggesting new features, improving the documentation, or even writing code. To get started, you can visit the NDoc project page on SourceForge.
What are some best practices for writing XML documentation comments?
When writing XML documentation comments, it’s important to be clear and concise. Describe what each method, class, or property does, and explain any parameters or return values. Avoid using technical jargon that might confuse other developers. It’s also a good idea to update your comments regularly to reflect any changes in the code.
Can I automate the generation of XML documentation?
Yes, you can automate the generation of XML documentation in Visual Studio. By checking the ‘XML documentation file’ box in the project’s properties, Visual Studio will automatically generate an XML file every time you build your project. This can save you a lot of time and ensure that your documentation is always up-to-date.
What should I do if I encounter problems with NDoc?
If you encounter problems with NDoc, you can seek help from the community. The NDoc project page on SourceForge has a forum where you can ask questions and get answers from other users. You can also report bugs or issues directly on the project page.
Chris is the principal of Mettle Systems LLC, an IT consulting firm that specializes in providing its clients with custom business solutions. You can read more of his writings at MettleMouth.

Published in
·Cloud·Cloud·Microsoft Tech·Performance & Scaling·PHP·Programming·Web·Web Hosting & Domains·December 13, 2013