In this article, we’ll go through the process of generating your first Ethereum wallet and sending and receiving ether through the MyEtherWallet interface.
This introduction to MyEtherWallet was originally published at Bruno’s Bitfalls website, and is reproduced here with permission.
For a better understanding of the information which follows, it’s recommended you read the following first:
There are many ways to interact with the Ethereum blockchain. In this piece, we’ll be using MyEtherWallet (MEW).
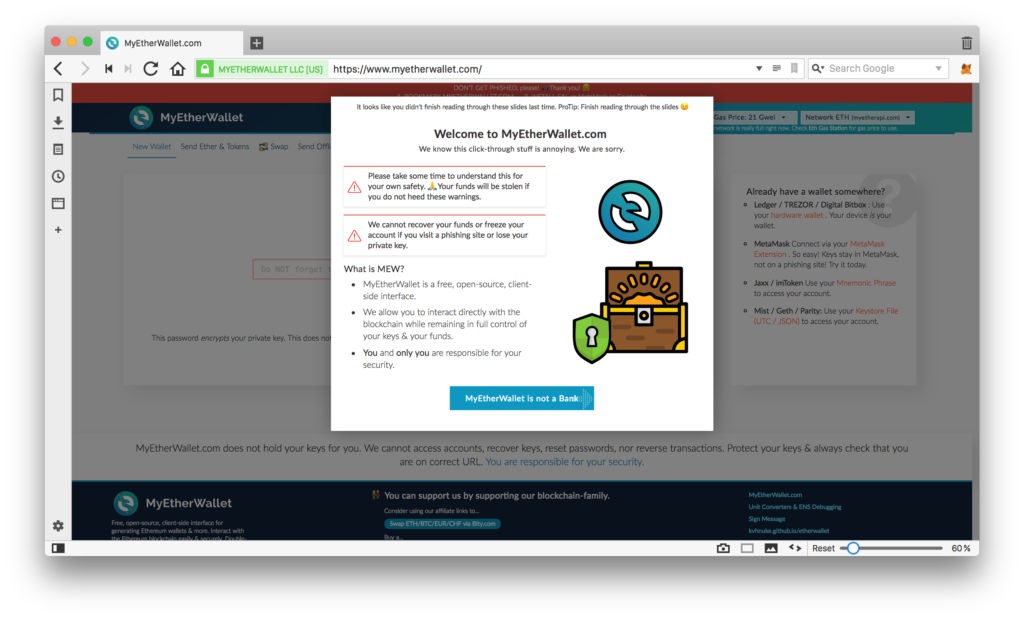
Note: After opening the site, please bookmark it so you never have to paste it into your browser again. There are many bad people who want your ether, and they’ve bought domains similar to the domain of this site hoping you’ll fall into that trap by mistyping!
Immediately after loading, the page will display some warnings about them not being a bank and basically not being able to help you if you lose your funds because they don’t have access to them. The gist of it is that you’re responsible for your own funds.
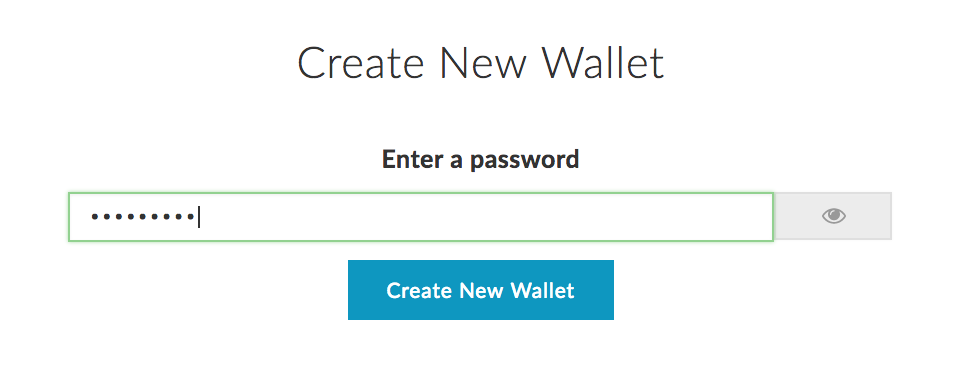
Creating and Reading an Address
The first screen of MEW is the “input password” screen. Input a password for a new wallet. (Make it something complex but easy to remember or use a password generator like LastPass.)
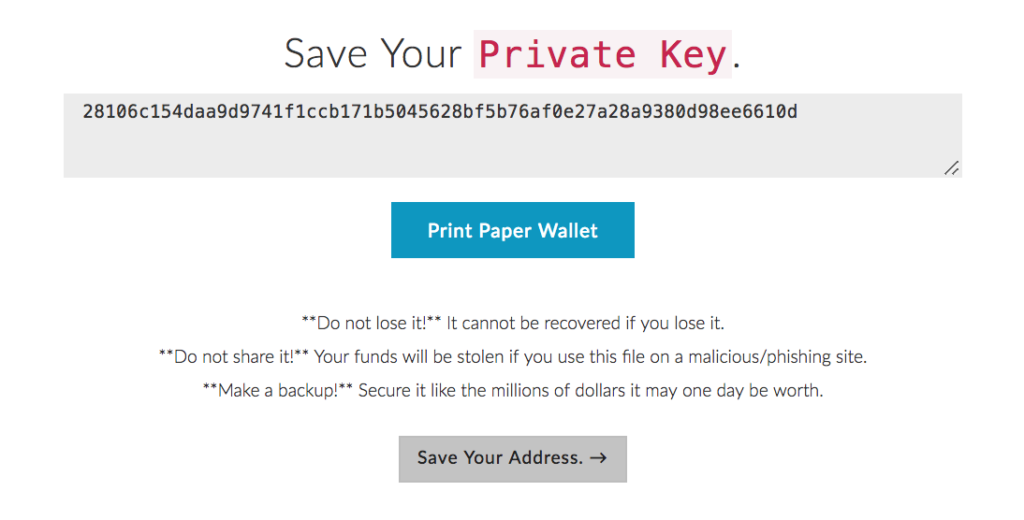
The address is immediately generated in the background, but MEW won’t let you see it yet. For as long as you haven’t saved the Keystore file somewhere safe, you cannot proceed. Click Download Keystore File (UTC / JSON) and store it on a USB drive, then hide it from curious family members. The file will be called something like UTC--2018-01-26T10-39-56.592Z--d877263725d9247352661e44c444b21dc5a28581. The first part is the date of creation, the second is the address itself. After you’ve stored it safely, the next screen will display the private key.

Very imporant!!: the private key is equivalent in access level to the file you downloaded previously. Both can be imported into wallet software and used to unlock an address to spend money on it. But there is an important difference: the private key does not require a password! If you enter a private key into another tool like MetaMask, the address will immediately become unlocked without a password and can be used for sending Ether and tokens. If you import the previously downloaded file into any wallet software, it will require a password before letting you access it fully. Therefore, it’s safer to only keep one method around: either store the file and remember the password, or store only the private key in a very secure location. Destroy the other method. The fewer ways to access your wallet there are, the safer the money is.
You can generate a Paper Wallet on the same screen. This will open a new tab with a neatly generated printable layout of two QR codes. One is the public key — the address to which you can send funds and tokens — and the other is the private key mentioned above.
If you’re planning to use this address for long-term holding of ether, it’s smart to print it and store it in a safe as if you had a bond or a big wad of cash.
After these steps have been completed, MEW lets us unlock the wallet and view its info. This can be done in two ways:
- Picking the Keystore/JSON file will provide you with a form through which you upload the file you downloaded previously. You’ll then be asked for a password.
- Picking a private key lets you paste the private key directly into the field, unlocking the address for use.
Unlock your wallet and you should see something like the image below:

This interface lets you print the wallet again if you lost or destroyed the previous one, or to re-download the JSON file if you lost it and accessed the wallet with the private key. The QR code for the private key can be read by clicking the eye icon under the black rectangle in the bottom of the screen.
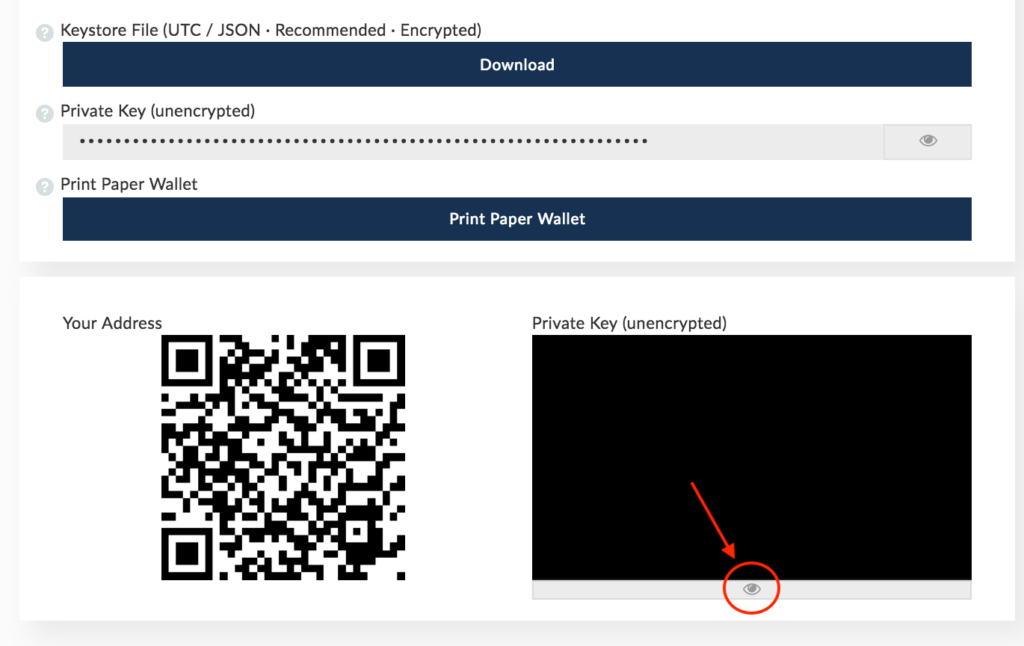
On the right, you can see your account’s balance: 0 Eth. A little lower you can see the Token Balances frame, which shows you how many of which tokens you have. Because of a large number of available tokens out there, you first need to click Show all tokens to load them.
This screen is visible because you’re on the View Wallet Info option, to which MEW automatically redirects you after creation. When sending tokens or ether, the option to use is Send Ether & Tokens.

Receiving Ether
On the View Wallet Info screen, the QR code in the lower left is the address to which tokens and ether can be sent. The value of the code is equivalent to the value in Your Address at the top, and the Account Address value in the right sidebar.
To receive some Ether, let’s switch to the Ropsten test network. In the upper right corner of the screen you can pick the network to connect to:
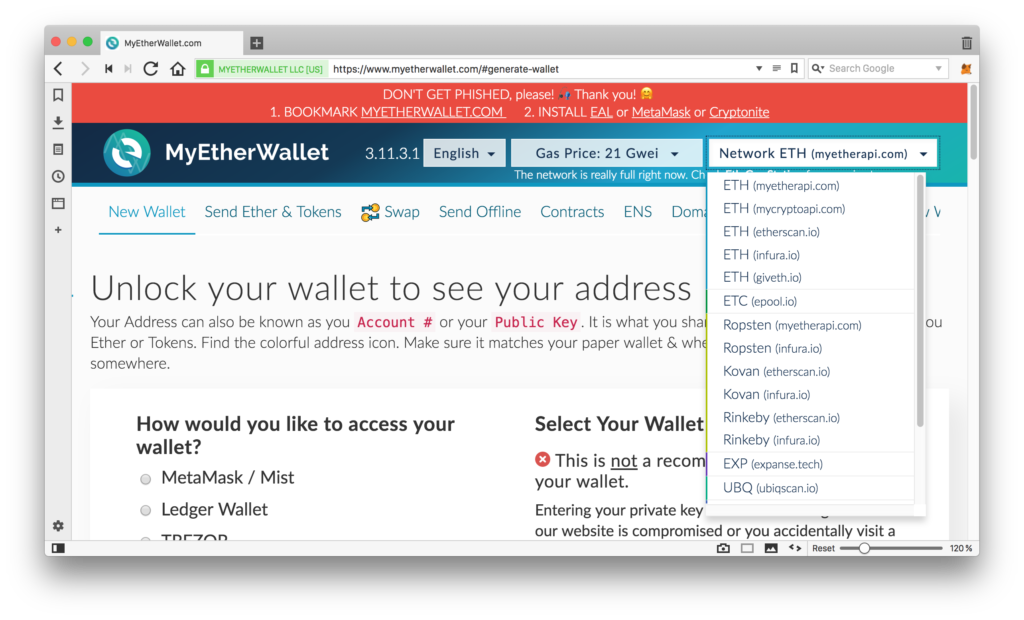
Pick any Ropsten. The screen will refresh and you’ll have to re-enter the wallet. After re-entering via the Send Ether & Tokens tab, the interface will be a little different. No QR codes and the balance will be in ROPSTEN ETH, not ETH.
Testnets are environments for playing around and testing the Ethereum blockchain without financial consequences. You can find out more about them here. Open the Ropsten faucet next. It’s a page which lets us request free Ropsten Ether: faucet.ropsten.be:3001
In the recipient field, enter your wallet’s address. Copy it from the Account Address part of MEW.
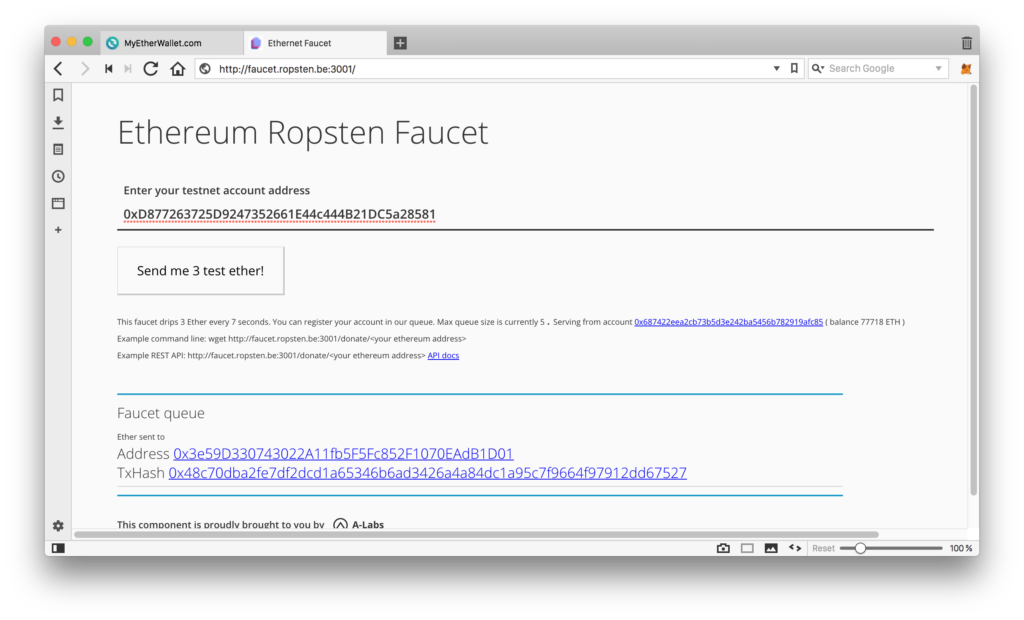
The Ether should arrive within a minute or two, depending on how busy the testnet is.
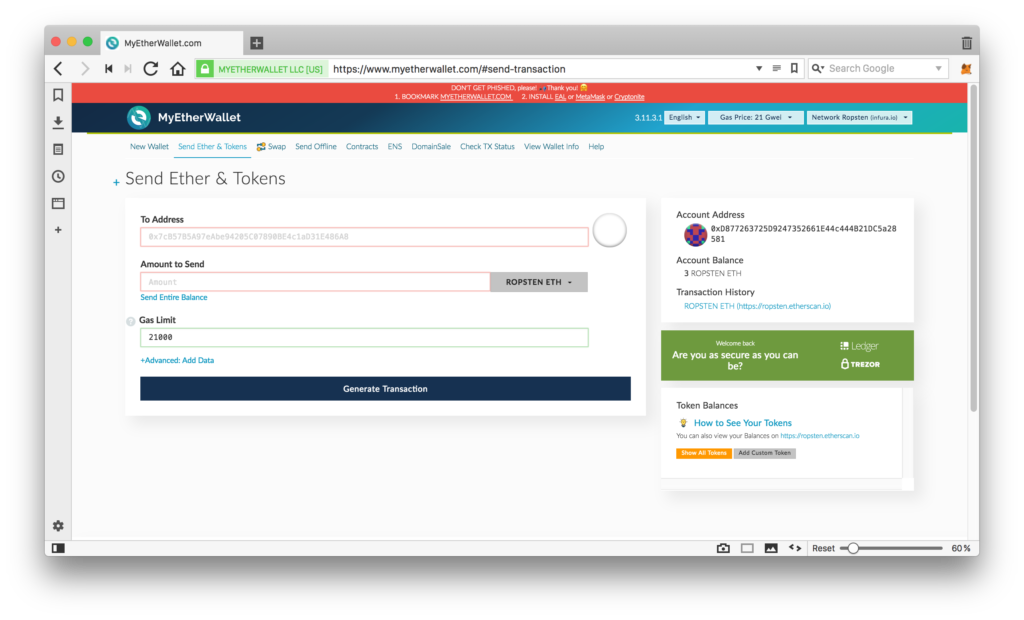
Sending Ether
Now let’s send some Ether. In a new tab open MEW again and generate another wallet, following instructions from before. Copy this newly generated address’ public key (Account Address) to the To Address field of the original unlocked wallet with test Ether.

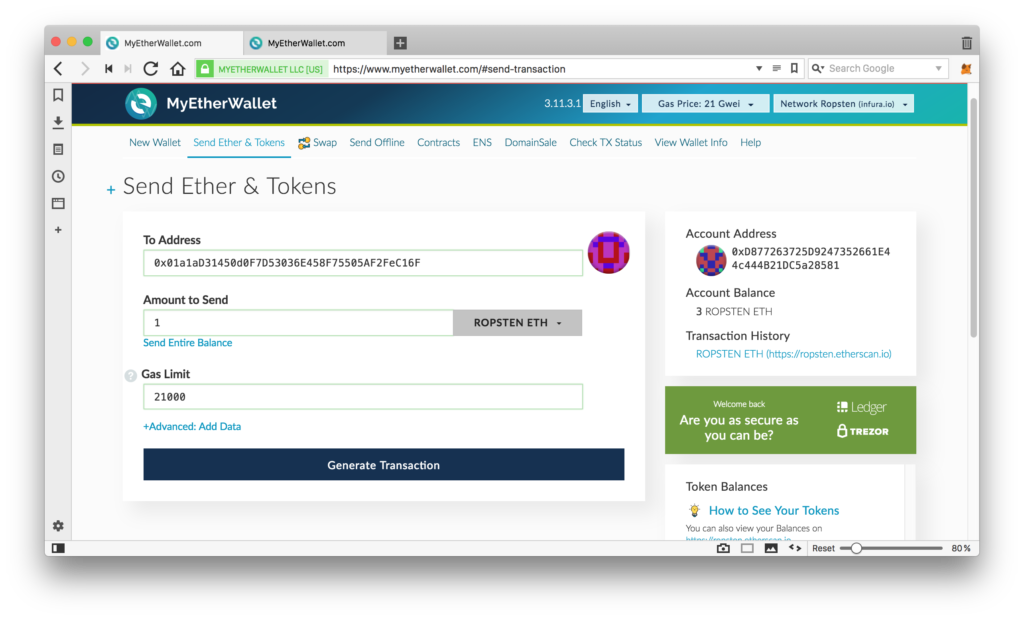
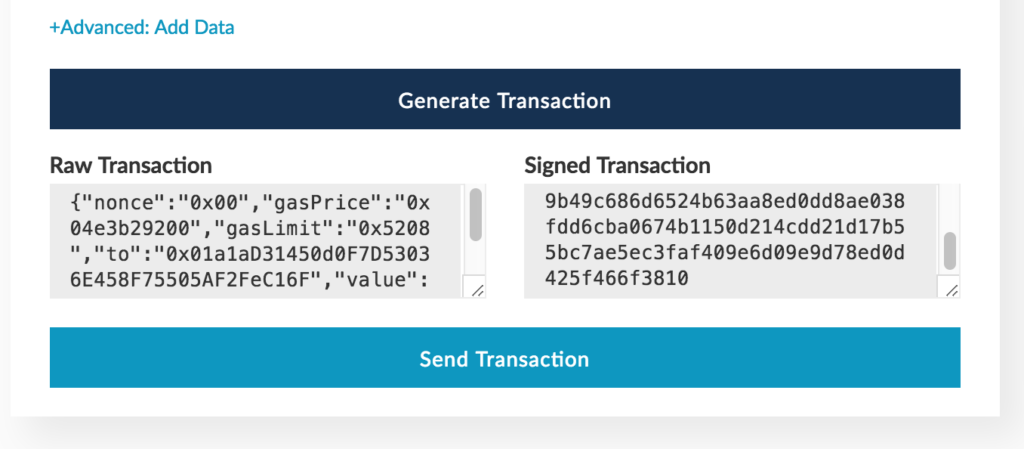
Set the amount to less than maximum and click Generate Transaction. After it’s generated, confirm it with Send Transaction.
Another confirmation window will appear, listing all the thus far provided information:
- sender and recipient
- amount
- balance of sender’s account
- coin being sent
- network being used
- gas limit and price, i.e. the cost of the transaction
- nonce and data (irrelevant for now)
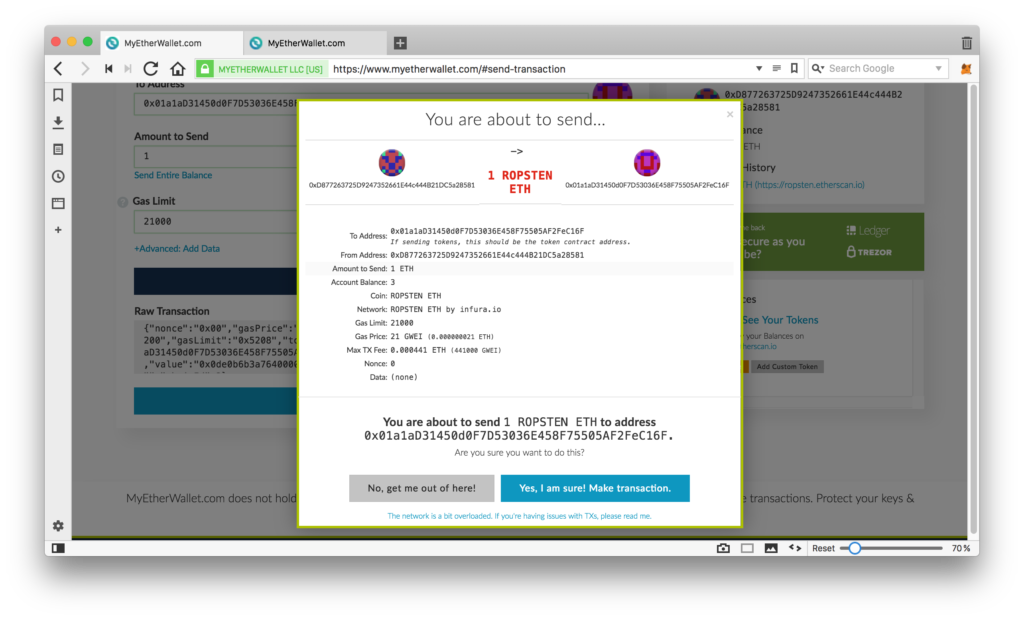
Confirm the sending. After sending, a green confirmation message should appear at the bottom of the screen with a Verify link which lets you look at the transaction on Etherscan, Ethereum’s most popular block explorer. Etherscan has access to the Ropsten network and can inspect it.

This is how the TX looks for our case above:
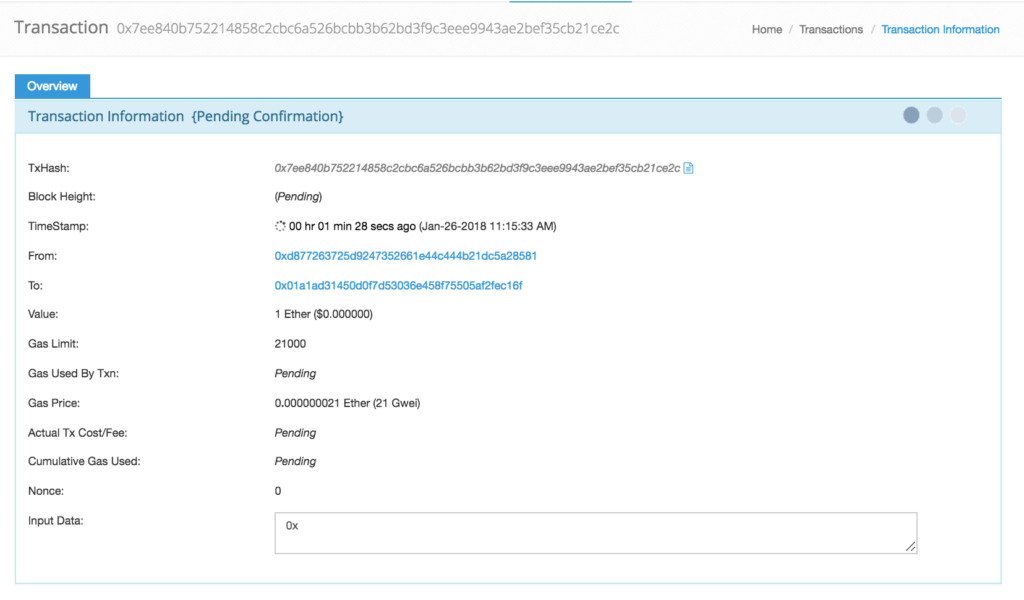
Pending means the transaction is still being processed. The higher the gas price, the faster it turns into Success. Once it’s successful, the ROPSTEN ETH state of the second, new address, will change (sometimes a re-unlock is necessary so MEW registers the changes).

Conclusion
MyEtherWallet is a simple and safe tool for interacting with the Ethereum blockchain. You can use it to interact with contracts, register domains (like bitfalls.eth), track accounts, activate smart contracts, send Ether, even run decentralized apps. (More on that in a followup post.)
But while MEW is a pretty safe option, nothing can match the safety of hardware wallet like Ledger Nano S. Seeing as MEW’s interface can seem a little complex, there’s a simpler alternative as well — MetaMask.
 Bruno Skvorc
Bruno is a blockchain developer and technical educator at the Web3 Foundation, the foundation that's building the next generation of the free people's internet. He runs two newsletters you should subscribe to if you're interested in Web3.0: Dot Leap covers ecosystem and tech development of Web3, and NFT Review covers the evolution of the non-fungible token (digital collectibles) ecosystem inside this emerging new web. His current passion project is RMRK.app, the most advanced NFT system in the world, which allows NFTs to own other NFTs, NFTs to react to emotion, NFTs to be governed democratically, and NFTs to be multiple things at once.