The pursuit of building an error-free application continues. But in the meanwhile, we need to monitor our application’s errors and take action quickly. Many companies have tried to solve this problem, and one of the best on the market right now is Bugsnag.
They focus on the problem of providing a bug notification system that makes sense of errors and helps you take action in various ways. In this article, we’re going to discover Bugsnag and integrate it into an existing Laravel application. You can clone the demo app from Github to follow along.

Project Setup
You can follow the instructions below to set up the demo application (it is assumed you have a working PHP environment like this one).
// clone the repo
git clone git@github.com:Whyounes/bugsnag_demo.git

cd bugsnag_demo

// update dependencies
composer update

// migrate and seed the database
php artisan migrate && php artisan db:seed
Creating an Account on BugSnag
Before starting to use Bugsnag, we need to create a new account and create our new project. You can start with a 30 day free trial and switch to a paid plan depending on your application’s size. After signing up, you’ll have to create a new project and specify your project type. In our case, that’ll be PHP.
Adding BugSnag to Our Project
Bugsnag provides a list of notifiers for different application types. We’re going to install and configure the PHP notifier package. Alternatively, because the demo application is built using Laravel 4, you may want use the Laravel package and follow the Laravel integration guide to easily set up your project, but in this case, we’ll take a more framework-agnostic approach.
- Require
bugsnag/bugsnag:2.*using Composer. - Grab your project API key from
project dashboard > settingsin Bugsnag’s control panel. You can store your API key in your environment variables or inside a configuration file depending on your application. In this case, we’re going to add it to ourapp/config/app.php.
// app/config/app.php

return array(
    // ...
    'bugsnag_api_key'   => 'YOUR KEY'
    // ...
);
Inside app/start/global.php, we bind and configure our Bugsnag client.
// app/start/global.php

App::singleton('bugsnag', function() {
    $bugsnag = new Bugsnag_Client( Config::get('app.bugsnag_api_key') );

    return $bugsnag;
});

// ...
The container dependency injection setup will vary, depending on your application. The above case is common for Laravel apps.
Additionally, you can optionally set a release stage with:
$bugsnag->setReleaseStage(App::environment());
This will make Bugsnag log errors only during a specific release stage of an application.
After creating the Bugsnag client, you should attach it to your error handler. This will depend on how you manage errors and exceptions inside your application. Laravel provides fatal and error methods which accept a callback handler, but you can also use PHP’s set_exception_handler and set_error_handler.
// app/start/global.php

App::error(function($exception) {
    App::make('bugsnag')->notifyException($exception, null, "error");
});

App::fatal(function($exception) {
    App::make('bugsnag')->notifyException($exception, null, "error");
});
The notifyException method accepts additional meta data as a second parameter and the error level as a third parameter, which will default to warning. However, if you want to attach it directly to the PHP error and exception handlers.
$bugsnag = App::make('bugsnag');

set_error_handler(array($bugsnag, 'errorHandler'));
set_exception_handler(array($bugsnag, 'exceptionHandler'));
Configuring Bugsnag
-
Adding user details to the error:
By default, Bugsnag sends the ID of the logged in user with the error, but you can change that by updating the Bugsnag client instance on the container.// app/start/global.php App::make('bugsnag')->setUser([ 'email' => Auth::check() ? Auth::user()->email : 'Guest user' ]);Now we can see the user’s username in the error details by selecting the
usertab.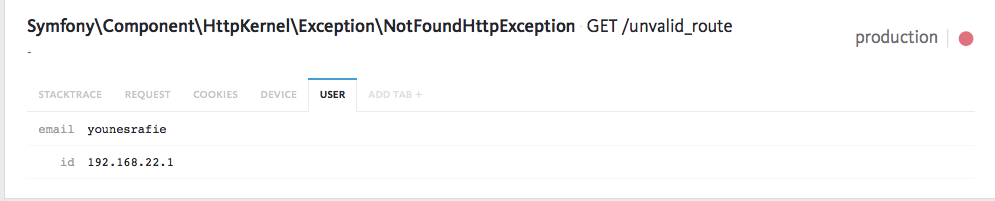
-
You can also alter the error object being sent to the server by using the
setBeforeNotifyFunctionmethod which accepts a callable function as a parameter.// app/start/global.php App::make('bugsnag')->setBeforeNotifyFunction(function($error) { $error->setMetaData([ "user" => [ "username" => Auth::check() ? Auth::user()->username : 'Guest user' ], "metrics" => [ "Metric 1" => "Some data here" ] ]); });If you noticed on the screenshot above, we have a list of tabs to group meaningful details about the error. We can update existing ones like the
USERtab, and add new ones for metrics, etc. -
To avoid sensitive details about your customers or application leaking out, you can add a list of attributes that you want to filter out to your Bugsnag client instance. The value will appear as
[FILTERED]on your dashboard.// app/start/global.php App::singleton('bugsnag', function() { $bugsnag = new Bugsnag_Client( Config::get('app.bugsnag_api_key') ); $bugsnag->setFilters([ 'password' ]); return $bugsnag; }); // ...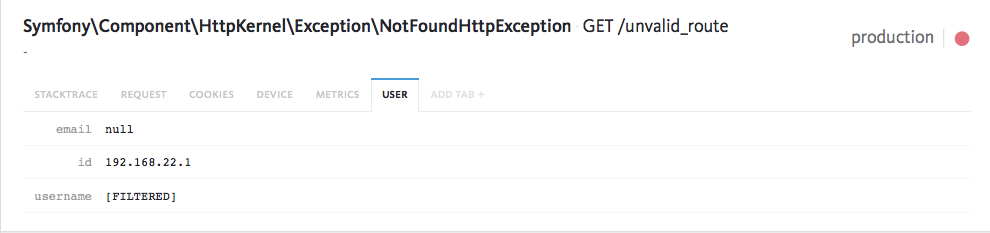
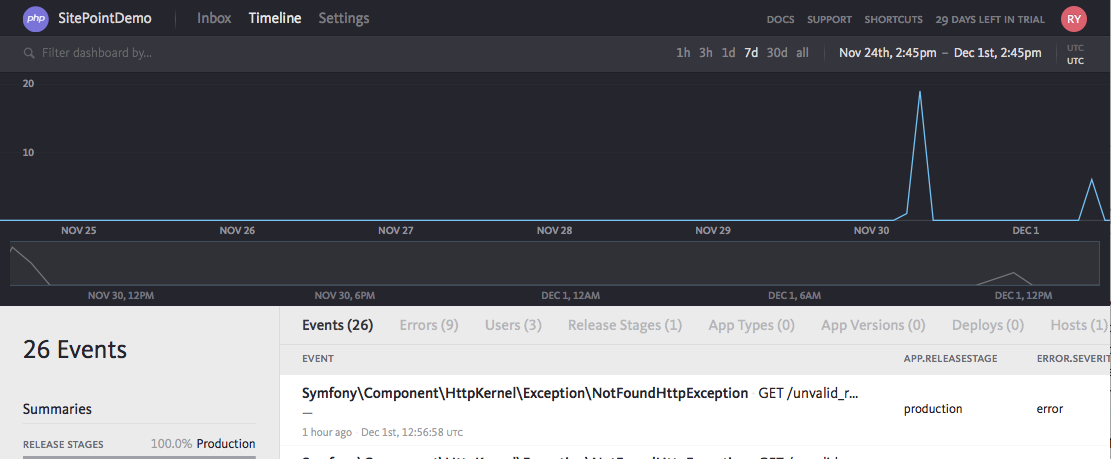
Bugsnag Dashboard
After creating our Bugsnag account and attaching it to the application, we need to visit the dashboard to explore the different available components. We can choose between the Inbox view, which shows us the list of errors as a list that we can filter through, or switch to the timeline graph page by clicking on the timeline link on the top of the page. You can check the documentation for more details about the timeline graph dashboard.
Let’s Generate Some Errors
Inside our questions view template, we display the question owner’s username. The user being deleted would cause a problem, and throw an error. (Trying to get property of non-object). If we have a lot of users accessing the questions page (which you can simulate by requesting the same page multiple times), it could clutter our errors dashboard with the same bug. If you seeded the database using the artisan db:seed command, you’ll have a question assigned to a user with an id of 10, which doesn’t exist in the database.
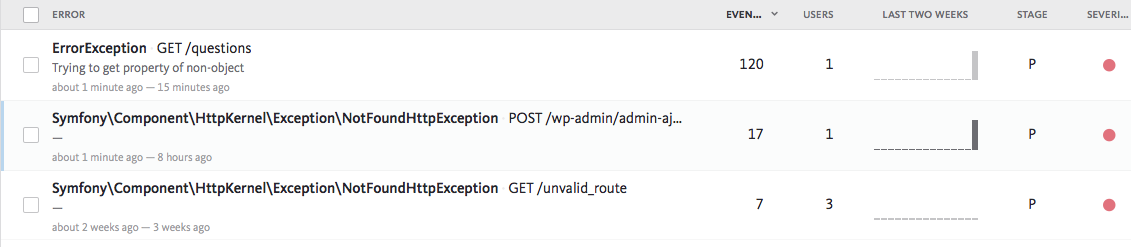
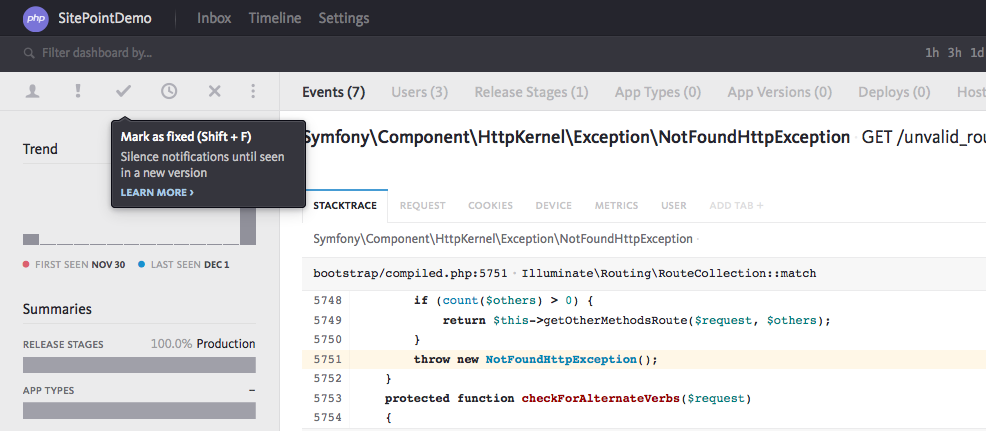
We don’t have to worry about repetitive errors being displayed on the dashboard, and apply any grouping to them. After parsing your errors, Bugsnag will decide if we’re dealing with a repetitive or a new error. Here is an example from our application.
We can fix this error by adding a simple test before accessing the username property on the object.
// app/views/user/questions.blade.php

// ...
{{ isset($question->user) ? $question->user->username : 'User deleted' }}
//...
Filters
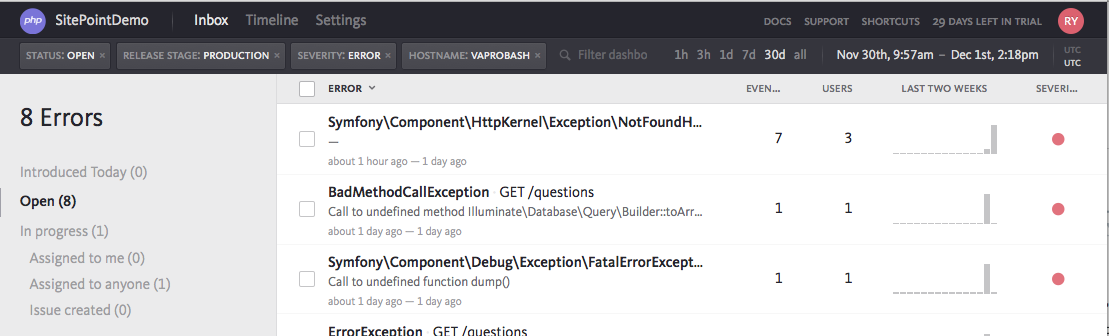
To investigate our errors, Bugsnag provides us with a set of filters to drill down on the data and gather specific details about the source of the problem.
You can filter errors by time using the date range selector on the top filter bar, or see all errors by selecting the all filter.
A better way to filter errors is by data – like user, error status, severity, assigned to X, etc. You can check the documentation for the list of supported filters. Because Bugsnag parses your error messages when you send them, it will help auto-complete the search terms for hostnames, release stage, etc.
Adding Collaborators
There is a good chance that you’re not working alone on your project, or you’re the project manager. You can add project collaborators by going to the top right corner and clicking the collaborators link.
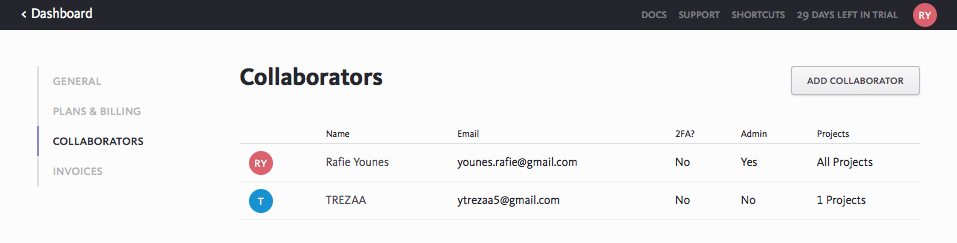
Bugsnag parses the errors and groups them accordingly to avoid long repetitive lists. After selecting an error, we can assign it to an existing collaborator or invite a new one.
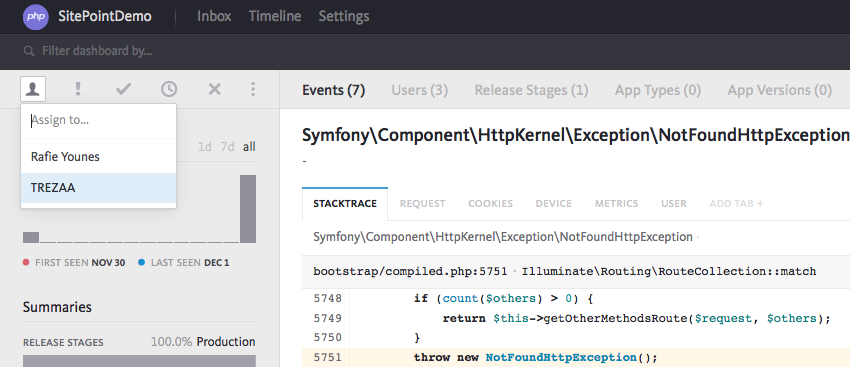
Error Status
The left sidebar on the dashboard shows the list of errors grouped by status, (Open, In progress, Fixed, Snoozed, Ignored). After selecting an error, we can change its status in the top left bar.
By default, Bugsnag will only show status:open errors to help us identify active errors, but we can change that using the aforementioned filters.
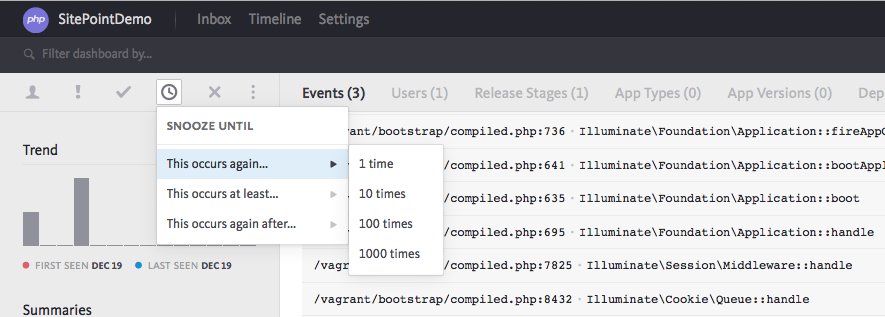
Snoozing and Ignoring Errors
If you have an error occurring frequently and your team is currently working on a fix for it, you can snooze it for a specific period or by using a condition.
If you’d like to ignore this error – which is not recommended for production – you can do so by using the ignore button next to the snooze option on the actions menu.
Third Party Notifications
Teams often use multiple apps and services for their development process. Bugsnag offers a list of notification plugins that we can configure to send notifications for different types of errors. You can notify your team on Slack, create issues on Github, post to your server’s webhook, etc.
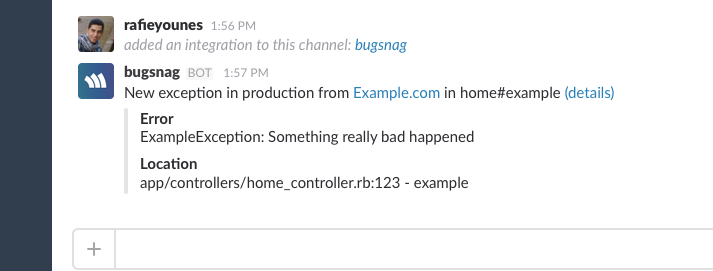
Slack Notifications
Navigate to our project settings and click on the Team Notifications link to display the list of integrations, then select Slack.
We need to specify when it should notify us and how often. Then, we need to get our Slack webhook URL by following the link above the input, paste the URL, and send a test notification.
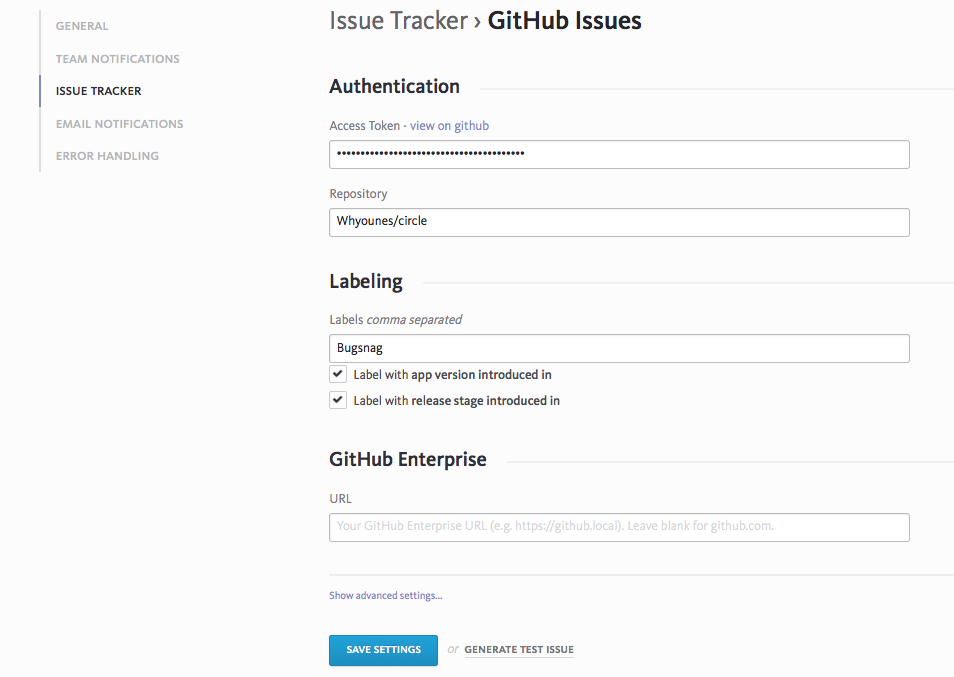
Creating a Github Issue
The other way to act on error notifications is to create a new Github issue. Navigate to our project settings and click on the Issue Tracker link to display the list of integrations, then select Github issues.

Conclusion
Bugsnag provides a nice platform for automating one’s error tracking system and save the time of going through logs, creating monitoring scripts, etc. You can focus on building your application while keeping an eye on what’s happening on your production release.
Bugsnag has already attracted some big companies like Github, Cisco, LinkedIn, etc. You can start by creating your 30 days trial to explore available features and switch to a paid plan if you really like it. If you’re using another error monitoring platform, or you’ve already tried Bugsnag, let us know what you think!
Frequently Asked Questions (FAQs) about Laravel with Bugsnag
How does Laravel with Bugsnag improve error monitoring?
Laravel with Bugsnag provides a comprehensive solution for error monitoring. It offers real-time error reporting, which means you can identify and fix issues as they occur. It also provides detailed diagnostic data for each error, including the stack trace, request parameters, and user information. This allows you to understand the context and cause of each error, making it easier to fix. Additionally, Bugsnag’s error grouping feature helps you prioritize errors by grouping similar ones together, so you can focus on fixing the most critical issues first.
What are the key features of Laravel with Bugsnag?
Laravel with Bugsnag offers several key features that make it a powerful tool for error monitoring. These include real-time error reporting, detailed diagnostic data, error grouping, and support for multiple programming languages. It also provides a user-friendly dashboard that allows you to easily monitor and manage errors. Furthermore, it offers integrations with popular tools like Slack, Jira, and GitHub, enabling you to streamline your workflow.
How does Laravel with Bugsnag compare to other error monitoring tools?
Compared to other error monitoring tools, Laravel with Bugsnag stands out for its comprehensive features and user-friendly interface. It provides real-time error reporting and detailed diagnostic data, which are not always offered by other tools. It also supports multiple programming languages, making it a versatile solution for diverse development teams. Additionally, its integration capabilities allow you to seamlessly incorporate it into your existing workflow.
How easy is it to set up Laravel with Bugsnag?
Setting up Laravel with Bugsnag is straightforward. You simply need to install the Bugsnag Laravel package using Composer, configure it with your Bugsnag API key, and then add the Bugsnag service provider to your Laravel application. Detailed instructions are provided in the Bugsnag documentation, making the setup process easy even for beginners.
Can Laravel with Bugsnag be used for large-scale applications?
Yes, Laravel with Bugsnag is designed to handle large-scale applications. It can process millions of errors per minute, making it suitable for high-traffic websites and applications. It also provides error grouping, which helps you manage and prioritize a large volume of errors effectively.
How does Laravel with Bugsnag handle security and privacy?
Laravel with Bugsnag takes security and privacy seriously. It uses encryption to protect your data and complies with industry-standard security practices. It also offers features like data scrubbing, which allows you to remove sensitive information from your error reports.
What support options are available for Laravel with Bugsnag?
Bugsnag offers a range of support options for Laravel users. These include comprehensive documentation, a community forum, and a dedicated support team. You can also contact Bugsnag directly for personalized assistance.
How does Laravel with Bugsnag help with debugging?
Laravel with Bugsnag provides detailed diagnostic data for each error, including the stack trace, request parameters, and user information. This allows you to understand the context and cause of each error, making it easier to debug. It also offers a user-friendly dashboard that allows you to easily monitor and manage errors.
Can Laravel with Bugsnag be integrated with other tools?
Yes, Laravel with Bugsnag can be integrated with a wide range of tools, including project management tools like Jira, communication tools like Slack, and version control systems like GitHub. This allows you to streamline your workflow and manage errors more effectively.
Is Laravel with Bugsnag suitable for beginners?
Yes, Laravel with Bugsnag is suitable for beginners. It offers a user-friendly interface and comprehensive documentation, making it easy to get started. It also provides a range of support options, including a community forum and a dedicated support team, to assist you as you learn to use the tool.
 Younes Rafie
Younes is a freelance web developer, technical writer and a blogger from Morocco. He's worked with JAVA, J2EE, JavaScript, etc., but his language of choice is PHP. You can learn more about him on his website.