
Key Takeaways
- Webix is a JavaScript and HTML5 framework designed for developing cross-platform, data-rich web applications with responsive user interfaces. It is known for its simplicity, speed, and lightweight nature, and can integrate with other frameworks like Backbone.js, Angular.js and jQuery.
- The Webix framework offers over 100 UI widgets and controls, making it a powerful tool for developers. It is suitable for beginners due to its intuitive coding style and extensive documentation. The framework supports all modern browsers and mobile platforms, making it possible to create mobile-friendly applications.
- Webix allows developers to build a wide range of applications, from simple web pages to complex web applications. It is particularly well-suited for creating data-intensive applications due to its powerful data management features. It also offers on-the-fly skin changing, allowing developers to easily customize the look and feel of their applications.
Nowadays there are a lot of frameworks, everyone with something unique. We have AngularJS, Ember, and Aurelia.io. On SitePoint we have covered these frameworks in many occasions: Creating a Next Gen JavaScript Application with Aurelia, Building a Twitter App Using AngularJS, and Add Twitter Authentication to an Ember.js App with Torii.
In this article, I want to cover the Webix framework. To show how it works I’ll guide you through the creation of an online audio player model. Keep in mind that it’s just a model, so there is no playback. (Sorry, maybe I’ll do it in a following article.) You can check out the source code and a demo on this GitHub page.
Introducing Webix
Webix is a JavaScript and HTML5 framework for developing cross-platform data-rich web applications with responsive user interfaces. The library is easy to learn, fast and lightweight. Integration with Backbone.js, Angular.js and jQuery may be pretty handy. For example, you can use jQuery methods and utility functions to create your Webix applications. Personally, the feature I like the most is its simplicity.
Developing the Project
Now that you know what Webix is, let’s start developing our project.
Starting the Engine
After you’ve downloaded the library, crate an index.html page. Inside it, you should include the CSS and the JavaScript files:
<link rel="stylesheet" href="codebase/webix.css" />

<script src="codebase/webix.js"></script>
Alternatively, you can include them using the Webix CDN:
<link rel="stylesheet" href="//cdn.webix.com/edge/webix.css" />

<script src="//cdn.webix.com/edge/webix.js"></script>
My suggestion is to include the full library. “Why?” you might ask. One of the reason is the skin collection. I’ll cover this topic and how to use the skins later in this article.
But for now, let’s work on the initialization. You should place all your code inside the webix.ui() constructor. If you want to be sure that your application will be executed after the page is fully loaded, use webix.ready(function() { ... }. So, your code should look like:
webix.ready(function(){

    webix.ui({

        /* your code */

    });

});
So far, so good. Let’s create our layout now. And there will be no need to mess with HTML or CSS. I promise.
Rows and Columns: Creating the Layout
Webix offers two properties named rows and cols that can help you in creating any layout you want:
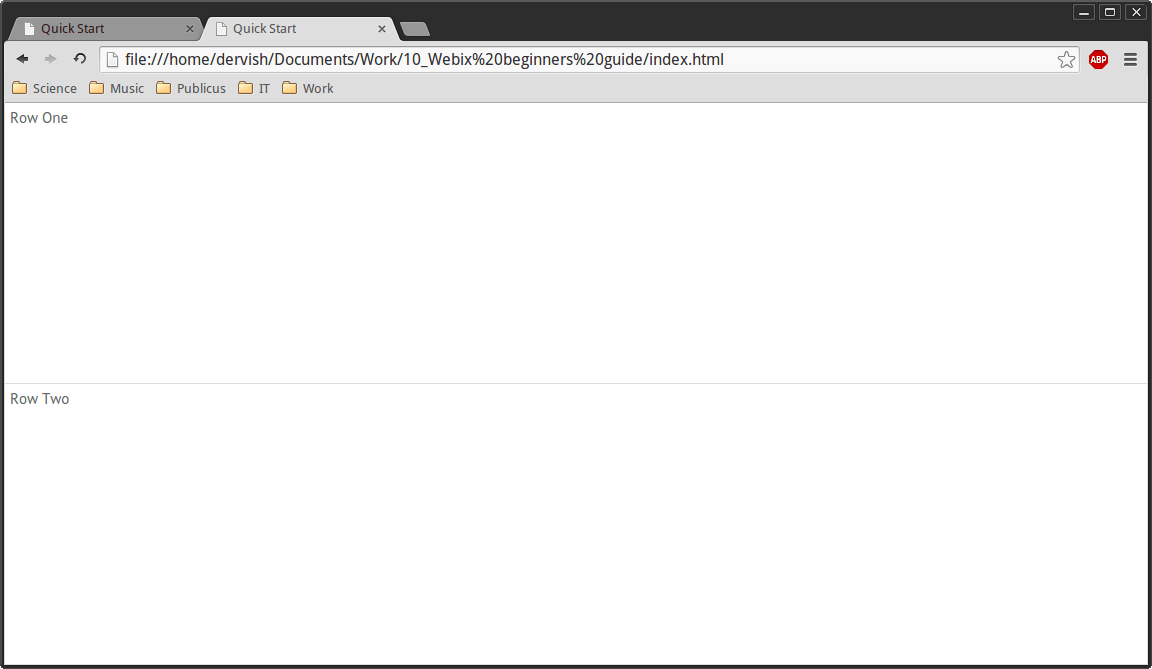
webix.ui({

    rows: [

        {template: "Row One"},

        {template: "Row Two"}

    ]

});
And here’s the result:
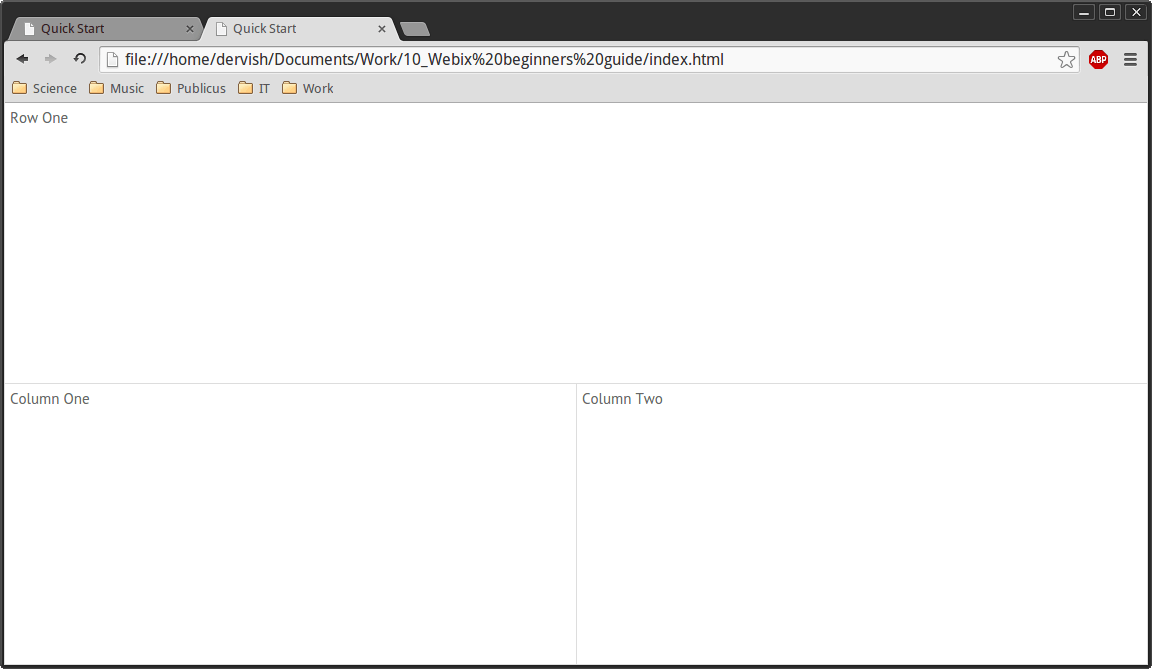
With template:"Row One" we’ve created a simple container. You can place any HTML content into it. You can also use nested containers to make something complex:
webix.ui({

    rows: [

        {template:"Row One"},

        {cols:[

            {template:"Column One"},

            {template:"Column Two"}

        ]}

    ]

});
The result is shown below:
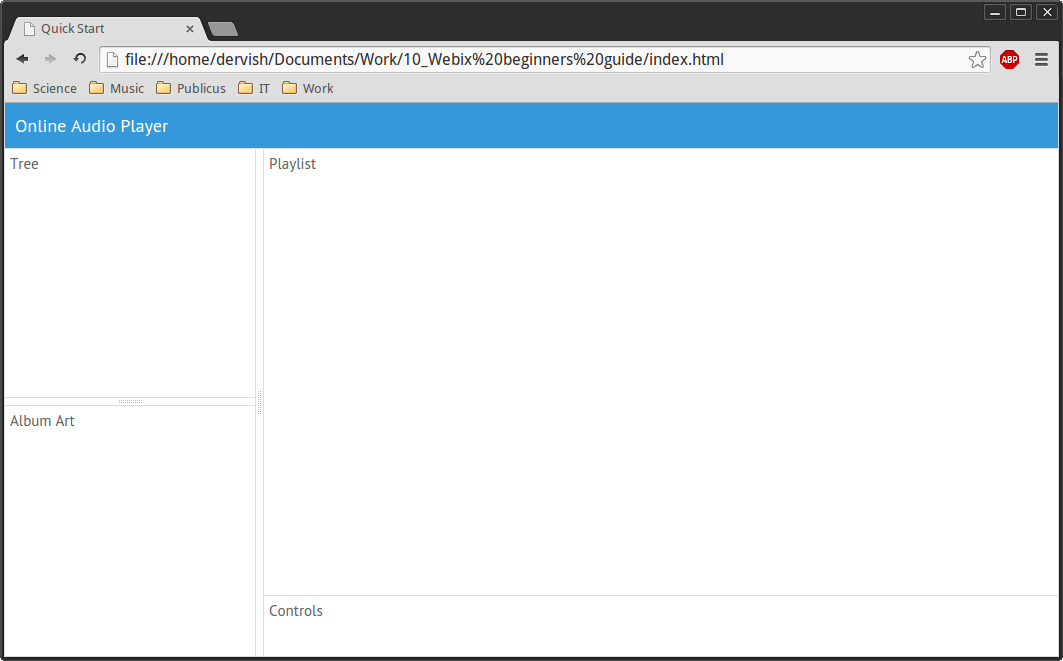
By combining nested rows and columns you can create the layout you need. Here’s my code of our demo app:
webix.ui({

    rows: [

        {type:"header", template:"Online Audio Player"},

        {cols: [

            {rows: [

                {template:"Tree"},

                {view:"resizer"},

                {template:"Album Art", width: 250, height: 250}

            ]},

            {view: "resizer"},

            {rows: [

                {template:"Playlist"},

                {template:"Controls", height: 60}

            ]}

         ]

        }

    ]

});
As you can see, there’s something new here: type:"header". It turns your container into a header. I’ve also used view: resizer to make my “Album Art” and “Playlist” fields resizable. In particular, we’re using the view property to create a UI component.
The image below represents the result achieved so far:
Trees and Tables: Navigation Through Data Arrays
Let’s now breathe some life into it.
Tree Widget
We’ll use the Tree Widget to handle our records collection. Here’s the data.js file that contains all the data that we need. It defines a couple of arrays, so nothing unusual here. Before we move on, don’t forget to include it in your HTML file.
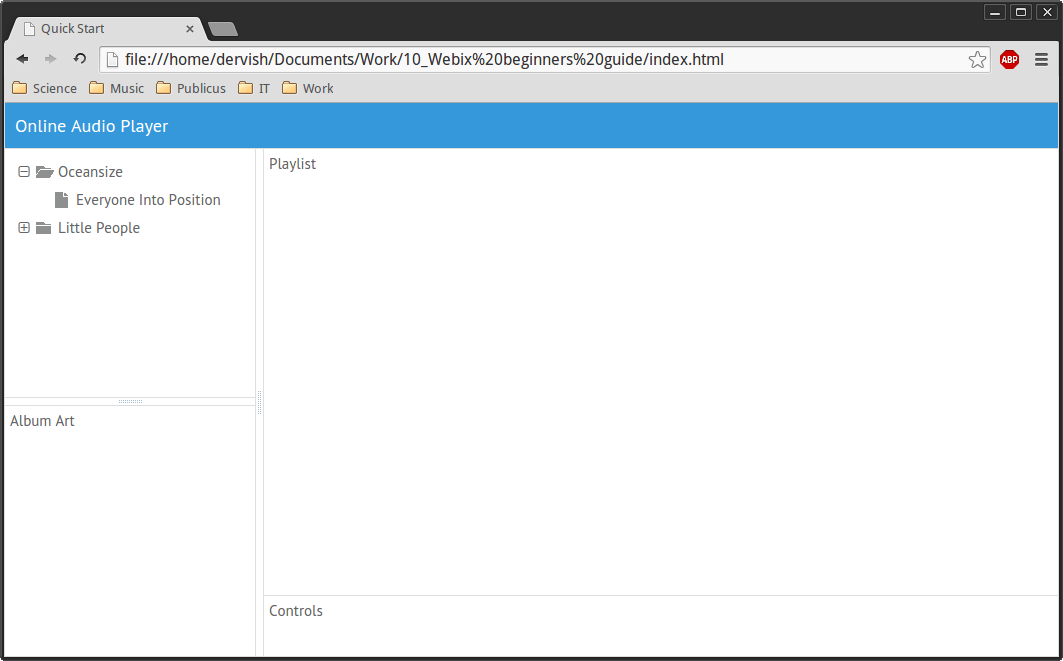
Let’s now render this data on the screen. To do that replace the template: "Tree" with actual tree code:
view: "tree",

id: "myTree",

data: recordsData,

select:true
This code builds a tree with the myTree ID. It uses the recordsData array from the data.js file, then it makes this tree selectable.
Let’s take a look:
DataTable Widget
DataTable Widget is useful if you want to create a list of data. For example… Playlist, right!
To create our playlist, we should replace template: "Playlist" with:
view: "datatable",

id: "myList",

autoConfig: true,

data: oceanData
This code creates a datatable with the myList ID. Then it configures the datatable and creates columns in it, according to the gridColumns array from data.js. As the final step, it uses the oceanData array as the data source.
Below you can see the current state of our application:
Looks fine and it’s sortable! But our Tree and Playlist are separated from each other. Let’s combine them.
Tree + DataTable = Data Explorer
Here’s how I made my tree and playlist work together:
var selected = oceanData;

webix.ui({

    /* ... */

    {view:"tree", id:"myTree", data:recordsData , select: oceanData, on: {

        onSelectChange: function(){

            selected = $$("myTree").getSelectedId();

            if (isNaN(selected)) {

                $$("myList").clearAll();

                $$("myList").define("data", selected);

                $$("myList").refresh();

            }

        }

        }

    },

    /*...*/

    {view:"datatable", id:"myList", autoConfig:true, data:selected}
What do we have here? The selected variable contains the default album value. The DataTable widget uses it as the data source now. Notice how the Tree Widget code has extended. Now it contains the event handler:
on: {

    onSelectChange: function() {

    }

}
This function will run after the new tree item is selected. In our case selected = $$("myTree").getSelectedId(); assigns the currently selected id to the selected variable. It’ll be a number if we select a folder or an array name if we select an album.
Since we don’t want to use the folder data, we should test the returned value:
if (isNaN(selected))
Not a Number? Fine! Let’s render it in three simple steps:
$$("myList").clearAll();

$$("myList").define("data", selected);

$$("myList").refresh();
First, we need to clear the list by executing the clearAll() method. Then initialize it with the new selected value using the define() method. "data" is the property we want to change and selected is the new value for it. Finally, we invoke refresh(). And here’s the result:
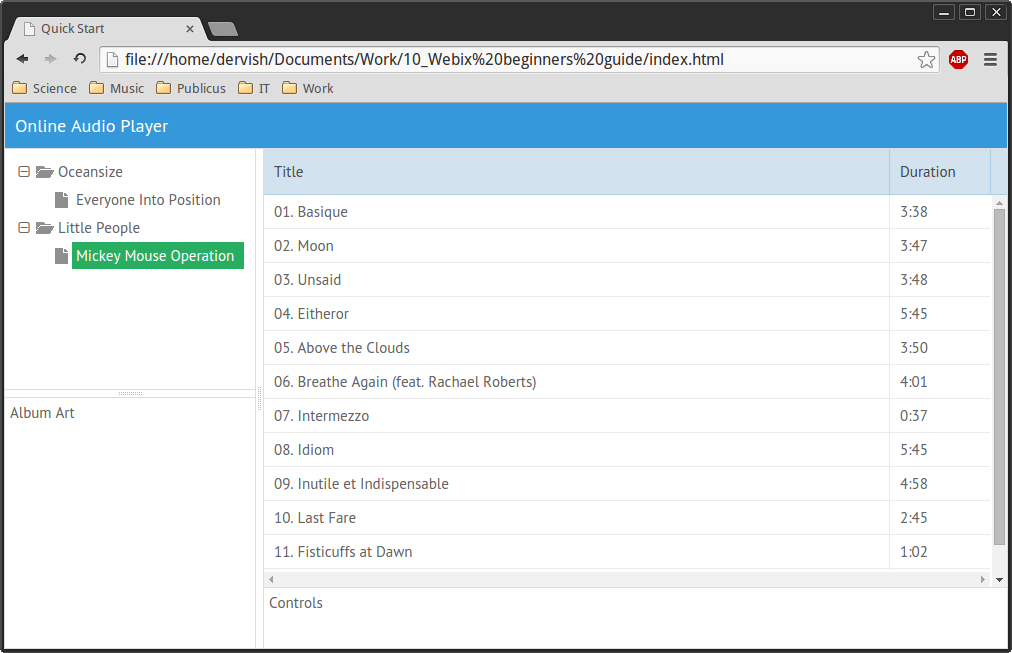
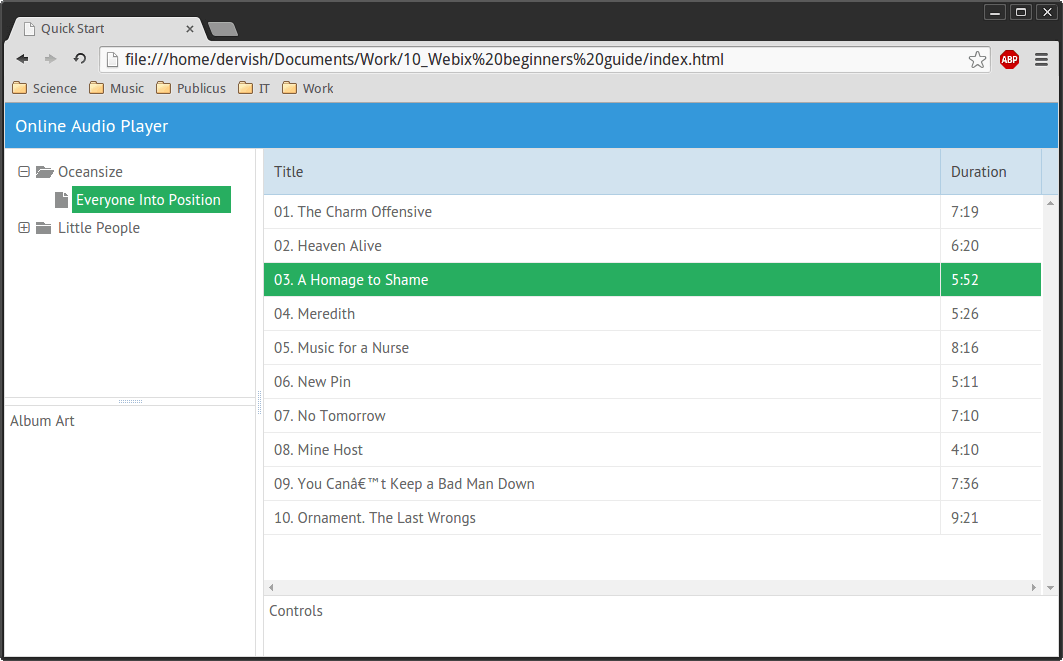
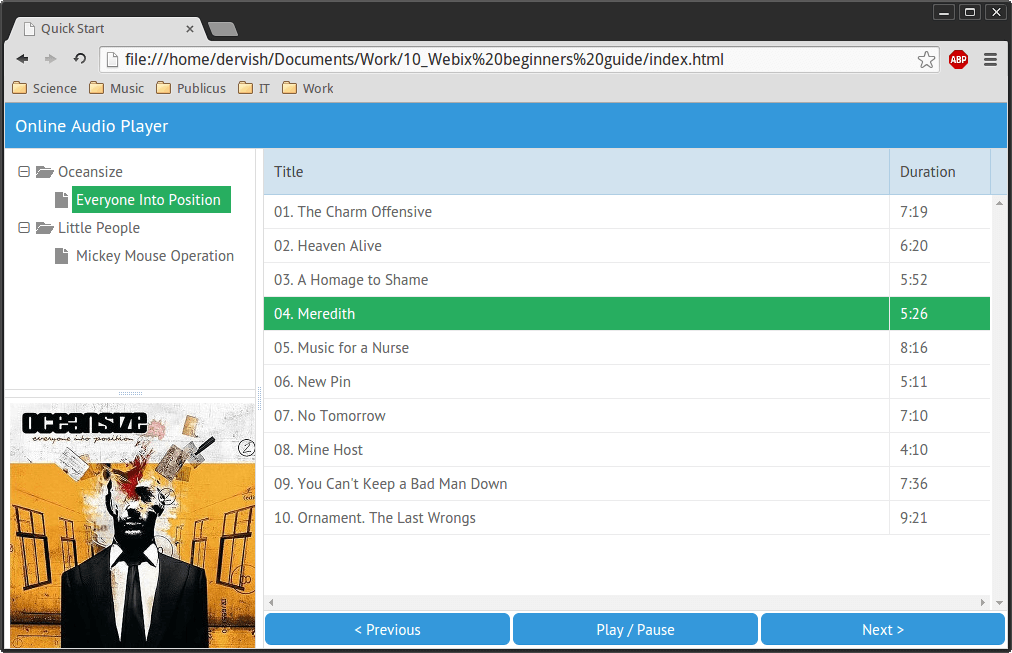
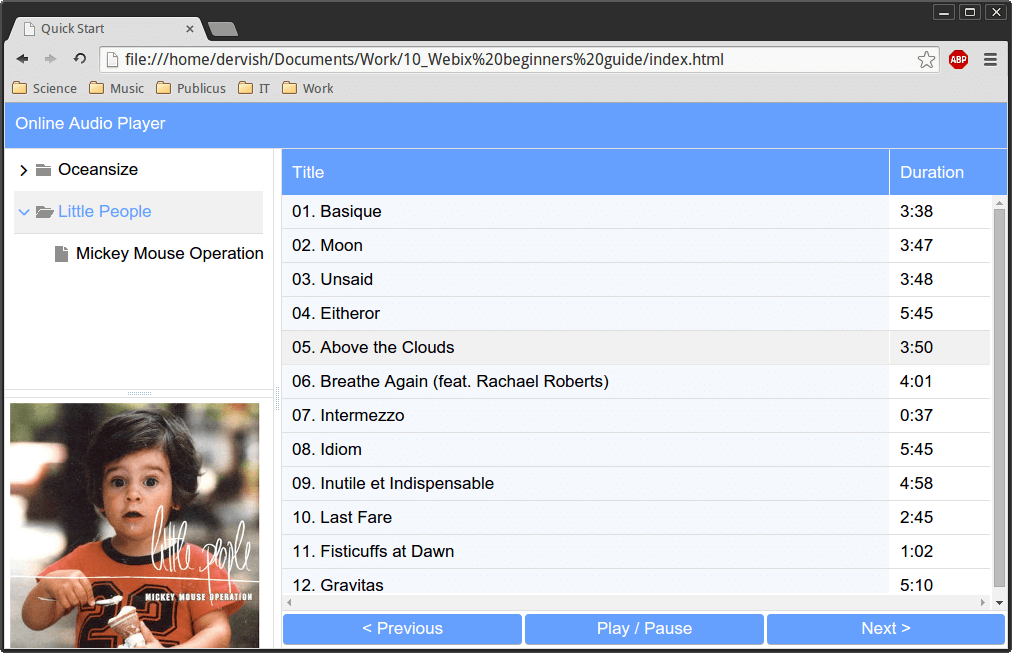
Now we can select any tree element we want and our Playlist content will change.
Pictures and Buttons. To See and Control
Let’s define the default cover value:
var coverPath = "imgs/oceanData.jpg";
We want the “Album Art” field to refresh every time, so we select a new Tree item. To do that, we should paste the following code in our event handler given above:
on: {

	onSelectChange: function(){

		/*...*/

		coverPath = "imgs/" + selected + ".jpg";

		$$("myCover").define("data", { src: coverPath });

	}

}
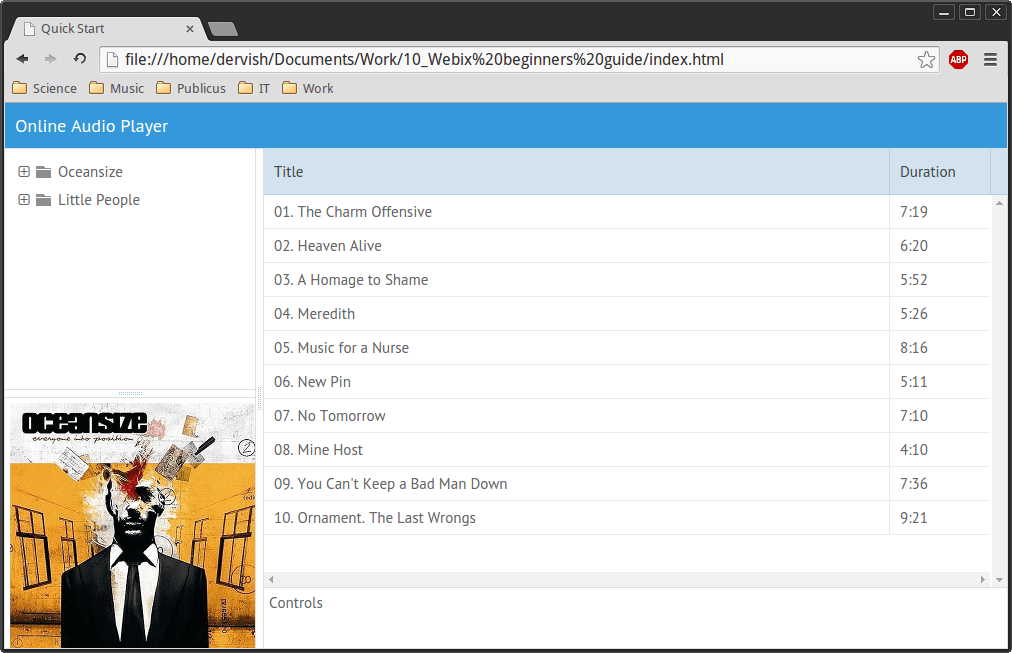
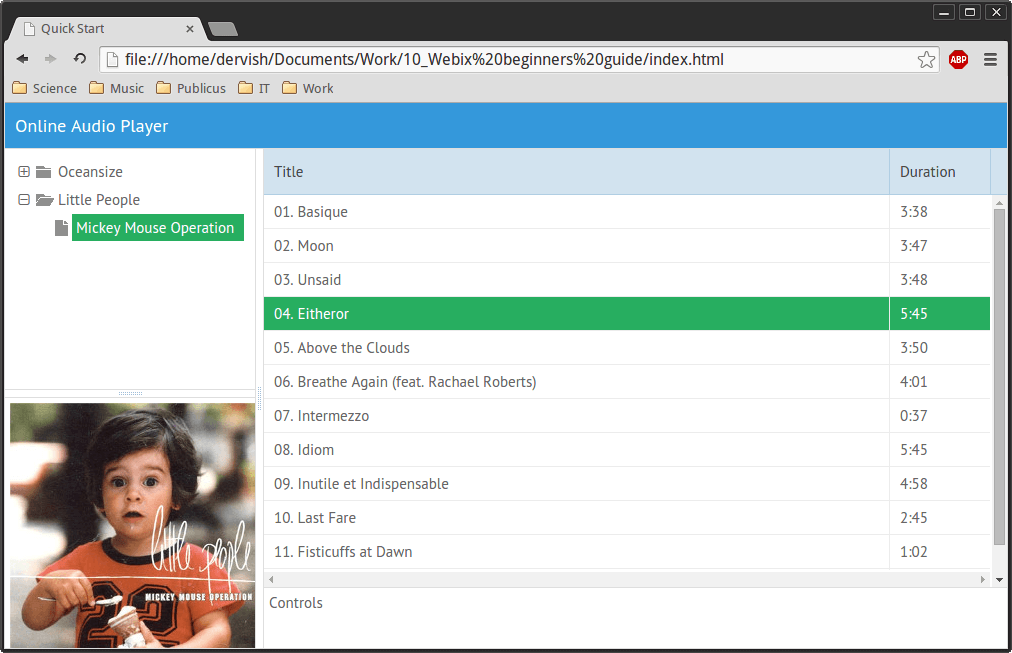
The cover’s image name is equal to its album id value. That’s why we can use the selected variable again. Then we apply the define() method to refresh the myCover container.
Let’s now show the proper album cover to a user. To achieve this, replace
template:"Album Art", width: 250, height: 250
with:
width: 250, height: 250, id:"myCover", data: {src: coverPath},

    template: function (obj) {

        return '<img src="'+obj.src+'"/>'

    }
The data property defines the content of our container. src contains the image path. In our case it’s coverPath. The path’s value changes when the onSelectChange event fires. The template function will generate the proper HTML code.
Let’s now check how the “Album Art” works. The default view is:
A new album is selected:
And now, the best part: buttons! To perform this step, replace
template:"Controls", height: 60
with:
cols: [

   {gravity: 3 },

   {view:"button", value:"< Previous"},

   {view:"button", value:"Play / Pause"},

   {view:"button", value:"Next >"}

]
This code will create three columns, each of which holding a button. The gravity parameter sets relative size proportions for the elements within the common parent container.
Here’s how our player looks like with buttons:
On-the-fly Skin Changing
Remember what I’ve told you about getting the full library instead of using the CDN service? You can find a bunch of skins inside it! And all you need to change the skin is a single line of code:
<link rel="stylesheet" href="codebase/skins/touch.css" />
Obtaining this result:
Conclusion
As you can see, it’s pretty simple to create a good-looking responsive web application with Webix. The syntax is intuitive and the documentation is well written. Demos are available, too. As a final note, this Webix code snippet playground will help you to dive straight into the action. Enjoy!
Frequently Asked Questions about Webix Framework
What is the Webix Framework and what makes it unique?
The Webix Framework is a powerful JavaScript UI library that allows developers to create rich and interactive web applications. What sets it apart from other frameworks is its extensive collection of UI widgets and controls, its speed, and its compatibility with various platforms. It also offers a simple and intuitive coding style, making it easier for developers to create complex applications.
How does Webix Framework compare to other JavaScript UI libraries?
Compared to other JavaScript UI libraries, Webix stands out due to its comprehensive set of features and widgets. It offers over 100 UI widgets and controls, which is more than most other libraries. Additionally, Webix is known for its high performance and speed, making it a preferred choice for developers working on complex projects.
Is Webix Framework suitable for beginners?
Yes, Webix Framework is suitable for beginners. It offers a simple and intuitive coding style, which makes it easier for beginners to understand and use. Additionally, it provides extensive documentation and tutorials, which can help beginners get started with the framework.
What platforms are compatible with Webix Framework?
Webix Framework is compatible with a wide range of platforms. It works well with all modern browsers, including Chrome, Firefox, Safari, and Edge. It also supports mobile platforms, making it possible to create mobile-friendly web applications.
How can I get started with Webix Framework?
To get started with Webix Framework, you can visit the official Webix website and download the library. From there, you can follow the tutorials and documentation provided on the website to learn how to use the framework.
What kind of applications can I build with Webix Framework?
With Webix Framework, you can build a wide range of applications, from simple web pages to complex web applications. It is particularly well-suited for creating data-intensive applications, thanks to its powerful data management features.
Does Webix Framework offer support for mobile development?
Yes, Webix Framework offers support for mobile development. It provides a set of mobile-friendly widgets and controls, making it possible to create web applications that work well on mobile devices.
Is there a community of developers using Webix Framework?
Yes, there is a vibrant community of developers using Webix Framework. You can join the community to get help, share your knowledge, and learn from other developers.
How does Webix Framework handle data management?
Webix Framework offers powerful data management features. It provides a set of data components that allow you to easily load, edit, and save data. It also supports various data formats, including JSON, XML, and CSV.
Can I customize the look and feel of my application with Webix Framework?
Yes, you can customize the look and feel of your application with Webix Framework. It provides a set of themes that you can use to style your application. Additionally, you can create your own custom themes if you want to have a unique look and feel for your application.