If you’ve used blogging services such as Tumblr or the now-defunct Posterous, you may be aware that many of them let you bypass their web interface and create posts via email by sending a message to a specific email address. In this article, I’m going to look at how you might implement an email-to-post feature, using SendGrid. SendGrid is a service for sending email – usually in bulk, but they also offer a less well-publicized feature for handling incoming email. SendGrid can be configured to handle all incoming messages for a given domain by pinging a URI of your choosing, and by implementing a simple webhook, you can act on the incoming mail accordingly.
Getting Started
I’ve based the example code for this article on this Slim Framework skeleton application. To make the app easier to debug, we can implement file-based logging by adding the following to therequire section of its composer.json file:
"slim/extras": "dev-develop",include/services.php to configure the logger as follows:
$app = new Slim(array(
    'view' => new Twig(),
    'templates.path' => $c['config']['path.templates'],
    'log.writer' => new \Slim\Extras\Log\DateTimeFileWriter(array(
        'path' => dirname($c['config']['path.logs']),
        'name_format' => 'Y-m-d',
        'message_format' => '%label% - %date% - %message%'
    ))
));config/config.php and set your own configuration values (such as your database connection details). Additionally, add the following lines to specify the directories that will hold log files and uploaded images:
'path.logs'    => $basedir . 'logs/',
'path.uploads' => $basedir . 'public/uploads/'@ in the recipient email address, we can determine the user who’s posting. In the real world, you’ll probably want to make the alias something much more difficult to guess, and perhaps restrict access to emails sent from a specific address (though of course this is fairly simple to spoof!).
The database schema defines two tables to hold the users and posts respectively:
CREATE TABLE users (
    id INTEGER NOT NULL AUTO_INCREMENT,
    name VARCHAR(128) NOT NULL ,
    alias VARCHAR(45) NOT NULL ,

    PRIMARY KEY (id) ,
   INDEX alias (alias ASC)
);

CREATE  TABLE posts (
    id INTEGER NOT NULL AUTO_INCREMENT,
    title VARCHAR(255) NOT NULL,
    body TEXT NOT NULL,
    image varchar(255),
    user_id INTEGER NOT NULL,

    PRIMARY KEY (id)
);
Building the Callback
The application should respond to POST requests at the URL you specified, for example:$app->post('/endpoints/email', function () use ($app, $c) {
test-user@example.com"Test User" <test-user@example.com>"Test User" <test-user@example.com>, another-recipient@example.com"Test User" <test-user@example.com>; "Another Recipient" <another-recipient@example.com>
$to = $req->post('to');
preg_match_all('/\b[A-Z0-9._%+-]+@(?:[A-Z0-9-]+\.)+[A-Z]+\b/i', $to, $result, PREG_PATTERN_ORDER);

foreach ($result[0] as $toAddress) {
    // handle the from address
}$alias = substr($toAddress, 0, strpos($toAddress, '@'));
$user = $c['db']->users->where('alias = ?', $alias)->fetch();
if ($user) {
// great, we've got a valid user
}$c['db']->posts()->insert(array(
'title' => $req->post('subject'),
'body' => ($req->post('html')) ? $req->post('html') : $req->post('text'),
'user_id' => $user['id'],
));attachments which contains the number of attached files. Attached files are POSTed along with the request and can be handled in the same way you would handle file uploads from a web form.
if ($user) {
    $numAttachments = $req->post('attachments');
    $uploadedFiles = array();

    if ($numAttachments) {
        foreach ($_FILES as $key => $file) {
            $log->info('Saving file to ' . $c['config']['uploads.dir'] . $file['name']);
            move_uploaded_file($file['tmp_name'], $c['config']['uploads.dir'] . $file['name']);
            $uploadedFiles[] = $file['name'];
    }
}$c['db']->posts()->insert(array(
'title' => $req->post('subject'),
'body' => ($req->post('html')) ? $req->post('html') : $req->post('text'),
'user_id' => $user['id'],
'image' => (count($uploaded_files)) ? $uploadedFiles[0] : ''
));Summary
In this article we’ve looked at a simple use for incoming email parsing – a basic “email to post” type function for a blogging-style application, allowing users to create posts by sending an email to a special address. By registering a simple callback, there are all sorts of fun and interesting things you can do to respond to incoming emails. For instance, how about:- sending alerts when an email has been received
- transferring attachments to Dropbox, Copy.com, SkyDrive, S3, etc.
- allowing people to reply by email to notifications from bulletin boards, messaging systems, etc.
- handling unsubscribe requests
Frequently Asked Questions (FAQs) about Handling Incoming Email with SendGrid
How can I set up the Inbound Parse Webhook in SendGrid?
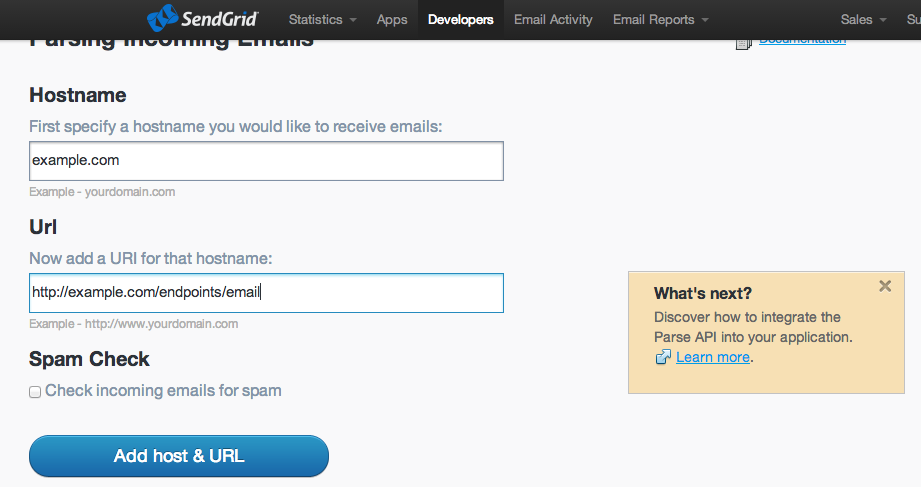
Setting up the Inbound Parse Webhook in SendGrid involves a few steps. First, you need to log into your SendGrid account and navigate to the Settings section. Here, you will find the Inbound Parse option. Click on it and then click on ‘Add Host & URL’. You will be required to provide a hostname and a URL where the parsed emails will be posted. The hostname should be a subdomain of a domain you have validated on SendGrid. The URL should be a route on your server where you can handle POST requests. Once you have filled in these details, click on ‘Add’. SendGrid will now send all emails addressed to your specified hostname to your provided URL.
What is the structure of the data posted by SendGrid’s Inbound Parse Webhook?
The data posted by SendGrid’s Inbound Parse Webhook is a multipart/form-data POST, which includes both the parsed email fields and the attachments. The parsed email fields include headers, text, html, from, to, cc, subject, sender_ip, and so on. The attachments are included as separate parts of the POST and can be handled as file uploads.
How can I handle the data posted by SendGrid’s Inbound Parse Webhook in my server?
To handle the data posted by SendGrid’s Inbound Parse Webhook, you need to set up a route on your server that can handle POST requests. This route should be the same as the URL you provided when setting up the Inbound Parse Webhook. In this route, you can parse the multipart/form-data POST using a suitable middleware. For example, in Node.js, you can use the multer library to handle multipart/form-data.
How can I test the Inbound Parse Webhook locally?
To test the Inbound Parse Webhook locally, you can use tools like ngrok to expose your local server to the internet. Once you have set up ngrok or a similar tool, you can provide the generated public URL as the URL for the Inbound Parse Webhook. Now, when you send an email to your specified hostname, it will be posted to your local server.
How can I handle multiple email addresses with the Inbound Parse Webhook?
The Inbound Parse Webhook can handle multiple email addresses by using wildcard subdomains. When setting up the Inbound Parse Webhook, if you provide a hostname like *@yourdomain.com, SendGrid will send all emails addressed to any subdomain of yourdomain.com to your provided URL.
How can I secure the data posted by the Inbound Parse Webhook?
To secure the data posted by the Inbound Parse Webhook, you can use HTTPS for your URL. This will ensure that the data is encrypted during transmission. Additionally, you can also verify the data’s integrity by comparing the ‘X-Twilio-Email-Integrity’ header with a SHA256 hash of the raw email and your SendGrid Inbound Parse API Key.
How can I handle large attachments with the Inbound Parse Webhook?
The Inbound Parse Webhook includes attachments as separate parts of the POST. These can be handled as file uploads. However, there is a limit of 20MB for the total size of all attachments. If an email exceeds this limit, it will be bounced back to the sender.
How can I troubleshoot issues with the Inbound Parse Webhook?
SendGrid provides an Activity Feed in the dashboard where you can see the status of the emails processed by the Inbound Parse Webhook. If there are any issues, you can check the HTTP response code and the response body for any errors.
Can I use the Inbound Parse Webhook with a free SendGrid account?
Yes, the Inbound Parse Webhook is available for all SendGrid accounts, including free accounts. However, the number of emails you can process depends on your account’s email limit.
How can I process the parsed email data?
Once you have received the parsed email data on your server, you can process it according to your needs. For example, you can store the data in a database, send a response email, trigger a workflow, etc. The possibilities are endless and depend on your specific use case.
 Lukas White
Lukas is a freelance web and mobile developer based in Manchester in the North of England. He's been developing in PHP since moving away from those early days in web development of using all manner of tools such as Java Server Pages, classic ASP and XML data islands, along with JavaScript - back when it really was JavaScript and Netscape ruled the roost. When he's not developing websites and mobile applications and complaining that this was all fields, Lukas likes to cook all manner of World foods.