- Creating a Plugin for Our Functionality
- Adding Custom Meta-fields
- Saving Our New Metadata
- Adding Custom Columns
- Populating our Custom Columns to Display Current Values
- Customizing the Quick Edit Interface
- Enqueuing Our Admin JavaScript File
- Dynamically Populating the Quick Edit Screen with Values
- Wrapping It All Up
- Frequently Asked Questions (FAQs) about Extending Quick Edit Actions in the WordPress Dashboard
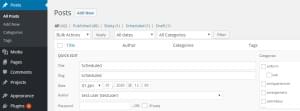
The inbuilt ‘Quick Edit’ feature in the administration screens in WordPress gives you a simple and quick way to change the content of your posts, without the need to jump into the full post editor.
By default WordPress includes several fields to speed up your editing process, such as the title, slug, taxonomies and metadata like the publish date and post status selectors. However if you’ve extended your post types then you’ll find you can’t change these values here. That’s what we’re going to look at now.
Creating a Plugin for Our Functionality
It’s good practice to create plugins when we’re modifying functionality (you can find a guide for beginners if you’re just starting out with plugin development). Start by creating a class that will act as our plugins entry point. There are several moving parts to get this up and running, so start with a basic structure.
/*
Plugin Name: Extend Quick Edit
Plugin URI: https://elevate360.com.au/plugins/extend-quick-edit
Description: Extends the quick-edit interface to display additional post meta
Version: 1.0.0
Author: Simon Codrington
Author URI: http://simoncodrington.com.au
Text Domain: post-quick-edit-extension
Domain Path: /languages
*/

class el_extend_quick_edit{

    private static $instance = null;

    public function __construct(){

        add_action('manage_post_posts_columns', array($this, 'add_custom_admin_column'), 10, 1); //add custom column
        add_action('manage_posts_custom_column', array($this, 'manage_custom_admin_columns'), 10, 2); //populate column
        add_action('quick_edit_custom_box', array($this, 'display_quick_edit_custom'), 10, 2); //output form elements for quickedit interface
        add_action('admin_enqueue_scripts', array($this, 'enqueue_admin_scripts_and_styles')); //enqueue admin script (for prepopulting fields with JS)
        add_action('add_meta_boxes', array($this, 'add_metabox_to_posts'), 10, 2); //add metabox to posts to add our meta info
        add_action('save_post', array($this, 'save_post'), 10, 1); //call on save, to update metainfo attached to our metabox

    }

    //adds a new metabox on our single post edit screen
    public function add_metabox_to_posts($post_type, $post){

    }
    //metabox output function, displays our fields, prepopulating as needed
    public function display_metabox_output($post){

    }
    //enqueue admin js to pre-populate the quick-edit fields
    public function enqueue_admin_scripts_and_styles(){

    }
    //Display our custom content on the quick-edit interface, no values can be pre-populated (all done in JS)
    public function display_quick_edit_custom($column){

    }
    //add a custom column to hold our data
    public function add_custom_admin_column($columns){

    }
    //customise the data for our custom column, it's here we pull in meatdata info
    public function manage_custom_admin_columns($column_name, $post_id){

    }
    //saving meta info (used for both traditional and quick-edit saves)
    public function save_post($post_id){

    }
    //gets singleton instance
    public static function getInstance(){
        if(is_null(self::$instance)){
            self::$instance = new self();
        }
        return self::$instance;
    }


}
$el_extend_quick_edit = el_extend_quick_edit::getInstance();
Adding Custom Meta-fields
Since we eventually want to extend the Quick Edit screen, we need to start by adding a new meta field to our posts. We’ll add a custom metabox and then output a few different types of form elements:
- A checkbox to determine if our post will be ‘featured’, which we could then use somewhere in our theme for unique styling.
- A list of numbers to be used as the posts ‘rating’. This will be displayed as a select element. This could be used by the theme to limit post output to certain rankings and higher
- A simple text input to hold the ‘subtitle’ for our post, somewhat like a trainee that could be displayed below the posts main title.
If you’re new to adding custom meta fields to your post types, feel free to read up on our recent article where we looked at adding custom metaboxes/fields.
//adds a new metabox on our single post edit screen
public function add_metabox_to_posts($post_type, $post){

    add_meta_box(
        'additional-meta-box',
        __('Additional Info', 'post-quick-edit-extension'),
        array($this, 'display_metabox_output'),
        'post',
        'side',
        'default'
    );
}
Now that we have our metabox we need to add our fields. For each of our different fields we need to output the markup and pre-select/populate values if we already have them set.
//metabox output function, displays our fields, prepopulating as needed
public function display_metabox_output($post){
$html = '';
wp_nonce_field('post_metadata', 'post_metadata_field');
$post_featured = get_post_meta($post->ID, 'post_featured', true);
$post_rating = get_post_meta($post->ID, 'post_rating', true);
$post_subtitle = get_post_meta($post->ID, 'post_subtitle', true);
//Featured post (radio)
$html .= '<p>';
$html .= '<p><strong>Featured Post?</strong></p>';
$html .= '<label for="post_featured_no">';
if($post_featured == 'no' || empty($post_featured)){
$html .= '<input type="radio" checked name="post_featured" id="post_featured_no" value="no"/>';
}else{
$html .= '<input type="radio" name="post_featured" id="post_featured_no" value="no"/>';
}
$html .= ' No</label>';
$html .= '</br>';
$html .= '<label for="post_featured_yes">';
if($post_featured == 'yes'){
$html .= '<input type="radio" checked name="post_featured" id="post_featured_yes" value="yes"/>';
}else{
$html .= '<input type="radio" name="post_featured" id="post_featured_yes" value="yes"/>';
}
$html .= ' Yes</label>';
$html .= '</p>';
//Internal Rating (select)
$html .= '<p>';
$html .= '<p>';
$html .= '<label for="post_rating"><strong>Post Rating</strong></label>';
$html .= '</p>';
$html .= '<select name="post_rating" id="post_rating" value="' . $post_rating .'" class="widefat">';
$html .= '<option value="1" ' . (($post_rating == '1') ? 'selected' : '') . '>1</option>';
$html .= '<option value="2" ' . (($post_rating == '2') ? 'selected' : '') . '>2</option>';
$html .= '<option value="3" ' . (($post_rating == '3') ? 'selected' : '') . '>3</option>';
$html .= '<option value="4" ' . (($post_rating == '4') ? 'selected' : '') . '>4</option>';
$html .= '<option value="5" ' . (($post_rating == '5') ? 'selected' : '') . '>5</option>';
$html .= '</select>';
$html .= '</p>';
//Subtitle (text)
$html .= '<p>';
$html .= '<p>';
$html .= '<label for="post_subtitle"><strong>Subtitle</strong></label>';
$html .= '</p>';
$html .= '<input type="text" name="post_subtitle" id="post_subtitle" value="' . $post_subtitle .'" class="widefat"/>';
$html .= '</p>';
echo $html;
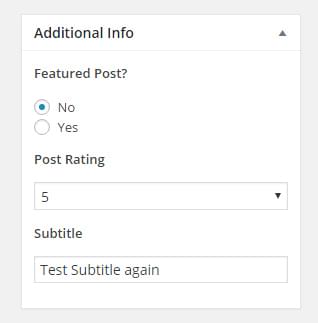
}Most of our output is fairly self explanatory, we’re outputting our form controls after we display our nonce field and then populating our various values. All of this content will be displayed inside of your metabox when editing your post and should look similar to the image below.
Saving Our New Metadata
Since we’re adding new fields we need to hook into the save_post hook so we can update our data. This information is shown on our custom columns and eventually used to pre-populate our Quick Edit controls. Copy the following into the save_post method of the plugin.
//saving meta info (used for both traditional and quick-edit saves)
public function save_post($post_id){

    $post_type = get_post_type($post_id);

    if($post_type == 'post'){

        //check nonce set
        if(!isset($_POST['post_metadata_field'])){
            return false;
        }

        //verify nonce
        if(!wp_verify_nonce($_POST['post_metadata_field'], 'post_metadata')){
            return false;
        }


        //if not autosaving
        if ( defined( 'DOING_AUTOSAVE' ) && DOING_AUTOSAVE ) {
            return false;
        }

        //all good to save
        $featured_post = isset($_POST['post_featured']) ? sanitize_text_field($_POST['post_featured']) : '';
        $post_rating = isset($_POST['post_rating']) ? sanitize_text_field($_POST['post_rating']) : '';
        $post_subtitle = isset($_POST['post_subtitle']) ? sanitize_text_field($_POST['post_subtitle']) : '';

        update_post_meta($post_id, 'post_featured', $featured_post);
        update_post_meta($post_id, 'post_rating', $post_rating);
        update_post_meta($post_id, 'post_subtitle', $post_subtitle);
    }

}
The first part of our function checks that our nonce is set and that it’s valid. This nonce is outputted at the top of our metabox an acts as a simple security method. We collect our values, sanitize them and save them with update_post_meta.
Adding Custom Columns
To add custom output to the Quick Edit screen you need to have at least one custom column in your post manage screen; there is no way around this as the hook we use later to output our content only fires when there’s a custom admin column.
These columns are important as it’s here we will be outputting our posts current value for our metadata (as the Quick Edit output function doesn’t have the ability to pre-populate our values). Copy the following into your plugin.
//add a custom column to hold our data
public function add_custom_admin_column($columns){
    $new_columns = array();

    $new_columns['post_featured'] = 'Featured?';
    $new_columns['post_rating'] = 'Rating';
    $new_columns['post_subtitle'] = 'Subtitle';

    return array_merge($columns, $new_columns);
}
We hook into the manage_post_posts_columnsfilter to add our own custom columns to the post content type. For our example we’re adding three columns, but you could add as many or as few as you like.
Populating our Custom Columns to Display Current Values
Now that we have our custom columns we need to populate them with values from our post. We hook into the manage_posts_custom_column action and compare the column_name variable so we can populate our column.
An important part here is that for each of our meta values we’re wrapping them in a div with an id such as post_featured_{$post_id}. This is intentional so that later on when we need to get the current meta values and pre-populate our fields outputted in the Quick Edit screen.
//customise the data for our custom column, it's here we pull in metadata info for each post. These will be referred to in our JavaScript file for pre-populating our quick-edit screen
public function manage_custom_admin_columns($column_name, $post_id){

    $html = '';

    if($column_name == 'post_featured'){
        $post_featured = get_post_meta($post_id, 'post_featured', true);

        $html .= '<div id="post_featured_' . $post_id . '">';
        if($post_featured == 'no' || empty($post_featured)){
            $html .= 'no';
        }else if ($post_featured == 'yes'){
            $html .= 'yes';
        }
        $html .= '</div>';
    }
    else if($column_name == 'post_rating'){
        $post_rating = get_post_meta($post_id, 'post_rating', true);

        $html .= '<div id="post_rating_' . $post_id . '">';
            $html .= $post_rating;
        $html .= '</div>';
    }
    else if($column_name == 'post_subtitle'){
        $post_subtitle = get_post_meta($post_id, 'post_subtitle', true);

        $html .= '<div id="post_subtitle_' . $post_id . '">';
            $html .= $post_subtitle;
        $html .= '</div>';
    }

    echo $html;
}
Customizing the Quick Edit Interface
To customize this section we need to hook into the quick_edit_custom_box action. This action is triggered for each of our posts in the admin interface, rendering all of the default quick actions and giving us access to add our own custom ones.
This function is called once for every custom column registered. It’s here we hook into to extend the interface.
//Display our custom content on the quick-edit interface, no values can be pre-populated (all done in JavaScript)
public function display_quick_edit_custom($column){
$html = '';
wp_nonce_field('post_metadata', 'post_metadata_field');
//output post featured checkbox
if($column == 'post_featured'){
$html .= '<fieldset class="inline-edit-col-left clear">';
$html .= '<div class="inline-edit-group wp-clearfix">';
$html .= '<label class="alignleft" for="post_featured_no">';
$html .= '<input type="radio" name="post_featured" id="post_featured_no" value="no"/>';
$html .= '<span class="checkbox-title">Post Not Featured</span></label>';
$html .= '<label class="alignleft" for="post_featured_yes">';
$html .= '<input type="radio" name="post_featured" id="post_featured_yes" value="yes"/>';
$html .= '<span class="checkbox-title">Post Featured</span></label>';
$html .= '</div>';
$html .= '</fieldset>';
}
//output post rating select field
else if($column == 'post_rating'){
$html .= '<fieldset class="inline-edit-col-center ">';
$html .= '<div class="inline-edit-group wp-clearfix">';
$html .= '<label class="alignleft" for="post_rating">Post Rating</label>';
$html .= '<select name="post_rating" id="post_rating" value="">';
$html .= '<option value="1">1</option>';
$html .= '<option value="2">2</option>';
$html .= '<option value="3">3</option>';
$html .= '<option value="4">4</option>';
$html .= '<option value="5">5</option>';
$html .= '</select>';
$html .= '</div>';
$html .= '</fieldset>';
}
//output post subtitle text field
else if($column == 'post_subtitle'){
$html .= '<fieldset class="inline-edit-col-right ">';
$html .= '<div class="inline-edit-group wp-clearfix">';
$html .= '<label class="alignleft" for="post_rating">Post Subtitle</label>';
$html .= '<input type="text" name="post_subtitle" id="post_subtitle" value="" />';
$html .= '</div>';
$html .= '</fieldset>';
}
echo $html;
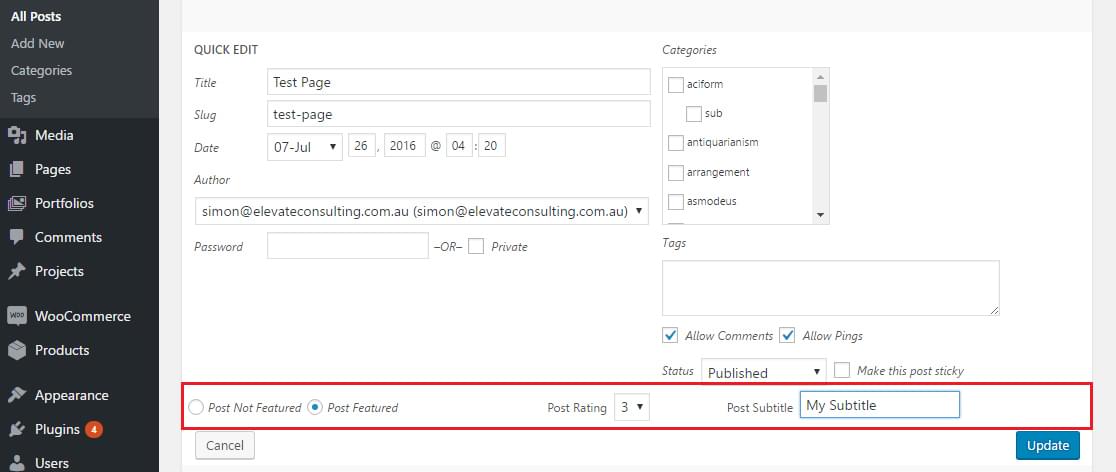
}The overall process for outputting these fields is similar to what we did for our metabox. We want to display our featured checkbox, rating select field and text input controls. The classes used on our elements are the same ones that WordPress uses for their layout. You will need to experiment with them if you’re after a particular style, but using inline-edit-col-left, inline-edit-col-center and inline-edit-col-right will align your layout for you.
Enqueuing Our Admin JavaScript File
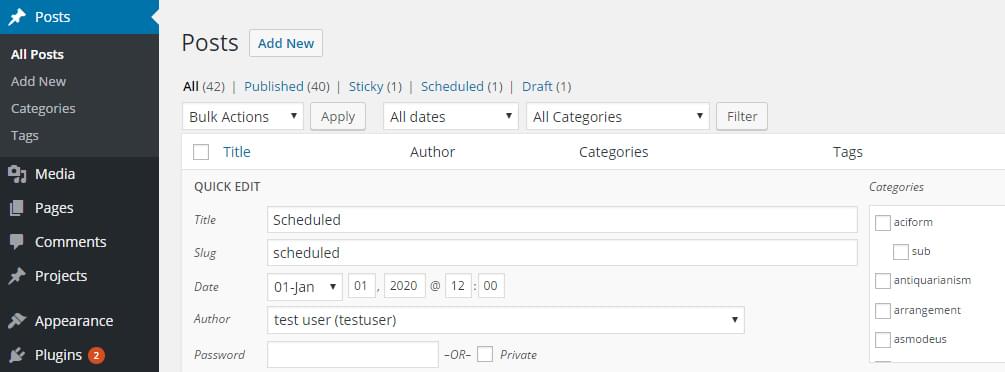
The Quick Edit interface isn’t created when WordPress outputs the post admin screen. When the user presses the ‘edit’ button, WordPress will dynamically create the edit controls, populating the title, slug, author and other information.
Since this is all dynamic we can’t just output our metadata in PHP, we need to collect our values using JavaScript.
Add the following function to include our admin only JavaScript file. I’ve added it in the base directory of the plugin but you could change up the structure if you wanted it in a dedicated JavaScript folder.
public function enqueue_admin_scripts_and_styles(){
    wp_enqueue_script('quick-edit-script', plugin_dir_url(__FILE__) . '/post-quick-edit-script.js', array('jquery','inline-edit-post' ));
}
Dynamically Populating the Quick Edit Screen with Values
The quick_edit_custom_box action we used before outputs all of the form controls for the Quick Edit control. However as mentioned before, this control is made dynamically with JavaScript so it’s not possible to pre-populate our meta fields automatically.
There are two methods you can use to get your values:
- Create a custom method to get your information: Hook onto the
editaction and trigger an Ajax call to a registered function. To get this to work you can pass on the ID of the post from the Quick Edit interface and then useget_post_metafunction to retrieve and return your values. - Leverage WordPress’s existing functionality: Copy the existing WordPress JavaScript function and extend it to collect your custom values.
The first method is good, but requires a bit more leg work with a return trip to the server for more information. Our second option is a bit easier, we can hook into the JavaScript function used to render the Quick Edit box, and then extend it to collect our metadata. That is the route we’ll be taking.
Open up your new enqueued JavaScript file and add the following. We’ll take a look at how it all works shortly.
/*
 * Post Bulk Edit Script
 * Hooks into the inline post editor functionality to extend it to our custom metadata
 */

jQuery(document).ready(function($){

    //Prepopulating our quick-edit post info
    var $inline_editor = inlineEditPost.edit;
    inlineEditPost.edit = function(id){

        //call old copy
        $inline_editor.apply( this, arguments);

        //our custom functionality below
        var post_id = 0;
        if( typeof(id) == 'object'){
            post_id = parseInt(this.getId(id));
        }

        //if we have our post
        if(post_id != 0){

            //find our row
            $row = $('#edit-' + post_id);

            //post featured
            $post_featured = $('#post_featured_' + post_id);
            post_featured_value = $post_featured.text();
            if(post_featured_value == 'yes'){
                $row.find('#post_featured_yes').val(post_featured_value).attr('checked', true);
            }else{
                $row.find('#post_featured_no').val(post_featured_value).attr('checked', true);
            }

            //post rating
            $post_rating = $('#post_rating_' + post_id);
            $post_rating_value = $post_rating.text();
            $row.find('#post_rating').val($post_rating_value);
            $row.find('#post_rating').children('[value="' + $post_rating_value + '"]').attr('selected', true);

            //post subtitle
            $post_subtitle= $('#post_subtitle_' + post_id);
            post_subtitle_value = $post_subtitle.text();
            $row.find('#post_subtitle').val(post_subtitle_value);


        }

    }

});
We start by getting the inline editor object with inlineEditPost.edit. We keep this copy and replace it’s functionality. Inside of our new function we call the old function using $inline_editor.apply( this, arguments);, this ensures that our default WordPress functionality for creating the Quick Edit box is preserved.
It’s at this point now that we can trigger our functionality. We ensure that the id variable passed to the function is an object and then get the post_id from it.
We use this post_id to look for our custom admin columns where our metadata is saved. For example if we’re editing post 2100 we can look for it’s post rating by finding the column with the ID ofpost_rating_2100.
We find all of our values and then pre-populate our form controls accordingly. If you had more fields you could use the same logic to extend it further.
When the user clicks the update button an Ajax request will go off and trigger a save post call; this will trigger our save_post function we hooked previously, taking care of the updating of our new meta-values.
Wrapping It All Up
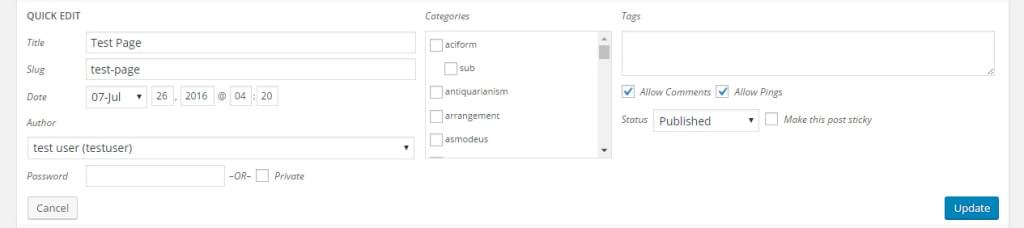
There were several steps in getting this all sorted, but as you can see in the following image it was all worth it. Your quick edit interface now shows your metadata and you can easily update it without having to open your post
The interface itself is a great tool and if you’re attaching several different types of meta-fields to your post, then extending them to the Quick Edit interface is a great idea. Managing your posts without needing to enter each one manually will be a great time-saver and making administering your site much easier.
You can output any type of information you want in the Quick Edit field, so you can take what we’ve done here and extend it further to provide an even more customized solution.
Frequently Asked Questions (FAQs) about Extending Quick Edit Actions in the WordPress Dashboard
How can I add custom fields to the Quick Edit menu in WordPress?
To add custom fields to the Quick Edit menu, you need to use the ‘quick_edit_custom_box’ hook. This hook allows you to add custom fields to the Quick Edit menu. You can use it in your theme’s functions.php file or in a custom plugin. The hook takes three parameters: the column name, the post type, and the post format. You can use these parameters to specify where and when your custom fields should appear.
Can I use Quick Edit to edit custom post types?
Yes, you can use Quick Edit to edit custom post types. The Quick Edit feature in WordPress is not limited to posts and pages. It can also be used with custom post types. To do this, you need to add the ‘quick_edit_custom_box’ hook to your custom post type. This will allow you to add custom fields to the Quick Edit menu for your custom post type.
How can I save the data entered into my custom Quick Edit fields?
To save the data entered into your custom Quick Edit fields, you need to use the ‘save_post’ hook. This hook is triggered whenever a post is saved or updated. You can use it to save the data from your custom fields to the database. The hook takes two parameters: the post ID and the post object. You can use these parameters to access the data from your custom fields and save it to the database.
Can I use Quick Edit to edit post metadata?
Yes, you can use Quick Edit to edit post metadata. The Quick Edit feature in WordPress allows you to edit various aspects of a post, including its metadata. To do this, you need to add custom fields to the Quick Edit menu using the ‘quick_edit_custom_box’ hook. These custom fields can be used to edit the post’s metadata.
How can I customize the appearance of the Quick Edit menu?
To customize the appearance of the Quick Edit menu, you can use CSS. WordPress adds several classes to the Quick Edit menu that you can use to target it with your CSS. For example, the Quick Edit menu has the class ‘inline-edit-row’. You can use this class to style the Quick Edit menu to match your theme or personal preferences.
Can I disable the Quick Edit feature in WordPress?
Yes, you can disable the Quick Edit feature in WordPress. To do this, you can use the ‘post_row_actions’ or ‘page_row_actions’ filters. These filters allow you to modify the actions available for each post or page in the WordPress admin. By removing the ‘inline hide-if-no-js’ class from the Quick Edit action, you can effectively disable the Quick Edit feature.
How can I add custom actions to the Quick Edit menu?
To add custom actions to the Quick Edit menu, you can use the ‘post_row_actions’ or ‘page_row_actions’ filters. These filters allow you to modify the actions available for each post or page in the WordPress admin. You can use these filters to add your own custom actions to the Quick Edit menu.
Can I use Quick Edit to edit post categories?
Yes, you can use Quick Edit to edit post categories. The Quick Edit feature in WordPress allows you to edit various aspects of a post, including its categories. To do this, you need to add a custom field to the Quick Edit menu using the ‘quick_edit_custom_box’ hook. This custom field can be used to edit the post’s categories.
How can I use Quick Edit to edit post tags?
To use Quick Edit to edit post tags, you need to add a custom field to the Quick Edit menu using the ‘quick_edit_custom_box’ hook. This custom field can be used to edit the post’s tags. When a user enters tags into this field and saves the post, the ‘save_post’ hook can be used to save these tags to the database.
Can I use Quick Edit to edit post author?
Yes, you can use Quick Edit to edit the post author. The Quick Edit feature in WordPress allows you to edit various aspects of a post, including its author. To do this, you need to add a custom field to the Quick Edit menu using the ‘quick_edit_custom_box’ hook. This custom field can be used to edit the post’s author.
 Simon Codrington
Full stack developer and overall web enthusiast. I love everything to do with web / design and my passion revolves around creating awesome websites. Focusing primarily on WordPress, I create themes, plugins and bespoke solutions.