

Key Takeaways
- Intel XDK is a new tool for developing cross-platform mobile applications, simplifying the process by including all potential target platforms in one package and integrating several familiar tools.
- The XDK IDE includes all the tools necessary for full app development, from start to finish, and supports building for Android, iOS, Windows 8, Windows 8 Phone, Tizen, Firefox OS (beta), and Amazon apps, among others.
- Intel XDK stands out for its cross-platform capabilities, enabling developers to write code once and deploy it across multiple platforms, saving significant time and resources compared to developing separate apps for each platform.
Intel XDK is a new tool for developing cross platform mobile applications. It attempts to keep the process simple by including all possible target platforms in one package and collecting several tools that may be familiar and useful to you.
In this article I will explain what Intel XDK is and prepare you to start building an app for every mobile platform using HTML5. The interface is easy but different from other IDEs. We will explore everything step by step.
Installation
You can find Intel XDK at the official web site. It is available for Windows, Linux and Mac. When you first start the Software you will need to create an account so that you can use the build features. With this service you can host your projects in the Cloud and build them from there. After creating an account, sign in and you are ready to start with it.
NOTE:I encountered some problems when trying to install Intel XDK on Debian. On Ubuntu which is Debian based it performs well. I haven’t tried it yet with other Linux distros but leave a comment if you find any problems.
Workflow
What I like the most about the XDK IDE is that it includes all the tools to fully develop an app from start to publishing. Development, Emulation, Testing, Debugging, Profiling and Building are all included. There is also a special feature for third party Services. All of this workflow is organized into 7 tabs that are in an appropriate order.
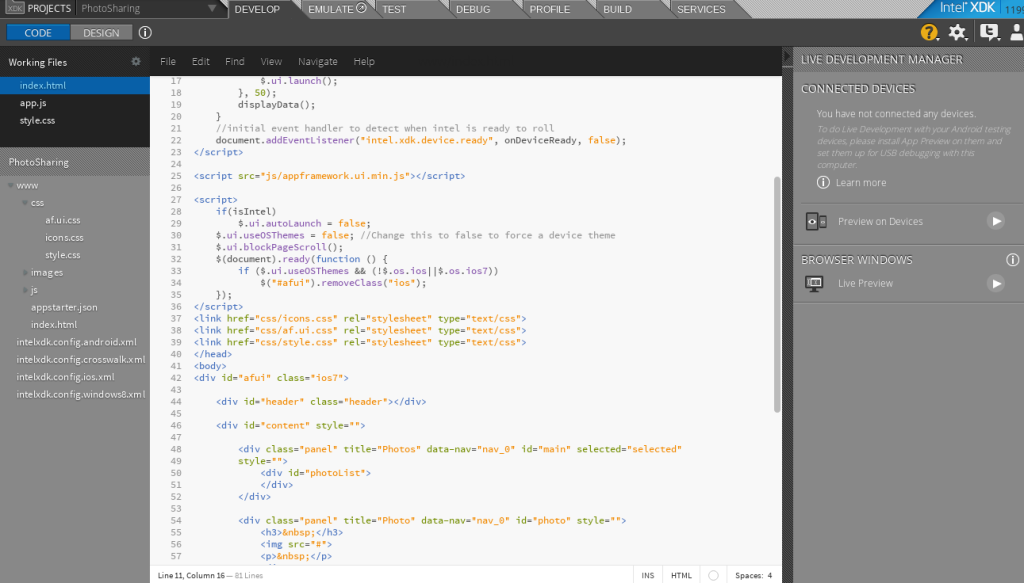
The development tab is where you are going to spend the most of your time. You can develop your app using the drag and drop tools (App Designer and App Starter) or the text editor. The text editor is based on Bracket editor which is an open source editor build using HTML5. Bracket is maintained by Adobe. For the drag and drop prototyping you can choose App Designer or App Starter. App Starter is a simple tool and is aimed for beginners. It only supports the App Framework. App Designer is a more complex tool than App Starter with more features. It supports App Framework, Bootstrap 3, JQuery Mobile and TopCoat. When developing with the drag and drop tools and the code editor, you can switch back and fourth. You can also use both of them side by side. I personally choose not to use the GUI building tools as they produce too much unnecessary code. I like to code everything from scratch as the whole project is more maintainable and your code is cleaner when you code from scratch. One feature that I love to play with is the live preview on device, you can easily code and preview live on a connected device.
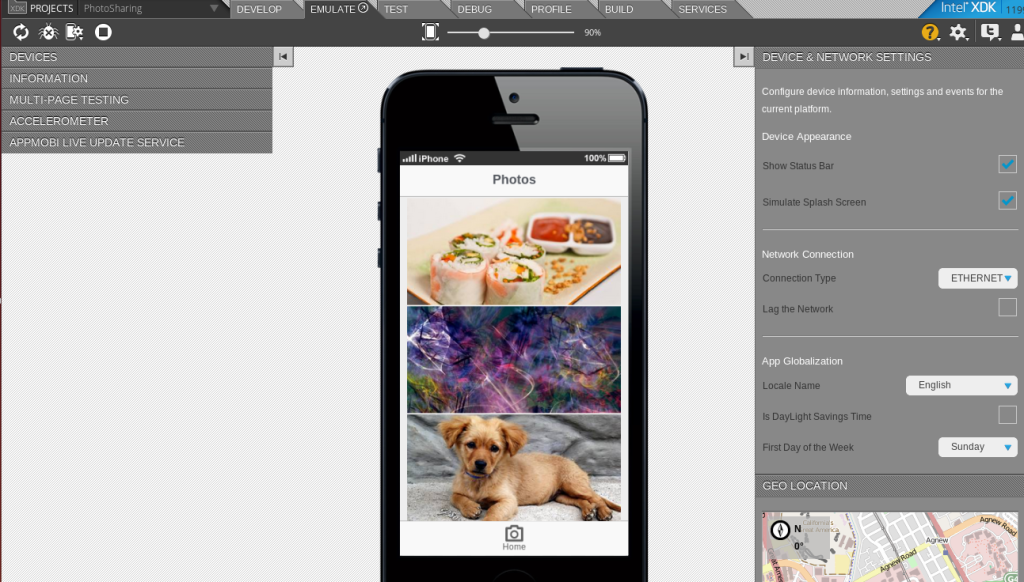
The second tab is the Emulate tab. The emulator is based on Apache Ripple. It is a kind of Chrome Browser plus some extra APIs, it supports Cordova and Intel XDK Apis. Testing for different screen sizes and different devices is really easy with this tool as you can choose from a wide variety of devices. Intel integrated the Chrome Developer Tools for real time debugging and inspection of your front end. It’s much like the live preview on the develop tab but here you can deal with a hardware emulator.
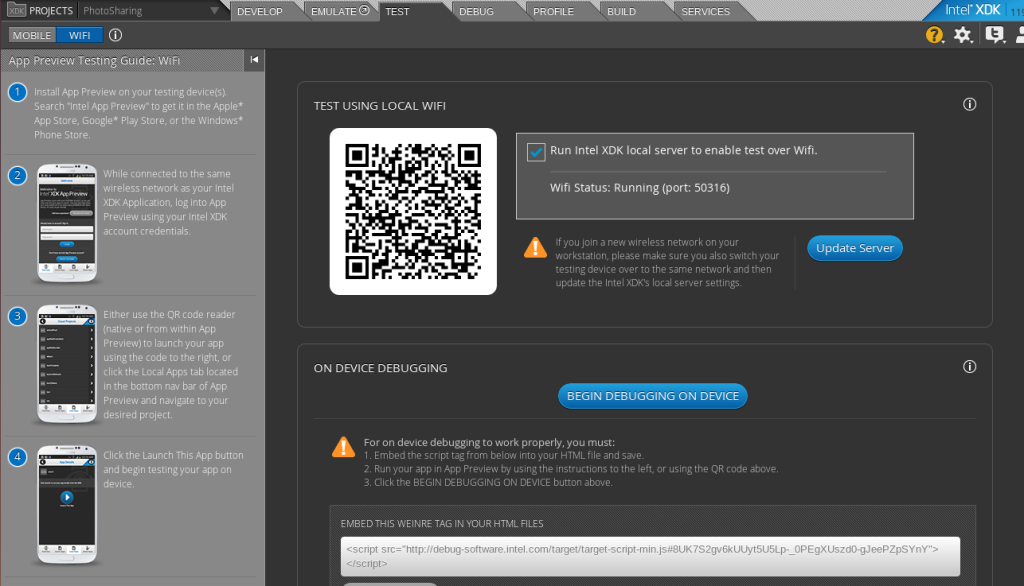
The testing features makes development time even faster as you don’t have to build the app every time you want to test it. Firstly you download the App Preview onto your test machine (phone, tablet etc). It is available on IOS, Android and the Windows Store. There are two ways to test. The first is by pulling the project from the server and executing it in the App Preview. The second is using WiFi, connect the smart-phone or tablet with the same WiFi that you connect your laptop. The second method is faster as you don’t have to push and pull the data between the server each time. You can also debug remotely with weinre (not full javascript support).
The debug tab is only available for Android 4.x devices. This is an usb debugging much like remote test debugging. This debugging method uses Chrome Developers Tool with extra support for Javascript and gives more in depth debugging tools. The tab provides information on how to set up your device to make use this feature.
The profile tab is also only available for Android 4.x devices. In this tab you can collect information on app performance.
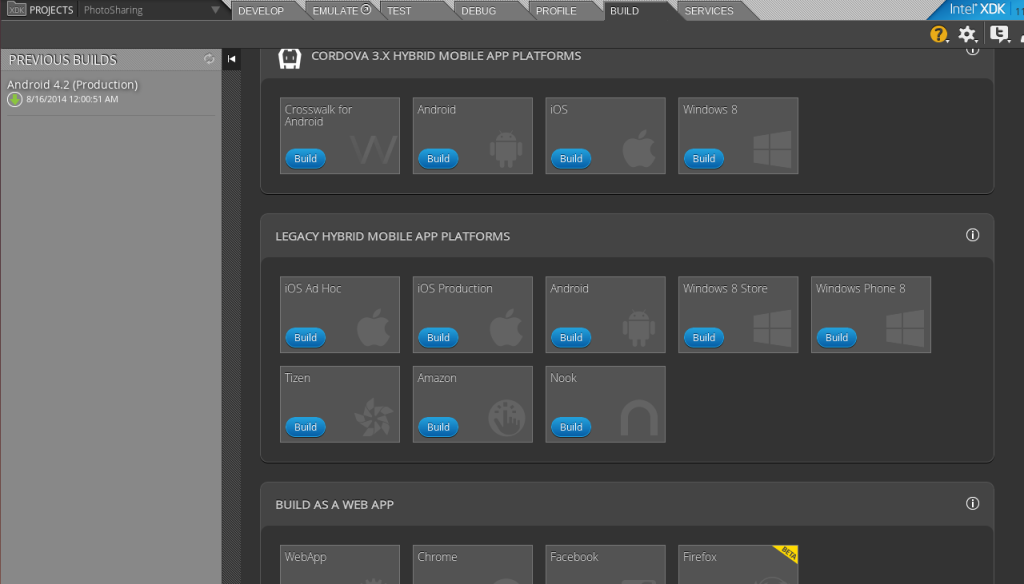
Intel XDK supports building for Android, iOS, Windows 8, Windows 8 Phone, Tizen, Firefox OS (beta) and Amazon apps. It also supports building Facebook and Chrome Web Apps.
Building is the easiest part. All you have to do is configure some information about the app. Different platforms have different configuration requirements. For example iOS requires some information about your iOS developer account. What I like about building apps in Intel XDK is that it offers unlimited private projects. Phonegap only gives you free cloud building limited to 5 private projects.
The last tab is the Service tab. In this tab you will see a list of various additional services. Advertising, Data Feeds, Notifications and Social. All these services are external to Intel XDK and they can be used under all platforms. Let’s say for example we want push notifications in our application. We can use the AppMobi PushMobi service. Or maybe we want to regular update the application, we can implement Live Update by App Mobi. Or we want to use Dropbox Api, also easy to do.
Conclusion
HTML5 is getting stronger every day as a viable option for mobile app development. Every day new tools and new companies are helping this trend. One of the most prestigious tech companies in the world (Intel) has now invested in hybrid mobile applications. This is a huge investment of faith in HTML5 technology.
Building hybrid applications is already easy, Intel XDK makes it even easier as it has all you need for developing an mobile app in one place. In a future article I’ll be showing you the frameworks we can choose to start a project and start building a simple app.
Frequently Asked Questions about Intel XDK
What is the Intel XDK and what is it used for?
Intel XDK is a comprehensive, cross-platform development environment for creating mobile applications. It provides a simplified workflow that enables developers to design, code, debug, and build high-quality, interactive HTML5 applications for multiple platforms, including iOS, Android, Windows, and more. It includes a variety of tools and services that streamline the development process, such as a built-in emulator, live preview on connected devices, and cloud-based build services.
How does Intel XDK compare to other mobile app development tools?
Intel XDK stands out for its cross-platform capabilities, allowing developers to write code once and deploy it across multiple platforms. This can save significant time and resources compared to developing separate apps for each platform. Additionally, it offers a range of features designed to simplify the development process, including a drag-and-drop interface, a built-in emulator for testing, and a cloud-based build service.
Is Intel XDK free to use?
Yes, Intel XDK is free to use. Intel provides this tool as a free resource to encourage and facilitate mobile app development. However, it’s important to note that while the tool itself is free, deploying your app on various app stores may involve fees.
Can I use Intel XDK to develop apps for both Android and iOS?
Yes, Intel XDK is a cross-platform development tool, which means you can use it to develop apps for a variety of platforms, including both Android and iOS. This can be a significant advantage if you’re looking to reach as wide an audience as possible with your app.
How can I test my app using Intel XDK?
Intel XDK includes a built-in emulator that allows you to test your app directly within the development environment. You can also use the live preview feature to test your app on a connected device. This can be particularly useful for testing how your app will look and function on different screen sizes and resolutions.
What programming languages does Intel XDK support?
Intel XDK primarily supports HTML5, CSS, and JavaScript for app development. This makes it a great choice for web developers looking to transition into mobile app development, as they can use their existing skills and knowledge.
Can I use Intel XDK to develop desktop applications?
While Intel XDK is primarily designed for mobile app development, it can also be used to develop desktop applications. However, it’s important to note that the tool’s features and workflow are optimized for mobile development, so it may not be the best choice for complex desktop applications.
What kind of support is available for Intel XDK users?
Intel provides a range of resources to support Intel XDK users, including documentation, tutorials, and a community forum where you can ask questions and share knowledge with other developers.
Can I use Intel XDK to develop games?
Yes, Intel XDK can be used to develop games. It supports HTML5, which is a popular choice for game development due to its cross-platform capabilities and support for interactive content.
Is Intel XDK suitable for beginners?
Intel XDK is designed to be user-friendly and accessible, even for beginners. It offers a simplified workflow and a range of tools and features designed to make the development process as straightforward as possible. However, as with any development tool, there is a learning curve, and some prior knowledge of HTML5, CSS, and JavaScript will be beneficial.