

Key Takeaways
- The author suggests an alternative Laravel package development workflow that involves developing the package outside the Laravel framework. This method allows for better isolation of the package, making it easier to test and debug.
- The workflow starts with setting up a new repository in GitHub, creating a package skeleton, and configuring the package. It then involves creating a structure for the package and using a Laravel provider for installation.
- The author emphasizes the importance of testing before releasing any code publicly. He recommends using the orchestra/testbench package for Laravel and tagging a first version to start with.
- The workflow concludes with the use of Continuous Integration tools to integrate new parts into the existing code and send a notification about any infringements. The author uses TravisCI as the CI tool for the package in the article.
This article was peer reviewed by Francesco Malatesta. Thanks to all of SitePoint’s peer reviewers for making SitePoint content the best it can be!
Every framework gives developers a way to extend the system using packages / extensions. We can generally hook in our logic at any point where we want to provide specific functionality, and Laravel is no exception! Following the article of my fellow author Francesco Malatesta about his Laravel package development workflow, I noticed that mine is a bit different and I wanted to share it with you!

Demo Package
As a demo package, we’re going to build a Laravel two factor authentication package for this article. The package will handle the user authentication with a verification code being sent through a medium like Nexmo, Twilio, etc. You can check out the final package here.
Setting up the Repository
Before we start the development, we need to create a new repository inside GitHub so we can push/pull from it through the development phase.
Composer supports a repositories key inside the composer.json file. We can use this to specify our custom packages that don’t yet exist on Packagist.
{
    // ....
    "repositories": [
        {
            "type": "vcs",
            "url": "https://github.com/Whyounes/laravel-two-factor-auth-demo"
        }
    ],
    // ....
}
Now, we can require our package as usual.
{
    // ....
    "require": {
        "php": ">=5.6.4",
        "laravel/framework": "5.4.*",
        "laravel/tinker": "~1.0",
        "Whyounes/laravel-two-factor-auth-demo": "dev-master"
    },
    // ....
}
We can specify a branch or a version number. In case we want to use a branch, it should be prefixed with dev-. You can read more about configuring repositories on the Packagist website.
Package Skeleton
Since Composer identifies packages using the composer.json file, we need to create one for our package and push it to the repository.
{
  "name": "whyounes/laravel-two-factor-auth",
  "type": "library",
  "description": "Laravel two factor authentication",
  "keywords": [
    "auth",
    "passwordless"
  ],
  "homepage": "https://github.com/whyounes/laravel-two-factor-auth",
  "license": "MIT",
  "authors": [
    {
      "name": "Rafie Younes",
      "email": "younes.rafie@gmail.com",
      "homepage": "http://younesrafie.com",
      "role": "Developer"
    }
  ],
  "require": {
    "php": "^5.5.9 || ^7.0",
    "illuminate/database": "5.1.* || 5.2.* || 5.3.* || 5.4.*",
    "illuminate/config": "5.1.* || 5.2.* || 5.3.* || 5.4.*",
    "illuminate/events": "5.1.* || 5.2.* || 5.3.* || 5.4.*",
    "illuminate/auth": "5.1.* || 5.2.* || 5.3.* || 5.4.*",
    "twilio/sdk": "^5.4"
  },
  "require-dev": {
    "phpunit/phpunit": "^4.8 || ^5.0",
    "orchestra/testbench": "~3.0",
    "mockery/mockery": "~0.9.4"
  },
  "autoload": {
    "psr-4": {
      "Whyounes\\TFAuth\\": "src"
    },
    "classmap": [
      "tests"
    ]
  }
}
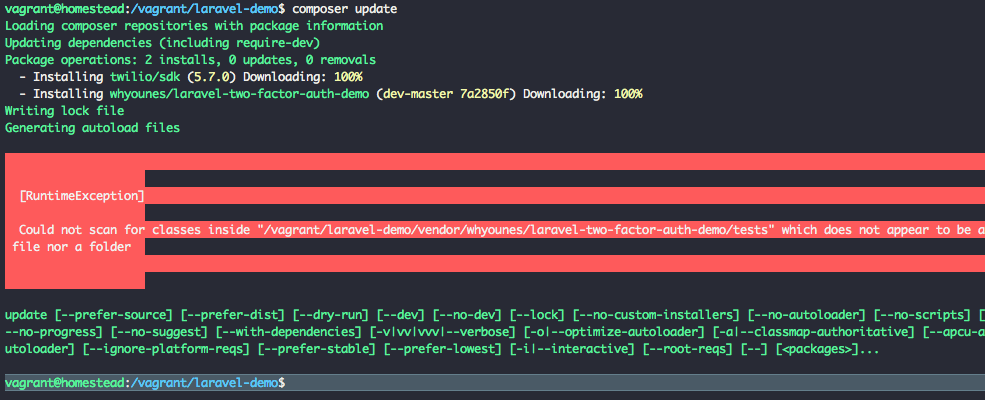
After running the composer update command inside the Laravel project’s root folder, we see an error that no tests were found under the tests folder. This won’t halt the installation process, so we’re fine to continue!
The last part of our package configuration is to link the downloaded package to the GitHub repository.
// assuming you're inside your project folder

cd vendor/whyounes/laravel-two-factor-auth
git init origin git@github.com:Whyounes/laravel-two-factor-auth.git
git commit -am "Init repo"
git push origin master -f // force push for the first time
Package Structure
This part is a little bit controversial, we can’t all agree on one single structure. Here’s our package structure:
▶ config/
    auth.php
    services.php
▶ migrations/
    2014_10_1_000000_add_tfa_columns_to_users_table.php
    2016_12_1_000000_create_tokens_table.php
▶ resources/
    ▶ views/
        verification_code.blade.php
▶ src/
    ▶ Contracts/
        VerificationCodeSenderInterface.php
    ▶ Controllers/
        TFAController.php
    ▶ Exceptions/
        TFANotEnabledException.php
        UserNotFoundException.php
    ▶ Models/
        TFAuthTrait.php
        Token.php
    ▶ Providers/
        TwoFAProvider.php
    ▶ Services/
        Twilio.php
▶ tests/
To install the package we use a Laravel provider:
// config/app.php

// ...
'providers' => [
    // ...
    Whyounes\TFAuth\TwoFAProvider::class,
};
The provider class looks like this:
// src/Providers/TwoFAProvider.php

namespace Whyounes\TFAuth;

use Illuminate\Auth\Events\Authenticated;
use Illuminate\Routing\Router;
use Illuminate\Support\Facades\App;
use Illuminate\Support\Facades\Event;
use Illuminate\Support\ServiceProvider;
use Twilio\Rest\Client;
use Whyounes\TFAuth\Contracts\VerificationCodeSenderInterface;
use Whyounes\TFAuth\Services\Twilio;
/**
 * Class TwoFAProvider
 *
 * @package Whyounes\TFAuth
 */
class TwoFAProvider extends ServiceProvider
{
    public function boot()
    {
        $this->loadMigrationsFrom(__DIR__ . '/../../migrations');
        $this->mergeConfigFrom(
            __DIR__ . '/../../config/auth.php', 'auth'
        );
        $this->mergeConfigFrom(
            __DIR__ . '/../../config/services.php', 'services'
        );
        $this->loadViewsFrom(__DIR__.'/resources/views', 'tfa');
        $this->publishes([
            __DIR__.'/../../resources/views' => resource_path('views/vendor/tfa'),
        ]);
    }

    public function register()
    {
        $this->registerBindings();
        $this->registerEvents();
        $this->registerRoutes();
    }

    public function registerBindings()
    {
        $this->app->singleton(Client::class, function () {
            return new Client(config('services.twilio.sid'), config('services.twilio.token'));
        });
        $this->app->bind(VerificationCodeSenderInterface::class, Twilio::class);
    }

    public function registerEvents()
    {
        // Delete user tokens after login
        if (config('auth.delete_verification_code_after_auth', false) === true) {
            Event::listen(
                Authenticated::class,
                function (Authenticated $event) {
                    $event->user->tokens()
                        ->delete();
                }
            );
        }
    }

    public function registerRoutes()
    {
        /** @var $router Router */
        $router = App::make("router");
        $router->get("/tfa/services/twilio/say/{text}", ["as" => "tfa.services.twilio.say", "uses" => function ($text) {
            $response = "<Response><Say>" . $text . "</Say></Response>";
            return $response;
        }]);
    }
}
Let’s go through every method here:
- The
bootmethod will be publishing our package assets (config, migrations, views). - The
registerBindingsmethod binds theVerificationCodeSenderInterfaceto a specific implementation. The package uses the Twilio service as a default, so we create asrc/Services/Twilioclass which implements our interface and defines the necessary methods.
// src/Services/Twilio.php

namespace Whyounes\TFAuth\Services;
use Twilio\Rest\Client;
use Whyounes\TFAuth\Contracts\VerificationCodeSenderInterface;

class Twilio implements VerificationCodeSenderInterface
{
    /**
     * Twilio client
     *
     * @var Client
     */
    protected $client;

    /**
     * Phone number to send from
     *
     * @var string
     */
    protected $number;

    public function __construct(Client $client)
    {
        $this->client = $client;
        $this->number = config("services.twilio.number");
    }

    public function sendCodeViaSMS($code, $phone, $message = "Your verification code is %s")
    {
        try {
            $this->client->messages->create($phone, [
                "from" => $this->number,
                "body" => sprintf($message, $code)
            ]);
        } catch (\Exception $ex) {
            return false;
        }
        return true;
    }

    public function sendCodeViaPhone($code, $phone, $message = "Your verification code is %s")
    {
        try {
            $this->client->account->calls->create(
                $phone,
                $this->number,
                ["url" => route('tfa.services.twilio.say', ["text" => sprintf($message, $code)])]
            );
        } catch (\Exception $ex) {
            return false;
        }
        return true;
    }
    // getters and setter
}
- The
registerEventsmethod will delete the previously used token upon authentication if the config value is set totrue. - The
registerRoutesmethod adds a route for sending a verification code via a phone call.
If, for example, we wanted to switch from Twilio to Nexmo, we only need to create a new class that implements the VerificationCodeSenderInterface and bind it to the container.
Finally, we add a trait to the User model class:
// app/User.php

class User extends Authenticatable
{
    use \Whyounes\TFAuth\Models\TFAuthTrait;

    // ...
}
Tests
Tests are mandatory before releasing any code publicly, not just for Laravel. DO NOT use any packages that don’t have tests. For Laravel, you may use the orchestra/testbench package to help you out, and the documentation provides a really nice flow for testing Laravel components like Storage, Eloquent, etc.
For our package, we have tests for our controller, model and service classes. Check the repository for more details about our tests.
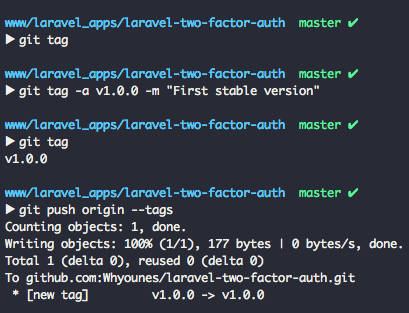
Tagging
We can’t keep just a master branch for our package. We need to tag a first version to start with. This depends on how far along are we in the feature development stage, and what the goal is here!
Since our package is not that complicated and doesn’t have a lot of features to build, we can tag it as a first stable version (1.0.0). You can check the Git documentation website for more details about tagging, and here’s the list of commands for adding a new tag to our repository:
git tag
git tag -a v1.0.0 -m "First stable version"
git push origin --tags
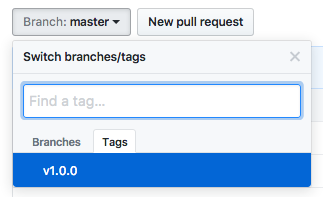
We should now see the tag on GitHub under the branch select box:
Continuous Integration
Continuous Integration tools help us integrate new parts into our existing code and send a notification about any infringements. It also gives us a badge (image with a link) for the status of the code. For this package, we use TravisCI as our CI tool.
![]()
// .travis.yml

language: php

php:
  - 5.6
  - 7.0
  - 7.1

sudo: true

install:
- travis_retry composer install --no-interaction --prefer-source
This config file will be picked up by TravisCI to know how to test the code and what versions to test on. You can read more about how to integrate it here.
Conclusion
The development workflow is not that complicated. In fact, we can develop a package without needing to install the Laravel framework; just include the necessary Illuminate components and test drive your package’s implementation. At the end, you can do an integration test as a demo that the package is working as expected. I hope this helps you create some packages to give back to the community :)
If you have any questions or comments you can post them below! What’s your package development workflow?
Frequently Asked Questions (FAQs) on Laravel Package Development Workflow
What are the key differences between Laravel’s default package development workflow and the alternative workflow?
The Laravel’s default package development workflow is a standard process that involves creating a new package, developing it within the Laravel framework, and then publishing it to Packagist. However, the alternative workflow, as discussed in our article, suggests developing the package outside the Laravel framework. This approach allows for better isolation of the package, making it easier to test and debug. It also enables the package to be used in other PHP projects, not just Laravel, increasing its versatility.
How can I test my Laravel package outside the Laravel framework?
To test your Laravel package outside the Laravel framework, you can use PHPUnit, a popular testing tool for PHP. You can write unit tests for your package’s classes and methods, and run these tests using PHPUnit. This will help ensure that your package works correctly in isolation, without any dependencies on the Laravel framework.
Can I use Laravel’s service providers and facades in my package?
Yes, you can use Laravel’s service providers and facades in your package. However, you need to be careful to avoid tight coupling with the Laravel framework. Your package should be able to work independently of Laravel, so that it can be used in other PHP projects. You can achieve this by using dependency injection and interface-based programming.
How can I publish my Laravel package to Packagist?
To publish your Laravel package to Packagist, you need to create a composer.json file for your package, specifying its name, description, version, and dependencies. You also need to specify an autoload section, so that Composer can automatically load your package’s classes. Once you have created your composer.json file, you can submit your package to Packagist via their website.
What are the benefits of developing a Laravel package outside the Laravel framework?
Developing a Laravel package outside the Laravel framework has several benefits. It allows for better isolation of the package, making it easier to test and debug. It also enables the package to be used in other PHP projects, not just Laravel, increasing its versatility. Furthermore, it encourages good programming practices, such as dependency injection and interface-based programming.
How can I ensure that my Laravel package is compatible with different versions of Laravel?
To ensure that your Laravel package is compatible with different versions of Laravel, you can use continuous integration (CI) tools like Travis CI or CircleCI. These tools can automatically test your package against different versions of Laravel, and alert you if any compatibility issues are found.
Can I use other PHP libraries in my Laravel package?
Yes, you can use other PHP libraries in your Laravel package. You can specify these libraries as dependencies in your composer.json file, and Composer will automatically download and install them when your package is installed.
How can I contribute to the Laravel community by developing packages?
By developing and sharing your Laravel packages, you can contribute to the Laravel community. Your packages can provide new functionality or improve existing functionality in Laravel applications, helping other developers to build better applications more quickly and easily.
What are the best practices for Laravel package development?
Some of the best practices for Laravel package development include developing your package outside the Laravel framework, using PHPUnit for testing, using dependency injection and interface-based programming, and publishing your package to Packagist.
How can I get help if I encounter problems during Laravel package development?
If you encounter problems during Laravel package development, you can seek help from the Laravel community. There are many online forums and discussion groups where you can ask questions and get answers from experienced Laravel developers. You can also refer to the Laravel documentation and various online tutorials and guides.

