Being a web developer isn’t always exciting. There are lots of tedious things you end up doing over and over again: writing code to talk to a database, writing code to handle page templating, writing an administrative interface … Sooner or later you start to wish someone would just come along and wrap up all that repetitive code in nice, integrated, reusable packages, right? Well, today’s your lucky day, because someone finally has.
Say hello to Django. In this article, I’ll be walking through the process of creating a simple application — a to-do list — with Django; this tutorial will only cover a small portion of what Django can do for you, but it’ll be a good start and (hopefully) enough to whet your appetite for more.
An Integrated Web Framework
In a nutshell, Django is a rapid web development framework. Like a number of other frameworks that have been making news recently (for example, Ruby on Rails), Django is designed to take care of tedious and repetitive tasks for you, freeing you up to write interesting code again. However, unlike most of the other frameworks, Django goes a few steps further and tries to provide generic building blocks that you can stick together to accomplish common tasks (like building administrative interfaces or RSS feeds). Everyone who works to develop Django also uses the framework, so anything it can do to make our jobs easier is a candidate for inclusion.
Django started life at the Lawrence Journal-World, a newspaper which serves a small town in northeastern Kansas, growing from the need to develop full-featured web applications to meet newsroom deadlines. The Journal-World released Django under an open-source license in July 2005, after it had been under development, and in use, at the paper for a couple of years.
Django is written in Python, a modern, object-oriented programming language; that means that the applications you write with Django will be in Python, too.
Python: the Five-minute Tour
If you’re used to languages like PHP or Perl, Python might look a little strange to you, but once you get to know it, it’ll be like a breath of fresh air.
There are two big things you’ll notice when you start using Python for the first time.
First, there aren’t any curly brackets marking blocks of code; you’ll more than likely indent your code inside functions, for loops, if statements and such regardless of which language you use, so Python relies on this indentation to tell it where those blocks of code begin and end.
Second, the core Python language is deliberately kept small and lightweight, with functions that might be built into the core of other languages (for example: regular expressions) instead supplied in “modules” that you can import into your programs. Python comes with a solid set of standard modules to cover a programmer’s most common needs.
If you’re new to Python, it’d probably be a good idea to read through the official tutorial to get a feel for the basics of the language. The official documentation for Python also includes a complete listing of all the standard modules and explanations of how to use them, so browse through that list to see what Python can do out-of-the-box.
Getting Django
Since it’s written in Python, Django requires you to have Python installed before you can use it. If you’re on Mac OS X or Linux, you probably already have Python installed, but if you’re on Windows or if (for some strange reason) Python wasn’t preinstalled on your computer, you can download it from python.org. As I write this article, the latest version of Python is 2.4.3, but version 2.5 should be released any day now; there shouldn’t be any incompatibilities between the two versions, but if you’re going to install Python, it’s probably safest to stick with version 2.4.3 until any bugs in 2.5 have been ironed out. The only version restriction that Django imposes is a requirement that you use Python 2.3 or higher.
Once you have Python, the official Django install documentation will step you through the process of downloading and installing Django. As part of this process, you’ll need to download and install a Python database adapter module for the database you’ll be using. I’ll be using MySQL in this article; you can download the adapter (a module called mysqldb) directly from SourceForge (at the time of publication, this package will not work with Python 2.5; you’ll have to use Python 2.4.3 until the SourceForge project is updated).
Windows users should just grab the .exe version, Mac users can grab a pre-built Mac installer package from the PythonMac site, and Linux users should be able to get a pre-built package from their Linux distributor, or manually build the module using the .tar.gz download from SourceForge.
If you’d prefer to use a different database, the Django installation documentation has links to download the adapter modules for PostgreSQL and SQLite, which are the two other databases Django officially supports (support for Oracle and Microsoft SQL Server is in development, but at this point is still experimental).
Once you’ve got Python installed, you’ll need to get set up Django itself. The official Django documentation provides good instructions for Linux and Mac users, but Windows users will have to adapt the directions slightly:
In order to open the Django tarball, use a program such as WinZip instead of tar.
You’ll need to add C:Python24 to the PATH environment variable. You can do this either through the My Computer Properties dialog, or by entering the following at the command line:
SET PATH=%PATH%;C:Python24Of course, this command will only affect the current command line, so you’ll have to retype it every time you work with Django. Your best bet is to set the PATH variable once and for all in My Computer Properties.
There’s no equivalent to sudo in Windows. To set up Django, enter the following commands:
cd path-to-django

setup.py install
After setting up Django, add the django/bin directory to the PATH environment variable. Again, you can do this once through the My Computer Properties dialog, or each time you work with Django by entering the following at the command line:
SET PATH=%PATH%;path-to-djangodjangobinDiving In
Let’s explore Django by writing a simple application. “Getting things done” is a popular mantra these days, so we’ll build an easy tool to help with that: a to-do list manager.
Now that you’ve got Django installed, simply open up a command line, navigate to the directory in which you want to keep your code, and type this command:
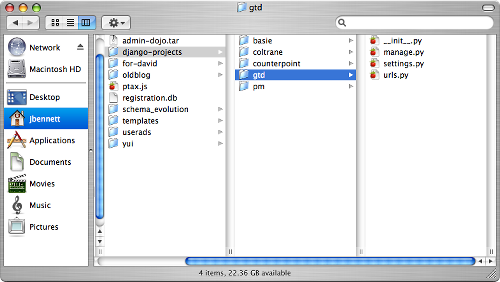
django-admin.py startproject gtdThat will start a new Django “project” for you; Django draws a distinction between an “application,” which usually provides a specific set of features, and a “project,” which is usually a collection of different applications working together on the same web site.
Running the startproject command will automatically create a new directory with the name gtd, and place a few files inside it: a blank file called __init__.py, which tells Python that the directory is a Python module; a Python script called manage.py, which contains some utilities for working with your project; a settings file called settings.py; and a URL configuration file called urls.py.
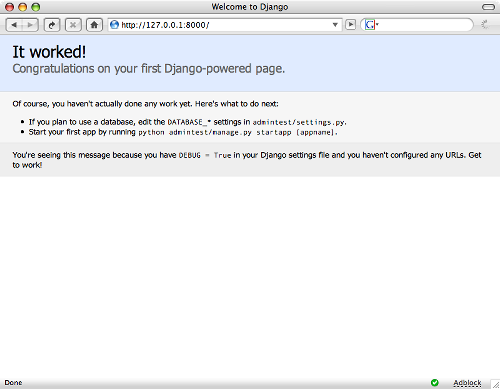
At this point, you can test that everything was set up properly by typing this command (run this from a command line, inside the “gtd” directory):
manage.py runserverDjango includes a lightweight web server for testing purposes, so you don’t have to set up Apache just to work on your project. The command manage.py runserver will start it up. By default, the built-in server runs on port 8000, so you should be able to type http://127.0.0.1:8000 into your browser and see a nice page telling you that Django is working.
To stop the built-in server, press Ctrl+Break on Windows, or Ctrl+C on Mac OS X or Linux.
Now that we know Django is set up properly, we can start working on our to-do list application. Type this command:
manage.py startapp todoThis will create a directory called todo, and automatically drop in a few files for you: __init__.py, again to tell Python that the directory is a Python module; and two files for application code: models.py and views.py.

Writing Models
One of the more tedious parts of web development is laying out all the database tables you’ll need, figuring out which types of columns you’ll want, and working out how to get data into and out of them. Django solves these problems by letting you define “models.” Django’s models are just Python classes that inherit from Django’s own base Model class, and they let you specify all the attributes of a particular type of object in code. The Model class knows how to translate its properties into values for storage in the database, so most of the time you don’t have to think about that — you just interact with the objects as you would in any other object-oriented language.
For this application, we’ll need two models: one representing a list, and one representing an item in a list. In database terms, these models will end up being two tables: one for lists, and one for the items in those lists. Each of the list items will have a foreign key that specifies the list to which it belongs.
Let’s start with the model for the list. Open up the models.py file that Django created for you, and below the line that says “Create your models here,” add this code:
class List(models.Model):

  title = models.CharField(maxlength=250, unique=True)

  def __str__(self):

    return self.title

  class Meta:

    ordering = ['title']

  class Admin:

    pass
In a moment, when we tell Django to create our database tables, the above will translate into a table called list, with two columns:
- An integer primary key column called
id(Django generates this automatically for you; you don’t have to specify it explicitly). - A 250-character-wide
VARCHARcolumn calledtitle. Additionally, aUNIQUEconstraint will be created on this column, ensuring that we can’t create two to-do lists with the same title.
You’ll notice there’s also a method in the class called __str__. This method is just like toString in Java or .NET — whenever Python needs to show a string representation of an object, it calls that object’s __str__ method. The one we’ve defined here will return the to-do list’s title, which is probably the most useful way to represent it as a string.
The class Meta part allows us to set options that will tell Django how we want the model to behave. We can set a lot of options here, but for now we’ll just let Django know we want our lists to be ordered by their titles. When Django queries the database for to-do lists, it will order them by the title column.
The class Admin bit allows us to set options for Django’s automatic administrative interface, which we’ll see later. The pass keyword tells Django to just use its defaults.
Now let’s write the model for the items in the to-do lists. It looks like this:
import datetime


PRIORITY_CHOICES = (

  (1, 'Low'),

  (2, 'Normal'),

  (3, 'High'),

)


class Item(models.Model):

  title = models.CharField(maxlength=250)

  created_date = models.DateTimeField(default=datetime.datetime.now)

  priority = models.IntegerField(choices=PRIORITY_CHOICES, default=2)

  completed = models.BooleanField(default=False)

  todo_list = models.ForeignKey(List)

  def __str__(self):

    return self.title

  class Meta:

    ordering = ['-priority', 'title']

  class Admin:

    pass
This model is a little more complicated, but should be easy enough to understand. There are a couple of neat tricks we’re using here that deserve a quick mention, though.
The item’s priority will be stored in the database as an integer, but using the choices argument and passing it the PRIORITY_CHOICES list tells Django to only allow the values we’ve specified in PRIORITY_CHOICES. The PRIORITY_CHOICES list also lets us specify human-readable names that correspond to each value, and Django will take advantage of those for displaying HTML forms.
created_date will be a DATETIME column in the database, and datetime.datetime.now is a standard Python function which, as its name implies, returns the current date and time. To use this function, we need to include the line import datetime before the model’s definition.
We’ve specified that list items should be ordered by two columns: priority and title. The - in front of priority tells Django to use descending order for the priority column, so Django will include ORDER BY priority DESC title ASC in its queries whenever it deals with list items.
Now that our models are completed, it’s time to get Django to create database tables based on them. In Django parlance, this is called installing the models.
Installing the Models
The first step in installing our models is to tell Django which database we’re using, and that we want the models we just created to be installed. To do this, open up the settings.py file in your project directory, and change these settings.
DATABASE_ENGINE should be changed to whatever type of database you're going to use. As I mentioned earlier, I'm using MySQL as I write this, so I'll change the setting like so:
DATABASE_ENGINE = "mysql"DATABASE_NAME should be changed to the name of the actual database you're using:
DATABASE_NAME = "djangotest"Make sure that this database exists! If you choose to use SQLite, Django can automatically create a database file for you, but that’s not possible with MySQL and PostgreSQL.
DATABASE_USERandDATABASE_PASSWORDshould be changed to the username and password of a user who has full access to the database. For example:GA_googleFillSlot("Articles_6_300x250");
DATABASE_USER = 'django'

DATABASE_PASSWORD = 'swordfish'
If you’re using SQLite, these settings don’t need to be filled in, as SQLite doesn’t have a user/password system.
If your MySQL database is hosted on a separate machine, you’ll have to set DATABASE_HOST. If MySQL is running on the same server, you can leave this empty.
If MySQL is not set up to listen to its default port, you’ll need to set DATABASE_PORT to MySQL’s port number.
Down toward the bottom of the settings file is a list called INSTALLED_APPS, which lists all the applications you’re using. By default, several of the applications bundled with Django will be listed here. Add gtd.todo to the list like so:
INSTALLED_APPS = (

  'django.contrib.auth',

  'django.contrib.contenttypes',

  'django.contrib.sessions',

  'django.contrib.sites',

  'gtd.todo',

)
Once these settings are changed and saved, type this command in the gtd directory:
manage.py syncdbYou’ll see some output scroll past as Django sets up the database tables. It will also prompt you to create a “superuser”; Django’s authentication system is installed by default, and creating a superuser account at this point means you’ll be able to log in to Django’s automatic administrative interface when we set that up. Go ahead and create a superuser now.
Automatic Administration
At this point, we could write our own code to interact with the models we’ve set up, but Django provides a free, built-in administrative application that lets us start playing with the data immediately. To use it, you only need to do a couple of things:
- In the
settings.pyfile, adddjango.contrib.adminto the listINSTALLED_APPS. - In the project’s
urls.pyfile, locate the line that says “uncomment this for admin”, then remove the#from the start of the following line of Python code to uncomment it.
Run manage.py syncdb again, and the administrative interface will be installed.
Now start up the testing server again (by running manage.py runserver) and load http://127.0.0.1:8000/admin/ in your browser, which should show you a login screen. Log in with the username and password you specified for your superuser, and you’ll find yourself in Django’s admin interface.
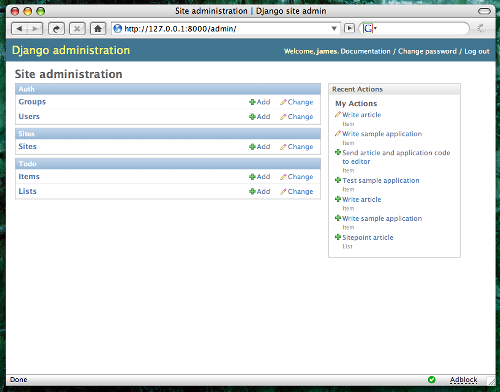
The main page of the admin system shows a list of installed models, classified by the application of which they’re part. If you click on one of the models, you’ll see a list of objects for that model. From this page, you can also change existing objects or add new ones.
Let’s create a to-do list. On the main admin page, click the “Add” link next to “Lists”. Fill in any value you like for the list’s title, then save it.
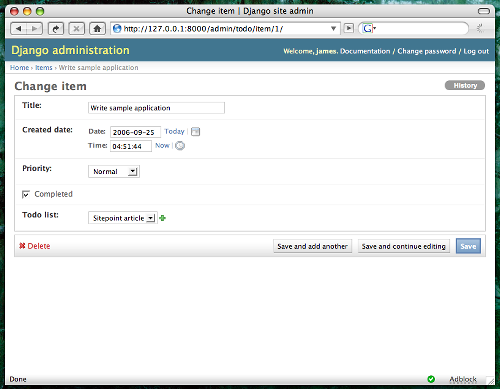
Go back to the main admin page, click the “Add” link next to “Items,” and fill in the details for your list’s first item. Each item has to be related to a to-do list, and Django will automatically create a drop-down menu that shows all the to-do lists that have been created so far.
This is a pretty nice interface to have — especially considering how little work was involved in setting it up — but this is just the default admin interface that Django provides. There are a ton of options (all covered in Django’s official documentation) you that can tweak in order to have the admin interface behave the way you want, and you never have to “rebuild” or re-generate any files to use them — the admin interface is generated on the fly, and changes you make to the configuration can take effect immediately.
If you’d like to learn more about customizing this admin interface, check out the official documentation — this documentation includes details of how you can enable a very nice edit-in-place feature, which you could use to edit many list items in a single page.
Delving into Views
Now that we have a nice little admin interface, let’s talk about views. As nice as the admin interface is, you’re probably always going to need at least a couple of additional pages to get your data to appear exactly as you want it to. Views are the functions that generate these pages in your application.
For example, one thing that would be nice to have in this application is a page that shows all of our to-do lists, along with the percentage of items in those lists that have been completed. It would be sort of a “status report” that we could check in on every once in a while. So let’s write a view that gives us this status report.
Django views are, for the most part, just ordinary Python functions. The URL configuration file (urls.py) decides which URL goes to which view; Django then calls the correct view function, passing it the incoming HTTP request as an argument. Here’s the code for our “status report” view; it should go into the views.py file in the todo directory:
from django.shortcuts import render_to_response

from gtd.todo.models import List


def status_report(request):

  todo_listing = []

  for todo_list in List.objects.all():

    todo_dict = {}

    todo_dict['list_object'] = todo_list

    todo_dict['item_count'] = todo_list.item_set.count()

    todo_dict['items_complete'] = todo_list.item_set.filter(completed=True).count()

    todo_dict['percent_complete'] = int(float(todo_dict['items_complete']) / todo_dict['item_count'] * 100)

    todo_listing.append(todo_dict)

  return render_to_response('status_report.html', { 'todo_listing': todo_listing })
As Python functions go, this one’s pretty simple, but it does show off a few of the nice things that Django can do:
List.objects.all, as you might guess, is a method that returns all of our to-do lists so that we can loop through them. Django will figure out the correct SQL and execute it for you automatically.- Each to-do list has an
item_setproperty, which represents the list’s items. We can use theitem_set.allmethod to get all of the items in the list, or we could use theitem_set.filtermethod to get only a certain subset of the items in the list. We could also useList.objects.filterto get only the to-do lists that match a certain set of criteria. - The function
render_to_responsehandles the business of returning an actual web page. It takes the name of a template to use (more on that in a moment), and a dictionary (“dictionary” is Python’s name for an associative array) of variables and values to which the template should have access, and takes care of rendering the template and sending an HTTP response.
The actual logic involved here isn’t very complex; we’re building a list called todo_listing, and each item in it will be a dictionary that contains information about one of the to-do lists. The only really complex part of that is figuring out the percentage of items completed. You’ll notice that it does a little bit of typecasting. That’s needed because, by default, Python does “integer division” when both of the numbers are integers — integer division always returns an integer. But we want a decimal number that we can convert into a percentage, so I’ve explicitly coerced the number of completed items to a floating-point number.
Writing the Template
We’ve told the view to use a template called status_report.html, but we haven’t created that yet. Luckily, creating templates for Django is incredibly easy. In the todo directory, create a new directory called templates, and in it, create the file status_report.html. Here’s the code for the template:
<!DOCTYPE html PUBLIC "-//W3C//DTD XHTML 1.0 Strict//EN" "https://www.w3.org/TR/xhtml1/DTD/xhtml1-strict.dtd">

<html xmlns="https://www.w3.org/1999/xhtml">

  <head>

    <meta http-equiv="Content-Type" content="text/html; charset=utf-8" />

    <title>To-do List Status Report</title>

  </head>

  <body>

    <h1>To-do list status report</h1>

{% for list_dict in todo_listing %}

    <h2>{{ list_dict.list_object.title }}</h2>

    <ul>

      <li>Number of items: {{ list_dict.item_count }}</li>

      <li>Number completed: {{ list_dict.items_complete }} ({{ list_dict.percent_complete }}%)</li>

    </ul>

{% endfor %}

  </body>

</html>
For the most part, Django templates look like HTML with just a couple extra things mixed in. There are “template tags,” which let you perform some rudimentary logic in the template, and there are variables, which will automatically be filled with values passed in to render_to_response. Tags start with {% and end with %}, while variables start with {{ and end with }}.
In this particular template, we’re using two tags: {% for list_dict in todo_listing %} and {% endfor %}. These tags tell the Django template system that we want to loop through each item in this list and do something with it. When we’re done with the code in the loop, we use the {% endfor %} tag to say so. Within the loop, we retrieve the values we set in the view in order to display the to-do list’s title, the number of items in the list, and so on.
Making it Work
Now that we have our view and template, we just have to give Django a couple pieces of information and it’ll all work! First, we need to tell Django where we’re storing the templates for our application; this is controlled by the TEMPLATE_DIRS setting in the settings.py file. Just go in and add a line with the path to the location at which you put the “status_report.html” template. In my case, I added this:
'/Users/jbennett/django-projects/gtd/todo/templates',It’s important to put the comma on the end of this line.
Once that’s done, we just need to set up a URL for our view, which we do in the urls.py file. Immediately below the line you un-commented earlier for the admin interface’s URLs, add this line:
(r'^report/$', 'gtd.todo.views.status_report'),Again, the comma is important.
Now, start up the testing server (manage.py runserver), and visit http://127.0.0.1:8000/report/. You should see something like this:

Django’s URL configuration is pretty simple; each line in the urls.py file has at least two things in it:
- a regular expression that specifies the URL or URLs to match
- the view function to use on URLs matching that regular expression, or a call to
include, which can pull in other lists of URLs (the admin interface, for example, has its ownurls.pyfile, and just uses include to tell Django to use that file for any URL that starts withadmin)
Where to Go from Here
So far we’ve written around fifty or sixty lines of code, and we’ve got the beginnings of a pretty nice little to-do application:
- We have database tables set up to store the to-do lists and their items.
- We have a nice administrative interface for creating and managing the lists.
- We have a quick “status report” page that tells us how we’re progressing on each list’s items.
That’s not bad at all, but it barely scratches the surface of what Django can do; there’s a ton of features rolled into Django already, and more are under development. Here are some of the highlights:
- a full-featured database API
- a built-in authentication and permissions system for user accounts
- “Generic views,” which save you from having to write code for common things like date-based content archives
- a built-in cache system to help you squeeze every possible ounce of performance out of Django
- an internationalization system to make it easy to translate your application’s interface into other languages
- easy, automatic generation of RSS feeds and Google sitemaps
- easy serialization of data to XML or JSON, for easy use with AJAX
- plus a whole lot more
If you’d like to learn more about Django, swing by the official site, peruse the documentation (which includes a tutorial that covers a lot of useful pieces of Django), and feel free to ask questions on the Django-users mailing list or in our IRC channel (#django on irc.freenode.net).
Frequently Asked Questions (FAQs) about Building a To-Do List with Django
How can I add a user authentication feature to my Django To-Do list app?
Adding a user authentication feature to your Django To-Do list app is a great way to personalize the user experience. Django comes with a built-in user authentication system that handles user accounts, groups, permissions, and cookie-based user sessions. You can use Django’s authentication system by adding ‘django.contrib.auth.middleware.AuthenticationMiddleware’ and ‘django.contrib.auth’ to your MIDDLEWARE and INSTALLED_APPS settings respectively. Then, you can use the ‘login’ and ‘logout’ views provided by Django to handle user authentication.
How can I deploy my Django To-Do list app?
Once you’ve built your Django To-Do list app, you can deploy it using platforms like Heroku, AWS, or Google Cloud. These platforms provide detailed instructions on how to deploy Django apps. Generally, you’ll need to set up a virtual environment, install necessary dependencies, set up your database, and configure your settings for production.
How can I add a search functionality to my Django To-Do list app?
Adding a search functionality to your Django To-Do list app can enhance user experience. Django provides a powerful and flexible search framework called ‘django.contrib.postgres.search’ that you can use. You’ll need to create a search vector and search query, and then use the ‘SearchRank’ function to order the results.
How can I add a due date to tasks in my Django To-Do list app?
To add a due date to tasks in your Django To-Do list app, you can add a ‘due_date’ field to your Task model. This field should be a DateTimeField, which allows you to store both the date and time of the due date. You can then display this field in your task form and task list.
How can I add categories to tasks in my Django To-Do list app?
To add categories to tasks in your Django To-Do list app, you can create a Category model with a ‘name’ field. Then, you can add a ‘category’ field to your Task model, which should be a ForeignKey to the Category model. This allows each task to be associated with a category.
How can I add a priority level to tasks in my Django To-Do list app?
To add a priority level to tasks in your Django To-Do list app, you can add a ‘priority’ field to your Task model. This field can be a CharField with choices such as ‘High’, ‘Medium’, and ‘Low’. You can then display this field in your task form and task list.
How can I add a completed status to tasks in my Django To-Do list app?
To add a completed status to tasks in your Django To-Do list app, you can add a ‘completed’ field to your Task model. This field should be a BooleanField, which allows you to store whether the task has been completed or not. You can then display this field in your task form and task list.
How can I add a task editing feature to my Django To-Do list app?
To add a task editing feature to your Django To-Do list app, you can create an ‘edit’ view that handles the GET and POST requests for editing a task. This view should retrieve the task to be edited, display the task form with the task’s current data, and update the task’s data when the form is submitted.
How can I add a task deleting feature to my Django To-Do list app?
To add a task deleting feature to your Django To-Do list app, you can create a ‘delete’ view that handles the GET and POST requests for deleting a task. This view should retrieve the task to be deleted, ask for confirmation before deleting, and delete the task when confirmed.
How can I add a task filtering feature to my Django To-Do list app?
To add a task filtering feature to your Django To-Do list app, you can use Django’s QuerySet API to filter tasks based on certain criteria. For example, you can filter tasks by category, priority level, due date, or completed status. You can then display the filtered tasks in your task list.
 James Bennett
James Bennett is a web developer at World Online, the online division of the Lawrence Journal-World of Lawrence, KS.