The action bar is an important design element, usually at the top of each screen in an app, that provides a consistent familiar look between Android apps. It is used to provide better user interaction and experience by supporting easy navigation through tabs and drop-down lists. It also provides a space for the app or activity’s identity, thus enabling the user to know their location in the app, and easy access to the actions that can be performed.
The action bar was introduced in Android 3.0, although support for older versions can be achieved by using the Android Support Library. Before its release, the Options Menu was usually used to provide the actions and functionality that are now put on the action bar. The action bar is included by default in all activities for apps with a minSdkVersion of 11. You can disable it and opt to only use the options menu, but for better user experiences it’s better to use the action bar as it is visible to the user, while the options menu needs the user to request it and the user might not be aware of its existence in the first place.
This tutorial explores setting up the action bar and discusses the different configurations that it offers.
Setting up the Action Bar
To start off, we are going to create a new project. We won’t be using the Android Support Library, so make sure to select a minimum SDK version of 11 or above. When you run your project, the action bar will be included at the top of your app’s screen. It is included in all activities that use or inherit from the Theme.Holo theme – which is the default when theminSdkVersion is set to 11 or greater. A typical action bar is shown in the following figure.
 The action bar consists of:
- App icon – This is used to identify your app with a logo or icon.
- View control – This can also be used to identify the app or the specific activity the user is on by the title. If your app has different views, it can also be used to display these and allow for easy switching between views.
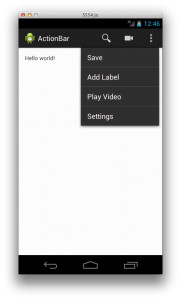
- Action buttons – These are used to display the most important and/or often used actions. If there isn’t enough space to show all of the action buttons, those that don’t fit are automatically moved to the action overflow.
- Action overflow – This is used for the lesser used actions.
Adding Actions to the Action Bar
To add actions to the action bar, create a XML file in theres/menu directory where you will define each action. It is possible to define the actions in Java code, but you will write less code if you use XML. The contents of res/menu/main_activity_bar.xml are shown below. In this example, we’re using the Action Bar Icon Pack for the action icons. Download it and copy the necessary icons to the res/drawable-xxxx directory for the different screen densities.
<menu xmlns:android="http://schemas.android.com/apk/res/android" >
  <item android:id="@+id/action_search"
    android:icon="@drawable/ic_action_search"
    android:title="@string/action_search"
    android:showAsAction="ifRoom" />
  <item android:id="@+id/action_record"
    android:icon="@drawable/ic_action_video"
    android:title="@string/action_record"
    android:showAsAction="ifRoom" />
  <item android:id="@+id/action_save"
    android:icon="@drawable/ic_action_save"
    android:title="@string/action_save"
    android:showAsAction="ifRoom" />
  <item android:id="@+id/action_label"
    android:icon="@drawable/ic_action_new_label"
    android:title="@string/action_label"
    android:showAsAction="ifRoom" />
  <item android:id="@+id/action_play"
    android:icon="@drawable/ic_action_play"
    android:title="@string/action_play"
    android:showAsAction="ifRoom" />
  <item android:id="@+id/action_settings"
    android:title="@string/action_settings"
    android:showAsAction="never" />
</menu>res/values/strings.xml, as shown below.
<?xml version="1.0" encoding="utf-8"?>
<resources>
  <string name="app_name">ActionBar</string>
  <string name="action_settings">Settings</string>
  <string name="action_search">Search</string>
  <string name="action_record">Record Video</string>
  <string name="action_save">Save</string>
  <string name="action_label">Add Label</string>
  <string name="action_play">Play Video</string>
  <string name="hello_world">Hello world!</string>
</resources>icon attribute takes a resource ID for an image which will appear on the action bar with or without the title. To display the action title add withText to showAsAction. For example you could use android:showAsAction="ifRoom|withText" to indicate that if there is room on the bar for the action button and text, they should both be shown. To force an action to always be displayed, use always on showAsAction. However, this is not advisable as it might cause undesirable layout effects on smaller screens. If you must, limit it to one or two items.
You should always define the title attribute, even if you don’t want to display both the icon and title, for the following reasons:
- The title will be used in the overflow if there isn’t enough space on the action bar for the action item.
- It might not be obvious to the user what the action item does just from its icon alone and so providing a title enables them to long press it to reveal a tool-tip that displays the title.
- The title provides accessibility for sight-impaired users, as the screen reader can read the menu item’s title.
onCreateOptionsMenu() callback method in our activity. This inflates the menu resource into the given Menu object for use in the action bar. The code for this function is shown below.
@Override
public boolean onCreateOptionsMenu(Menu menu) {
  MenuInflater inflater = getMenuInflater();

  inflater.inflate(R.menu.main_activity_bar, menu);
  return super.onCreateOptionsMenu(menu);
}
Splitting the Action Bar
Since the action items share the action bar real estate with the app icon and title, you might want to split the action bar so that the action items appear at the bottom of the screen. This will give them more space, and thus more items will be visible to the user. If there is enough space, for example on larger screens or in landscape mode, the action bar will not be split.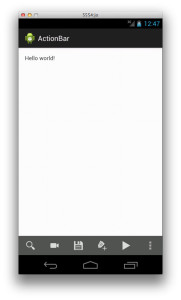 To split the action bar, add
 android:uiOptions="splitActionBarWhenNarrow" to each activity in your manifest file that you want to have a split action bar. This only supports API level 14 and above. To add support for lower levels use the following meta-data element.
<activity
  android:name="com.example.actionbar.MainActivity"
  android:label="@string/app_name"
  android:uiOptions="splitActionBarWhenNarrow" >
  <meta-data android:name="android.support.UI_OPTIONS"
    android:value="splitActionBarWhenNarrow" />
  <intent-filter>
    <action android:name="android.intent.action.MAIN" />

    <category android:name="android.intent.category.LAUNCHER" />
  </intent-filter>
</activity>
Hiding the Action Bar
You might not want to have the action bar visible at all times to the user. A common example to this is the Gallery app which hides the action bar when the user is looking at an image and shows the action bar when they touch the image. To toggle action bar visibility on touch, add the following to your activity file.@Override
public boolean onTouchEvent(MotionEvent event) {
if(event.getAction() == MotionEvent.ACTION_DOWN) {
toggleActionBar();
}
return true;
}
private void toggleActionBar() {
ActionBar actionBar = getActionBar();
if(actionBar != null) {
if(actionBar.isShowing()) {
actionBar.hide();
}
else {
actionBar.show();
}
}
}Overlaying the Action Bar
Overlaying the action bar provides a better hide/show experience since the activity doesn’t resize on each hide/show, allowing your content to stay put. You can enable overlaying by settingandroid:windowActionBarOverlay to true in your theme file. You should be using the Theme.Holo theme (or one of its descendants). If your minSdkVersion was set to 11, this should be the case.
In res/values/styles.xml, add the following:
<resources>
<style name="AppBaseTheme" parent="android:Theme.Light">
</style>
<!-- Application theme. -->
<style name="AppTheme" parent="AppBaseTheme">
<item name="android:windowActionBarOverlay">true</item>
</style>
</resources>Adding the Up Navigation
All screens in your app that are not the main entrance to your app (the “home” screen) should offer the user a way to navigate to the logical parent screen in the app’s hierarchy by pressing the Up button in the action bar. Starting in API level 14, you can declare the logical parent of each activity by specifying theandroid:parentActivityName attribute in the activity element in the manifest file. To support lower versions, include the Support Library and specify the parent activity as the value for android.support.PARENT_ACTIVITY, matching the android:parentActivityName attribute.
We’ll add another activity to demonstrate this. Add another activity file called SecondActivity, as shown in the following code listing. We call setDisplayHomeAsUpEnabled() to allow Up navigation with the app icon in the action bar. This will add a left-facing caret alongside the app icon. When it is pressed, the activity receives a call to onOptionsItemSelected().
package com.example.actionbar;
import android.app.Activity;
import android.os.Bundle;
import android.support.v4.app.NavUtils;
import android.view.Menu;
import android.view.MenuInflater;
import android.view.MenuItem;
public class SecondActivity extends Activity {
@Override
protected void onCreate(Bundle savedInstanceState) {
super.onCreate(savedInstanceState);
setContentView(R.layout.second_activity);
getActionBar().setDisplayHomeAsUpEnabled(true);
}
@Override
public boolean onCreateOptionsMenu(Menu menu) {
// Inflate the menu items for use in the action bar
MenuInflater inflater = getMenuInflater();
inflater.inflate(R.menu.second_activity_bar, menu);
return super.onCreateOptionsMenu(menu);
}
@Override
public boolean onOptionsItemSelected(MenuItem item) {
switch (item.getItemId()) {
// Respond to the action bar's Up/Home button
case android.R.id.home:
NavUtils.navigateUpFromSameTask(this);
return true;
}
return super.onOptionsItemSelected(item);
}
}res/layout/second_activity.xml, add the following:
<RelativeLayout xmlns:android="http://schemas.android.com/apk/res/android"
android:id="@+id/RelativeLayout1"
android:layout_width="fill_parent"
android:layout_height="fill_parent"
android:orientation="vertical" >
<TextView
android:id="@+id/TextView1"
android:layout_width="wrap_content"
android:layout_height="wrap_content"
android:layout_centerHorizontal="true"
android:layout_centerVertical="true"
android:text="@string/hello_world_again" />
</RelativeLayout>res/values.strings.xml.
<string name="hello_world_again">Hello world, again!</string>
<string name="second">Go To Second Activity</string>
<string name="second_activity_title">Second Activity</string>res/menu/second_activity_bar.xml, and add the following XML.
<menu xmlns:android="http://schemas.android.com/apk/res/android" >
<item
android:id="@+id/action_settings"
android:orderInCategory="100"
android:showAsAction="never"
android:title="@string/action_settings"/>
</menu><application>
...
<activity
android:name="com.example.actionbar.SecondActivity"
android:label="@string/second_activity_title"
android:parentActivityName="com.example.actionbar.MainActivity" >
<meta-data
android:name="android.support.PARENT_ACTIVITY"
android:value="com.example.actionbar.MainActivity" />
</activity>
...
</application>res/layout/activity_main.xml:
<Button
android:id="@+id/second"
android:layout_width="fill_parent"
android:layout_height="wrap_content"
android:layout_alignLeft="@+id/TextView1"
android:layout_centerVertical="true"
android:onClick="openSecondActivity"
android:text="@string/second" />onClick handler in MainActivity.java. This function, shown below, will start the second activity when the button is clicked.
public void openSecondActivity(View view) {
Intent intent = new Intent(this, SecondActivity.class);
startActivity(intent);
}
Action Bar Interactivity
So far we have created action items that do nothing when clicked on. Next we’ll see how to add some interactivity to the action bar.Handling Clicks on Action Items
When an action is clicked, the activity’sonOptionsItemSelected() method is called. The action can be identified by calling getItemId(). Add the onOptionsItemSelected() method to MainActivity.java, as shown in the following example. Here we are displaying a different message when each action is clicked on.
@Override
public boolean onOptionsItemSelected(MenuItem item) {
// Handle presses on the action bar items
switch (item.getItemId()) {
case R.id.action_search:
// Code you want run when activity is clicked
Toast.makeText(this, "Search clicked", Toast.LENGTH_SHORT).show();
return true;
case R.id.action_record:
Toast.makeText(this, "Record clicked", Toast.LENGTH_SHORT).show();
return true;
case R.id.action_save:
Toast.makeText(this, "Save clicked", Toast.LENGTH_SHORT).show();
return true;
case R.id.action_label:
Toast.makeText(this, "Label clicked", Toast.LENGTH_SHORT).show();
return true;
case R.id.action_play:
Toast.makeText(this, "Play clicked", Toast.LENGTH_SHORT).show();
return true;
case R.id.action_settings:
Toast.makeText(this, "Settings clicked", Toast.LENGTH_SHORT).show();
return true;
default:
return super.onOptionsItemSelected(item);
}
}Action Views
Action views are interactive widgets that appear within the action bar as a substitute for action buttons. They allow occasionally used UI items to be placed on the action bar, thus avoiding unnecessary consumption of screen space and switching of activities to use them. To declare an action view, use either theactionLayout or actionViewClass attribute to specify either a layout resource or widget class to use, respectively. As a quick example, to add a SearchView widget to our example, modify the search action in res/menu/main_activity_bar.xml as follows.
<item android:id="@+id/action_search"
android:icon="@drawable/ic_action_search"
android:title="@string/action_search"
android:showAsAction="ifRoom|collapseActionView"
android:actionViewClass="android.widget.SearchView" /> We will add our own custom view to the action bar. Create a layout file named
 res/layout/my_action.xml. This will be the custom view’s layout resource.
<LinearLayout xmlns:android="http://schemas.android.com/apk/res/android"
android:layout_width="fill_parent"
android:layout_height="fill_parent" >
<TextView
android:id="@+id/myActionTextView"
android:layout_width="fill_parent"
android:layout_height="wrap_content"
android:layout_weight="1"
android:text="Type here:"
android:gravity="right" />
<EditText
android:id="@+id/myActionEditText"
android:layout_width="fill_parent"
android:layout_height="wrap_content"
android:layout_weight="1"
android:gravity="left" />
</LinearLayout>res/menu/main_activity_bar.xml, as shown below.
<item android:id="@+id/my_action"
android:icon="@drawable/ic_action_edit"
android:title="My Action"
android:showAsAction="ifRoom|collapseActionView"
android:actionLayout="@layout/my_action" />collapseActionView collapses the action view so that only the icon shows on the action bar and when clicked on, it expands to reveal an edit text view. Clicking on the Up caret exits from the action view.
 Next, updated the main activity file,
 MainActivity.java, as shown below. Take note of the comments throughout the code.
package com.example.actionbar;
import android.os.Bundle;
import android.app.ActionBar;
import android.app.Activity;
import android.content.Intent;
import android.support.v4.view.MenuItemCompat;
import android.support.v4.view.MenuItemCompat.OnActionExpandListener;
import android.view.KeyEvent;
import android.view.Menu;
import android.view.MenuInflater;
import android.view.MenuItem;
import android.view.MotionEvent;
import android.view.View;
import android.widget.EditText;
import android.widget.TextView;
import android.widget.Toast;
public class MainActivity extends Activity implements TextView.OnEditorActionListener {
private MenuItem myActionMenuItem;
private EditText myActionEditText;
@Override
protected void onCreate(Bundle savedInstanceState) {
super.onCreate(savedInstanceState);
setContentView(R.layout.activity_main);
}
@Override
public boolean onCreateOptionsMenu(Menu menu) {
// Inflate the menu items for use in the action bar
MenuInflater inflater = getMenuInflater();
inflater.inflate(R.menu.main_activity_bar, menu);
// Here we get the action view we defined
myActionMenuItem = menu.findItem(R.id.my_action);
View actionView = myActionMenuItem.getActionView();
// We then get the edit text view that is part of the action view
if(actionView != null) {
myActionEditText = (EditText) actionView.findViewById(R.id.myActionEditText);
if(myActionEditText != null) {
// We set a listener that will be called when the return/enter key is pressed
myActionEditText.setOnEditorActionListener(this);
}
}
// For support of API level 14 and below, we use MenuItemCompat
MenuItemCompat.setOnActionExpandListener(myActionMenuItem, new OnActionExpandListener() {
@Override
public boolean onMenuItemActionCollapse(MenuItem item) {
// Do something when collapsed
return true; // Return true to collapse action view
}
@Override
public boolean onMenuItemActionExpand(MenuItem item) {
// Do something when expanded
if(myActionEditText != null) {
myActionEditText.setText("");
}
return true; // Return true to expand action view
}
});
return super.onCreateOptionsMenu(menu);
}
@Override
public boolean onTouchEvent(MotionEvent event) {
  if(event.getAction() == MotionEvent.ACTION_DOWN) {
    toggleActionBar();
  }
  return true;
}

private void toggleActionBar() {
  ActionBar actionBar = getActionBar();

  if(actionBar != null) {
    if(actionBar.isShowing()) {
      actionBar.hide();
    }
    else {
      actionBar.show();
    }
  }
}
public void openSecondActivity(View view) {
  Intent intent = new Intent(this, SecondActivity.class);
  startActivity(intent);
}
@Override
public boolean onOptionsItemSelected(MenuItem item) {
  // Handle presses on the action bar items
  switch (item.getItemId()) {
    case R.id.action_search:
      // Code you want run when activity is clicked
      Toast.makeText(this, "Search clicked", Toast.LENGTH_SHORT).show();
      return true;
    case R.id.action_record:
      Toast.makeText(this, "Record clicked", Toast.LENGTH_SHORT).show();
      return true;
    case R.id.action_save:
      Toast.makeText(this, "Save clicked", Toast.LENGTH_SHORT).show();
      return true;
    case R.id.action_label:
      Toast.makeText(this, "Label clicked", Toast.LENGTH_SHORT).show();
      return true;
    case R.id.action_play:
      Toast.makeText(this, "Play clicked", Toast.LENGTH_SHORT).show();
      return true;
    case R.id.action_settings:
      Toast.makeText(this, "Settings clicked", Toast.LENGTH_SHORT).show();
      return true;
    default:
      return super.onOptionsItemSelected(item);
  }
}
@Override
public boolean onEditorAction(TextView textView, int i, KeyEvent keyEvent) {
if(keyEvent != null) {
// When the return key is pressed, we get the text the user entered, display it and collapse the view
if(keyEvent.getAction() == KeyEvent.ACTION_DOWN && keyEvent.getKeyCode() == KeyEvent.KEYCODE_ENTER) {
CharSequence textInput = textView.getText();
// Do something useful with the text
Toast.makeText(this, textInput, Toast.LENGTH_SHORT).show();
MenuItemCompat.collapseActionView(myActionMenuItem);
}
}
return false;
}
}myActionEditText and set a listener on it. We want an operation to be made when the user types in some text and presses return. By default, when the user presses Return, the cursor goes to a new line. We want to instead collapse the action view and get the user’s input. This is done by the onEditorAction method which checks on the type of key event on the edit text view. If it is Enter, the text input is captured and displayed. Then, the action view is collapsed.
We set a listener on the action view with MenuItemCompat.setOnActionExpandListener to know when the view expands and collapses. MenuItemCompat is used to support older API versions.
By default, when the user enters text and leaves the action view, on expanding it again, the previous text is still visible. We use onMenuItemActionExpand() to remove any text before the action view expands so that the edit text view will be blank.
Conclusion
The action bar is an important design element and it can be used to greatly improve an app’s user experience. We have looked at some configurations you can use on the action bar for your app’s UI, but there are more out there. For more information, check out the documentation. You can see the code used in this article on GitHub.Frequently Asked Questions (FAQs) about Android Action Bar
How can I customize the Android Action Bar?
Customizing the Android Action Bar involves changing its appearance and behavior. You can modify the background, add custom views, change the title and subtitle, and add or remove action items. To change the background, use the setBackgroundDrawable() method. For adding custom views, use the setCustomView() method. The setTitle() and setSubtitle() methods allow you to change the title and subtitle respectively. To add or remove action items, use the add() and remove() methods on the Menu object.
What is the purpose of the Android Action Bar?
The Android Action Bar serves as a location for branding, navigation, search, and actions in an Android app. It provides a consistent navigation across the application and it is always visible to the user, making it a key part of the user interface. It can host action items and a navigation drawer, providing quick access to important functions.
How can I hide the Android Action Bar?
To hide the Android Action Bar, you can use the hide() method of the ActionBar class. This method hides the action bar if it is currently shown on the screen. It’s important to note that this method only hides the action bar temporarily. If you want to hide the action bar permanently, you should use a theme with no action bar.
How can I add action items to the Android Action Bar?
Action items can be added to the Android Action Bar using the MenuInflater class. You need to override the onCreateOptionsMenu() method in your activity and use the MenuInflater to inflate a menu resource file. This file should contain the action items you want to add to the action bar.
How can I enable Up Navigation in the Android Action Bar?
To enable Up Navigation in the Android Action Bar, you need to call the setDisplayHomeAsUpEnabled() method of the ActionBar class and pass true as the argument. This method enables the Up button in the action bar, which allows users to navigate up the app’s hierarchy.
How can I change the title in the Android Action Bar?
The title in the Android Action Bar can be changed using the setTitle() method of the ActionBar class. This method sets the title to be displayed in the action bar. You can pass a string or a string resource ID as the argument.
How can I add a navigation drawer to the Android Action Bar?
A navigation drawer can be added to the Android Action Bar using the ActionBarDrawerToggle class. This class provides a handy way to tie together the functionality of DrawerLayout and the framework ActionBar to implement the recommended design for navigation drawers.
How can I change the icon in the Android Action Bar?
The icon in the Android Action Bar can be changed using the setIcon() method of the ActionBar class. This method sets the icon to be displayed in the action bar. You can pass a drawable or a resource ID as the argument.
How can I add tabs to the Android Action Bar?
Tabs can be added to the Android Action Bar using the Tab class and the addTab() method of the ActionBar class. The Tab class represents a tab in the action bar, and the addTab() method adds a tab to the action bar.
How can I remove action items from the Android Action Bar?
Action items can be removed from the Android Action Bar using the removeItem() method of the Menu class. This method removes the item with the given ID from the menu.
 Joyce Echessa
I am a web developer who dabbles in mobile development from time to time. You can find me on Twitter @joyceechessa to see what I’m up to.