We’ve all heard it time and time again: “If you fail to plan, you plan to fail”. In the world of designing and creating Websites, if you fail to plan, you plan to have a lot of headaches, late nights and missed deadlines while re-designing your site to fit the content.
Implementing a few simple steps in carefully planning your site, before you create any graphics, can eliminate a lot of headaches. One method that I find very useful is the creation of a wire frame or “white site” model. I’ll outline the benefits and process of wire framing in this article.
Pin-Point Potential Problems
To better understand the world of wire framing a Website, we might consider Shrek. Before Shrek was big, green and ugly, he was a wire frame.
In the world of 3D animation, a wire frame is a working model of a character without color, skin, clothing or hair. This way, the animators can easily test the model and make modifications to it before a great deal of money is spent in developing its finer points.
This principle can also be very valuable to those building a Website. Wire framing a Website involves building a text-only version of the site, with working links, but without graphic detail.
Within this working model of your Website, the links can be followed through, which provides a real feel for how the information on your site connects and how the site flows. It enables you to pinpoint potential problems that might arise later on, once you’ve added content to the site.
I find this technique extremely helpful in keeping me focused on the content first and foremost. Once I’ve worked that out, I can then begin to add to the wire frame the skin (i.e. the graphic content) that supports the content.
Let’s get started. In a moment, I’ll take you through the wire framing process that I’ve found useful in planning my sites. But first, we’ll create a site map.
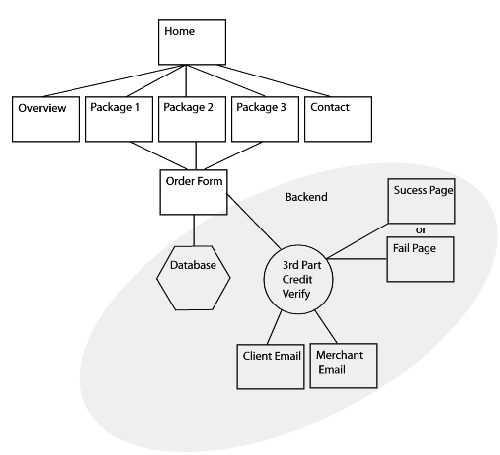
Prepare your Site Map
Before we even begin to work with our wire frame model, it’s a good idea to sketch out a quick signal flow diagram of the pages contained in the site. Draw simple boxes that represent each page and write the page’s title inside. Use lines to indicate how the sections of the site will link together. For most Web professionals out there, this is probably a fairly basic step, which you’re likely already doing as you plan a site.
Your site map can be hand-drawn, or you could use a program such as Microsoft Visio, Adobe Illustrator, or Macromedia FreeHand.
The goal is to provide a single-page overview of your site that will act as a guide to constructing the wire frame. I usually print it off and keep it next to me for my reference as I build the wire frame model.
Create Your Wire Frame Model
Stage 1 – Create the Wire Frame
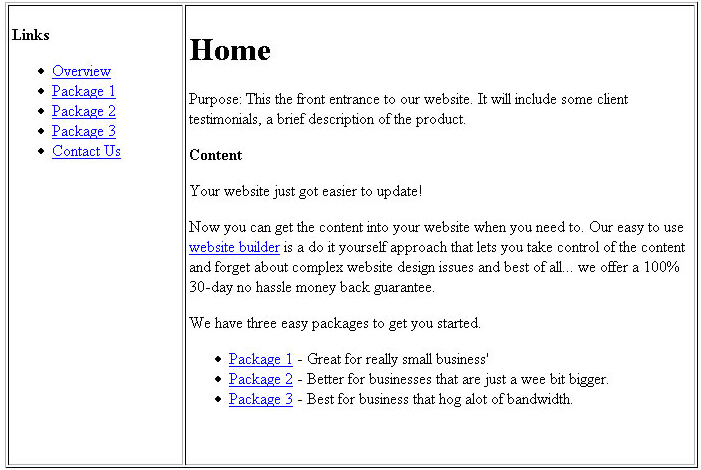
Now it’s time to open up your choice of HTML editor and begin piecing together your wire frame model. It’s important not to get too far ahead at this point. Try to eliminate any layout ideas that you have and concentrate instead on the skeleton of the site.
Begin by creating a simple HTML page for each of the blocks that you sketched out in your site map diagram. Include the title of the page and the purpose that the page will serve.
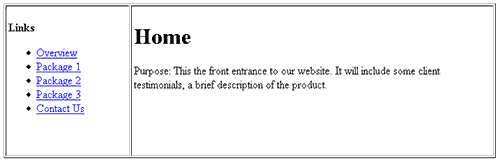
Click to popup a larger version of this image.
Once you have the whole site built, you can upload it to a secured area of your server and have your client sign off, or send amendments to, your wire frame. This will help eliminate any misunderstandings about the way in which the pages and the site will function.
It also gives you something tangible to show the client, that is relatively quick and easy to create. It took me less than an hour to complete stage one wire frames for a 12-page Website.
You can also use the wire frame as a checklist for gathering content. The more complex the site is, the more useful the wire frame becomes.
Stage 2 – Add Your Content
Once you have all the pages set up and your client has approved the page titles, purposes and link titles, you can begin to fill in the content for each page.
I suggest that you leave the purpose of the page at the top and drop in the content below. This way, you can always refer back to your original plans. Keeping track of each page’s purpose is also handy in helping to guide the client as they make decisions about what types of content should appear. Often, a client will want to add something that he or she may have seen on another site, but you feel that this content doesn’t fit with the purpose of the page. The problem is easily solved: remind the client of the page’s purpose and ask them how they’d like to proceed. When faced with the bigger picture, most clients will realize that the content doesn’t fit in and will at least be willing to compromise on the suggested inclusion.
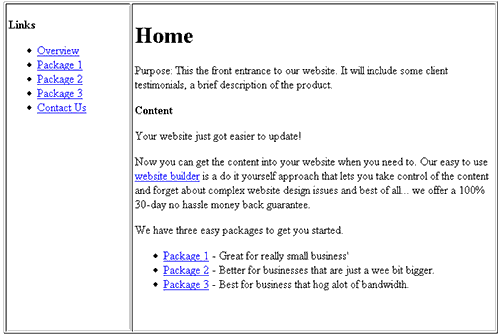
Click to popup a larger version of this image.
Stage 3 – Start Laying Out the Pages using Image Placeholders
In Stage 3, we complete our wire frame model. At this point, we need to create a rough layout of the site using placeholder images, or by creating separate layers.
Layers work best because they are easier to move around as you discuss the layout with the client. However, if the site is not overly complex, a simple table-based layout should do the job.
Better yet, if you use Macromedia Dreamweaver, Eric Ott has created an extension that will help you create your wire frames. It can be downloaded for free from the Macromedia Exchange Website.
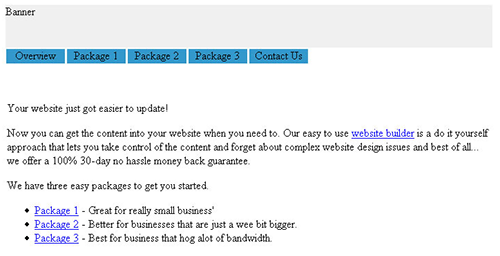
Click to popup a larger version of this image.
Conclusion
Wire frames are definitely not the most exciting part of designing a Website. However, when implemented as part of your design process, they can prove to be very valuable. It will help you, the designer, focus on the marketing message that you are trying to communicate through the site, produce a more effective site and open up channels of communication with your client. It could also save you a truckload of time.
Frequently Asked Questions about Wireframing
What is the importance of wireframing in web design?
Wireframing is a crucial step in web design as it helps to plan the layout and interaction of a website. It serves as a blueprint for the website, allowing designers to define the hierarchy of items, plan for navigation, and decide on the placement of elements. It also facilitates communication between the design team, clients, and developers, ensuring everyone is on the same page about the website’s structure and functionality.
How does wireframing differ from prototyping?
While both wireframing and prototyping are essential stages in the design process, they serve different purposes. Wireframing is about laying out the structure, hierarchy, and placement of elements on a page, while prototyping is about simulating user interaction with those elements. Prototypes are typically more detailed and interactive than wireframes.
What tools can I use for wireframing?
There are numerous tools available for wireframing, each with its own strengths and weaknesses. Some popular ones include Sketch, Adobe XD, Figma, and Balsamiq. The choice of tool often depends on the complexity of the project and the designer’s personal preference.
How detailed should a wireframe be?
The level of detail in a wireframe can vary depending on its purpose. A low-fidelity wireframe, which is more abstract and schematic, can be useful for brainstorming and initial discussions. A high-fidelity wireframe, which is more detailed and may include actual content, is useful for visualizing the final design and for usability testing.
Can I skip wireframing and jump straight to design?
While it’s technically possible to start designing without a wireframe, it’s not recommended. Wireframing allows you to plan and refine the structure of your website before you invest time and resources into design and development. Skipping this step can lead to problems down the line, such as poor usability or a lack of coherence in the design.
How do I decide what to include in my wireframe?
The content of your wireframe should be guided by your website’s goals and your users’ needs. Start by defining the key tasks that users need to accomplish on your site, and then design your wireframe to facilitate these tasks. This might include deciding on the placement of navigation elements, content blocks, and calls to action.
How do I make my wireframe user-friendly?
User-friendly wireframes prioritize usability and accessibility. This means designing for clarity and ease of use, with intuitive navigation and clear visual hierarchy. It’s also important to consider accessibility guidelines, such as ensuring sufficient contrast between text and background and providing alternative text for images.
What is the difference between a wireframe and a mockup?
A wireframe is a schematic representation of a website’s layout, while a mockup is a static, high-fidelity representation of the design. A mockup includes colors, typography, and images, giving a more realistic preview of how the final website will look.
How do I share my wireframes with clients or team members?
Most wireframing tools have sharing features that allow you to share your wireframes with others. You can also export your wireframes as PDFs or image files. When sharing, it’s important to provide some context or explanation to help others understand your design decisions.
How do I update my wireframe based on feedback?
Updating your wireframe based on feedback is a key part of the iterative design process. Most wireframing tools allow you to easily make changes to your design. It’s important to consider all feedback, but also to stay focused on your website’s goals and your users’ needs.
 Matt Beach
Matt Beach has five years' experience building sites and has established Tremble Fish :: Design, a company that helps small business owners understand the ins and outs of launching a Website. He is also the resident advisor and ezine publisher for alectrosystems.com.


