If you’re looking for a way to prevent brute-force attacks against your login pages, automated sign-ups through your registration forms, or automated spam in your blog commenting system, then look no further! In this article, I’ll guide you through the basics of creating and integrating a security image like those found on the sign-up pages of many mainstream sites.
A security image is a visual representation of a number of random characters that can be easily read by humans, but is difficult for a computer program to interpret. If you integrate such an image into your form, ask your site visitors to enter into a separate input box the letters they see in the image, and compare the two, you can easily distinguish humans from machines.
Server Requirements
This project requires that you have a Web server with PHP and the GD library installed, so make sure your hosting environment supports these packages if you want to try out this tutorial. The example we’ll discuss writes GIF images, but you could easily substitute the relevant functions to output JPEG or PNG images instead, if that’s all your hosting environment supports.
Creating a Reusable Security Image Class
To begin, we’ll create a reusable PHP class that we can use to generate security images; we’ll finish up with a simple login screen that demonstrates the use of this class.
Our class will need to perform a number of tasks to generate a suitable security image. It will need to:
- Create a blank image with a white background.
- Add some random background noise to the image. This will help to confuse automated processes that try to use character recognition algorithms to identify the characters within the image.
- Write out a specified number of random characters using random font selection for each character.
- Write the image to the user’s browser. For added flexibility, our class will also provide the option to write the image to a file, although this isn’t a core requirement of this example.
Here’s the skeleton of our security image class:
class SecurityImage {

      var $oImage;

      var $iWidth;

      var $iHeight;

      var $iNumChars;

      var $iNumLines;

      var $iSpacing;

      var $sCode;


      function SecurityImage(

         $iWidth = 150,

         $iHeight = 30,

         $iNumChars = 5,

         $iNumLines = 30

      ) {


      }


      function DrawLines() {


      }


      function GenerateCode() {


      }


      function DrawCharacters() {


      }


      function Create($sFilename = '') {


      }


      function GetCode() {


      }

   }
Here, we’ve defined a few class properties; these will hold important information that we’ll use when we generate our image. The class constructor will take four parameters, allowing us to change the appearance of the generated image. Specifically, we can choose the overall width and height of the image, the number of characters we want the image to display, and the number of background lines (or the amount of noise) to draw.
Coding the Constructor
The constructor will create the blank image, assign parameters to class properties and define the background colour of our image. Let’s add that code now:
function SecurityImage(

   $iWidth = 150,

   $iHeight = 30,

   $iNumChars = 5,

   $iNumLines = 30

) {

   // get parameters

   $this->iWidth = $iWidth;

   $this->iHeight = $iHeight;

   $this->iNumChars = $iNumChars;

   $this->iNumLines = $iNumLines;


   // create new image

   $this->oImage = imagecreate($iWidth, $iHeight);


   // allocate white background colour

   imagecolorallocate($this->oImage, 255, 255, 255);


   // calculate spacing between characters based on width of image

   $this->iSpacing = (int)($this->iWidth / $this->iNumChars);

}
The last line calculates a value for the spacing to include between characters, based on the number of characters it needs to generate, and the image width we specified.
Making some Noise
Next, we’ll add code to create background noise (the lines). We add the lines first, because we want the characters to sit above them in the image, ensuring that the characters can be read by human users.
function DrawLines() {

   for ($i = 0; $i < $this->iNumLines; $i++) {

      $iRandColour = rand(190, 250);

      $iLineColour = imagecolorallocate($this->oImage, $iRandColour, $iRandColour, $iRandColour);

      imageline($this->oImage, rand(0, $this->iWidth), rand(0, $this->iHeight), rand(0, $this->iWidth), rand(0, $this->iHeight), $iLineColour);

   }

}
As the code loops, it creates lines of random lengths in random positions. Each line is drawn with a random grey scale selected from a RGB range. I have chosen a range of 190-250 to sufficiently obscure the characters from any automated process that might try to interpret them, while at the same time offering enough contrast to make them easily readable without squinting! You’ll see below that we’ve chosen a darker grey scale range to write out the characters. You can increase or decrease the number of lines drawn — and, therefore, the noise generated — by passing a higher or lower value to the lines parameter of the class constructor.
On to the Characters
The code to generate the characters is split between two methods. The first, GenerateCode, generates the code, while the second, DrawCharacters, writes it to the image.
function GenerateCode() {

   // reset code

   $this->sCode = '';


   // loop through and generate the code letter by letter

   for ($i = 0; $i < $this->iNumChars; $i++) {

      // select random character and add to code string

      $this->sCode .= chr(rand(65, 90));

   }

}
The GenerateCode method starts by clearing the $this->sCode variable, to prevent any saved characters that were generated previously from confusing our current image generation work.
Then, the method loops until it has selected the number of random characters requested in the class constructor. On each iteration of the loop, it appends the selected character to the $this->sCode variable.
Upper case characters are picked from ASCII character codes in the range 65 to 90. We use the rand function to select a number within this range, then pass it to the chr function to convert it into a readable character for display.
I’ve stuck to upper case characters because their ASCII codes are a continuous set of numbers; this makes it easier to pick a character at random. Including lower case characters or numbers would add an extra level of complexity to the character selection process. However, if you wanted to take this step, you could statically declare an array of characters to use, then choose a random number to act as an array index for character selection. The following code illustrates this point:
// characters to use

$aChars = array('A', 'B', 'C', '3', 'g');


// get number of characters

$iTotal = count($aChars) - 1;


// get random index

$iIndex = rand(0, $iTotal);


// selected character

$this->sCode .= $aChars[$iIndex];
This code would replace the following line in the GenerateCode method:
// select random character

$this->sCode .= chr(rand(65, 90));
Having generated this code, we call DrawCharacters to write the selected characters to the image.
function DrawCharacters() {

   // loop through and write out selected number of characters

   for ($i = 0; $i < strlen($this->sCode); $i++) {

      // select random font

      $iCurrentFont = rand(1, 5);


      // select random greyscale colour

      $iRandColour = rand(0, 128);

      $iTextColour = imagecolorallocate($this->oImage, $iRandColour, $iRandColour, $iRandColour);


      // write text to image

      imagestring($this->oImage, $iCurrentFont, $this->iSpacing / 3 + $i * $this->iSpacing, ($this->iHeight - imagefontheight($iCurrentFont)) / 2, $this->sCode[$i], $iTextColour);

   }

}
With each iteration of the loop, the DrawCharacters method selects a random font from the five built into the GD library. They’re simply numbered 1 to 5. We could have used FreeType or TrueType fonts, but this would have meant that, for this example to work, we’d have to worry about the locations of the required font files. I’ll leave adding support for those fonts as an exercise for you!
In the next section, a random grey scale from an RGB range of 0 to 128 is selected. As previously mentioned, this is darker than the range we used two draw the background lines, ensuring that our image displays enough contrast to maintain its readability. You may want to tinker with these ranges to obtain what you feel is the best trade-off between obscurity and readability.
Finally, the character is written to the image. You’ll notice that we’re treating the $this->sCode string as an array, which enables us to select each character in turn.
The three methods we’ve created so far — DrawLines, GenerateCode and DrawCharacters — are private. Any code that calls the class won’t use them directly, but, instead, uses them through a public wrapper method. In PHP 4, there’s no way to mark a method as private, so we’ll just have to hope that anyone who calls the class is well-behaved and uses the wrapper function we’ve provided.
We better create that wrapper quickly! It’s imaginatively called Create:
function Create($sFilename = '') {

   // check for existence of GD GIF library

   if (!function_exists('imagegif')) {

      return false;

   }


   $this->DrawLines();

   $this->GenerateCode();

   $this->DrawCharacters();


   // write out image to file or browser

   if ($sFilename != '') {

      // write stream to file

      imagegif($this->oImage, $sFilename);

   } else {

      // tell browser that data is gif

      header('Content-type: image/gif');


      // write stream to browser

      imagegif($this->oImage);

   }


   // free memory used in creating image

   imagedestroy($this->oImage);


   return true;

}
It starts by checking for existence of the imagegif function, and therefore, by implication, the GD library. If it doesn’t find it, the function exits and returns straight away — after all, there’s no point continuing if the image generation functions don’t exist.
Assuming the function gets past this check safely, DrawLines, GenerateCode and DrawCharacters are called to carry out those all-important functions.
Next, the image is created with imagegif, and saved to a file, or, in the case of our example, written to the user’s browser. The final step frees memory used by the process.
We’ve only got one more tiny method to flesh out, and our class will be complete! GetCode simply returns a textual representation of the random characters generated and, as mentioned above, allows us to compare those characters with user-entered input. Here it is, short and sweet:
function GetCode() {

   return $this->sCode;

}
Putting the Class to Use
It’s time to implement this solution in a real application. We’re going to create a simple login form that prompts users to enter their usernames and passwords, but additionally displays our security image and asks them to type the characters they see. We will assign a textual representation of the code displayed by the image to a PHP session variable. When the users submit the form, we’ll compare the code they entered with the characters stored in our session variable. If they match, we’ll show the users a suitably congratulatory message. If the character strings don’t match, we’ll let the users know, and provide them with a link to go back and try again. For the purposes of this example, we won’t worry about what they enter in the username and password fields of our form.
And all the code that we’ll discuss in this section is included in this downloadable code archive.
Creating a Wrapper Page
First, we’ll create a page (security-image.php, which can be found in the code archive) that will call the new class and pass any required parameters.
This page starts by including the file (security-image.inc.php, which is contained in the code archive) that contains the SecurityImage class. Next, we call session_start. Any PHP page that makes use of sessions needs to call this before any other output is sent to the browser. It creates a new session, or resumes an existing one.
We then pick up any GET variables passed to the page, and assign them to relevant variables. If a GET variable doesn’t exist for a specific option variable, we assign a default. We then call the SecurityImage constructor, passing our preferences, to create a new instance of the class.
Next, the Create method is called. If this returns successfully, we assign the corresponding textual code of the generated image to our session variable. If it’s not successful, we return a suitable error message instead:
<?php

   // include security image class

   require('includes/security-image.inc.php');


   // start PHP session

   session_start();


   // get parameters

   isset($_GET['width']) ? $iWidth = (int)$_GET['width'] : $iWidth = 150;

   isset($_GET['height']) ? $iHeight = (int)$_GET['height'] : $iHeight = 30;


   // create new image

   $oSecurityImage = new SecurityImage($iWidth, $iHeight);

   if ($oSecurityImage->Create()) {

      // assign corresponding code to session variable

      // for checking against user entered value

      $_SESSION['code'] = $oSecurityImage->GetCode();

   } else {

      echo 'Image GIF library is not installed.';

   }

?>
The page, which outputs an image direct to the browser, will be called from an HTML image tag in our next page, which displays our login form.
Creating the Login Page
The login page submits to itself and serves the dual purpose of displaying the form and the two possible result messages.
As an added bonus, our form is coded semantically using CSS. There’s not a table or break tag in sight!
<?php

  // start PHP session

  session_start();

?>

<!DOCTYPE html PUBLIC "-//W3C//DTD XHTML 1.0 Strict//EN" "https://www.w3.org/TR/xhtml1/DTD/xhtml1-strict.dtd">

<html xmlns="https://www.w3.org/1999/xhtml" xml:lang="en" lang="en">


<head>

  <title>Security Image Test</title>

  <meta http-equiv="Content-Type" content="text/html; charset=ISO-8859-1" />

  <style type="text/css">

     form { width: 18em; }

     fieldset { display: block; float: left; }

     legend { font-size: 1.2em; font-weight: bold; color: #000; }

     #security img { float: right; border: 1px solid #000; }

     label, input, #security img { margin: 5px 0; }

     input, #login { float: right; }

     label, #login { clear: both; }

     label { float: left; width: 7em; }

     #login { margin-top: 5px; }

  </style>

</head>


<body>

  <?php

     // check for posted form

     if (isset($_POST['login'])) {

        // see if the code the user typed matched the generated code

        if (!empty($_SESSION['code']) && strtoupper($_POST['code']) == $_SESSION['code']) {

           unset($_SESSION['code']);

           echo 'Congratulations, you entered the correct code.';

        } else {

           echo 'You have entered the wrong code. Please <a href="index.php">try again</a>.';

        }

     } else {

  ?>

  <form method="post" action="index.php">

     <fieldset>

        <legend>Login</legend>

        <label for="username">Username:</label><input type="text" name="username" id="username" value="" />

        <label for="password">Password:</label><input type="password" name="password" id="password" value="" />

        <div id="security"><img src="security-image.php?width=144" width="144" height="30" alt="Security Image" /></div>

        <label for="code">Security Image:</label><input type="text" name="code" id="code" value="" />

        <input type="submit" name="login" id="login" value="Login" />

     </fieldset>

  </form>

  <?php

     }

  ?>

</body>


</html>
The page starts by calling the session_start function.
Next the HTML header and the CSS that defines the visual representation of the form are written; a check for form submission follows. If the form has been submitted, the user-entered code is checked against the saved version, and the appropriate message is displayed. If the form hasn’t been submitted, the form is displayed. As we can’t be sure that our user will enter the code using only upper case characters, strtoupper is used to convert their input before the comparison is made.
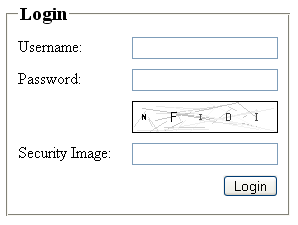
The Finished Form
You can see a screen shot of our finished form complete with security image below:
With that, we’ve completed our Security Image implementation! Take a well-earned coffee break and ponder on the possibilities for integrating this example into your forms.
You can find out more about the PHP GD functions at PHP.net.
Frequently Asked Questions (FAQs) about Form Security with Images in PHP
How can I implement form security with images in PHP?
Implementing form security with images in PHP involves creating a CAPTCHA system. This system generates an image with random characters that the user must input correctly to submit the form. This helps to prevent spam and bot submissions. You can use PHP’s GD library to create the image and session variables to store the generated string for comparison with the user’s input.
What is the GD library in PHP?
The GD library is a graphics design used to create and manipulate image files in a variety of different image formats, including GIF, PNG, JPEG, WBMP, and XPM. It provides functions for drawing lines, arcs, circles, and text to be used on the image.
How can I install the GD library in PHP?
The GD library is included with PHP, but you may need to enable it in your php.ini file. You can do this by removing the semicolon (;) before the extension=php_gd2.dll line. After making this change, you’ll need to restart your web server for the changes to take effect.
How can I generate a random string in PHP?
You can generate a random string in PHP using a combination of the rand() function and the chr() function. The rand() function generates a random number, and the chr() function converts this number into a character. You can use a loop to generate a string of a specific length.
How can I compare the user’s input with the generated string in PHP?
You can compare the user’s input with the generated string using the strcmp() function. This function compares two strings and returns 0 if they are equal. If they are not equal, it returns a negative or positive number.
How can I display an error message if the user’s input doesn’t match the generated string?
You can display an error message using the echo statement. If the strcmp() function doesn’t return 0, you can use echo to display a message to the user.
How can I prevent the form from being submitted if the user’s input doesn’t match the generated string?
You can prevent the form from being submitted using the die() function. If the strcmp() function doesn’t return 0, you can call the die() function to stop the script execution.
How can I refresh the CAPTCHA image if the user’s input doesn’t match the generated string?
You can refresh the CAPTCHA image by reloading the page. You can do this using the header() function to redirect the user to the same page.
How can I make the CAPTCHA image more difficult to read for bots?
You can make the CAPTCHA image more difficult to read for bots by adding noise to the image. This can be done by drawing random lines and dots on the image.
How can I improve the accessibility of the CAPTCHA system for visually impaired users?
You can improve the accessibility of the CAPTCHA system by providing an audio alternative. This can be done by generating a random string of numbers and using a text-to-speech library to convert this string into an audio file.
 Edward Eliot
Edward is a Web Developer for Yahoo! Europe and a Zend Certified Engineer based in London, UK. When not online he enjoys traveling, running and walking. Visit Edward online at www.ejeliot.com.