Step-by-Step Jakarta Tapestry
The Jakarta Tapestry framework is a hidden treasure of Java web development. It greatly simplifies the work of both web designers and developers. It offers significant convenience by transparently handling much of the boring “plumbing”. It even changes the paradigm of web development (at least in terms of the presentation tier) to one that is more natural.
Yet Tapestry remains more or less unknown to a great majority of web developers, for numerous reasons. The most obvious is Tapestry’s legendary “steep learning curve” which, in my opinion, is more myth than reality: Tapestry is in fact easier to learn and use than are many other frameworks. Yes, internally Tapestry is more complex than its predecessors, in the same way that a contemporary camcorder is much more complex than those mechanical devices that our grandfathers used to produce their amateur movies. But is a camcorder more difficult to use? No, it is much, much easier (believe me — I’ve tried both types of devices).
All right, enough brainwashing, let’s jump straight in! By the end of this tutorial, you’ll be able to decide for yourself just how easy Tapestry is to use. We won’t be creating the traditional ‘Hello World’ web application here — that really would be too trivial with Tapestry. We’ll start with something more realistic: a login form.
On our way to unraveling the wonders of Tapestry, we need to pass through a kind of purgatory — the process of creating of a working, Tapestry-ready configuration on our computers. This is more or less standard practice for Java web development, so we’ll make it as simple as possible.
If you’ve ever tried any kind of Java Web development — using servlets, JSP or Struts — chances are that you’ll already have most of the necessary components on your machine. But if not, don’t worry: we’ll install everything very quickly and easily. In fact, the installation is mostly about downloading and unpacking ready-to-use pieces of software.
Requirements
We’ll need the following:
- Java Development Kit (JDK)
- Tomcat Web server
- Eclipse Integrated Development Environment (IDE)
- Spindle plugin for Eclipse IDE
- Tapestry-specific libraries
If you already have some of these components installed on your computer, just skip the appropriate part of the instructions that follow.
Although Tapestry 4 has just been released, we’ll start from the third version of the framework. Many concepts of Tapestry development are more or less the same in both versions — especially from a beginner’s viewpoint. Additionally, Spindle, a very convenient and helpful tool for Tapestry development, is currently only available for Tapestry 3.
What we are going to do now may not seem very exciting, but we need to do this just once. Some of the following instructions are platform-specific — choose whichever are appropriate for you.
Installing the JDK
If you’ve ever tried your hand at Java development, you’ll already have a JDK installed on your computer. It comes pre-installed with the latest versions of Mac OS X. To verify whether you have it or not, try the following.
In Windows, choose Start > Run…, then type cmd and press the OK button. In Linux or Mac OS X, simply open a terminal window.
Enter the following command at the prompt:
javacPress Enter. If your computer has a JDK installed and configured, you will see more than a dozen lines of output, beginning with the following:
Usage: javac <options> <source files>

where possible options include:

  -g                        Generate all debugging info

... more lines of output ...
If your computer didn’t recognize the command, you’ll need to install a JDK. You could install either the latest version, JDK 5.0, or the previous one, JDK 1.4.2. Both are fine for the purposes of this tutorial. Let’s assume that you’re going to install the most recent version.
1. Download the JDK
For Windows and Linux: download the recent version of JDK 5.0 (at the time of writing, it’s JDK 5.0 Update 6). Please note: you will need the JDK, not the JRE!
Some advice for Linux users: whichever distribution you use, you might wish to download the Linux self-extracting file (jdk-1_5_0_06-linux-i586.bin), not the Linux RPM self-extracting file (jdk-1_5_0_06-linux-i586-rpm.bin). In some cases, the former is easier to install and configure.
For Mac OS X: You may not need to download anything, as you probably already have something like the JDK 1.4.2_09 installed on your computer. If you want the new version of the JDK, download it here. However, be warned that changing the default version of the JDK in Mac OS X is not a trivial task, so for the purposes of this tutorial, you might want to stick to the pre-installed JDK 1.4.2.
To better understand the problems running Java 5 on Mac OS X, refer to this discussion at the Javaranch.com forum.
2. Install the JDK
With Windows and Mac OS X versions, you aren’t given many choices; just launch the executable file you’ve downloaded, and follow the instructions.
In Linux, you’ll need to change permissions for the downloaded file in order to be able to execute it:
chmod +x jdk-1_5_0_06-linux-i586-rpm.binThen, execute it:
./jdk-1_5_0_06-linux-i586-rpm.binOnce you agree to the terms and conditions that are shown to you, the file will unpack itself. Move the resulting directory, jdk1.5.0_06, to the location where you want it to live (e.g. to /usr/java).
Now, you need to add the bin subdirectory (say, /usr/java/jdk1.5.0_06/bin) to the PATH of your machine. One way you can accomplish this under Linux is to add the following two lines to your .bashrc file (if you use bash, of course):
PATH=/usr/java/jdk1.5.0_06/bin:$PATH

export PATH
That’s it! If you followed these instructions correctly, you should have the JDK installed.
Installing Tomcat
Strictly speaking, Tomcat is much more than a web server — it’s what’s referred to as a servlet container, which works as a gateway between the world of Web and the world of Java. But it has a decent web server in it too, at least for development purposes. Installing Tomcat is very easy, but we do need to configure an environment variable afterwards.
1. Download Tomcat
This step is common for all the platforms, as Tomcat is a Java program! Go to http://tomcat.apache.org. If you’ve got JDK 5, choose the latest stable version of Tomcat (at the time of writing, this is 5.5.12), otherwise download Tomcat 5.0.28 — for our purposes it will work exactly the same.
2. Unpack Tomcat
Unpack the downloaded package into a directory of your choice. This might be c:apache-tomcat-5.5.12 on a Windows computer, something like /home/alex/apache-tomcat-5.5.12 under Linux, or /Users/alex/jakarta-tomcat-5.5.12 under Mac OS X. The installer wizard for Windows makes this process even easier.
3. Set the JAVA_HOME Environment Variable
This environment variable should point to the directory into which you’ve placed your JDK. Since we’re dealing with the computer’s operating system at this point, the following instructions are platform-specific.
Windows XP
Your JDK may have been installed automatically, but it’s not difficult to find out where it was installed. It most probably lives in the C:Program FilesJava directory, so your environment variable should point to something like this:
C:Program FilesJavajdk1.5.0_06To set the variable, right-click on My Computer and select Properties. In the dialog that opens, choose the Advanced tab, then click the Environment Variables button at the bottom.
The System Variables are listed in the lower portion of the window (see Fig. 1). If you don’t see JAVA_HOME there, create it by pressing the New button, otherwise edit it as needed by pressing the Edit button.
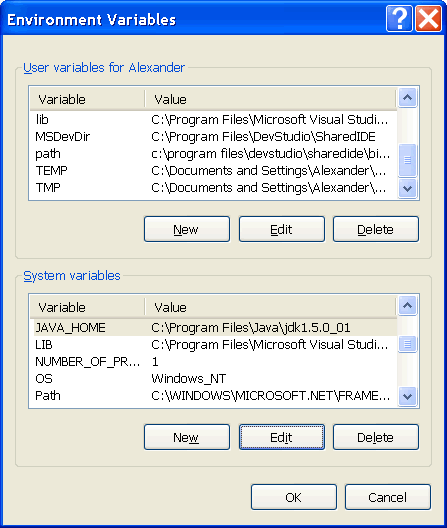
Fig.1. Setting JAVA_HOME in Windows XP
Linux
If you installed the JDK as described above, you’ll know where it is. Otherwise, you might need to find it using the following command:
which javaThis will display something similar to this:
/usr/java/jdk1.5.0_06/bin/javaYour JAVA_HOME should therefore point to /usr/java/jdk1.5.0_06.
There are several places where you can set an environment variable in Linux. My preferred option is to edit the .bashrc file, adding the following line:
export JAVA_HOME=/usr/java/jdk1.5.0_06Mac OS X
The Mac OSX process is mostly the same as the one we used for Linux, the difference being that finding the location at which your JDK is installed is more difficult on Mac. To find out, type:
which javaThis will give you something like:
/usr/bin/javaIn this case, your JAVA_HOME should point to /usr.
To set the variable, edit your .bash_profile file and add to it the following line:
export JAVA_HOME=/usr4. Test it!
To test whether or not your installation of Tomcat really works, go to the bin subdirectory of the directory where you installed Tomcat. In other words, if you’ve installed Tomcat into c:apache-tomcat-5.5.12, go to c:apache-tomcat-5.5.12bin.
There, you’ll find the following scripts: startup.sh and shutdown.sh (for Linux and MacOS X usage) and startup.bat and shutdown.bat (for Windows).
Note that on a Linux or Mac OS X machine you may need to change the permissions of all the .sh scripts in this directory in order to be able to execute them, but that’s easy:
chmod +x *.shTo start Tomcat, launch startup.sh or startup.bat (depending on your platform), wait a few seconds, then navigate your web browser to http://localhost:8080. If everything’s functioning correctly, you’ll see a page similar to Fig.2.
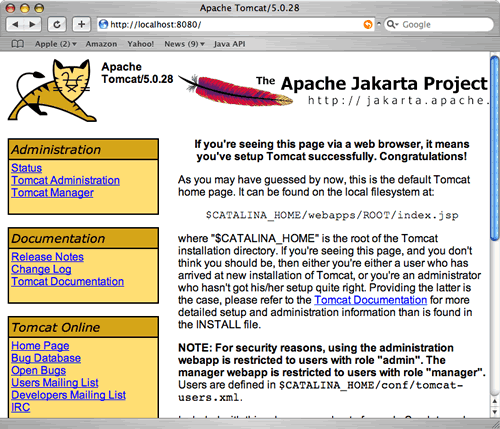
Fig.2. If you see this page, your Tomcat was installed successfully.
In the world of networking, localhost refers to your own computer, when it’s referred to as a server. When you navigate to localhost:8080, you are actually asking your computer if anybody is listening on port 8080 (ports on your computer are like telephone extensions inside your office). And this is where Tomcat is listening, by default, so it shows its face.
To stop Tomcat when you don’t need it any more, use the shutdown.sh or shutdown.bat scripts. If you used the Windows Tomcat installer, you’ll also have a handy little monitoring tool that sits in your task bar. You can use this to start and stop the server.
Installing Eclipse
An efficient and convenient IDE greatly enhances a developer’s productivity, and when it comes to Tapestry development, the natural choice of IDE is Eclipse, primarily because the Spindle plug-in we’re going to use only exists for Eclipse, but also, of course, because the Eclipse is a superb IDE!
Installing Eclipse is very simple. Go to the Eclipse downloads page and download the version that suits you, for example eclipse-SDK-3.1.1-win32.zip for Windows, eclipse-SDK-3.1.1-macosx-carbon.tar.gz for Mac OS X, or eclipse-SDK-3.1.1-linux-gtk.tar.gz for Linux. Unpack the download to the directory of your choice, e.g. c:eclipse or /Users/alex/eclipse.
You can start the IDE by launching Eclipse.app in Mac OS X, eclipse.exe in Windows, or by typing eclipse in Linux. When you start Eclipse for the first time, you’ll be asked to choose your workspace — the directory in which all your Eclipse projects will be stored. You can choose either the default directory, or a different one.
That’s it! Now we’ve got the JDK, Tomcat and Eclipse, all of which are prerequisites for general Java Web development. Now, we’re going to enrich our work environment with a few Tapestry-specific components.
Installing Spindle
This Eclipse plug-in greatly simplifies Tapestry development, and it’s quite easy to install.
Open your Eclipse IDE. Choose Help > Software Updates > Find and Install…
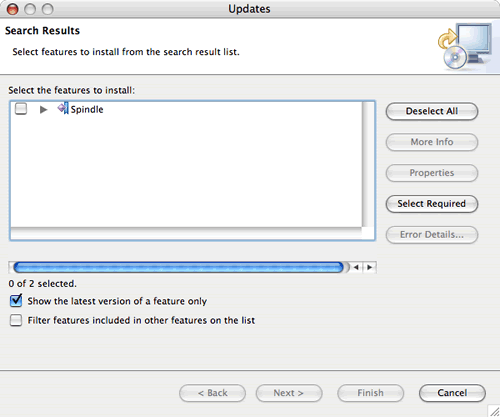
Figure 3. Selecting to install Spindle
In the dialog that appears, select Search for new features to install and press Next. In the next window, press the New Remote Site… button. Enter Spindle for the Name and http://spindle.sf.net/updates for the URL, then press OK and Finish. You will be prompted to select a mirror; select the closest location to you and press OK.
Eclipse will search for the plug-in and show you the result, as shown in Figure 3 above. Select Spindle and press Next.
In the next dialog, accept the terms in the license agreement and press Next. Finally, press Finish. Eclipse will download everything it needs to install Spindle (this could take half an hour or more, depending on your connection). It will then ask you to verify that you really want to install ‘an unsigned feature’ (see Fig.4).
Choose Install All and, when the installation completes, agree to restart your workbench.
Great! Now your IDE is ready for Tapestry development. The very last step we need to take is to download all the libraries that Tomcat needs to run a Tapestry Web application, and place them in an appropriate location.
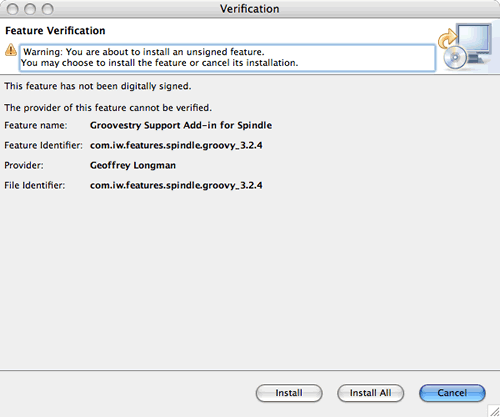
Figure 4. Installing Spindle: Verification Stage.
Downloading Tapestry and Other Libraries
Tapestry 3 itself comes in two .jar files: tapestry-3.0.3.jar and tapestry-contrib-3.0.3.jar. But it also relies on other libraries, some of which are included in its distribution, while others need to be downloaded separately. The easiest way to get all the necessary libraries is to download the tapestry_libs.zip archive that I have created for you.
Unpack all the contents of this archive into the shared/lib directory under your Tomcat installation. It can be, say, c:apache-tomcat-5.5.12sharedlib on a Windows machine or /Users/alex/jakarta-tomcat-5.5.12/shared/lib on Mac OS X.
Whew, we’ve done it! We’re now ready to unleash the magic of Tapestry.
Our First Tapestry Web Application
First, let’s visualize what we’re going to create. Our first Tapestry application will be quite simple — though still useful — and will have two pages. The first page will display a login form: just a standard form that ask for a username and a password. The second page will greet visitors using their login names — that is, if they successfully pass authentication. If the login/password combination is wrong, the login page will be redisplayed again.
Figure 5 shows what both pages should look like when completed. For simplicity, I haven’t used any styles here, but you can apply your creativity to create a design of your own.
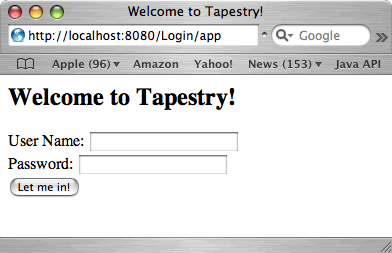
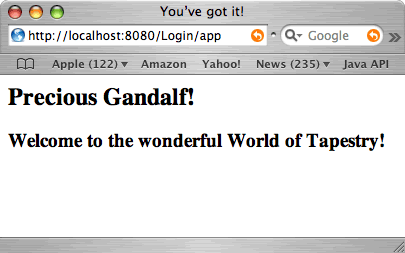
Figure 5. This is how the completed pages of our application will look.
In fact, it makes sense to begin the development of your Tapestry application by first creating the HTML ‘mockups’ — prototypes of your future pages that show exactly how they’ll look in a working application.
You can exercise all your creative skills to the full when creating mockups or, if you’re the manager or client of a good design team, tell your designers not to limit their imagination. You’re not going to spoil their efforts by inserting ugly tags or mixing carefully crafted design with an unintelligible mix of HTML and code. As you’ll soon see, Tapestry treats page design with great care.
Here’s the HTML code for my page mockups:
Page 1:
<!DOCTYPE HTML PUBLIC "-//W3C//DTD HTML 4.01//EN"

    "https://www.w3.org/TR/html4/strict.dtd">

<html>

<head>

  <title>Welcome to Tapestry!</title>

</head>

<body>

  <h2>Welcome to Tapestry!</h2>

  <form action="">

    <p>User Name: <input type="text"/><br/>

        Password: <input type="password"/><br/>

        <input type="submit" value="Let me in!"/></p>

  </form>

</body>

</html>
Page 2:
<!DOCTYPE HTML PUBLIC "-//W3C//DTD HTML 4.01//EN"

    "https://www.w3.org/TR/html4/strict.dtd">

<head>

  <title>You've got it!</title>

</head>

<body>

  <h2>Precious User!</h2>

  <h3>Welcome to the wonderful World of Tapestry!</h3>

</body>

</html>
Now that we have our mockups ready, let’s create our first Tapestry project.
Creating a Tapestry Project
Fire up Eclipse (but not Tomcat yet). To create a new Tapestry project, choose File > New > Other… and, under the Tapestry node, choose Tapestry Web project, as shown in Fig. 6. Then press Next.
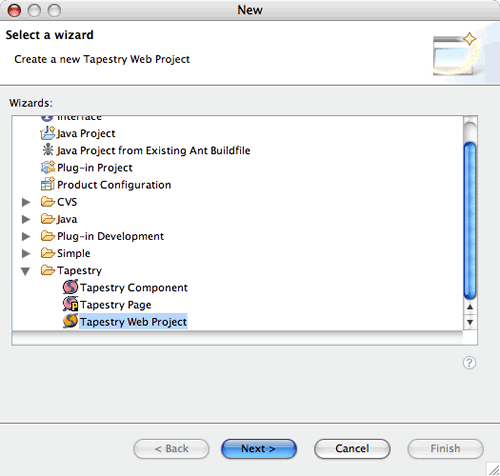
Figure 6. Choosing a Tapestry Web Project
Name the project, say, ‘Login’, and check the box Include the Tapestry redirect filter in web.xml (see Fig.7).
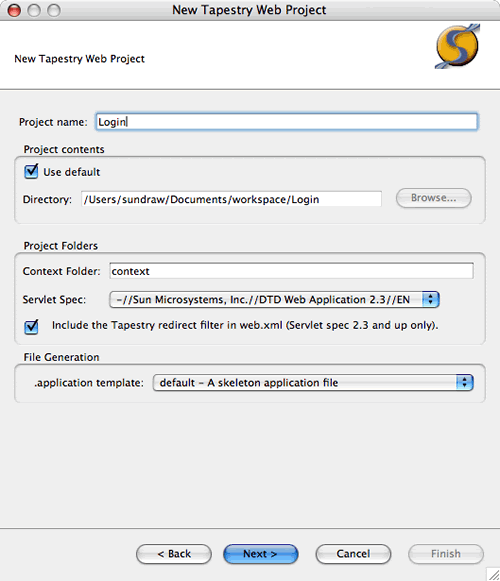
Fig. 7. Naming the project
Press Next, and in the next window click Finish. You’ll see the structure of your new application, as shown in Fig.8.
General Structure of a Java Web Application
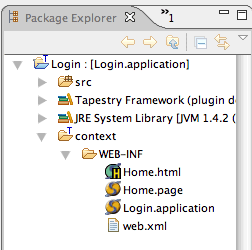
Fig. 8. The Structure of a New Tapestry Project
If you don’t have any experience with Java web development, you might benefit from a brief overview of the standard structure of Java web application. This structure is common to all frameworks based on servlets, including JSP, Struts, Tapestry and virtually everything that exists in the Java web world.
A simplified version of this structure is shown in Fig. 9. The whole application is contained within one directory, which is given the name of the application. We’ve labeled this top-level directory AppName in the diagram.
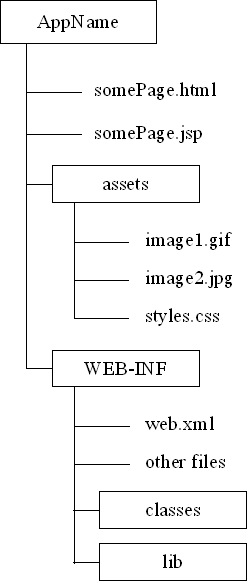
Fig. 9. The Generic Structure of a Java Web Application
Directly under AppName live those resources that are directly accessible by the outside world, via the Web. This includes HTML pages, JSP pages, CSS files, images and any other resources that might be needed for the external part of the application. I use the term “external” because if you have, say, a page named MyPage.html that’s stored directly under the AppName directory on your www.myserver.com server, web users can see that page by pointing their browsers to http://www.myserver.com/AppName/MyPage.html.
Images and style sheets are often put into a subdirectory — in this case, one named assets. Grouping content like this helps to keep things neat; this subdirectory will be also accessible to everyone.
You’ll notice a (particularly important) subdirectory named WEB-INF. It should be named exactly like this — not web-inf or Web-Inf — otherwise your Web application won’t work. This is the inner sanctum of a Java Web application: nothing that goes inside this directory will be exposed directly to the outer world (i.e. to the Web).
There’s an important file inside WEB-INF named web.xml. It has the same name in all Java web applications, and is the deployment descriptor. The purpose of this file is to tell Tomcat some general, important information about the application.
There are also two subdirectories under WEB-INF, named classes and lib. All the compiled Java classes that make up the application go into the classes subdirectory, and all the libraries that are used by the application go into the lib directory — simple! Many other files serving different purposes can be kept under WEB-INF and in its subdirectories, but this is the standard structure.
Now, let’s see how this arrangement maps to the structure of our first Tapestry application, created for us by Eclipse (together with Spindle).
The Structure of our Web Application
You can see that the top level directory of our application is named Login — the name that we gave to the application.
The src subdirectory was created for our convenience. This is where the source code of all our Java classes will be stored. Below it, you’ll see two library references: Tapestry Framework and JRE System Library. Eclipse displays them here to indicate that we have them at our disposal for this project. There’s also a context subdirectory. All of our application’s files — everything that was listed directly under AppName in Figure 9 — are stored in the context subdirectory. We don’t have any static HTML pages here right now, but we might do later. We would also keep any images or style sheets here if we had them. Right now, we see just the sacred WEB-INF file.
In WEB-INF you’ll see the deployment descriptor, web.xml. We won’t explore it just yet, though.
We haven’t created any Java classes, nor have we used any libraries, so no classes or lib subdirectories are displayed just yet.
There is also a Login.application file that contains application-wide configuration. Right now, we’ll just leave it as it is, but later, when we make some changes to it, we’ll discuss the contents of this file.
Now we come to the most interesting part of the process: creating Tapestry pages.
Creating the Home Page
You’ll notice that Spindle has created two more files for us: Home.html and Home.page. A page named Home is the default page for a Tapestry application, very much like index.html is the default page for a Website’s directory. If no page is specified in a request from the client, Tapestry will show the Home page.
We’ll put our login form on this page. Let’s see what sort of HTML Spindle has created for us. Double-click the Home.html file to open it in the editor:
<html>

<head>


</head>


<body>


</body>

</html>
This is just an empty stub for a HTML page. Let’s replace it with our mockup for the first page. We’ll add a doctype, a title and a simple form to the body.
<!DOCTYPE HTML PUBLIC "-//W3C//DTD HTML 4.01//EN"

    "https://www.w3.org/TR/html4/strict.dtd">

<html>

<head>

  <title>Welcome to Tapestry!</title>

</head>

<body>

  <h2>Welcome to Tapestry!</h2>

  <form action="">

    <p>User Name: <input type="text"/><br/>

        Password: <input type="password"/><br/>

        <input type="submit" value="Let me in!"/></p>

  </form>

</body>

</html>
Let’s say we’ve just received this carefully crafted HTML page from our design team. It’s time to apply our knowledge of Tapestry and convert the mockup into the real thing — an HTML template for a Tapestry page! Here’s the end result of such a conversion:
<!DOCTYPE HTML PUBLIC "-//W3C//DTD HTML 4.01//EN"

    "https://www.w3.org/TR/html4/strict.dtd">

<html>

<head>

  <title>Welcome to Tapestry!</title>

</head>

<body>

  <h2>Welcome to Tapestry!</h2>

  <form action="" jwcid="loginForm">

    <p>User Name: <input type="text" jwcid="uname" /><br/>

        Password: <input type="password" jwcid="password" /><br/>

      <input type="submit" value="Let me in!"/></p>

  </form>

</body>

</html>
Of course, your eagle eye has spotted the changes we’ve made, but will your web browser notice them? Open the original mockup in a browser of your choice, then open the converted version and check if there are any differences. There aren’t. Because those strange jwcid attributes mean nothing to a web browser from a rendering perspective, it just ignores them.
You might be interested to know that jwcid means “Java Web Component ID”, and these jwcid attributes are our way of telling Tapestry, “We want to apply some magic here. Please turn these standard HTML elements into dynamic Tapestry components.” As a result, the standard HTML element <form> will become a Tapestry component, as will the two standard <input> elements.
By the way, the names that you assign to jwcid attributes are, more or less, arbitrary. If you like, you can give them name them like jwcid="bilbo" or jwcid="FrodoBaggins". But don’t try something like jwcid="%@^&*", the language of Mordor won’t work here. I recommend you use something indicative of the type of data the file represents.
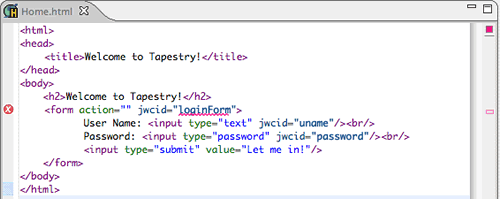
Fig. 10. Spindle Has Found an Error
All right, so if the component IDs are arbitrary, how will Tapestry know exactly which of its standard or custom components you want to use in place of the static HTML? You might notice that Spindle isn’t quite happy with our new attributes — it underlines the first of them with a red line and draws a red, crossed circle in the left margin of the editor window (see Figure 10). If you hover your cursor over the underlined word or the red circle, you’ll see this error message:
Tag <form> on line 7 references unknown component id 'loginForm'.Logically, there should be a place where we can specify for Tapestry the details of our design, and there is! This place is called the page specification and for our Home page it is represented by the Home.page file, which was already created for us by Spindle.
Now is the time to discuss the following revelation: Tapestry pages actually consist of three parts:
- an HTML template (Home.html for our first page, for example)
- a page specification (such as
Home.page) - a page class (we’ll call ours
Home.class— see later)
The HTML template defines what our users will see. The page class contains the page’s functionality. And the page specification links the components in the template with the corresponding functionality in the page class. It specifies all the necessary details for these components, and may also contain some other page-specific information.
We’ll return to the three-part nature of Tapestry pages later — and more than once, too — because it’s very important. But right now, let’s create the page specification for our Home page. Double-click the Home.page file in your Package Explorer in Eclipse. This is what you should see:
<?xml version="1.0" encoding="UTF-8"?>

<!DOCTYPE page-specification PUBLIC

  "-//Apache Software Foundation//Tapestry Specification 3.0//EN"

  "http://jakarta.apache.org/tapestry/dtd/Tapestry_3_0.dtd">

<!-- generated by Spindle, http://spindle.sourceforge.net -->


<page-specification class="org.apache.tapestry.html.BasePage">

  <description>add a description</description>

</page-specification>
If you don’t have much experience with XML documents and doctypes, don’t pay too much attention to the first five lines. The first line just states that this is an XML document. The cryptic-looking <!DOCTYPE> tag tells an XML parser how to understand the document that follows.
We’re interested in the information inside the page-specification element, beginning with the attribute class="org.apache.tapestry.html.BasePage".
Remember how I told you that every Tapestry page consists of three parts, one of which is a Java class that contains the page’s functionality? Even if you don’t create a class, a default class exists anyway — the BasePage class referred to by this attribute. Of course, it doesn’t contain any custom functionality, but it still has many default methods that give us access to the infrastructure of Tapestry.
When we decide to create our custom page class, it will always extend this default BasePage class.
Next comes the description element. You can either leave this as it is, or if you are like me and prefer to keep your stuff well organized, go ahead and add a description of the page — something like ‘Login page’.
Inside of the page-specification element, we have to explain to Tapestry what we really meant when we wrote jwcid="uname" etc.
Here, I’ll show you what we’re going to write for our page specification, and explain what it means before we type it into Eclipse. In a moment you’ll see how we can use some handy features of Spindle and Eclipse to write all these specifications in no time at all.
First, we’re going to describe our loginForm component. Its specification will look like this:
<component id="loginForm" type="Form">

  <binding name="listener" expression="listeners.onFormSubmit" />

</component>
You may already have deduced that this piece of XML tells Tapestry: “The jwcid="loginForm" that I inserted into the HTML template will be a standard Tapestry Form component.”
The binding element actually creates a link between the HTML template and the page class. When the name of the binding is listener (there are a few other names available), we’re describing the name of the method on the page class that will be invoked when the form is submitted.
A Tapestry Form’s listener is specified like this:
<binding name="listener" expression="listeners.onFormSubmit"/>The only part of this element that you can change is the actual listener method name, in this case onFormSubmit. You have control over the name of this method, so you could call it onSubmit, or something that was more meaningful to you, if you liked. Let’s stick with onFormSubmit for now; Tapestry will therefore be looking in the page class for a method with the following signature:
public void onFormSubmit(IRequestCycle cycle) {}It will be your responsibility to provide the implementation of such a method. And if you decide to name the listener myGloriousMethod, make sure that you provide a method to Tapestry with the signature:
public void myGloriousMethod(IRequestCycle cycle) {}.Where can you provide such a custom listener method? In a custom page class (we’ll come to that later). Don’t bother for now about that IRequestCycle thing, either — we’ll come to that in a moment. Right now, let’s tell Tapestry how to handle the other two components that we’re yet to specify.
The first is uname, for storing the user name. This is how it should be specified:
<component id="uname" type="TextField">

  <binding name="value" expression="uname"/>

</component>
Here, we’re telling Tapestry that what we marked in the HTML template as jwcid="uname" is actually a standard Tapestry TextField component, and the value obtained from it should be stored in a property uname. Again, this will be a property of our custom page class, but we’ll cover that later. You can actually name this property whatever you like, though it is convenient (and good practice) to give the property the same name as the component’s ID.
The last component on our Home page is password. This is how it should be specified:
<component id="password" type="TextField">

  <binding name="value" expression="password"/>

  <static-binding name="hidden" value="true"/>

</component>
This tells Tapestry that the component we marked as password is also a TextField, that its value should be stored in a property named password, and that its hidden parameter should be set to true.
Because Tapestry doesn’t have a special Password component, the effect of replacing keystrokes with asterisks is achieved by setting the hidden property of a normal TextField component to true, so that the characters are not echoed to the screen.
The difference between <binding> and <static-binding> is that <binding> is evaluated by Tapestry every time the form is rendered or submitted, which is good for unpredictable or variable values (who knows what password a user will enter?). On the other hand, <static-binding> is good for constant values: we want the hidden parameter always to be true; this will be remembered by Tapestry, which won’t evaluate hidden every time, saving precious resources.
Now let’s edit our Home.page file and add to it the component specifications we’ve just discussed. But writing XML by hand is boring and error-prone, so we’re going to rely on Spindle’s help here.
Place your cursor in the line below the <description> tag and press Ctrl + Space. In the Code Assist window that opens, select component (see Fig. 11).
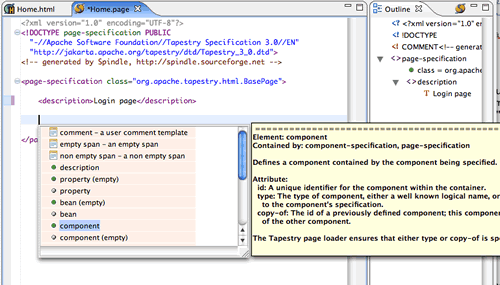
Fig. 11. Writing component specification with the help of Code Assist
Press Enter and you’ll get a stub of a component specification:
<component id="value"></component>Notice that value is already selected for you, so you can enter something to replace it immediately. Enter loginForm. Press Tab, and the cursor will jump to the next place of entry. This feature may not work if you’re constantly switching between your browser and your Eclipse window, so you might want to print this tutorial or arrange your workspace (or, if possible, memorize these few steps) so you can perform this procedure in one go. Press Ctrl + Space again, select type from the list and press Enter. This is how your new specification should look:
<component id="loginForm" type="value"></component>The word value is selected again. Once again, press Ctrl + Space and type the letter ‘f’. You’ll see the names of the components that start with F. Choose Form and press Enter. This is what you’ll see now:
<component id="loginForm" type="Form"></component>Press Tab again to jump to the next entry point, right between the <component ...> and </component> tags, and — you guessed it — press Ctrl + Space. Choose binding (empty) from the list and press Enter. At this stage, your specification will look like this (I pressed Enter another couple of times to format the code nicely; you might want to do the same):
<component id="loginForm" type="Form">

  <binding name="value"/>

</component>
With the word value selected, press Ctrl + Space. Choose listener, press Enter, then Tab and Ctrl + Space again. The only choice in the list will be expression, so choose it by pressing Enter. Finally, enter listeners.onFormSubmit instead of value. That’s it! We’ve completed the specification for our first component.
After you become accustomed to using Code Assist, you’ll see how easy it is to write component specifications.
Now go on and have some practice. Create specifications for the other two components, and check back here when you’re done. The final result of your numerous Ctrl + Space keystrokes should look like this:
<?xml version="1.0" encoding="UTF-8"?>

<!DOCTYPE page-specification PUBLIC

  "-//Apache Software Foundation//Tapestry Specification 3.0//EN"

  "http://jakarta.apache.org/tapestry/dtd/Tapestry_3_0.dtd">

<!-- generated by Spindle, http://spindle.sourceforge.net -->


<page-specification class="org.apache.tapestry.html.BasePage">


  <description>Login page</description>


  <component id="loginForm" type="Form">

    <binding name="listener"

        expression="listeners.onFormSubmit"/>

  </component>

  <component id="uname" type="TextField">

    <binding name="value" expression="uname"/>

  </component>

  <component id="password" type="TextField">

    <binding name="value" expression="password"/>

    <static-binding name="hidden" value="true"/>

  </component>


</page-specification>
We’ve completed the page specification for our Home page, and the Spindle syntax checker should be completely happy with what we have written (i.e. there should be no wavy red lines either in Home.html, nor in Home.page). However, the page won’t work yet. Remember, we promised Tapestry that there would be an onFormSubmit listener and two properties named uname and password in the page class.
Right now, this page uses the default BasePage class, and it doesn’t have any custom methods or properties. To implement our custom logic, we should create our own Java class that will inherit from BasePage.
Creating the Page Class
Right-click (or Ctrl-click on a Mac) in your Package Explorer and choose New > Other…, then, in the Select a wizard dialog, choose Class (see Fig. 12). Press Next.
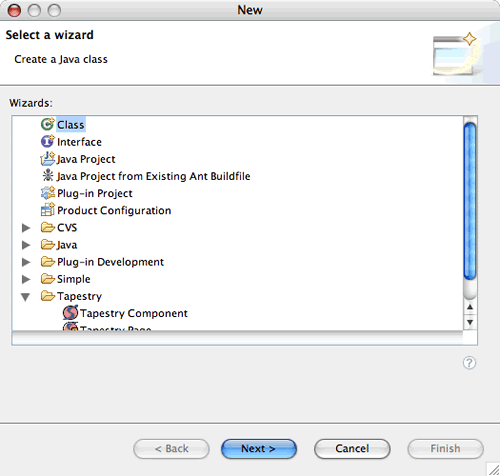
Figure 12. Selecting a Class wizard
In the Java Class dialog enter a package name, for example com.sitepoint.tapestry.login. Enter Home for the name of the new class, and org.apache.tapestry.html.BasePage for the Superclass. Make sure the public static void main(String[] args) checkbox is deselected — we’re not going to run this class as a standalone program. You might find it useful to add automatically generated comments, so select the Generate Comments checkbox. The final result should look like Fig. 13.
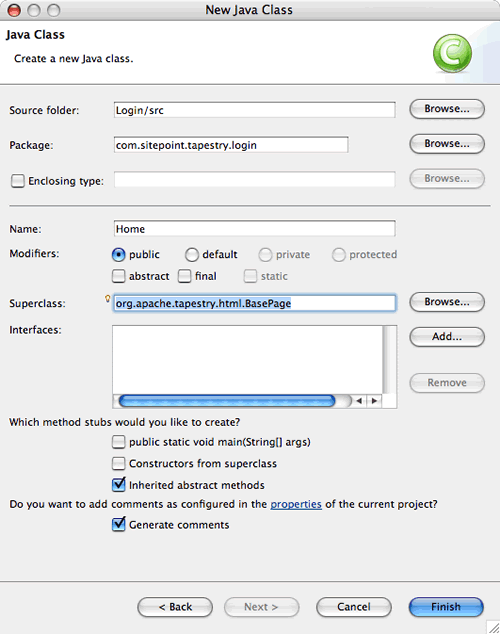
Figure 13. A new class is ready to be created
Press Finish, and a brand new page class will be generated for you in a few seconds. It will be named Home.java and its code will look like this:
/**

 *

 */

package com.sitepoint.tapestry.login;


import org.apache.tapestry.html.BasePage;


/**

 * @author alex

 *

 */

public class Home extends BasePage {


}
This is where we define our listener method. Specify it like this:
public class Home extends BasePage {


  public void onFormSubmit(IRequestCycle cycle) {

    // Some code will go here

  }

}
At this stage, we’ll create only the skeleton of the method — the rest of the code will be added later. The mysterious IRequestCycle parameter can be thought of as Tapestry’s representative in our code. Whenever we need something from the framework, we’ll ask this cycle to get it for us. We’ll see an example of this soon.
However, at the moment Eclipse tells us that it doesn’t know what an IRequestCycle is. To make it happy, we’ll need to add the following import statement:
import org.apache.tapestry.IRequestCycle;Now that we have a custom page class, we need to specify it in our page specification. Change the opening <page-specification> tag in Home.page to look like this:
<page-specification class="com.sitepoint.tapestry.login.Home">Specifying Properties the Tapestry Way
Now is the time to deal with the two properties uname and password. There are two ways to specify a property in Tapestry: the standard Java way (a private class member, public getter and setter, and perhaps some other maintenance code), and the Tapestry way. The latter, although it looks slightly unusual, is used much more often, so we’ll use the Tapestry approach here.
We don’t want to write all that property-related code by hand, so we’ll just ask Tapestry to generate it for us automatically at run time. All we need to do is to describe how the properties should be named, and what type they should be (any Java class available to Tapestry can suffice as the type).
You’ve probably already guessed that we’ll describe the properties we want in our page specification. In Home.page class, just below the <description> tag, add the following two lines (of course, you don’t have to write them all out by hand — use your Code Assist Ctrl + Space skills):
<property-specification name="uname" type="java.lang.String"/>

<property-specification name="password" type="java.lang.String"/>
That’s it! Now you can just assume that at run time these properties will be ready for you, and they’ll be managed by Tapestry properly without any efforts from your side and without any code written by you.
Previously, before we even specified these properties, we had already connected them to two of our components: a TextField component with the ID uname is bound to the property uname, and a TextField component with the ID password is bound to the password property. Let me describe all the activities that Tapestry will perform based on our page specification:
- When the Home page is requested, Tapestry will create the page class for it (an instance of
com.sitepoint.tapestry.login.Home, created by us). It will then notice that we asked to add two properties to this page, so Tapestry will create an ‘enhanced’ version of our class (i.e. another class that inherits from Home), and will add to it the two requested properties along with all the code that might be needed to handle them. - Tapestry then asks the enhanced page class instance to render itself to the user. To do that, the page class instance will use our Home.html template. When rendering the uname and password components, the class instance will check whether these components have any default values. We didn’t specify any, so the components will just be shown as blank text fields.
- When the login form is submitted, Tapestry (using the same kind of page class instance, either created anew or taken from the pool) will take the values entered by the user into the two text fields, and put them into their corresponding properties, so that we can use them in our code.
It took three paragraphs for me to describe what Tapestry will do automatically for us as a result of just a few lines in the page specification. You don’t really need to know all those procedures when you’re taking your first steps with Tapestry. All you need to know is that you can specify the properties you need, connect them to the components you use on your page and, as a result, whatever is submitted by a user will be available in your code via these properties.
The only nuance is that to use or edit a value of this kind of property in your code, you should create a getter or a setter (or both, if necessary) in your page class. Admittedly, this is a tad unusual: you didn’t create any properties in your Java code, and you certainly didn’t write anything like this:
private String uname;

private String password;
Yet we’re asking Tapestry to provide them at run time, so we’ll just believe that the properties will be there. All this is a little bit… abstract. And yes, we are going to create abstract getters for these shadowy properties. Here they are:
public abstract String getUname();

public abstract String getPassword();
We’ll add these getters to our page class and, since it will have abstract methods, this class will also become abstract! This is how it will look (with comments removed for the sake of brevity):
package com.sitepoint.tapestry.login;


import org.apache.tapestry.html.BasePage;

import org.apache.tapestry.IRequestCycle;


public abstract class Home extends BasePage {

  public void onFormSubmit(IRequestCycle cycle) {

    // Some code using getUname() and getPassword will go here

  }


  public abstract String getUname();

  public abstract String getPassword();

}
Using abstract classes as a “final product” in your application looks somewhat strange, but as soon as you get used to it, you’ll realize that this is actually very handy: you write exactly what you need, and Tapestry takes over and cleverly creates all the “plumbing” for you.
By the way, you can see this approach not only in Tapestry, but also in EJBs with container-managed persistence.
Right, we’ve written enough to test our first Tapestry page. It won’t do anything visible at this point, but at least we can check whether Tapestry understands our code properly. If everything goes as planned, we’ll see a web page that looks identical to our mockup for the Home page.
Informing Tomcat about our Web Application
Before running our Tapestry Web application for the first time, we need to inform Tomcat that we’ve created this application and where to find it. To do this, we’ll create a very simple XML file, a kind of note for Tomcat. We’ll call it Login.xml. You can use any text editor to create this file; it won’t be a part of our Web application.
This is all we need to write:
<Context docBase="/Users/alex/Documents/workspace/Login/context"

    path="/Login"/>
In the docBase attribute, you must specify the path to the context subdirectory of your Web application. It will depend on where you’ve chosen to place your workspace directory when installing Eclipse. In this example, you can see the location of this directory on my Mac. It will be something similar on a Linux machine.
For Windows, note that when specifying the path to your context, you should use forward slashes, not the backward ones normally used in Windows paths. In other words, you should write docBase="c:/workspace/Login/context", instead of docBase="c:workspaceLogincontext".
Put this Login.xml file into the conf/Catalina/localhost subdirectory in your Tomcat directory (examples: c:apache-tomcat-5.5.12confCatalinalocalhost or /Users/alex/jakarta-tomcat-5.0.28/conf/Catalina/localhost).
We’re now ready to run our Tapestry Web application.
Running the Application
Start your Tomcat server as explained in the “Installing Tomcat” section. If Tomcat was already running, shut it down and start up again — this will give Tomcat the opportunity to read the new configuration file that we just created when it starts up.
Point your browser to http://localhost:8080/Login/app. If everything was done properly, you should see the login page as shown in Figure 5 — exactly as expected. If instead you get an error, go back and double-check that every step has been followed, then restart your Tomcat server and try again.
You already know that a request for http://localhost:8080 will invoke Tomcat running on your computer. /Login tells Tomcat which Web application we want our request sent to. Remember, when configuring Tomcat in the previous section, we told it the path to our application using path="/Login".
The /app part of our request tells our application that this is a request for its Tapestry part. By default, it’s configured in such a way that all requests addressed to Tapestry must end with /app. This is for the case that our application contains other, non-Tapestry resources — static HTML pages, for example. In the next part of this tutorial, I’ll show you how to change the configuration so that all requests to /Login are passed to Tapestry.
Congratulations! You’ve got your first Tapestry Web application running. Admittedly, it’s not much more impressive than ‘Hello World’ right now, but behind the scenes this page is already using three Tapestry components, and it’s just waiting for us to add more functionality.
Let’s add the following ground-breaking behaviour: when a user presses the “Let me in!” button, the second page will be displayed. For now, we won’t perform any validation of the username or password. We’ll just react to the pressing of the button by displaying the second page.
Which second page? The one we are going to create right now!
Creating the Second Page
Let’s name the second page Content, as though it contained something valuable requiring user authentication.
Right-click the Package Explorer, choose New > Other… , and locate and select the Tapestry Page option. Press Next.
In the New Tapestry Page Component dialog which opens, enter Content for the Page Name. Make sure that the Generate an associated HTML file? checkbox is checked. Leave all other values to their default settings and press Next.
Here you can choose which class to use as a page class. We’re going to create some custom functionality, so let’s make our own class. Select the Create a new class radio button. Specify the package to be com.sitepoint.tapestry.login, and make the class public and abstract (yes, we are going to use those shadowy Tapestry properties again). Your dialog should look like Figure 14.
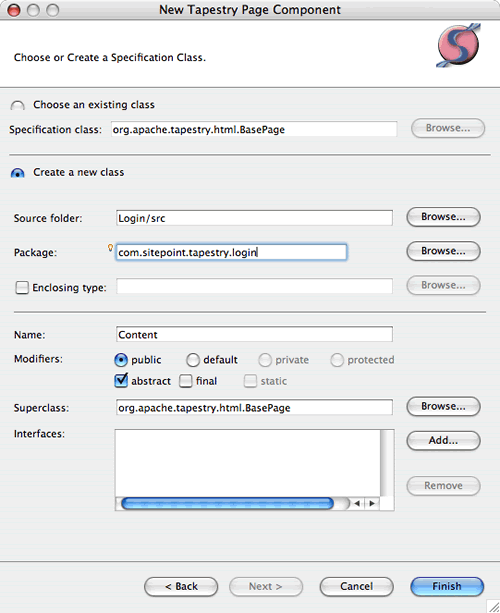
Figure 14. Creating a New Page with a Custom Page Class
Press Finish and Spindle will create three new files for you: Content.html, Content.page and Content.java.
The default HTML template for the second page doesn’t contain anything useful, so we’ll replace its contents with the mockup code from Page 2 in the previous section (titled “Our First Tapestry Web Application”). Modify this mockup into the real HTML template, which looks like this:
<!DOCTYPE HTML PUBLIC "-//W3C//DTD HTML 4.01//EN"

    "https://www.w3.org/TR/html4/strict.dtd">

<html>

<head>

  <title>You've got it!</title>

</head>

<body>

  <h2>Precious <span jwcid="uname">User</span>!</h2>

  <h3>Welcome to the wonderful World of Tapestry!</h3>

</body>

</html>
You can see that, on the second page, we’ll be using just one Tapestry component, which is named uname and disguised as a standard HTML span element. You’re probably aware that the span element is often used to apply a special style to text. We won’t be specifying any styles here, just our magical jwcid, which is incomprehensible and invisible to a web browser.
A Specification for the Second Page
We’re going to need both the username and password in the code for the second page, so let’s create the same two properties in the page specification (you can just copy them from Home.page):
<property-specification name="uname" type="java.lang.String"/>

<property-specification name="password" type="java.lang.String"/>
Let’s also specify the uname component mentioned in the HTML template. This time, it will be a standard Tapestry Insert component, which simply inserts a string into the outputted HTML. This is how the specification will look:
<component id="uname" type="Insert">

  <binding name="value" expression="uname"/>

</component>
And here’s the completed page specification, which goes into the Content.page file:
<?xml version="1.0" encoding="UTF-8"?>

<!DOCTYPE page-specification PUBLIC

  "-//Apache Software Foundation//Tapestry Specification 3.0//EN"

  "http://jakarta.apache.org/tapestry/dtd/Tapestry_3_0.dtd">

<!-- generated by Spindle, http://spindle.sourceforge.net -->


<page-specification class="com.sitepoint.tapestry.login.Content">


  <description>Content page</description>

  <property-specification name="uname" type="java.lang.String"/>

  <property-specification name="password"

      type="java.lang.String"/>


  <component id="uname" type="Insert">

    <binding name="value" expression="uname"/>

  </component>


</page-specification>
All that’s left is to fill in our custom page class with some functionality.
Adding Functionality to the Page Class
We want to be able not only to read the uname and password properties of the page, but to set them as well. That’s why we’ll create two pairs of abstract getters/setters for the page class. Remember from the first page that these methods will be abstract, because we didn’t create the properties ourselves, but asked Tapestry to make them for us at run time.
With the addition of getters and setters, our Content.java will look like this:
package com.sitepoint.tapestry.login;


import org.apache.tapestry.html.BasePage;


public abstract class Content extends BasePage {

  public abstract String getUname();

  public abstract String getPassword();

  public abstract void setUname(String uname);

  public abstract void setPassword(String password);

}
It’s now time to return to the first page, Login, and add functionality to its page class so that when the form is submitted, the second page (that we named Content) is shown.
Navigating From Page to Page
Our listener method onFormSubmit() is still empty. Let’s add some code to it to display the second page. This can be done quite simply: we’ll just ask Tapestry to show another page.
How do we ask Tapestry to do something for us from our code? We’ve got its representative, cycle (of type IRequestCycle), which is passed as a parameter to our listener method. So let’s just ask this cycle object to do the job for us. This is what our listener method in Home.java looks like:
public void onFormSubmit(IRequestCycle cycle) {

  cycle.activate("Content");

}
Let’s see if it works. At the moment, we need to keep restarting Tomcat every time we make a change, in order to see the most recent version of our application. This is definitely not the most convenient thing to do, and there are easier ways to achieve the same result. However, we’ve had enough distractions already, so I’ll leave you to research the alternatives. For the moment, let’s press on.
Shut down Tomcat if it was running, then start it up again. Point your browser to http://localhost:8080/Login/app and you’ll see our login form. Push the Let me in! button and you should see the second page as shown on Fig. 15.
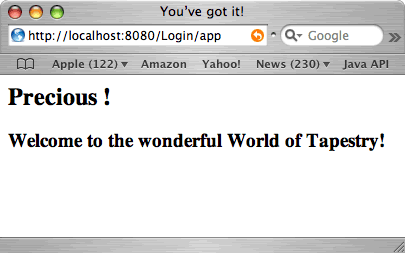
Figure 15. The Second Page is Displayed Without a User Name
Notice that no username is output. Well, I didn’t ask you to enter a login or password into the login form! But even if I had done so, we didn’t tell the second page in our listener method what information we were receiving from the user. Let’s correct this.
Passing Parameters to the Second Page
I’ll now show you a design pattern that’s used often in Tapestry development to pass variables to another page: the “bucket brigade” pattern.
We’ll do the following:
- Ask Tapestry to give us a reference to the next page that we want to display.
- Use setters on that page to assign values that we want to pass to the page’s properties.
- Ask Tapestry to display the next page.
At this point you should understand one important thing: although the users of our web application think of the pages they’re viewing as HTML that’s being sent to their browsers, in reality (and as far as Tapestry is concerned), each page is a Java class — a page class — such as Home or Content. This class has many talents; the ability to send an HTML response is just one of them.
Our next page is called Content. So, if we wanted to declare a reference to the next page, it would look like this:
Content nextPage;We can tell Tapestry: “Please give us a reference to an instance of a page class for the page named Content”. Translated into Java, it would look like this:
Content nextPage = (Content) cycle.getPage("Content");After receiving the reference, we can use it to invoke any setters that we have prepared in that next page. For example, if we had a username and password received from a user stored in uname and password variables, we could write this:
nextPage.setUname(uname);

nextPage.setPassword(password);
We’ll then ask Tapestry to show the next page:
cycle.activate(nextPage);Our completed listener method looks like this:
public void onFormSubmit(IRequestCycle cycle) {

  Content nextPage = (Content) cycle.getPage("Content");

  nextPage.setUname(getUname());

  nextPage.setPassword(getPassword());

  cycle.activate(nextPage);

}
Note that in nextPage.setUname(getUname()); we’re calling the abstract getter of our Home class and passing the returned value to the abstract setter of Content class. It looks strange: how can we use a method that has yet to be implemented? But it works perfectly well at run time, because Tapestry creates implementations of all the abstract methods for us.
Let’s test the new version of our application. Shut down and start up your Tomcat server, and point your browser to http://localhost:8080/Login/app. When the login form appears, enter a user name and any password into it and press the Let me in! button. Depending on which user name you used, the result might look like Figure 16.
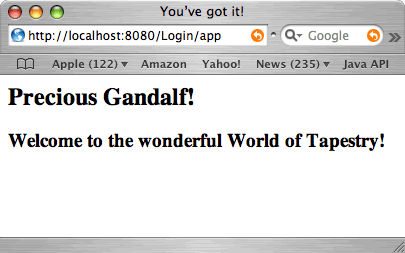
Figure 16. The Second Page Displays as Expected
Limiting Access to a Page
Since we’re requesting a user name and password, it would be natural to limit access to our valuable Content page, so that only authorised users can access it. For now, let’s hard-code one password for all users.
Normally, we’d check the password in the Login page and, if it was correct, we’d send the visitor the hidden Content. But what if some unwanted visitor managed to request the Content page directly, without logging in? Technically, this is possible.
One of the solutions to this problem is to check the password in the Content page. If the password is correct, we display the contents of the page, otherwise we redirect the user to the Login page.
To be able to do this, our Content page needs to make an agreement with Tapestry. It should ask, “Please notify me when you are going to show me, so that I can check a few things.” This kind of agreement can be achieved if the page implements the PageValidateListener interface. To implement this interface, we need to declare it and add a pageValidate() method to our page class. With these additions, our Content.java looks like this:
package com.sitepoint.tapestry.login;


import org.apache.tapestry.html.BasePage;

import org.apache.tapestry.event.PageValidateListener;

import org.apache.tapestry.event.PageEvent;


public abstract class Content extends BasePage

    implements PageValidateListener {


  public void pageValidate(PageEvent event) {

    // Some code will go here

  }


  public abstract String getUname();

  public abstract String getPassword();

  public abstract void setUname(String uname);

  public abstract void setPassword(String password);

}
Notice the two new import statements. You don’t have to know where to find the classes or interfaces that you need, and you don’t need to write these statements by hand. Eclipse will do all that for you. For example, when you type PageEvent, Eclipse will underline it with red, because it doesn’t know what you mean. Place your cursor somewhere on this word and choose Source > Add Import, and this smart IDE will create the necessary import statement for you!
Tapestry will check that the page implements the PageValidateListener interface, so it should have a pageValidate() method. Tapestry calls this method just before showing the page to a user, and it is up to us to define which checks should be done in the method.
We’re going to check if the password specified by the user is the same as the one we’ve hard-coded. If not, we’ll tell Tapestry: “Stop! Don’t show this page! Redirect the user to the Home page instead.” This is what it looks like in Java:
if (!"mellon".equals(getPassword())) {

  throw new PageRedirectException("Home");

}
If the password entered by the user is “mellon” (the Elvish word for “friend”), everything is fine: they’ll see the Content page. If not, we switch on an alarm and tell Tapestry: “Forget whatever you were doing, just show our login form to this user.”
This is how the completed Content.java should look:
package com.sitepoint.tapestry.login;


import org.apache.tapestry.PageRedirectException;

import org.apache.tapestry.html.BasePage;

import org.apache.tapestry.event.PageValidateListener;

import org.apache.tapestry.event.PageEvent;


public abstract class Content extends BasePage implements PageValidateListener {


  public void pageValidate(PageEvent event) {

    if (!"mellon".equals(getPassword())) {

      throw new PageRedirectException("Home");

    }

  }


  public abstract String getUname();

  public abstract String getPassword();

  public abstract void setUname(String uname);

  public abstract void setPassword(String password);


}
Now let’s test our completed login web application.
Start or restart Tomcat and navigate, as usual, to http://localhost:8080/Login/app. Enter any user name and a wrong password, and press the Let me in! button. Nothing should happen — you’ll just see the same login form. Now type the secret word for the password that we hard-coded above. You should be able to view the Content page!
What Have we Learnt?
First, we saw that Tapestry HTML templates can be displayed perfectly in any web browser, because Tapestry’s server-side hooks are limited to the attributes of standard HTML tags, so they remain virtually invisible.
This is very important because the presentation (HTML) remains absolutely independent of the logic (Java code), and either of them can be edited without any changes to the other. This is the cleanest possible separation between presentation and logic — something that other frameworks struggle with and often fail to achieve.
We also saw how convenient and useful the Eclipse IDE (with the Spindle plug-in) is when it comes to Tapestry development.
We got our hands dirty and created a couple of pages, and saw that every page has three parts to it: an HTML template, a page specification and a page class.
We learned that Tapestry components are declared in the page specification, and saw how the binding is established between a component’s jwcid attribute in the HTML template and either an event listener or a property.
We also saw one of the trickier but more powerful aspects of Tapestry: how page properties can be declared in the page specification, and how we can work with them as if they really existed, even though they’re only created by Tapestry at run time.
We learned how to write code to navigate from one page to another, and how to pass parameters between pages (the “bucket brigade” pattern).
Finally, we saw how a Tapestry page can protect itself from being accessed by unauthorised visitors, and how little needs to be done to implement this functionality.
Whew! We’ve mastered quite a lot for this introduction, but there is still much more to the world of Tapestry!
Further Reading
Currently there are only two books on Jakarta Tapestry available in English:
- “Tapestry in Action” by Howard Lewis Ship, the creator of Tapestry. This book is useful for gaining a deeper understanding of the ideas behind Tapestry, and details of the inner workings of Tapestry 3. However, it’s not very useful as a tutorial for beginners.
- “Enjoying Web Development with Tapestry” by Ka lok ‘Kent’ Tong. I would call this book an advanced tutorial, and it is a must-have title for every Tapestry developer. It’s packed with examples and advice starting from the basics and going on to some advanced topics. I found it invaluable when working on my own commercial Tapestry application. The book is available in two editions: for Tapestry 3 and for Tapestry 4.
Frequently Asked Questions about Jakarta Tapestry
What is Jakarta Tapestry and how does it work?
Jakarta Tapestry is a powerful, open-source, component-oriented framework for creating dynamic, robust, highly scalable web applications in Java. It simplifies web application development by structuring it in terms of objects, methods, and properties, rather than URLs and query parameters. Tapestry uses a component-based architecture, meaning that complex pages are built from simpler components, which promotes code reuse and modular design. It also includes built-in support for form handling, localization, and error handling, making it a comprehensive solution for web development needs.
How does Jakarta Tapestry compare to other Java web frameworks?
Jakarta Tapestry stands out from other Java web frameworks due to its simplicity, efficiency, and productivity. Unlike many other frameworks, Tapestry is designed to be easy to learn and use, with a straightforward programming model that doesn’t require extensive XML configuration. It also emphasizes performance and scalability, with features like efficient page rendering and live class reloading. Furthermore, Tapestry promotes productivity by automating common tasks, providing robust error reporting, and integrating with popular tools and libraries.
What are the main features of Jakarta Tapestry?
Jakarta Tapestry offers a wide range of features designed to simplify and enhance web application development. These include a component-based architecture, which promotes code reuse and modular design; live class reloading, which allows changes to be made without restarting the server; efficient page rendering, which improves performance; robust error reporting, which aids in debugging; and built-in support for form handling, localization, and error handling. Tapestry also integrates with popular tools and libraries, making it a versatile solution for a variety of development needs.
How can I get started with Jakarta Tapestry?
Getting started with Jakarta Tapestry is straightforward. First, you’ll need to download and install the Tapestry library, which is available for free from the Apache website. Once you’ve done that, you can create a new Tapestry project using your preferred IDE or build tool. Tapestry provides a number of tutorials and examples to help you get started, and there’s also a vibrant community of users and developers who can provide support and advice.
What are the system requirements for Jakarta Tapestry?
Jakarta Tapestry is a Java-based framework, so it requires a Java Development Kit (JDK) to run. The minimum required version is JDK 1.5, but later versions are also supported. Tapestry also requires a servlet container, such as Apache Tomcat or Jetty, to serve web pages. Other than that, there are no specific system requirements for Tapestry, and it can run on any platform that supports Java.
Can I use Jakarta Tapestry for mobile app development?
While Jakarta Tapestry is primarily designed for web application development, it can also be used to create mobile apps. This is because Tapestry’s component-based architecture and efficient page rendering make it well-suited to the demands of mobile app development. However, it’s worth noting that Tapestry doesn’t provide any specific features or tools for mobile development, so you may need to use additional libraries or frameworks to handle things like touch events and screen scaling.
How does Jakarta Tapestry handle security?
Jakarta Tapestry includes a number of features designed to enhance security. For example, it provides built-in protection against cross-site scripting (XSS) and cross-site request forgery (CSRF) attacks. Tapestry also supports secure HTTPS connections, and includes features for managing user sessions and authentication. However, as with any web framework, it’s important to follow best practices for web security when developing with Tapestry.
What kind of support is available for Jakarta Tapestry?
As an open-source project, Jakarta Tapestry is supported by a vibrant community of users and developers. There are numerous resources available online, including tutorials, examples, and documentation. There’s also a mailing list where you can ask questions and get help from other Tapestry users. In addition, commercial support is available from several companies that specialize in Tapestry development.
How can I contribute to Jakarta Tapestry?
There are many ways to contribute to Jakarta Tapestry. One of the easiest ways is to use the framework and provide feedback on your experiences. You can also contribute by reporting bugs, suggesting new features, or writing documentation. If you’re a developer, you can contribute code to the project, either by fixing bugs or implementing new features. All contributions are welcome, and can help to make Tapestry a better tool for everyone.
What is the future of Jakarta Tapestry?
As an open-source project, the future of Jakarta Tapestry is largely determined by its community of users and developers. The project is actively maintained, with regular releases that add new features and improvements. There’s also a strong focus on keeping Tapestry up-to-date with the latest trends and technologies in web development. As such, you can expect Tapestry to continue evolving and improving in the future.
Alexander wrote his first program in FORTRAN in the year 1979, in Java - in 1996, and also spent a number of years doing Web development with PHP. He is now a founder and a Director of Sirius Lab Ltd, a company offering solutions for iOS and Android platforms. You can also read his Sundraw blog.


