Accessible Header Images With CSS And XHTML Article

Key Takeaways
- Using CSS to add images to Web pages is a vital cornerstone of future web design, as it offers control over the presentation of images across a whole site.
- Image replacement is a technique where a standard header tag’s text is hidden and an image is displayed instead. This can be done using CSS3, but as no browser currently supports this, creative solutions are required.
- The text-indent property can be used to effectively slide the header text off the page, while keeping it accessible. However, if images are turned off, this results in an empty box. To overcome this, the text can be moved under the graphic using a span.
- Two methods are presented for styling headers using CSS – one that prioritizes clean XHTML, and another that still works without images. The choice between the two depends on the individual site’s requirements.
Before CSS, images were always put into Web pages with image tags. We gave them alternate (alt) text so they still made sense when images were turned off – it was the only way.
Today, we have Cascading Style Sheets. Using CSS to add images to Web pages has been called a “vital cornerstone of all future Web design”. It gives us new power to control the presentation not just of basic styles like borders, but all the images across a whole site.
Fahrner Image Replacement (FIR) was the first widespread method of doing this, and remains the most well known. But it isn’t perfect. Today I’ll show you two methods that overcome its problems. You can see the final code at the end of the article.
Before we begin, the first question we have to ask is: “Is this image part of the content?”
Images As Content
Imagine you have a photo album on your Website. Your visitor has come to your site to see those photos. The images must be the content.
For these sorts of images, we should still use the tried and tested image tag:
<img src="sunset.jpg" alt="The sunset burning red" title="Our first night" />
This is the perfect solution for content images because:
- with images turned on, everyone gets the photo: “sunset.jpg”
- with images off, the image’s description is shown: “The sunset burning red”
- the image will print out like the rest of the textual content
But what if the image isn’t part of the content?
For example, consider a decorative header. The content is the text in the header, not the image of that text.
This is where image replacement comes in.
Image Replacement
Image replacement is a simple idea: take a standard header tag (<h1>), hide its text, and show an image.
For these examples, this is the code I’ll use:
<h1 id="album">My photo album</h1>
In an ideal world, this would be all the CSS3 you would need:
#album { content: url(header.gif), contents; }
With just one line, the content is replaced with an image. No image found? It shows the original content – the text. Perfect!
And then reality sets in… No browser supports CSS3.
The W3C is on the case. In a year or two we might see the first support for CSS3 in browsers.
Today, we’ve got to be creative.
The Technique
The bare header code does this:
![]()
To make the replacement, we have to do three things:
- resize the header to fit the image
- display the image
- hide the text
Here is the image we’ll use for the tutorial:

Right click and select “Save Picture As…” or “Save Image…” if you want to work through the techniques as we go. Call it ” header.gif” (no quotes).
Sizing the Header
This is the easy bit — just set the height and width. This can change from one header to another, so we’ll use the header’s ID.
<h1 id="album">My photo album</h1>

#album { width: 300px; height: 75px; }
Remember: Use a number, set a unit. Images are set in pixels, so we will size our header in pixels (px), too.
Displaying the Image
We’ll use the background property for this: it has good browser support and involves simple code.
<h1 id="album">My photo album</h1>

#album {

width: 300px; height: 75px;

background-image: url(header.gif);

background-repeat: no-repeat;

}
Now the image looks like this:

Hiding the Text
This is the make or break step. We have to hide the text, but have it still be accessible.
The original FIR technique removed the text from the page totally, using display: none. This failed the accessibility test:
- screen readers couldn’t “see” the text (no more access for blind visitors),
- with images off, there is no content at all (so we lose many dialup visitors).
Mike Rundle found a smart solution to the first problem: don’t remove the text; just slide it out the side.
Mike used the text-indent property, but with a negative value. He effectively out-dented the header right off the page.
His code looked something like this:
h1 { text-indent: -100em; }
Notice the value is in ems: they change with the size of the text. If the browser uses larger fonts, the header will move further away. It will never get back onto the page.
There’s just one problem. What about the second point? What happens if images are turned off?
We’re no better off than we were with FIR: an empty box. Time for a new method.
Show us Your Text!
It’s ironic that after finally finding a way to remove text, we go right ahead and try to get it back.
For that, we have to put the text not outside the window, but under the graphic. Here’s a picture of what we want: header image on top, text below:
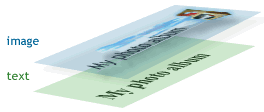
Because the background image would be behind the text, we can’t set it on the header tag itself. Time to make a sacrifice for users on slow connections: we need an extra span.
Here’s the new XHTML:
<h1 id="album"><span></span>My photo album</h1>
All we have to do is what we did before, except when it comes to the span. To set a height and width on the span, we also have to set its display: block property.
A negative margin-bottom will move the text upwards, but in most browsers this will make the text appear on top of the span. We need to set a z-index on the span to position it above the text.
I like pictures, so here’s another one. This time I’ve added a green border and a small negative margin-bottom to the span:

Here’s the code that puts the text completely underneath the span:
/* repeated code per header */

#album, #album span {

width: 300px; height: 75px;

background-image: url(header.gif);

background-repeat: no-repeat;

}

/* This is what moves the text under the span */

#album span { margin-bottom: -75px; }

/* code for all styled headers */

h1 span {

display: block;

/* place the span on top */

position: relative;

z-index: 1;

}
Overflow
So far, the code will work fine as long as the header text is short enough to fit underneath the header image.
When text is too long to fit inside its container, it is said to “overflow” out of it. We don’t want to see this text, so we have to hide it. In fact, this is exactly the CSS we need:
h1 { overflow: hidden }
If you only worry about Windows browsers, the story ends here. Everyone else has one more crime to commit. With this naked code, Internet Explorer 5 for the Mac will hide the whole thing. Not just the overflow – the whole thing is gone. Poof!
This is a problem specific to IE5 for Mac. Thankfully, a simple hack will let us hide the line above from IE5 for Mac, and give it to everyone else.
What shall we give those Mac users instead? Simple: we’ll use Mike’s solution from before. Here’s the two-part hack:
/* IE5 Mac Hack */

h1 { overflow: hidden; }

/*/

h1 { text-indent: -100em; }

/* End Hack */
The first line is given to all browsers except IE5 for Mac. On the other hand, IE5 for Mac only sees the second line. Learn more about the hack at Sam Foster’s site.
Summing Up
We started with perfect XHTML and perfect CSS. Then we made concessions to browser support.
Now we have two methods for styling headers fully using CSS, one with clean XHTML, and one that still works without images.
I’ll leave it up to you decide which is more important for your site.
XHTML-Centric header
<h1 id="album">My photo album</h1>

#album {

width: 300px; height: 75px;

background-image: url(header.gif);

background-repeat: no-repeat;

}

h1 { text-indent: -100em; }
User-Centric Header
<h1 id="album"><span></span>My photo album</h1>

/* repeated code per header */

#album, #album span {

width: 300px; height: 75px;

background-image: url(header.gif);

background-repeat: no-repeat;

}

#album span { margin-bottom: -75px; }

/* non-repeated code */

h1 span {

display: block;

position: relative;

z-index: 1;

}

/* IE5 Mac Hack */

h1 { overflow: hidden; }

/*/

h1 { text-indent: -100em; }

/* End Hack */
Learn More
- Negative text-indent method: Mike Rundle
http://phark.typepad.com/phark/2003/08/accessible_imag.html - The original FIR: Doug Bowman http://www.stopdesign.com/also/articles/replace_text/
- More methods:
- Seamus Leahy http://www.moronicbajebus.com/playground/cssplay/image-replacement/
- Stuart Langridge http://www.kryogenix.org/code/browser/lir/
- Other useful links:
- Sam Foster’s IE5 Mac Hack
http://www.sam-i-am.com/testsuite/css/mac_ie5_hack.html - The W3C on CSS
https://www.w3.org/Style/CSS/ - W3C CSS Validator
http://jigsaw.w3.org/css-validator/ - Half a million paths to CSS
http://www.google.com/search?q=css
- Sam Foster’s IE5 Mac Hack
Frequently Asked Questions about Header Images in CSS and XHTML
How can I add a header image in CSS and XHTML?
Adding a header image in CSS and XHTML involves a few steps. First, you need to have the image you want to use saved in your project folder. Then, in your HTML file, you can add an image tag in the header section. The ‘src’ attribute should point to the location of your image file. In your CSS file, you can then style this image as needed, for example, by setting its width and height, or adding margins or padding.
Can I use a responsive header image in CSS and XHTML?
Yes, you can make your header image responsive in CSS and XHTML. This means that the image will automatically adjust its size based on the screen size of the device viewing the webpage. To do this, you can use the ‘max-width’ property in your CSS file and set its value to 100%. This will ensure that the image never exceeds the width of its container.
How can I position my header image in CSS and XHTML?
Positioning your header image can be done using CSS. You can use the ‘position’ property to specify the type of positioning you want for your image. For example, ‘absolute’ positioning allows you to place your image at a specific position relative to its nearest positioned ancestor. You can then use the ‘top’, ‘right’, ‘bottom’, and ‘left’ properties to further adjust the position of your image.
Can I use a background image as a header in CSS and XHTML?
Yes, you can use a background image as a header in CSS and XHTML. To do this, you can use the ‘background-image’ property in your CSS file and set its value to the URL of your image file. You can then use other background properties to control the size and position of your image.
How can I add a border to my header image in CSS and XHTML?
Adding a border to your header image can be done using CSS. You can use the ‘border’ property to specify the width, style, and color of the border. For example, ‘border: 2px solid black;’ will add a 2-pixel-wide solid black border around your image.
How can I add a hover effect to my header image in CSS and XHTML?
Adding a hover effect to your header image can be done using CSS. You can use the ‘:hover’ pseudo-class to specify how your image should look when the mouse pointer is over it. For example, you could change the opacity of the image, or add a border.
Can I use an animated header image in CSS and XHTML?
Yes, you can use an animated header image in CSS and XHTML. This can be done using CSS animations or transitions. For example, you could gradually change the size or position of the image over a certain period of time.
How can I add a link to my header image in CSS and XHTML?
Adding a link to your header image can be done in your HTML file. You can wrap your image tag in an ‘a’ tag, with the ‘href’ attribute set to the URL you want to link to.
Can I use a gradient as a header in CSS and XHTML?
Yes, you can use a gradient as a header in CSS and XHTML. This can be done using the ‘background-image’ property in your CSS file and setting its value to a gradient function.
How can I optimize my header image for better performance in CSS and XHTML?
Optimizing your header image for better performance can involve several steps. For example, you could compress your image to reduce its file size, or use CSS sprites to reduce the number of HTTP requests. You could also use lazy loading to delay loading the image until it’s needed.
Douglas is a Holland-based designer who runs redmelon.net, his successful freelance Web design company. He prides himself on working with technically and aesthetically pleasing projects.
