Working with Paths and the Pen Tool
Becoming comfortable with the Pen Tool often takes a while for vector graphic newbies. Unlike pencil-and-paper doodling (or comparatively, using a pencil- or brush-type tool in a typical drawing program), where your hand (or mouse) guides the drawn path, the pen tool creates shapes based on a series of points and their corresponding “direction lines” (Illustrator term) or “handles” (Freehand term).
Drawing a complex shape with a pencil or brush tool usually involves clicking once to start the shape, then holding the mouse button down, and dragging the mouse to follow the lines of the shape. Drawing the same shape with a pen tool involves a series of clicks and drags to set the anchor points and define curve directions. It sounds complicated, but once you get the hang of it, you’ll never look back!
Select the Pen Tool, and go for it:
Illustrator: ![]()
Freehand: ![]()
Click once on the document, then move the cursor and click again. This creates a line that connects the two points.
![]()
By clicking again, you can start to create a shape:

To “close” the path to actually make a shape, move the cursor to the original point. When the cursor turns to a pen shape with a small circle, click on the point and the shape will be closed off. If the cursor doesn’t change, it means that you aren’t quite on top of the original point, so you’ll end up just creating another point without closing the shape.

What you’ve learned so far:
- Clicking with the pen tool creates corner points.
- Each new click creates a connected line segment with the previous point.
- Bringing the cursor back to the original point and clicking will close the path to create a shape.
Now, let’s move on to curves.
With the same Pen Tool, click once to create a starting “corner” point. Then, click again — but this time, hold the mouse down and drag. A curve will form. You can continue to hold and drag in different directions to see how the curve is affected. The resulting tangent line can be referred to as a “direction line” or a “handle.”

The location at which you place the next point will affect the shape of the resulting curve, as you can see in the examples below:

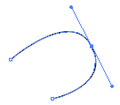
The black arrow tool selects the entire path (so that you can move it around and resize it). Use the “white arrow tool” (known as the Direct Selection Tool in Illustrator and the Subselect Tool in Freehand) to tweak individual points and direction lines.
Illustrator: ![]()
Freehand: ![]()
With the white arrow tool, select the point on the curve that you wish to tweak:

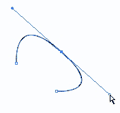
Now, grab one of the direction line handles and pull. You’ll see the curves adjust; the entire curve shifts so that the direction line remains tangent to the curve. The side of the curve that you’re pulling grows more pronounced the further out you drag the handle.
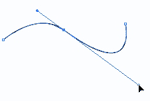
In another example, you can see how pulling out both handles makes the curve “wider.”
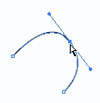
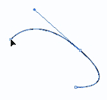
The white arrow tool can also be used to move individual points around:

Now you also know how to:
- Use the pen tool to create curved points (by clicking and dragging).
- Use the white arrow tool to tweak points and direction lines.
But there are many more ways that you can work with paths…
A Whirlwind Tour of Other Path Tools
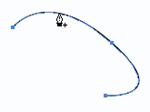
You may add points to an existing path. In both Illustrator and Freehand, first select the path that you want to add points to, then hover over the path with the pen tool. You’ll see the cursor change to a pen with a plus (+) sign. Click once and a new point will be added, with direction handles that follow the existing curve. (Illustrator also has the “Add Anchor Point Tool,” hidden behind the Pen Tool, which does the same thing but doesn’t require you to select a path first.)
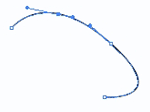
In Illustrator, to delete an anchor point, you may also use the Pen Tool to hover over a point until the cursor changes to a pen with a minus (-) sign. Click once and the anchor point will be deleted. Once again, Illustrator does have a separate Delete Anchor Point Tool, hidden behind the Pen Tool.


Also hidden behind the Pen Tool in Illustrator is the Convert Direction Point Tool, which looks like a caret, or just the angle part of an arrow.
![]()
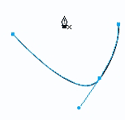
When you use this tool, clicking on a curve point will convert it into a corner point; clicking and dragging on corner points will convert them into curve points. In the diagram below, we converted a curve point into a corner point.
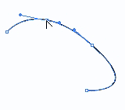
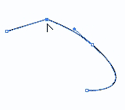
Freehand has combined these functions into the Pen Tool. In Freehand, when you select the Pen Tool and hover over an existing point, you’ll see the cursor change to a pen with the same caret symbol used in Illustrator for the Convert Direction Point tool. This functions in the same way as the tool did in Illustrator, and converts a curve point to a corner point (and vice versa).
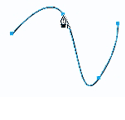
After you click the point once to convert it, the cursor will change to the pen with a minus sign, giving you the option you to delete the point completely. (Contrast this with the above instructions for Illustrator, where you actually choose different tools for those different functions. Freehand puts all those tools into one.)
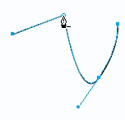
Another useful thing you might want to do to a path is to cut it. In Illustrator, the Scissors and Knife tools allow you to cut paths and shapes. In Freehand, the Knife tool combines both functions. Sound complicated? It can be…
![]()

The Illustrator Scissors tool and the Freehand Knife tool do the same job: cut a path into pieces. To use either, select the tool, and then click anywhere on a path. You’ll notice that it looks like a point has been added to the path. Big deal, right? Well, if you use the white arrow tool and move things around, you’ll see that in actuality, you now have two line segments:


Illustrator’s Knife Tool allows you to divide a shape into two distinct shapes. Just select the shape with the black arrow tool, then, with the Knife Tool, draw a dividing line — straight or curved — and the shape will be divided into two pieces along the corresponding path!


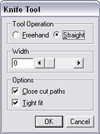
To achieve this same functionality in Freehand, double-click on the Knife tool to get to the options, and check the “Close cut paths” option.
They’re the basics of manipulating paths. In the next section, we’ll take you step-by-step through an easy, practical example where you can apply all your new knowledge… and even learn a few more tricks along the way!
Easy Logos Using Paths
Let’s say that you work for Gateway, and you need to duplicate the Gateway “spotted-g” logo:
![]()
Gateway and the Spotted G Gateway logo are trademarks of Gateway, Inc. We’ve used them here for the purposes of illustration only – no infringement of the trademark is intended.
With Illustrator or Freehand, this will be quite a snap!
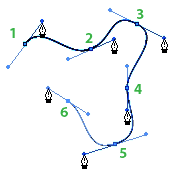
First, use the Pen Tool to create the basic shape.
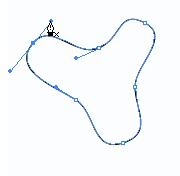
The shape is obviously not quite perfect, so we’ll use the white arrow tool to tweak the lines and points…
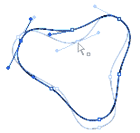
Note: there are a number of additional steps the perfectionist could have taken to get a perfectly even curved-triangle shape. For example, you could have created a 3-sided triangle with the polygon tool first and used the Convert Direction Tool to “curve” the points. In Freehand, you could have skipped this step by modifying the Object Properties of a triangle to have curved corners. Then, you could have used the Pen Tool — or Add Anchor Points Tool — to add three more points on the sides of the now-curved triangle. These points could be moved “inward” by hand, or by using the white arrow tool to select only those three side points, then using the Scale tool to move them towards the center. Perhaps you may want to try this process; for the purposes of this educational tutorial, doing things freehand — no pun intended — is fine.
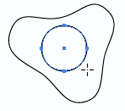
Now, use the Ellipse Tool to create a circle. Here’s another tip: to make a perfect circle or square, hold the Shift key down while you draw. Holding the shift key generally “constrains” movements in most graphics programs. We also held down the Alt key (Mac — Option key) to draw the circle from the center, instead of the corner.
Create another circle, centered inside the first.
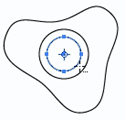
Note: There are plenty of ways that you can create two circles within each other. In Illustrator, one way is to draw two circles, then click on the center of one of the circles and move it over the center of the other circles. You’ll notice that the top circle “snaps” to the middle of the other circle when you get close enough. This method works for other polygons that have “centers.” Another way that works in both Illustrator and Freehand is to select the two circles, then use the Align Palette to line up the centers. Yet another way is to draw the first circle, select it, and switch to the Scale tool. Hold the Shift key — to keep it a perfect circle — then start dragging to make a smaller circle. Hold down the Alt (PC) or Option (Mac) key while you’re dragging… then let go of the mouse. Holding down the Alt/Option key makes a copy of the object, which is a useful trick for other purposes.
Now, use the Rectangle Tool to make the long rectangular section of the logo.
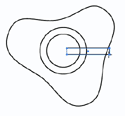
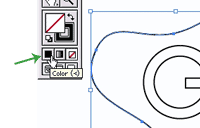
With the basic shapes in place, we’ll first fill the curvy shape with black. In Illustrator, select the shape, and in the Tools Palette, click the Color button to fill the shape with color.
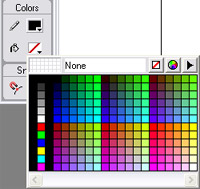
In Freehand, select the shape, then use the paint bucket color dropdown to fill the shape with color.
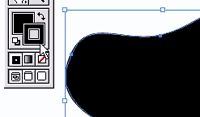
You may also get rid of the outline (stroke). In Freehand, use the pencil dropdown (above the paint bucket) to choose the “no color” option. In Illustrator, first click on the Stroke icon (outlined box), then click the “no color” option.

At this point, hide the curvy shape by hitting Ctrl-3 (PC) or Command-3 (Mac) in Illustrator, or going to View > Hide Selection in Freehand. This will allow us to work with the other shapes without getting distracted.
Ok, it’s time to work with the other shapes: use the knife tool to cut the circle path just a little above and below the rectangle.
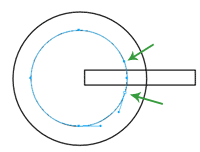
Use the black arrow tool to select the cut segment and delete it.
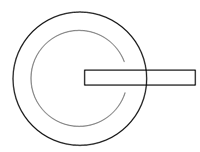
Do the same to the other circle.
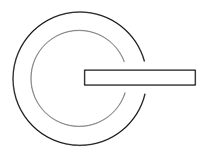
Now, use the pen tool to connect the endpoints of the shape.
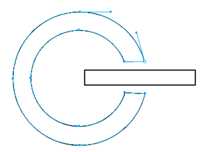
Just to demonstrate that there are lots of ways you can do things, here’s another way to achieve the same effect in Illustrator:
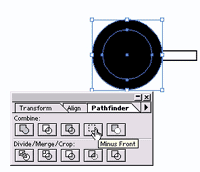
First, fill the larger circle with black (so that you can see it more easily).

Select both circles: use the black arrow tool and drag across the corner of the circles so that both are selected. Open the Pathfinder palette in Illustrator. Choose the “Minus Front” command. The two circles will be combined into one doughnut shape.
Now, use the Knife Tool to cut two lines across the ring shape slightly above and below the rectangle.
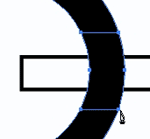
Select the new cutout piece and hit Backspace to delete it.
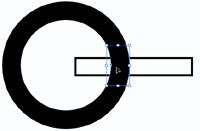
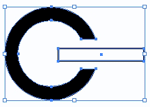
Same effect; different method!
We’re almost there! Select both shapes and set the fill color to white.
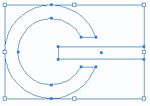
Finally, unhide the curvy shape. In Illustrator, hit Ctrl-Alt-3 (PC) or Command-Option-3 (Mac). In Freehand, go to View > Show All. The black curvy shape will reappear, and the logo is complete!

Summary
In this lengthy tutorial, you learned:
- The difference between raster and vector graphics
- How to make basic shapes in Illustrator and Freehand
- How to resize shapes using the black arrow to select objects and drag on their corner handles
- How to use the pen tool to create corner points (by clicking)
- That each new click creates a connected line segment with the previous point
- That bringing the cursor back to the original point and clicking will close the path to create a shape
- How to use the pen tool to create curved points (by clicking and dragging)
- How to use the white arrow tool to tweak points and direction lines
- How to add, delete and convert points using the Pen Tool and its derivatives
- How to use the Scissors and/or Knife Tools
- How to use the Shift key to make perfect circles or squares
- How to align two circles so that they’re centered
- How to use the Alt key when moving objects to make copies of the object
- How to change the fill and stroke colors of objects
- How to “Hide” and “Unhide” objects
Many of these concepts are transferable across other graphics programs that use vector graphics. For example, you’ll find that Photoshop, Freehand, and Flash all have vector/path tools that work almost identically to Illustrator and Freehand.
Happy vectoring!
If you enjoyed reading this post, you’ll love Learnable; the place to learn fresh skills and techniques from the masters. Members get instant access to all of SitePoint’s ebooks and interactive online courses, like Illustrator Basics.Frequently Asked Questions about Graphics Illustrator Freehand
How can I convert an image into a vector in Adobe Illustrator?
Converting an image into a vector in Adobe Illustrator is a simple process. First, open the image in Illustrator and select it. Then, go to the ‘Window’ menu and select ‘Image Trace’. This will open a new panel. In this panel, you can adjust the settings to get the desired result. Once you’re satisfied with the settings, click ‘Trace’. Now, your image has been converted into a vector. You can further edit it using the Direct Selection Tool.
How can I draw freehand in Adobe Illustrator?
Drawing freehand in Adobe Illustrator is quite straightforward. Select the Brush tool from the toolbar. You can adjust the brush size and style from the options bar at the top. Now, you can start drawing on the artboard just like you would on a piece of paper. The Pencil tool can also be used for freehand drawing.
How can I turn a hand-drawn image into a vector image in Illustrator?
To turn a hand-drawn image into a vector image in Illustrator, first, scan or photograph your drawing and open it in Illustrator. Then, use the Image Trace function to convert the image into a vector. You can adjust the settings in the Image Trace panel to get the desired result. Once you’re satisfied, click ‘Expand’ to finalize the conversion.
What are some tips for drawing in Illustrator?
When drawing in Illustrator, it’s important to use layers to keep your work organized. You can also use the Pen tool for precise lines and curves, and the Brush tool for more freehand styles. Don’t forget to take advantage of the Shape tools and Pathfinder panel for creating complex shapes.
How can I improve my Illustrator skills?
The best way to improve your Illustrator skills is through practice. Try to recreate existing designs or create your own. There are also many online tutorials and courses available that can help you learn new techniques and tools.
Can I use Illustrator for digital painting?
Yes, Illustrator can be used for digital painting. It has a variety of brushes and tools that can be used to create digital paintings. However, it’s important to note that Illustrator is a vector-based program, so the painting process may be different from raster-based programs like Photoshop.
How can I create custom brushes in Illustrator?
To create a custom brush in Illustrator, first, draw the shape or pattern you want to use as a brush. Then, select it and go to the Brushes panel. Click on the ‘New Brush’ button and choose the type of brush you want to create. Adjust the settings as needed and click ‘OK’.
How can I color my drawings in Illustrator?
Coloring in Illustrator can be done using the Fill and Stroke options. Select the object you want to color, then choose a color from the Color panel for the Fill or Stroke. You can also use the Gradient panel to apply gradients to your objects.
Can I use Illustrator to design logos?
Yes, Illustrator is a great tool for designing logos. Its vector-based nature makes it perfect for creating scalable logos that can be used in various sizes without losing quality. You can use the Shape tools, Pen tool, and Type tool to create your logo.
How can I export my Illustrator artwork?
To export your Illustrator artwork, go to the ‘File’ menu and select ‘Export’. Choose the format you want to export in, such as JPEG, PNG, or PDF. Adjust the settings as needed and click ‘Export’. Your artwork will be saved in the chosen format.
Corrie is the lead designer and developer for PixelMill. This would-be triathlete has a mathematics degree but wishes she had double-majored in computer science and art instead. Maybe next time...

