Chances are you’ve seen them online somewhere — they covered the Web a few years ago, but when used in moderation, collage-type images, such as the one shown here, can produce great results.
Essentially, the graphic is just a series of images, overlaid with a colored texture.
These collage-type images are commonly used as backgrounds, with other elements placed on top of them.
This tutorial will show you an easy way to produce these types of graphics using Macromedia Fireworks.
However, these techniques should work just as well on other graphics programs, given their simplicity.

1. The Canvas
To start, all you’ll need is a blank canvas, a few images, and about 10 spare minutes. If you’re in need of some stock images, check some of the references in this thread.
Firstly, open a white canvas, and set the size to match the dimensions of the area you want your image to cover. Now, consider what colour you’d like the base colour of your finished graphic to be, and place a square of your selected colour over the canvas area.
A good rule of thumb for colour selection is that if your images are dark, choose a lighter shade, and if they’re light, select a slightly darker shade. Here, I’ve used a dark green because my images have a lot of light areas.
2. Prep the Images
Next, import a number of pictures that will adequately cover the canvas area, resizing them if need be. Now, we need to make these images ‘melt’ together.
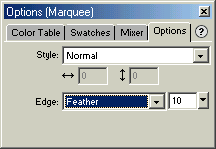
First, let’s feather the edges of each image by cutting them out using the marquee tool:
![]() …with edge set to "feather". I’ve used a value of 10%, but you can alter this figure to reflect the degree to which you wish your images to ‘melt’ together.
…with edge set to "feather". I’ve used a value of 10%, but you can alter this figure to reflect the degree to which you wish your images to ‘melt’ together.

Now, when you cut the images with a feather edge, only feather the edges that will ‘melt’ with other images — not the sides, or top and bottom of your canvas.
As demonstrated below, you’d feather only one side of the images that will appear at each end of your canvas, and you’d feather both the left and right sides of images that will appear in the middle of the canvas. But you’ll never need to feather the top and bottom edges of your images.

Now copy the selected region of each image, and delete the original. Finally, paste the new feathered image back in. Repeat this process for each of your images.
3. Create the Collage
Position the images on your canvas as I have below, with the feathered edges overlapping each other. The amount of overlap is really up to you.

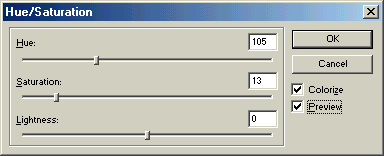
Next, you need to colorize the images. So, select all your images, click Effects > Adjust Color > Hue/Saturation, and check "Colourize". Adjust the Hue, Saturation and Lightness to produce your desired color. Keep in mind that dark and dull colors work best.

Next, adjust your image’s opacity. In the collage below, I’ve selected 80% so that the dark green square that I laid over my canvas won’t show through too much. If your images are light, use a low opacity percentage, to allow that coloured square to show through more strongly.

Why is the use of that colored square so important? Well, if one of your images is dark, and another is light, this solid coloured square will help the images ‘melt’ together more completely.
4. Finishing Touches
Now, place another square of your desired color over the top of the collage image, and set its opacity — I’ve used 30% here. Use the opacity of this square to adjust the overall image’s darkness.
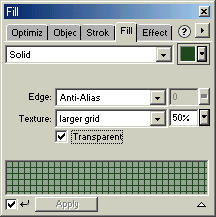
Next, fill the square with your desired texture: either lines, squares, or the textures packaged with Fireworks. In this case, I’ve chosen squares. Make the texture transparent, and set the texture amount to 50% as shown below. Yet again, adjust this to your particular liking.

You can adjust any of the values or colors to get the exact look you desire.
For instance, colorizing the images and the two squares will change the collage’s color completely. Try various fill textures also with different levels of fill amount and object opacity, and see what you like. Play around with the values, and you’ll be able to produce varying effects to suit a range of different purposes. You can also lay other images over the originals to produce different results.
5. A Few Variations
The final result should look similar to this:

To add some more detail and depth, simply place more images over your originals, under that final textured square.

As you can see, these types of images are well applied as backgrounds on header graphics etc. Changing the texture is just as easy:

Have a play around with this technique to see what you can come up with. Trial and error is the best way to come up with the specific look you desire.
I hope you enjoy using this effect!
Daniel is currently studying a Bachelor of Information and Communications Technology at Notre Dame University. He's been a freelance Web and graphic designer for past 4 years, and also enjoys teaching himself about computers and the Internet. Visit him at www.DanielKerton.com.
