Drupal is one of the most popular open source content management systems. It has a lot of functionality built in and thousands of free and paid modules to choose from for your site. It has a very extensible and flexible architecture which lets you build on top of the Drupal core and extend its functionality as needed. Drupal lets you plug into its system using Drupal hooks. We are going to use some of the hooks in the module which we are going to build in this article – a Drupal 7 module to show the different types of nodes (all content on a Drupal website is stored and treated as nodes) on your Drupal site by creating a Drupal block. The types of nodes which will be shown can be selected in the configuration menu of the module.
Before we begin, if you don’t have an active Drupal installation on your machine, please set one up by following the instructions in their installation guide.
Building your module’s basic structure
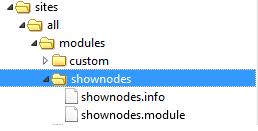
Let’s start by creating the basic folder structure and files for our module. A Drupal module needs to be placed in a specific directory in your Drupal installation and it needs to have some basic files so that it can be identified as a module by the Drupal system. The first thing we need to do is create a folder for our module called shownodes. That folder should be kept in the sites\all\modules\ folder of your Drupal installation. In this folder create two blank files called shownodes.info and shownodes.module.
The file shownodes.info provides the general information about your module to Drupal and the file shownodes.module will contain the implementation for various hooks used by our module. The following is how the file structure should look for our module.
Now open the shownodes.info file and add the following content:
name = shownodes
description = This module displays various nodes in a block on your Drupal site.
core = 7.x
This basically describes your module’s basic properties like its name, description and on which Drupal core level it can be deployed. Once you have added these details to the shownodes.info file you should be able to see your module in the module list as shown below. You can enable your module now.

Understanding Drupal Hooks
The system to extend Drupal is built completely on the concept of hooks. Hooks are based on naming. For a module to implement a hook in Drupal, it has to create a function called modulename_hookname depending on which hook it needs to implement in the .module file. Once there is an event to call the hooks, the Drupal system will call the hook implementation of all the enabled modules. To read more about the available hooks visit the hooks documentation page.
The first hook we will implement in our module is the hook_help which lets you provide help text on your module to describe what your module does.
Add the following code to your shownodes.module file
<?php
/**
 * @file
 * This is the main module file.
 */

/**
 * Implements hook_help().
 */
function shownodes_help($path, $arg) {

  if ($path == 'admin/help#shownodes') {
    $output = '<h3>' . t('About') . '</h3>';
    $output .= '<p>' . t('The shownodes module allows the Administrator to display various types of nodes as a block on your Drupal site.') . '</p>';
    return $output;
  }
}
We are implementing the hook_help hook through a function called shownodes_help which returns the help text for our module whenever the help request is fired. Once you have implemented this hook the help option will be shown on the module and clicking it will show the help as follows.

Adding configuration options to your Module
Now let’s add some configuration options for the administrator of our site. We will create an options page for the Administrator so that he can select which node types he wants to display in the block. This can be done using the Drupal menu hooks. We will implement the hook_menu hook in our shownodes.module like so:
/**
* Implementation of hook_menu().
*/
function shownodes_menu() {

  $items['admin/config/shownodes'] = array(
  'title' => t('Choose the nodes to show'),
  'description' => t('You can select which node types you want to show'),
  'page callback' => 'system_admin_menu_block_page',
  'access arguments' => array('administer site configuration'),
  'file' => 'system.admin.inc',
  'file path' => drupal_get_path('module', 'system'),
  );

  $items['admin/config/shownodes/settings'] = array(
  'title' => t('Choose the nodes to show'),
  'description' => t('You can select which node types you want to show'),
  'page callback' => 'drupal_get_form',
  'page arguments' => array('shownodes_admin_settings'),
  'access arguments' => array('administer site configuration'),
  'type' => MENU_NORMAL_ITEM,
  );

  return $items;
}

function shownodes_admin_settings() {

  $types = node_type_get_types();
  foreach($types as $node_type) {
    $nodetypes[$node_type->type] = $node_type->name;
  }

  $form['shownodes_nodes_toshow'] = array(
  '#type' => 'checkboxes',
  '#title' => t('Select the nodes to show'),
  '#options' => $nodetypes,
  '#default_value' => variable_get('shownodes_nodes_toshow', array('')),
  '#description' => t('All the node types selected below will be shown'),
  );

  return system_settings_form($form);
}
You can read more about hook_menu at the aforementioned hooks docs page.
In this case, we create two menu items at the path admin/config/shownodes and admin/config/shownodes/settings and then we build a form with the help of drupal_get_form which creates check boxes for all the installed node types which we get from the Drupal function node_type_get_types. Saving the form, Drupal will automatically store the selected values in a variable using variable_set with the name taken from the form element which in our case is shownodes_nodes_toshow. We can fetch the value of this using the function variable_get('shownodes_nodes_toshow', array('')).
We will use this to set the default values in the form and then later in the block implementation below to show the selected node types. Once we have added the above functions we should be able to see our configuration option as shown below in the Administration->configuration option.

Selecting this option will show us our form with all the node types in the Drupal system and we will be able to select and save the node types which we want to show on our block as shown below.

Creating latest node Block
Once our configuration is saved we will build our block to display the node types which were selected in the configuration. To create a block we will implement the hooks hook_block_info and hook_block_view as shown below.
/**
 * Implements hook_block_info().
 */
function shownodes_block_info() {
  $blocks = array();

  $blocks['shownodeblock'] = array(
    'info' => t('A block to show selected nodes'),
  );

  return $blocks;
}

/**
 * Implements hook_block_view().
 */
function shownodes_block_view($block_name = '') {
  if ($block_name == 'shownodeblock') {

    //Get the selected node types and create a list of them
    $show_nodes_list = array();
    $show_nodes_array = variable_get('shownodes_nodes_toshow', array(''));
    foreach ($show_nodes_array as $key => $value) {
      if($value) {
          array_push($show_nodes_list,$value);
      }
    }

    //Based on the node types create a query and then load the node types
    $query = new EntityFieldQuery();
    $query
    ->entityCondition('entity_type', 'node')
    ->entityCondition('bundle', $show_nodes_list)
    ->propertyCondition('status', 1)
    ->propertyOrderBy('created', 'DESC');

    $result = $query->execute();
    $nodes = array();
    if (isset($result['node'])) {
      $nids = array_keys($result['node']);
      $nodes = node_load_multiple($nids);
    }

    //Loop through the loded nodes to create a list
    //Which we will pass to the theme
    $list = array();
    foreach ($nodes as $node) {
      $options = array('absolute' => TRUE);
      $url = url('node/' . $node->nid, $options);
      $list[] = '<a href='.$url.'>'.$node->title.'</a>';
    }

    //Return the content of the block
    $theme_args = array('items' => $list, 'type' => 'ol');
    $content = theme('item_list', $theme_args);

    $block = array(
      'subject' => t('Show Nodes Block'),
      'content' => $content,
    );
    return $block;
  }
}
In the above code we define a new block called shownodeblock in the function shownodes_block_info. Then, in the function shownodes_block_view we provide the view for that block by first reading the values which were saved in the configuration using the function variable_get('shownodes_nodes_toshow', array(''));. Next we query Drupal to get the node IDs based on the node types using the EntityFieldQuery class. Finally, we load those nodes and then loop through them to show them on our block.
Once we have added the above code we should see our block in the block list. You can place the block in one of the regions (regions are actual parts of your layout, essentially, locations for blocks)

Once the block is placed in one of the regions it can be seen in the region displaying the node types as follows

Conclusion
In this article we created a complete Drupal module from scratch. We used different Drupal hooks and Drupal functions to create a configuration page and to create a block which we can place on a region. Drupal provides a variety of hooks which can be used to customize and provide additional functionality over the core. Through this short and fun tutorial, we’ve proven the extensible nature of Drupal makes expanding on it an easy and pleasant task. If you’d like to check out the full source code of this module, please see the Github repo.
 Abbas Suterwala
Abbas is a software engineer by profession and a passionate coder who lives every moment to the fullest. He loves open source projects and WordPress. When not chilling around with friends he's occupied with one of the following open source projects he's built: Choomantar, The Browser Counter WordPress plugin, and Google Buzz From Admin.