There are few things that people like to do more than give their opinion about a subject of interest to them – especially on the Web. This can be very useful for engaging your site’s visitors, measuring their interest in a topic, or just allowing them to express themselves. Web 2.0, and the advent of Rich Internet Applications (RIAs), allow for the installation of polling widgets on your web site, making it easier than ever to take the pulse of your community.
There are several different technologies you could use to build an interactive voting widget, but the end user needs to be considered carefully. For instance, you could use Ajax – but this approach can introduce issues with client-side compatibility. You could use Applets, but that’s not a popular choice at the moment – too many web surfers disable the Java VM in their browsers.
A very good option, on the other hand, is Flash. Practically everyone has it installed – who hasn’t come across a link to YouTube at some point and wanted to watch a video?
But what if you’re not across Flash? And isn’t Flash really an animator’s tool anyway? Well, as we’ll see, it’s easy for developers to build Flash applications using the Flex framework – freely available as open source from Adobe. In this article, the first of two on this complex subject, we’ll walk through the process of building a Flash widget for voting using the Flex framework.
Download the code archive for this article if you’d like to play along at home.
Pay attention – there will be a quiz at the end! The first 100 people to complete the quiz will win a copy of my book, Getting Started With Flex 3, delivered to their front door for FREE, thanks to Adobe. You can also download the book in PDF format for free for a limited time.
Flex Basics
Before we go any further, we’ll pause for a minute to talk about the Flex and Flash applications and where they fit into the client landscape. Take a look at the following graphic.
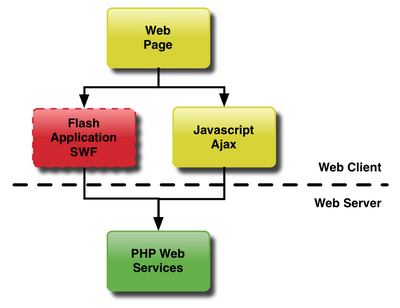
This diagram demonstrates how a Web 2.0 web page interacts with a PHP web server. The web page uses one of several tools to communicate with the web server. It can use Javascript and Ajax to make a request of the server, then update the page with the new data. Or it can use a Flash application to provide functionality to the user. This Flash application can either take up the entire page, or it may be contained to a widget that takes up just a portion of it. Flex has been used very successfully in both scenarios.
Flex applications are made of roughly three parts: the MXML that defines the interface, the ActionScript code that contains the application logic, and resources such as images and audio. To draw an analogy with web technologies, the MXML and ActionScript would be HTML and JavaScript respectively.
Now you could download the SDK and program your application using a simple text editor, but there’s a better option – a really good IDE called Flex Builder 3, available free from Adobe as a 30-day trial.
The following diagram shows Flex Builder 3 and how its function fits into the life cycle of generating a Flash application SWF.
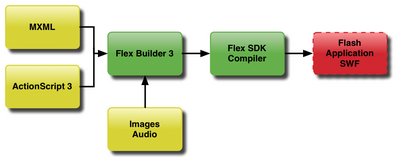
Flex Builder manages the MXML, ActionScript, and resources as a project. It uses the Flex SDK compiler to continuously compile the project as you make changes. That temporary output SWF file is then launched in your default browser to do the testing.
Hopefully this provides some context for getting started with Flex. If you’d like a more detailed walk-through of this subject, I recommend you try this excellent tutorial on Flex for beginners.
Getting Flex Up and Running
The Flex Builder 3 installer comes with everything you need built in. It automatically installs the Flex SDK, as well as the Eclipse-based IDE and the AIR runtime (which is useful if you want to build a desktop application rather than a web app.
Once you have Flex Builder 3 installed on your machine, launch it and you should see something like this.
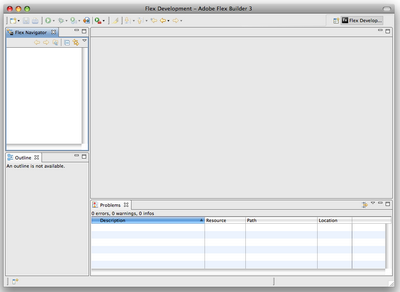
This is the empty Flex IDE. The next step is to create our first Flex project. Select Flex Project from the New menu and you should see this window.
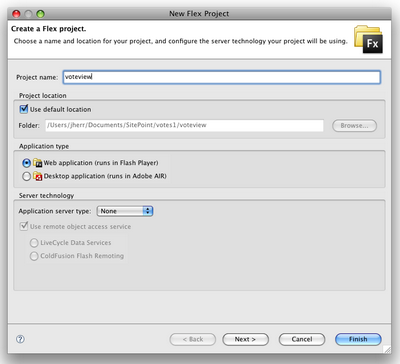
You can name your project whatever you like. I chose Voteview, since for the purposes of this article I’m only going to build an application that views the current vote totals. We’ll discover the interactive widget in the next article.
After you hit Finish to build the project, you should see the result pictured below.
Flex Builder 3 automatically creates an MXML application with the same name as the project. In this case, the “voteview” project has one source file, voteviewer.mxml.
At this point, you’re probably thinking, “I thought we were doing Flex, so what’s this MXML?” MXML is one of the two major technologies in a Flex application; it’s a tag-based language used to build user interfaces. The other is ActionScript 3, which is the programming language that we use to add interactivity to the interface.
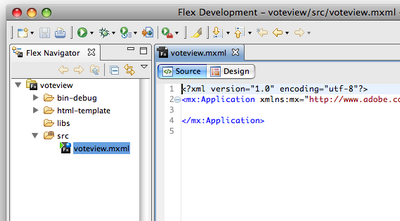
To make sure that everything’s working okay, we’ll add just a single tag to the MXML file, as shown here:
<?xml version="1.0" encoding="utf-8"?>

<mx:Application xmlns:mx="http://www.adobe.com/2006/mxml" layout="vertical">

  <mx:Label text="Hello World" fontSize="20" />

</mx:Application>
The <mx:Label> tag specifies that we want a control of type Label with the text of Hello World where the font size is 20px. This figure shows the result of launching it in Flex Builder.
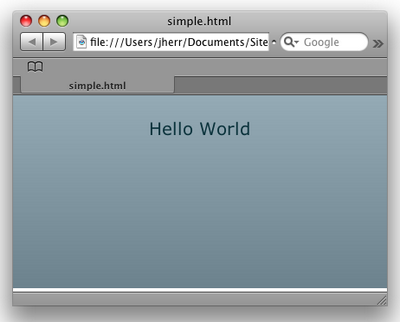
If that works, you know that everything is installed correctly and you’re all set to start developing in Flex.
The next step is to put an XML file on a web server that will contain the current vote totals. This is the data that the Flex application will fetch and display.
You can format your XML any way you choose, but something along these lines is simple enough:
<votes>

  <topic>What is the best Star Wars movie?</topic>

  <options>

    <option count="150" name="Episode IV" />

    <option count="250" name="Episode V" />

    <option count="50" name="Episode III" />

  </options>

</votes>
This XML defines that there is one question with three options, where each option has a name and a count of votes.
Once this XML file is up on your server somewhere (in my case, the localhost Apache server on my Mac), we can add some more tags to the MXML and get this party started!
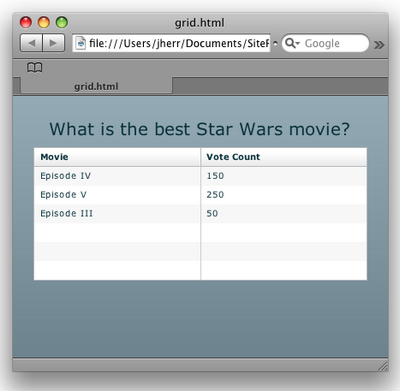
Here’s a simple Flex application that reads the data from the XML file and then displays the question in a Label control, and the current votes in a DataGrid control:
<?xml version="1.0" encoding="utf-8"?>

<mx:Application xmlns:mx="http://www.adobe.com/2006/mxml" layout="vertical"

  creationComplete="votes.send()">

  <mx:HTTPService id="votes" resultFormat="object" url="http://localhost/votes.xml" />

  <mx:Label fontSize="20" text="{votes.lastResult.votes.topic}" />

  <mx:DataGrid width="100%" dataProvider="{votes.lastResult.votes.options.option}">

    <mx:columns>

      <mx:DataGridColumn dataField="name" headerText="Movie" />

      <mx:DataGridColumn dataField="count" headerText="Vote Count" />

    </mx:columns>

  </mx:DataGrid>

</mx:Application>
There are two key elements involved in the code above. The first is the mx:HTTPService tag that defines where we will retrieve the data, and specifies an id for the data source. This service is invoked by the code attached to the creationComplete event on the Application tag.
The data display is handled automatically by Flex through the magic of the Flex event model. When the HTTService has successfully downloaded the XML, the lastResult variable on the service notifies the Label and the DataGrid that it has changed. Those controls then update themselves automatically to show the new values returned by the server.
Here’s the result of launching this in Flex Builder.
Well, it works okay, but it’s not very sexy in appearance, is it? I’m all about the sexy look, so I’m going to use Flex’s built-in charting service to display the votes in a pie chart instead of a DataGrid.
This updated code is shown below:
<?xml version="1.0" encoding="utf-8"?>

<mx:Application xmlns:mx="http://www.adobe.com/2006/mxml" layout="vertical"

  creationComplete="votes.send()">

  <mx:HTTPService id="votes" resultFormat="object" url="http://localhost/votes.xml" />

  <mx:Label fontSize="20" text="{votes.lastResult.votes.topic}" />

  <mx:PieChart width="100%" height="100%"

    showAllDataTips="true"

    dataProvider="{votes.lastResult.votes.options.option}">

    <mx:series>

      <mx:PieSeries field="count" labelField="name" nameField="name" explodeRadius="0.1" />

    </mx:series>

  </mx:PieChart>

</mx:Application>
The only change here is that we replaced the DataGrid with a PieChart control. When we run this in Flex Builder, we’ll see the window shown here.

Now, that’s certainly better. A picture is worth a thousand words, as they say. But could it be even cooler? As it turns out, it can; the Elixir data visualization components available from ILOG offers a set of amazing charting controls that you can use on a trial basis.
Once we’ve installed the ILOG Elixir controls on the machine, we can link them into the project by referencing the Elixir libraries. From there, we add a reference to the Elixir PieChart3D instead of to the original PieChart control.
This updated code is shown below:
<?xml version="1.0" encoding="utf-8"?>

<mx:Application xmlns:mx="http://www.adobe.com/2006/mxml" layout="vertical"

  creationComplete="votes.send()" xmlns:ilog="http://www.ilog.com/2007/ilog/flex">

  <mx:HTTPService id="votes" resultFormat="object" url="http://localhost/votes.xml" />

  <mx:Label fontSize="20" text="{votes.lastResult.votes.topic}" />

  <ilog:PieChart3D width="100%" height="100%"

    showAllDataTips="true"

    dataProvider="{votes.lastResult.votes.options.option}" elevationAngle="30">

    <ilog:series>

      <ilog:PieSeries3D field="count" nameField="name" explodeRadius="0.1" />

    </ilog:series>

  </ilog:PieChart3D>

</mx:Application>
And when brought up in Flex Builder 3, it looks like this figure.
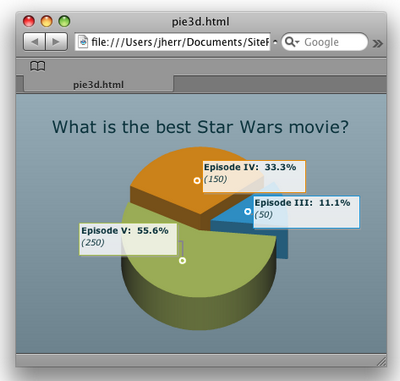
Now we’re really cooking with gas! With Elixir we can change the rotation of the chart, the colors, the viewing angle, the lighting, and more. We can even do all that on the fly by responding to mouseclick events and changing the parameters on the chart using ActionScript. This functionality allows the voter to spin the chart around and view it from different angles.
This is about as far as I’m going to go with the interface in this article series. To finish up, I’ll demonstrate how to use a different data transport technology, AMF, instead of XML. AMF is easier to use, particularly when you’re both reading and writing data – more on this in the next instalment!
NOTE:
AMF and XML aren’t the only ways that Flex can access data. Your applications can read JSON, text, AMF, or go direct to binary data through sockets. In other words, wherever your data is and whatever the format, Flex applications can get to it.
Going to AMF
Let’s use the free AMFPHP package to build an AMF service on the web server. AMFPHP comes with a built-in service browser, which I’ll show you in a minute, plus a directory where you put your services. In this case, we’ll add a new service to a new “votes” directory called VoteService.
Here’s the PHP code for VoteService:
<?php

include_once(AMFPHP_BASE . "shared/util/MethodTable.php");

class VoteService

{

  function getVotes()

  {

    return array( 'topic' => 'What is the best Star Wars movie?',

        'votes' => array(

            array( 'name' => 'Episode IV', 'count' => 150 ),

            array( 'name' => 'Episode V', 'count' => 250 ),

            array( 'name' => 'Episode III', 'count' => 50 )

          )

        );

  }

}
For this example, we’re just going to return the same data as we’d have gained from the XML file on the server. That way, if the results look the same we know everything’s in order.
To test the service, navigate to the amfphp/browser directory in your browser. You should see something like this.
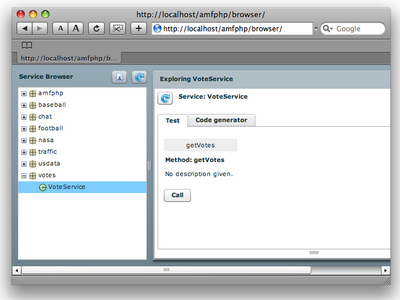
Next, click on the votes/VoteService and hit the Call button. This causes the AMF browser to invoke the service and display the results, as shown here.
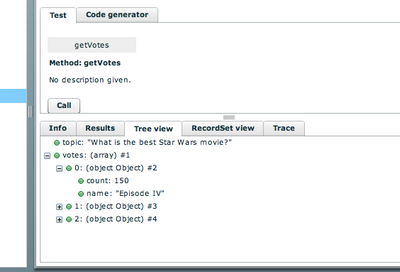
We can see that the data is returned correctly as an ActionScript object that’s very easy to manipulate.
From here, we can change the HTTPService from the original PieChart application to a RemoteObject service. The RemoteObject class connects to the AMF endpoint and then defines a bunch of methods. You can see this in the updated source:
<?xml version="1.0" encoding="utf-8"?>

<mx:Application xmlns:mx="http://www.adobe.com/2006/mxml" layout="vertical"

  creationComplete="voteRO.getVotes.send()">

<mx:RemoteObject id="voteRO"

  endpoint="http://localhost/amfphp/gateway.php"

  source="votes.VoteService" destination="votes.VoteService"

  showBusyCursor="true">

<mx:method name="getVotes" />

</mx:RemoteObject>

  <mx:Label fontSize="20" text="{voteRO.getVotes.lastResult.topic}" />

  <mx:PieChart width="100%" height="100%"

    showAllDataTips="true"

    dataProvider="{voteRO.getVotes.lastResult.votes}">

...

  </mx:PieChart>

</mx:Application>
Yes, that’s a lot more code than the HTTPService required to achieve the same outcome (don’t forget to download the code archive for this article). But using AMF instead of XML will make it a lot easier to perform both the vote collection and vote addition from the widget that we’ll create in the next article of this series.
What’s Next
So far, we’ve installed Flex Builder and created an application that displays some vote tallies from either an XML or an AMF data source. In the next article, we’ll upgrade this example to provide the voter with a way to submit votes before seeing the vote tallies.
Quiz Yourself!
Test your understanding of this article with a short quiz, and receive a FREE PDF of my book, Getting Started With Flex 3. The first 100 people to complete the quiz will also receive a paper copy delivered to their door for FREE, thanks to Adobe Systems.
 Jack Herrington
Jack Herrington is an engineer, author, and presenter who lives and works in the San Francisco Bay Area. He lives with his wife, daughter and two adopted dogs. When he's not writing software, books, or articles you can find him cycling, running, or in the pool training for triathlons. You can keep up with Jack's work and his writing at http://jackherrington.com.