
This article was peer reviewed by Haydar KÜLEKCİ. Thanks to all of SitePoint’s peer reviewers for making SitePoint content the best it can be!
With the explosion of machine learning services in recent years, it has become easier than ever for developers to create “smart apps”. In this article, I’ll introduce you to Microsoft’s offering for providing machine-learning capabilities to apps. Specifically, you’ll learn about the Text Analytics API and build an app to enhance the understanding of online sellers when it comes to their customers.

Microsoft Text Analytics API
The Text Analytics API is a part of Microsoft Cognitive Services, a collection of APIs the aim of which is to give apps a human side. The Text Analytics API includes the following features:
- Sentiment analysis – returns a score between 0 and 1 to identify and extract subjective opinion about given text. Numbers that are closest to 0 indicate a negative sentiment, and numbers that are closest to 1 indicate a positive sentiment.
- Key phrase extraction (terminology extraction) – returns a list of strings denoting the key talking points in the text supplied.
- Topic detection – detects the topic across a group of text records. This requires a minimum of 100 text records in order for it to work.
- Language detection – returns the detected languages along with their certainty score denoting how sure the engine is about a language’s detection.
Getting an API Key?
Microsoft Cognitive Services are offered as part of the Microsoft Azure Platform so you have to sign up for an account on the Azure website if you don’t already have one. Before doing that, you have to sign up for a Microsoft Live account which you will then use to sign up for Azure.
- Create a Microsoft Live Account
- Microsoft Azure Website – click on the Try it now button or any sign up button.
Once you’ve supplied all the information required, you may also need to supply your credit card information. You’ll get some free credit usable within a month after signing up. The Text Analytics API should also be free of charge for up to 5000 transactions each month. This should be more than enough for testing purposes.
Once your account is created, you should be redirected to the Azure portal. Once there, go to the search bar and type in cognitive services. Click on the one that says Cognitive Services accounts (preview).
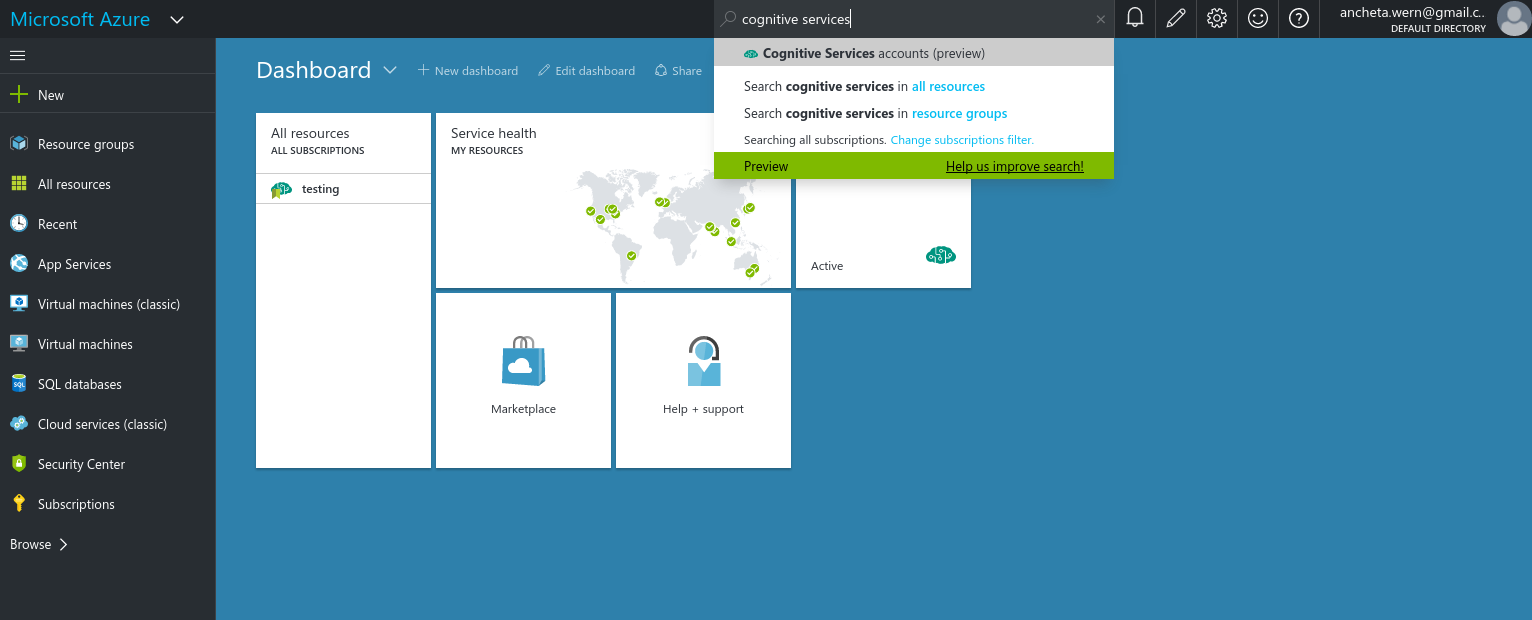
This should show you an interface similar to the one below:
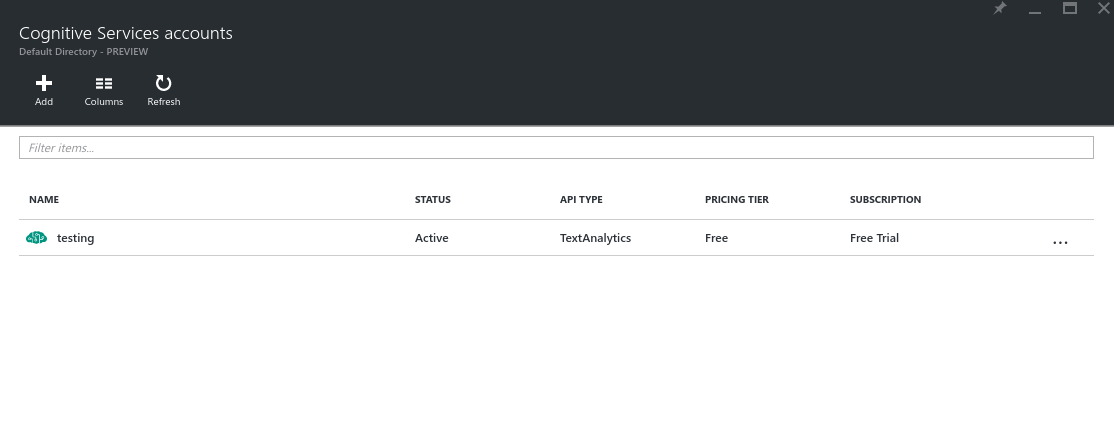
Click on the add button and fill up following fields:
- Account name – you can pick any name you want.
- API type – select Text Analytics.
- Pricing tier – select the free one which is the 5000 calls per month.
- Subscription – free trial.
- Resource group – select the existing one if you already have one, otherwise create a new resource group by picking the new option and then enter the name you want.
- Location – select West US.
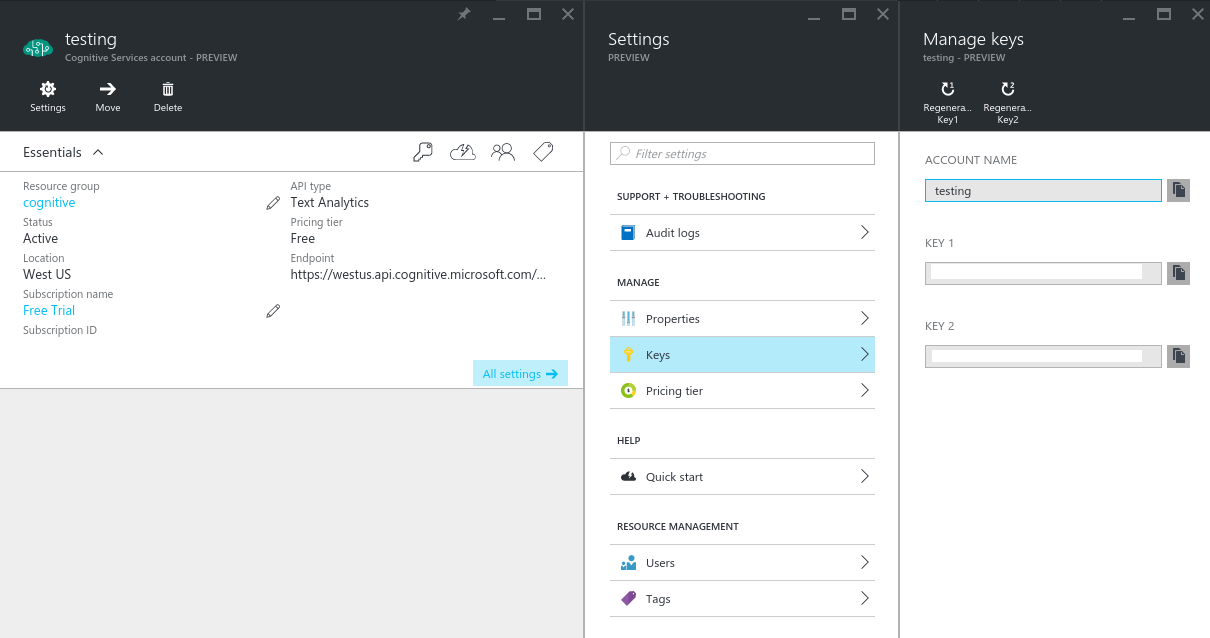
After agreeing to legal terms, click on the Create button. Give it a few seconds to deploy and click on the refresh button once you get a notification saying that the service has been deployed. This should list the new service. Click on it to view its general details. From there, you can click on keys to view the API keys that you can use when making requests.
Playing with the API
Now that you have an API key you can play with the API from each of these pages:
Here’s an example:
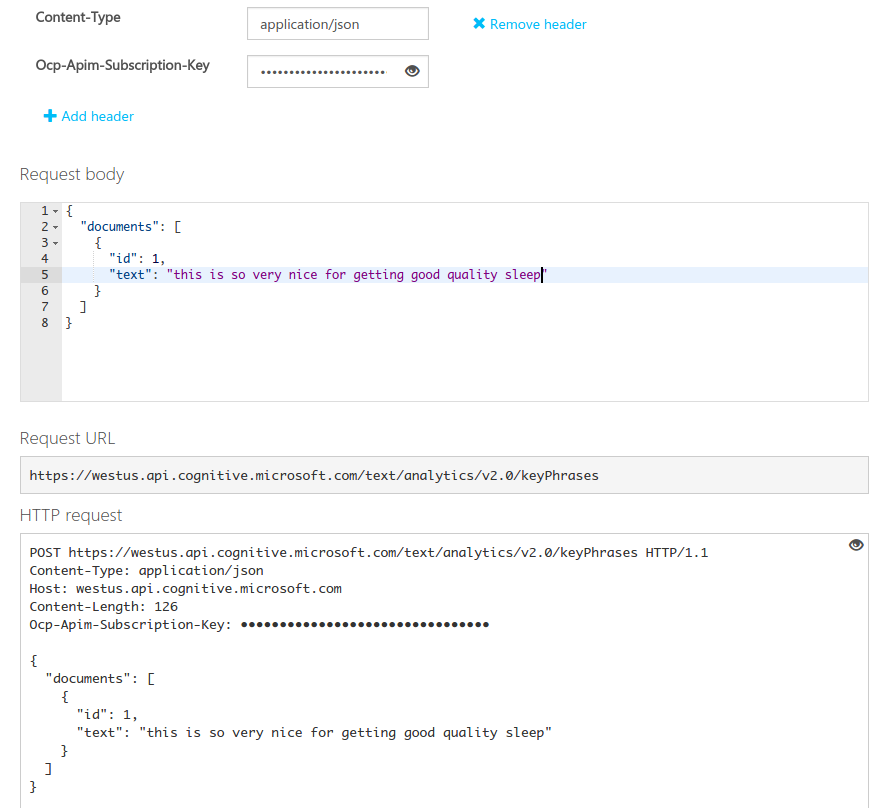
All you have to do is supply your API key as the value for the Ocp-Apim-Subscription-Key header. You can also click on Add header if there are any additional headers that the endpoint requires. Then add the following for the request body:
{
  "documents": [
    {
      "id": 1,
      "text": "this is so very nice for getting good quality sleep"
    }
  ]
}
This is the common structure for the request body. Just supply an object containing a property called documents and it will have an array of objects as its value. The object should only contain two properties: id and text. The id should be unique so that each text value that you supply will be uniquely identified.
Click on the Send button to send the request. It should give you the following response:
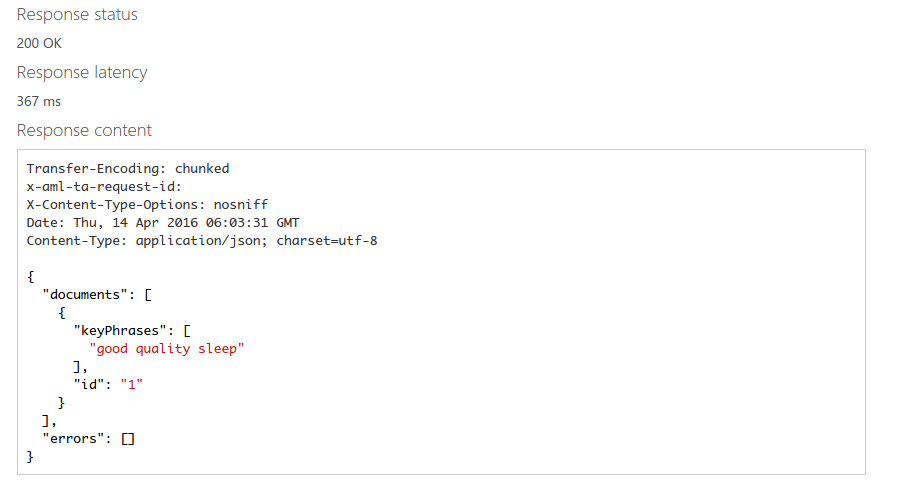
As you can see, it gives you the same structure that you have specified in your request body. Only this time it already has an array of keyPhrases instead of the text.
There’s also an operation status API, which you can only use when you have a pending operation from any of the requests that you have sent to the API. An operation is considered pending when you don’t get the data that you’re expecting in the response body of your request. In those cases, the API returns 202 Accepted for the status code. This is where the operation status endpoint comes in. This endpoint responds to GET requests to this URL:
https://westus.api.cognitive.microsoft.com/text/analytics/v2.0/operations/{operationId}
The operationId is the ID of the request which returned a 202 status code. You can find it in the x-aml-ta-request-id response header.
Setting up the Project
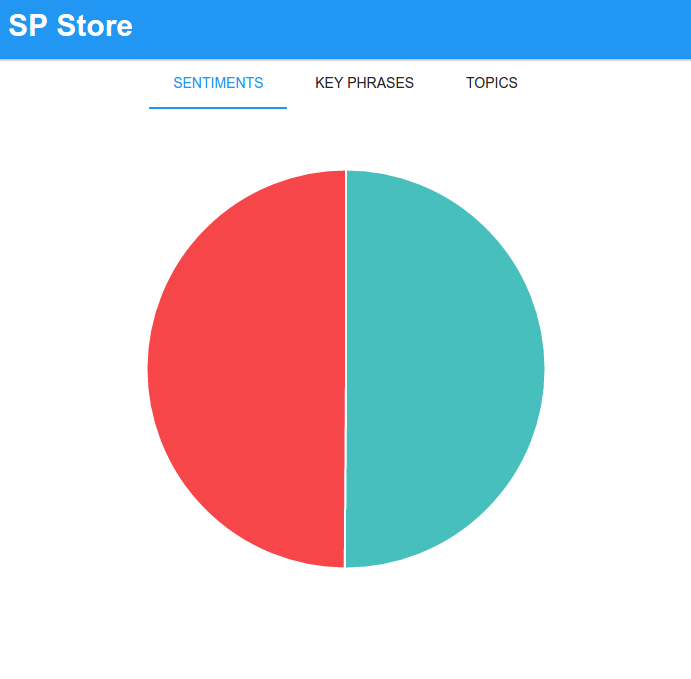
As mentioned in the introduction earlier, you’re going to build an app to enhance the understanding of online sellers when it comes to their customers. You’re going to build a small portion of the back-end of an online store where the sellers can have an insight into what their customers think of their products. This is where the text analytics API comes into play. You’ll get the customer reviews from this Amazon product and send them to the API for analysis. Then you’ll render the results in the front-end of the website. Here are some screenshots on what the app is going to look like.
The sentiments tab shows the average sentiment that the customers have on a specific product.
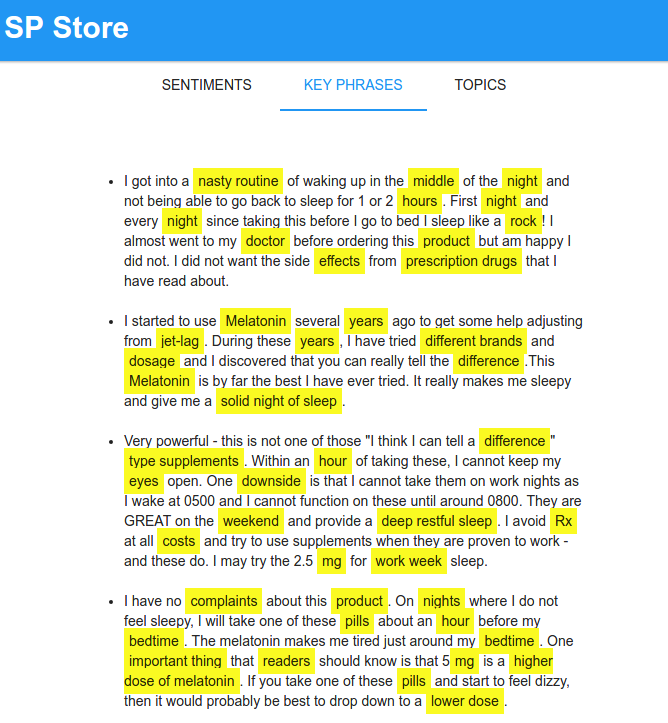
The key phrases tab highlights the key words and phrases in a specific review text.
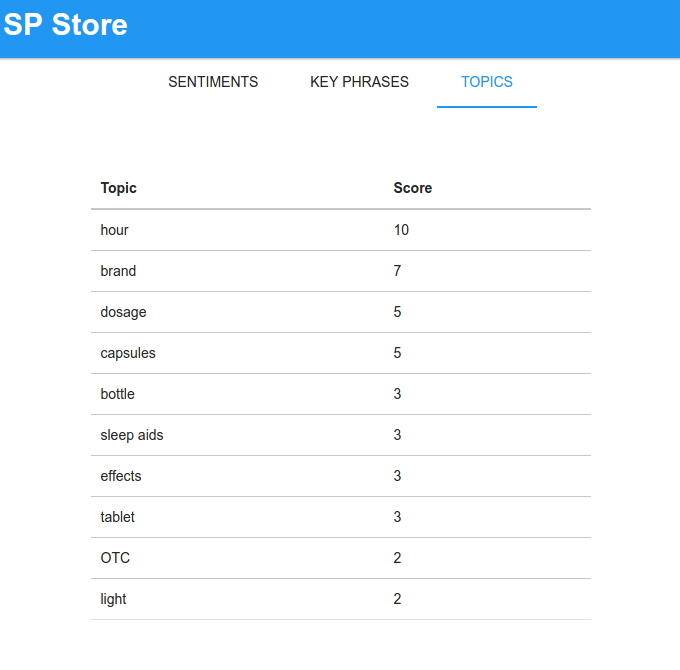
And the topics tab shows a table of the top ten topics being talked about by the customers.
Installing the Dependencies
You’ll be using Slim’s skeleton for this project. You can install it with the following command:
composer create-project -n -s dev akrabat/slim3-skeleton sp_store
This will create an sp_store folder. Navigate inside that folder and use Composer to install the following libraries:
slim/pdo– a PDO database library for the Slim framework.vlucas/phpdotenv– loads environment variables for the app.guzzlehttp/guzzle– used for performing requests to the API.maximebf/consolekit– used for creating commands that will get results from the API.
Database
The app will also use a database. You can find the SQL dump of the database schema in this gist. Here’s what each table does:
- requests – stores the operations which haven’t returned a response yet.
- reviews – stores the reviews for each product.
- review_key_phrases – stores the key phrases found for each review text.
- review_sentiments – stores the score for each review.
- topics – stores the topics determined from a group of reviews.
- review_topics – stores the topics determined for each review and their corresponding distance.
If you don’t want to bother with acquiring product reviews to send to the API, here’s a data dump for the reviews table that I used for testing. All credit goes to Amazon and all the customers who left a review for this product.
Configuring the Project
In the root of the project directory, create a .env file and add the following:
APP_NAME="SP Store"
APP_BASE_URL=http://spstore.dev
DB_HOST=localhost
DB_NAME=sp_store
DB_USER=user
DB_PASS=secret
CS_KEY="YOUR API KEY"
Make sure to replace APP_BASE_URL with the url you assigned to your app, all the DB_ config with your database credentials, and the CS_KEY with the API key that you got from Microsoft Azure Portal.
Go to the app directory and edit the settings.php file and set displayErrorDetails to true so you know exactly what’s going on in case things go wrong.
'displayErrorDetails' => true,
Change the folder permission of the cache and log folders to 755. This allows Slim to write to these directories.
sudo chmod -R 755 cache log
Building the Project
Now you’re ready to build the project. First you’ll work with the part where requests are made to the API.
Utility Classes
Create the following files inside the app/src/Lib directory:
HttpRequest.php– helper class for easily performing http requests with Guzzle.Reviews.php– used for interacting with the database.TextAnalyzer.php– used for making requests to the API.
Open the HttpRequest.php file and add the following code:
<?php
namespace App\Lib;

class HttpRequest
{
    private $headers;
    private $client;

    public function __construct()
    {
        $this->headers = [
            'Ocp-Apim-Subscription-Key' => getenv('CS_KEY'),
            'Content-Type' => 'application/json',
            'Accept' => 'application/json'
        ];
        $this->client = new \GuzzleHttp\Client(
            ['base_uri' => 'https://westus.api.cognitive.microsoft.com']
        );
    }

    public function make($type, $endpoint, $body)
    {
        try{
            $response = $this->client->request(
                $type, $endpoint,
                [
                    'headers' => $this->headers,
                    'body' => $body
                ]
            );
            $response_body = json_decode($response->getBody()->getContents(), true);

            if($response->getStatusCode() == 202){
                $operation_id = $response->getHeaderLine('x-aml-ta-request-id');
                return [
                    'operation_id' => $operation_id
                ];
            }

            return $response_body;

        } catch (RequestException $e) {
            if($e->hasReponse()){
                $error_data = json_decode($e->getResponse()->getBody()->getContents(), true);
                return ['error' => $error_data];
            }
        }
    }
}
Breaking down the code above, inside the constructor, supply the data required by the API in the header. This includes the Ocp-Apim-Subscription-Key which is the API key that you have. Content-Type and Accept headers are set to json which means that the request body should be in json format.
$this->headers = [
    'Ocp-Apim-Subscription-Key' => getenv('CS_KEY'),
    'Content-Type' => 'application/json',
    'Accept' => 'application/json'
];
$this->client = new \GuzzleHttp\Client(
    ['base_uri' => 'https://westus.api.cognitive.microsoft.com']
);
The make method accepts the http request method ($type), the endpoint ($endpoint) in the API in which to perform the request, and the data that you want to send ($body).
public function make($type, $endpoint, $body)
{
  ...
}
Set those in the request:
$response = $this->client->request(
    $type, $endpoint,
    [
        'headers' => $this->headers,
        'body' => $body
    ]
);
Once a response comes back, call a couple of methods from the $response object in order to get to the data that you want. The API returns a json string which is why you have to use json_decode to convert it to an array.
$response_body = json_decode($response->getBody()->getContents(), true);
Check for the “Accepted” status code (202). If this is the status code of the response, it means that the operation you requested isn’t completed yet. So instead of returning the $response_body, extract the x-aml-ta-request-id from the header. This is the ID of the operation that you requested. You can then get the data with this ID later by calling the get operation status endpoint.
if ($response->getStatusCode() == 202) {
    $operation_id = $response->getHeaderLine('x-aml-ta-request-id');
    return [
        'operation_id' => $operation_id
    ];
}

return $response_body;
Next open the TextAnalyzer.php file and add the following code:
<?php
namespace App\Lib;

class TextAnalyzer
{
    private $HttpRequest;

    public function __construct()
    {
        $this->HttpRequest = new HttpRequest();
    }

    public function formatDocs($docs)
    {
        $body = [
          'documents' => $docs
        ];
        return json_encode($body);
    }

    public function requestSentiments($docs)
    {
        $body = $this->formatDocs($docs);
        return $this->HttpRequest->make('POST', '/text/analytics/v2.0/sentiment', $body);
    }

    public function requestKeyPhrases($docs)
    {
        $body = $this->formatDocs($docs);
        return $this->HttpRequest->make('POST', '/text/analytics/v2.0/keyPhrases', $body);
    }

    public function requestTopics($docs)
    {
        $body = $this->formatDocs($docs);
        return $this->HttpRequest->make('POST', '/text/analytics/v2.0/topics', $body);
    }

    public function getAnalysis($request_id)
    {
        return $this->HttpRequest->make('GET', "/text/analytics/v2.0/operations/{$request_id}");
    }
}
The code above is pretty self-explanatory so I won’t go into details on what each line does. Just know that each method performs a request to a different endpoint in the API by making use of the HttpRequest class that you created earlier. The formatDocs method is responsible for formatting the text documents in a way that the API requires. This method gets called in each of the methods except for the getAnalysis method because it doesn’t require anything for the request body.
Open the Reviews.php file and add the following:
<?php
namespace App\Lib;

class Reviews
{
    private $db;

    public function __construct()
    {
        $db_host = getenv('DB_HOST');
        $db_name = getenv('DB_NAME');
        $dsn = "mysql:host={$db_host};dbname={$db_name};charset=utf8";
        $pdo = new \Slim\PDO\Database($dsn, getenv('DB_USER'), getenv('DB_PASS'));

        $this->db = $pdo;
    }

    public function getReviews()
    {
        $select_statement = $this->db->select(['id', 'review AS text'])
                   ->from('reviews')
                   ->where('analyzed', '=', 0)
                   ->limit(100);

        $stmt = $select_statement->execute();
        $data = $stmt->fetchAll();
        return $data;
    }

    public function getSentiments()
    {
        //gets sentiments from DB
        $select_statement = $this->db->select()
            ->from('review_sentiments');

        $stmt = $select_statement->execute();
        $data = $stmt->fetchAll();
        return $data;
    }

    public function getTopics()
    {
        $select_statement = $this->db->select(['topic', 'score'])
            ->from('topics')
            ->orderBy('score', 'DESC')
            ->limit(10);

        $stmt = $select_statement->execute();
        $data = $stmt->fetchAll();
        return $data;
    }

    public function getKeyPhrases()
    {
        $select_statement = $this->db->select(['review', 'key_phrases'])
            ->from('review_key_phrases')
            ->join('reviews', 'review_key_phrases.review_id', '=', 'reviews.id')
            ->where('analyzed', '=', 1)
            ->limit(10);

        $stmt = $select_statement->execute();
        $data = $stmt->fetchAll();
        return $data;
    }

    public function saveSentiments($sentiments)
    {
        foreach ($sentiments as $row) {
            $review_id = $row['id'];
            $score = $row['score'];
            $insert_statement = $this->db->insert(['review_id', 'score'])
                ->into('review_sentiments')
                ->values([$review_id, $score]);
            $insert_statement->execute();
        }
    }

    public function saveRequest($request_id, $request_type)
    {
        $insert_statement = $this->db->insert(['request_id', 'request_type', 'done'])
                ->into('requests')
                ->values([$request_id, $request_type, 0]);
        $insert_statement->execute();
    }

    public function updateRequest($request_id)
    {
        $update_statement = $this->db->update(['done' => 1])
                ->table('requests')
                ->where('request_id', '=', $request_id);
        $update_statement->execute();
    }

    public function saveTopics($topics_data)
    {
        $topics = $topics_data['topics'];
        foreach ($topics as $row) {
            $topic_id = $row['id'];
            $topic = $row['keyPhrase'];
            $score = $row['score'];
            $insert_statement = $this->db->insert(['topic_id', 'topic', 'score'])
                ->into('topics')
                ->values([$topic_id, $topic, $score]);
            $insert_statement->execute();
        }

        $review_topics = $topics_data['review_topics'];
        foreach ($review_topics as $row) {
            $review_id = $row['documentId'];
            $topic_id = $row['topicId'];
            $distance = $row['distance'];
            $insert_statement = $this->db->insert(['review_id', 'topic_id', 'distance'])
                ->into('review_topics')
                ->values([$review_id, $topic_id, $distance]);
            $insert_statement->execute();
        }
    }

    public function saveKeyPhrases($key_phrases)
    {
        foreach ($key_phrases as $row) {
            $review_id = $row['id'];
            $phrases = json_encode($row['keyPhrases']);
            $insert_statement = $this->db->insert(['review_id', 'key_phrases'])
                ->into('review_key_phrases')
                ->values([$review_id, $phrases]);
            $insert_statement->execute();
        }
    }

    public function getPendingRequests()
    {
        $select_statement = $this->db->select()
            ->from('requests')
            ->where('done', '=', 0);

        $stmt = $select_statement->execute();
        $data = $stmt->fetchAll();
        return $data;
    }

    public function setDone($from_id, $to_id)
    {
        $update_statement = $this->db->update(['analyzed' => 1])
            ->table('reviews')
            ->whereBetween('id', [$from_id, $to_id]);
        $update_statement->execute();
    }

    public function getAverageSentiment()
    {
        $select_statement = $this->db->select()
           ->from('review_sentiments')
           ->avg('score', 'avg_sentiment');
        $stmt = $select_statement->execute();
        $data = $stmt->fetch();
        return $data['avg_sentiment'];
    }
}
Again, this is pretty self-explanatory. Inside the constructor, you connect to the database. Each method in the class performs either a select, update or insert query to a specific table in the database.
Command Class
In this section, you’ll create a class that extends the Console Kit library. This allows you to perform requests to the API at a specific time using cron.
Start by creating a Commands/Analyze.php file inside the app/src directory and add the following code:
<?php
require 'vendor/autoload.php';

use \App\Lib\TextAnalyzer;
use \App\Lib\Reviews;

class AnalyzeCommand extends ConsoleKit\Command
{
    public function execute(array $args, array $options = array())
    {
        $dotenv = new \Dotenv\Dotenv(__DIR__ . '/../../..');
        $dotenv->load();

        $reviews = new Reviews();
        $text_analyzer = new TextAnalyzer();

        //check if there are pending requests
        $pending_requests = $reviews->getPendingRequests();
        foreach ($pending_requests as $request) {

            $request_id = $request['request_id'];
            $from_id = $request['from_review'];
            $to_id = $request['to_review'];

            $response = $text_analyzer->getAnalysis($request_id);
            if (strtolower($response['status']) == 'succeeded') {
                $result = $response['operationProcessingResult'];
                $topics = $result['topics'];
                $review_topics = $result['topicAssignments'];

                $reviews->saveTopics([
                    'topics' => $topics,
                    'review_topics' => $review_topics
                ]);

                $reviews->setDone($from_id, $to_id);
                $reviews->updateRequest($request_id);
            }
        }

        $docs = $reviews->getReviews();
        $total_docs = count($docs);

        if ($total_docs == 100) {
            $from_review = $docs[0]['id'];
            $to_review = $docs[$total_docs - 1]['id'];

            $sentiments_response = $text_analyzer->requestSentiments($docs);
            $reviews->saveSentiments($sentiments_response['documents']);
            $this->writeln('saved sentiments!');

            $key_phrases_response = $text_analyzer->requestKeyPhrases($docs);
            $reviews->saveKeyPhrases($key_phrases_response['documents']);
            $this->writeln('saved key phrases!');

            $topics_request_id = $text_analyzer->requestTopics($docs);
            $reviews->saveRequest($topics_request_id, 'topics', $from_review, $to_review);
            $this->writeln('topics requested! request ID: ' . $topics_request_id);
        }

        $this->writeln('Done!', ConsoleKit\Colors::GREEN);
    }
}

$console = new ConsoleKit\Console();
$console->addCommand('AnalyzeCommand');
$console->run();
Breaking down the code above. First, require the vendor/autoload.php file so you can use all the libraries as well as the utility classes that you created earlier.
require 'vendor/autoload.php';
use \App\Lib\TextAnalyzer;
use \App\Lib\Reviews;
Inside the execute method, initialize the dotenv library so you can get the configuration variables.
$dotenv = new \Dotenv\Dotenv(__DIR__ . '/../../..');
$dotenv->load();
Initialize the two utility classes:
$reviews = new Reviews();
$text_analyzer = new TextAnalyzer();
Fetch all the operations that haven’t been completed yet. In the database, these are stored in the requests table. All rows that have a value of 0 in the done column are returned.
$pending_requests = $reviews->getPendingRequests();
Loop through all the pending requests and request an analysis by calling the getAnalysis method from the $text_analyzer object. Note that the $request_id is the operation ID returned by the API when you made a request to a specific API endpoint. You only proceed with saving the results if the status has succeeded. This means that the request has been processed and the analysis data is ready to be fetched. Below, you are only taking into consideration the result of the topic detection endpoint. This is because the sentiment and key phrases endpoints returns the data immediately when you make a request. The data that you want are buried under the topics and topicAssignments key so extract those and save them into the database by calling the saveTopics method from the $reviews object. After that, you call the setDone method to flip the done switch of all the reviews that were analyzed so they don’t get picked again for analysis the next time the command runs. The same is true with the operation, the updateRequest method sets the operation to done so you don’t make a request to the same operation later on.
foreach ($pending_requests as $request) {

    $request_id = $request['request_id'];
    $from_id = $request['from_review'];
    $to_id = $request['to_review'];

    $response = $text_analyzer->getAnalysis($request_id);
    if (strtolower($response['status']) == 'succeeded') {
        $result = $response['operationProcessingResult'];
        $topics = $result['topics'];
        $review_topics = $result['topicAssignments'];

        $reviews->saveTopics([
            'topics' => $topics,
            'review_topics' => $review_topics
        ]);

        $reviews->setDone($from_id, $to_id);
        $reviews->updateRequest($request_id);
    }
}
Fetch product reviews from the database. The getReviews method limits the result to 100 rows. This is because the topics endpoint requires a minimum of 100 records in order for it to work. That’s why you’re also checking if the total number of documents returned is 100 before proceeding. If the condition returns true, determine the ID of the first and last rows that were returned. Save this information in the requests table by calling the saveRequest method. These are the same ID’s that you’ve used earlier in the code for processing pending operations.
Next, request data from the sentiments endpoint by calling the requestSentiments method. As mentioned earlier, this endpoint immediately returns the analysis data so you can save it to the review_sentiments table by calling the saveSentiments method. You also do the same with the key phrases endpoint. As for the topics endpoint, you’re only expecting to get the operation ID when you call the requestTopics method, so store it in the $topics_request_id variable and save the operation to the database. This way it will get selected for processing the next time the command runs.
$docs = $reviews->getReviews();
$total_docs = count($docs);

if ($total_docs == 100) {
    $from_review = $docs[0]['id'];
    $to_review = $docs[$total_docs - 1]['id'];

    $sentiments_response = $text_analyzer->requestSentiments($docs);
    $reviews->saveSentiments($sentiments_response['documents']);
    $this->writeln('saved sentiments!');

    $key_phrases_response = $text_analyzer->requestKeyPhrases($docs);
    $reviews->saveKeyPhrases($key_phrases_response['documents']);
    $this->writeln('saved key phrases!');

    $topics_request_id = $text_analyzer->requestTopics($docs);
    $reviews->saveRequest($topics_request_id, 'topics', $from_review, $to_review);
    $this->writeln('topics requested! request ID: ' . $topics_request_id);
}
Once you’re done with that, save the file and run the following command from the root of your project directory:
php app/src/Commands/Analyze.php analyze
Be sure that you have at least 100 records on the reviews table and you have supplied a valid API key in the .env file when you do so.
Routes
Open the public/index.php file and initialize the dotenv library right before the call to $app->run.
$dotenv = new Dotenv\Dotenv('../');
$dotenv->load();

// Run!
$app->run();
Open the app/routes.php file. It should contain the following code:
<?php
// Routes

$app->get('/', App\Action\HomeAction::class)
    ->setName('homepage');
The default route uses the HomeAction.php file inside the app/src/Action directory. Open that and add the following code:
<?php
namespace App\Action;

use Slim\Views\Twig;
use Psr\Log\LoggerInterface;
use Psr\Http\Message\ServerRequestInterface as Request;
use Psr\Http\Message\ResponseInterface as Response;
use \App\Lib\Reviews;
use \App\Lib\TextAnalyzer;
use \App\Lib\TextFormatter;

final class HomeAction
{
    private $view;
    private $logger;

    public function __construct(Twig $view, LoggerInterface $logger)
    {
        $this->view = $view;
        $this->logger = $logger;

        $filter = new \Twig_SimpleFilter('highlight', function ($item) {
           $key_phrases = json_decode($item['key_phrases'], true);

           $highlighted_key_phrases = array_map(function($value){
             return "<span class='highlight'>{$value}</span>";
           }, $key_phrases);

           return str_replace($key_phrases, $highlighted_key_phrases, $item['review']);

        });

        $this->view->getEnvironment()->addFilter($filter);
    }

    public function __invoke(Request $request, Response $response, $args)
    {
        $reviews = new Reviews();
        $text_analyzer = new TextAnalyzer();

        $avg_sentiment = $reviews->getAverageSentiment();
        $key_phrases = $reviews->getKeyPhrases();
        $topics = $reviews->getTopics();

        $labels = ['Good', 'Bad'];
        $colors = ['#46BFBD', '#F7464A'];
        $highlights = ['#5AD3D1', '#FF5A5E'];

        $first_value = $avg_sentiment;
        $second_value = 1 - $avg_sentiment;

        if($second_value > $first_value){
            $labels = array_reverse($labels);
            $colors = array_reverse($colors);
            $highlights = array_reverse($highlights);
        }

        $sentiments_data = [
            [
                'value' => $first_value,
                'label' => $labels[0],
                'color' => $colors[0],
                'highlight' => $highlights[0]
            ],
            [
                'value' => $second_value,
                'label' => $labels[1],
                'color' => $colors[1],
                'highlight' => $colors[1]
            ]
        ];

        $page_data = [
            'app_name' => getenv('APP_NAME'),
            'sentiments_data' => json_encode($sentiments_data),
            'key_phrases' => $key_phrases,
            'topics' => $topics
        ];
        $this->view->render($response, 'home.twig', $page_data);

    }
}
Breaking down the code above, first require all the libraries that you need:
use Slim\Views\Twig;
use Psr\Log\LoggerInterface;
use Psr\Http\Message\ServerRequestInterface as Request;
use Psr\Http\Message\ResponseInterface as Response;
use \App\Lib\Reviews;
use \App\Lib\TextAnalyzer;
use \App\Lib\TextFormatter;
Inside the constructor, add a custom twig filter that allows you to highlight specific words or phrases within a chunk of text. This custom filter accepts each $item containing the key phrases and the review text.
The value for $key_phrases comes from the review_key_phrases table in the database which, if you remember, is a json string. That’s why you need convert it back to an array using json_decode. Next, use array_map to wrap the items in the array in a span with a class of highlight. You then target this later using CSS to highlight the text. Lastly, use str_replace to replace all the occurrences of the $key_phrases with the $highlighted_key_phrases in the review text.
$filter = new \Twig_SimpleFilter('highlight', function ($item) {
   $key_phrases = json_decode($item['key_phrases'], true);

   $highlighted_key_phrases = array_map(function($value){
     return "<span class='highlight'>{$value}</span>";
   }, $key_phrases);

   return str_replace($key_phrases, $highlighted_key_phrases, $item['review']);

});
Inside the __invoke method is the code that you want to execute when the home page is accessed. This is where you fetch and format all the data that you need for the page.
$reviews = new Reviews();
$text_analyzer = new TextAnalyzer();

$avg_sentiment = $reviews->getAverageSentiment();
$key_phrases = $reviews->getKeyPhrases();
$topics = $reviews->getTopics();

$labels = ['Good', 'Bad'];
$colors = ['#46BFBD', '#F7464A'];
$highlights = ['#5AD3D1', '#FF5A5E'];

$first_value = $avg_sentiment;
$second_value = 1 - $avg_sentiment;

if ($second_value > $first_value) {
    $labels = array_reverse($labels);
    $colors = array_reverse($colors);
    $highlights = array_reverse($highlights);
}

$sentiments_data = [
    [
        'value' => $first_value,
        'label' => $labels[0],
        'color' => $colors[0],
        'highlight' => $highlights[0]
    ],
    [
        'value' => $second_value,
        'label' => $labels[1],
        'color' => $colors[1],
        'highlight' => $colors[1]
    ]
];

$page_data = [
    'app_name' => getenv('APP_NAME'),
    'sentiments_data' => json_encode($sentiments_data),
    'key_phrases' => $key_phrases,
    'topics' => $topics
];
$this->view->render($response, 'home.twig', $page_data);
Breaking down the code above, first, request for the average sentiment, key phrases and topics that are currently stored in the database.
$avg_sentiment = $reviews->getAverageSentiment();
$key_phrases = $reviews->getKeyPhrases();
$topics = $reviews->getTopics();
Declare the data to be used by the chart in the page. You’ll be using a pie chart to represent the sentiments of the buyers in the review. Below, there are three arrays with two items each. This is because there can only be two possible sentiments for a product: either good or bad. Here, you’re assuming that the average sentiment that you got from the database represents the good side.
$labels = ['Good', 'Bad'];
$colors = ['#46BFBD', '#F7464A'];
$highlights = ['#5AD3D1', '#FF5A5E'];
Calculate the difference between 1 and the average sentiment that you got. This will give you the percentage for the other half of the pie (the bad side).
$first_value = $avg_sentiment;
$second_value = 1 - $avg_sentiment;
If the other half of the pie is bigger than the average sentiment, reverse each of the arrays that you declared earlier. This is because the default data assumes that the average sentiment is the good side.
if ($second_value > $first_value) {
  $labels = array_reverse($labels);
  $colors = array_reverse($colors);
  $highlights = array_reverse($highlights);
}
Format the data in such a way that it can be readily consumed by the client-side script.
$sentiments_data = [
    [
        'value' => $first_value,
        'label' => $labels[0],
        'color' => $colors[0],
        'highlight' => $highlights[0]
    ],
    [
        'value' => $second_value,
        'label' => $labels[1],
        'color' => $colors[1],
        'highlight' => $colors[1]
    ]
];
Construct the data to be supplied to the page and then render the page. Note that you’re converting $sentiments_data to json so you could render it in the page as a value for a JavaScript variable.
$page_data = [
    'app_name' => getenv('APP_NAME'),
    'sentiments_data' => json_encode($sentiments_data),
    'key_phrases' => $key_phrases,
    'topics' => $topics
];

$this->view->render($response, 'home.twig', $page_data);
Front-End
Open app/templates/home.twig file and add the following:
<!DOCTYPE html>
<html lang="en">
<head>
  <meta charset="UTF-8">
  <title>{{ app_name }}</title>
  <link rel="stylesheet" href="/lib/mui/packages/cdn/css/mui.min.css">
  <link rel="stylesheet" href="/css/style.css">
  <script src="/lib/mui/packages/cdn/js/mui.min.js"></script>
  <script src="/lib/Chart.min.js"></script>
  <script>

  var sentiments_data = {{ sentiments_data|raw }}

  </script>
</head>
<body>
  <header class="mui-appbar mui--z1">
    <strong id="app-name">{{ app_name }}</strong>
  </header>

  <div id="content-wrapper" class="mui--text-center">
    <ul class="mui-tabs__bar">
      <li class="mui--is-active">
        <a data-mui-toggle="tab" data-mui-controls="pane-default-1">Sentiments</a>
      </li>
      <li>
        <a data-mui-toggle="tab" data-mui-controls="pane-default-2">Key Phrases</a>
      </li>
      <li>
        <a data-mui-toggle="tab" data-mui-controls="pane-default-3">Topics</a>
      </li>
    </ul>

    <div class="mui-tabs__pane mui--is-active" id="pane-default-1">
      <canvas id="sentiments_chart" width="400" height="400"></canvas>
    </div>

    <div class="mui-tabs__pane" id="pane-default-2">
      <ul class="align-left">
      {% for row in key_phrases %}
        <li>{{ row | highlight|raw }}</li>
      {% endfor %}
      </ul>
    </div>

    <div class="mui-tabs__pane" id="pane-default-3">
      <table class="mui-table mui-table--bordered">
        <thead>
          <tr>
            <th>Topic</th>
            <th>Score</th>
          </tr>
        </thead>
        <tbody>
          {% for row in topics %}
          <tr>
            <td>{{ row.topic }}</td>
            <td>{{ row.score }}</td>
          </tr>
          {% endfor %}
        </tbody>
      </table>
    </div>
  </div>

  <script src="/js/main.js"></script>
</body>
</html>
Material UI is used for styling the app:
<link rel="stylesheet" href="/lib/mui/packages/cdn/css/mui.min.css">
Chart.js is used for the pie chart. You can download Chart.js from cloudflare. You can also acquire Chart.js via bower or npm but take note that the version used in this tutorial is 1.1.1. Also note that there are some API changes with the newer version which at the time of writing is currently in beta. If you want to use that, you’ll have to update the code for the main.js file.
<script src="/lib/Chart.min.js"></script>
Those are the only dependencies for the front-end.
Inside the internal script, assign the value of the sentiments_data variable to the json string that you’ve passed from the controller earlier. Take note of the use of the raw filter by Twig. This allows you to render the json string as is.
<script>

var sentiments_data = {{ sentiments_data|raw }}

</script>
For the main content of the page, you have three tabs: one for the sentiments pie chart, one for the key phrases, and one for the topics.
For the sentiments pie chart we have a canvas with a predefined width and height.
<div class="mui-tabs__pane mui--is-active" id="pane-default-1">
  <canvas id="sentiments_chart" width="400" height="400"></canvas>
</div>
Inside the key phrases tab, loop through the results returned by the database. Then inside the loop, apply the highlight and raw filter. You’ve already seen how the highlight filter works so no need to explain that. As for the raw filter, you need it because the highlight filter outputs html so you use it to prevent the html from getting escaped.
<div class="mui-tabs__pane" id="pane-default-2">
  <ul class="align-left">
  {% for row in key_phrases %}
    <li>{{ row | highlight|raw }}</li>
  {% endfor %}
  </ul>
</div>
For the topics tab, use a table to show the top ten topics along with each score.
<div class="mui-tabs__pane" id="pane-default-3">
  <table class="mui-table mui-table--bordered">
    <thead>
      <tr>
        <th>Topic</th>
        <th>Score</th>
      </tr>
    </thead>
    <tbody>
      {% for row in topics %}
      <tr>
        <td>{{ row.topic }}</td>
        <td>{{ row.score }}</td>
      </tr>
      {% endfor %}
    </tbody>
  </table>
</div>
Create the public/js/main.js file and add the following:
var sentiments_ctx = document.getElementById('sentiments_chart').getContext("2d");
var sentiments_chart = new Chart(sentiments_ctx).Pie(sentiments_data);
This is the code for creating a pie chart based on the data stored in the sentiments_data variable.
Finally, create public/css/main.css file. It contains the following code:
#content-wrapper {
  width: 500px;
  margin: 0 auto;
}

li {
  margin-bottom: 20px;
}

.mui-table {
  text-align: left;
}

#app-name {
  font-size: 30px;
}

header {
  padding: 10px;
}

.mui-tabs__pane {
  padding-top: 40px;
}

.align-left {
  text-align: left;
}

span.highlight {
  background-color: #FAFA22;
  padding: 5px;
}
Conclusion
That’s it! In this tutorial you’ve learned how to make use of Microsoft’s Text Analytics API to give online sellers a better idea of how well their products are doing. Specifically, you’ve used the sentiments, key phrases and topic detection functionality of the API.
You can find the source code of the project in its Github repo.
I recommend you go check out the Microsoft Cognitive Services website to see what other machine learning goodness they offer. Have you used any of these cognitive services? What did you think? How could we further improve our app? Let us know in the comments!
 Wern Ancheta
Wern is a web developer from the Philippines. He loves building things for the web and sharing the things he has learned by writing in his blog. When he's not coding or learning something new, he enjoys watching anime and playing video games.