I have to admit it crossed my mind. The new Photoshop arrived and I found myself thinking: "Ah, come on, the old bird must be into her twelfth version by now. That’s like 125 in dog years, isn’t it? Surely after all this time the well has run dry and she has nought but gimmicks and parlor tricks to try to lure me in this time?"
While that may have been how I went in, I’m pleased to report she still has the ability to surprise and please.
Let’s take a closer look.
Content Aware Image Resizing
This is a nice story for Adobe. In August, 2007 there was a ripple of excitement through the graphics community when Shai Avidan and Ariel Shamir demonstrated a new mathematical approach to image resizing – dubbed Content Aware Image Resizing (CAIR). Adobe were quick to recognize the opportunity and immediately added Shai to the Photoshop team. However, finding a good idea and integrating it into a Goliath-like Photoshop are quite different things, and many a "gee whiz, ain’t that cool" idea has been warehoused when it all became too hard to make it work in the big wide world. Thankfully that hasn’t happened with CAIR, and Adobe have shown some commendable adaptability in the smooth integration of CAIR technology into Photoshop CS4.
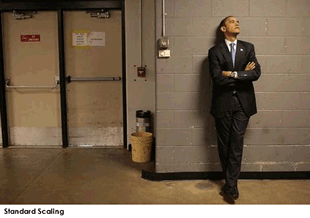
If you missed the initial talk on CAIR, it’s a fascinating concept. Traditional image-scaling methods stretch and compress all parts of the image equally, with scant regard for the image content. As the example below shows, this gives you nasty and very noticeable image distortion in all but the smallest resizes.
CAIR takes a smarter approach. As the name suggests, Content Aware Image Resizing analyzes the content of your image and then limits all image adjustment to the areas of least visual importance.
For instance, in the example below you can see the application is making its biggest changes to the more nondescript parts of the wall and doors, leaving the important compositional elements (Obama, the switches and bins) virtually untouched.

Adobe’s implementation of CAIR is very slick. While some early versions relied on the user cutting marks to protect detail, Photoshop CS4 generally gives you a great result by simply switching on the "Protect Skin Tones" option.
In short, this is one of those rare occasions where you have a new feature that has a serious wow factor and is seriously useful from day one. It’s a while since I can remember generating a crowd at my desk while demo-ing a new Adobe feature, but CAIR was able to do that. While it’s true that some images will lend themselves to CAIR more than others, I think this is genuinely a killer feature for almost any regular Photoshop user.
Adjustment Layers
Adjustments layers are nothing new, but they’ve become more powerful and easier to control in CS4.
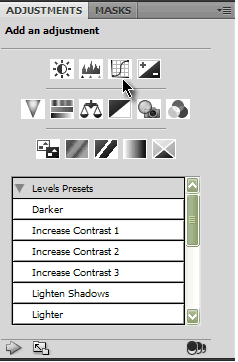
The first thing you’ll notice is that they’ve been given their own dedicated palette, giving you a fast, one-button click method to apply levels, curves, saturations, and color balances, amongst other adjustments. Clicking a button launches a hidden control subpanel for the adjustment, rather than the traditional popup dialog. This felt a bit weird to me. I suspect you adapt to it quickly, but I can’t think of another place where they handle the UI this way (the graphic below illustrates this idea).
Now, obviously curves have been around forever, but the way they can be applied here is new and, I think, rather cool – the On-screen Adjustment tool. Let’s look at a quick example of it in action.
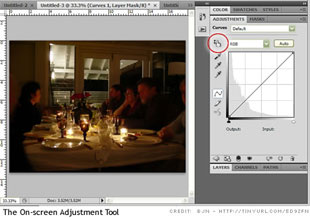
To use the tool, you simply apply a curves adjustment layer and click the small hand button, top left of the Curves palette. As you hover over your image you’ll see the eyedropper cursor, which shows you where that part of the image falls on the curve line.
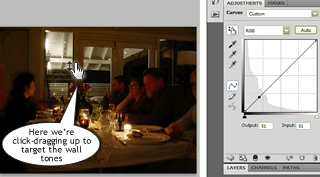
Big deal, right? It’s always done that. But try clicking on a specific part of the image you would like to brighten (in the example, the walls) and drag upwards. You’ll see those tones immediately lighten and your curve line will reflect that adjustment in real time.
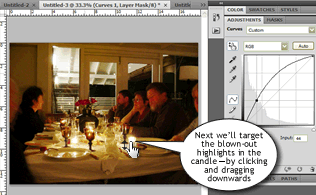
In our example, due to the previous action, the candles have lost some of their brightness. To bring those highlights back, we can target them by simply clicking directly on them and dragging down. Again, the curve reflects your adjustment.
Now, if you’re already a whiz with curves, you might not see great appeal in this tool. After all, there are other ways to achieve the same result – as long as you know what you’re doing. However, if you’re a visual thinker who has perhaps found it difficult to equate what’s happening in the graph to what’s happening in your image, this is a great connector. Working directly on the image certainly feels more natural to me.
3D Painting
Okay, yes there was 3D in CS3 but let’s be honest: it wasn’t hugely useful, was it? You jumped out into a separate applet to use a limited set of tools. It was a passable imitation of 3D at best. The new 3D implementation definitely raises the bar significantly.
Firstly, there is no jumping out of the application – all 3D manipulations are performed in the main workspace, side-by-side with the 2D tools. You can open a 3D file directly in Photoshop (U3D, 3DS, OBJ, DAE, and KMZ) or add a 3D layer to an existing project.
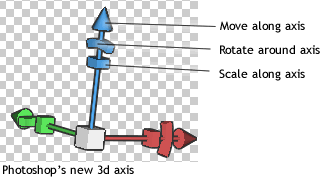
Secondly, the new model controls are a big improvement. While the toolbar now contains 3D Rotate, 3D Move and 3D Scale Tools, Adobe have also added a nice 3D Axis tool that overlays your model, allowing you to orientate it without leaving the workspace.
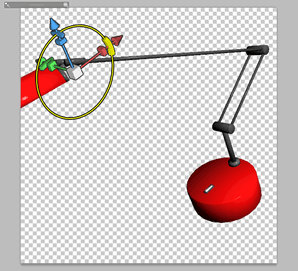
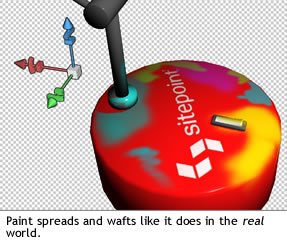
But perhaps most impressive of all is the way Adobe have been able to make their 2D tools operate on 3D surfaces. Grab your Brush Tool, set a color, and start painting. Paint diffusion rates and angles are all controllable.
It doesn’t end with flat color either. Switch the Paint Mode and you can paint with Bumps, Glossiness, Opacity, Shininess, Self-illumination, and Reflectivity.
You can even use the Merge Down option in the Layers palette to apply a 2D image (say, a logo) to your 3D object. That’s pretty nifty in my book.
In reality, the new 3D tools in Photoshop probably deserve a dedicated article; however, I think it suffices to say that as of CS4, 3D is a fully-fledged Photoshop citizen, rather than a tacked-on afterthought.
Summary
It’s always difficult making the call as to when to upgrade an expensive application like Photoshop – especially if you’re shelling it out of your own pocket, rather than your boss’s. No doubt your current version worked yesterday and will continue to do so tomorrow.
However, if the question of upgrading is on your mind, with the addition of features like CAIR, there are probably more compelling reasons to take the plunge this time than there’s been for a any of the past two or three versions.
 Alex Walker
Alex has been doing cruel and unusual things to CSS since 2001. He is the lead front-end design and dev for SitePoint and one-time SitePoint's Design and UX editor with over 150+ newsletter written. Co-author of The Principles of Beautiful Web Design. Now Alex is involved in the planning, development, production, and marketing of a huge range of printed and online products and references. He has designed over 60+ of SitePoint's book covers.