What is Firefox OS?
Firefox OS is a new mobile operating system created 2 years ago. Largely experimental until now, but in the last year it has been commercialized with the support of companies like LG and ZTE, who are the main producers of devices implementing Firefox OS. Firefox OS is created by Mozilla, who’s main product, the Firefox web browser, is one of the most used browsers in the world. The Firefox browser is important in the history of the web, with a large community of supporters and app developers. For an overall guide and general introduction to Firefox OS, read Jeff Friesen’s article.
In this article we will create a packaged app. We won’t install the simulator mentioned in the article above, but another recommended by Mozilla.
Why create a Firefox OS app?
Because it’s simple.
Applications for Firefox OS are developed using HTML5 and thus very simple to learn and develop, and gives an opportunity for everyone to develop a mobile app. Mozilla is a supporter of the Open Web, it has built an API that makes it easy to integrate apps with the device, and are working with the W3C to make this API a standard. You can gain valuable general knowledge by building a Firefox OS app.
What app are we creating?
I decided to create a simplified version of an existing application on the Firefox Marketplace. It is a running application to find how much have you run in distance and time, how many calories you have burnt and your average speed.
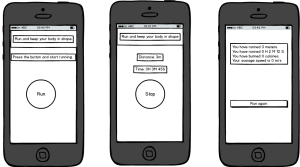
The application only contains two pages. The first page allows the user to start a timer and gives real-time running data. The second page shows the results and asks the user if they want to run again.
We will use Building Blocks and it’s infrastructure and logic. Building Blocks makes Firefox OS applications look more beautiful and native. Before starting, it is a good idea to take a look at the framework, its components, how you can use them and how they are interconnected.
You will also need the JQuery and Jquery color animation plugins.
Installing the simulator
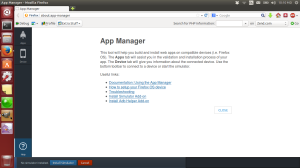
Install the Firefox OS simulator from Mozilla’s Firefox App Manager add-on page. Once installed, the simulator can be started in your Firefox browser from the Tools>Web Developer>App Manager menu and by clicking the blue button Start Simulator at the bottom of the window.
If you have a device available for testing, also download ADB Helper and the proper drivers. You can find a guide about installing drivers in Windows here
Let’s start
Unzip your Building Blocks download and open the manifest.webapp file. It’s easier if we just modify it. This is the manifest that contains information about the application. We will name the application “Runner-simplified, type this into the ‘name’ field.
You can put any description you want and leave launch_path as is, this is the file we will use for the application. Don’t change the icon links, if you want to add more icons, just change the existing ones. We also add the version of the application and the developer’s name and url.
We also need to add some more information into the manifest such as screen orientation and permissions relating to using the geolocation system. Since we find the location of the device every 10 seconds in order to find the distance run, it’s important we add this permission. After making these modifications we have the following manifest file
{
  "name": "Runner-simplified",
  "description": "Run and keep your body in shape.",
  "launch_path": "/app.html",
  "permissions": {
        "geolocation": {
            "description": "Used to calculate the distance of run"
        }
    },

  "icons": {
    "60": "static/images/app_icon_60.png",
    "128": "static/images/app_icon_128.png"

  },
  "version": "0.8",
  "developer": {
    "name": "Your Name",
    "url": "App`s site"
  },
  "default_locale": "en",
  "orientation": "portrait-primary"
}
What will we use from Building Blocks?
This app will only use two components of Building Blocks, a header and a blue button. Start by creating a backup file, a copy of app.html (which I’m calling onePageApp.html). This makes it simpler to return to an earlier stage of development. We also modify the manifest file by setting this new file (onepageApp.html) as the launch path.
Let’s code
Delete everything from the body except the first section with id=“index”. This section has another sub-section with the data-type of “sidebar” (Building Blocks has many different data-types that give a graphic meaning to the element identified). Since we don’t need it, delete it too. The second element is another sub-section which holds the header. We need it so don’t delete it. The header contains 2 links that were used by sidebar, delete those links.
The last modification we need is the element “article”. This will hold the code of the page. You can see in the mockup that there we need text and a button that will activate the GPS and keep it running until the button is clicked. We also delete the div with data-type of “list” inside the article, since we will not need it. We now have a blank page.
This is the look of the body after those changes:
<section id="index" data-position="current">

    <section role="region">
        <header class="fixed">
            <h1>Building Blocks <em>demo</em></h1>
        </header>
        <article class="scrollable header">

        </article>
    </section>

</section> <!-- end index -->

<script type="text/javascript" defer src="js/status.js"></script>
<script type="text/javascript" defer src="js/seekbars.js"></script>
<script type="text/javascript" defer src="js/app.js"></script>
Modify the header by putting the title from the mockup.
<header class="fixed">
    <h1>Run <em>and keep your body in shape</em></h1>
</header>
Add two divs for the text and the button. Inside the first div add an h2 for the text, and inside the second div add a span for the button.
<article class="scrollable header">
    <div>
        <h2>Press the button and start running</h2>
    </div>
    <div>
        <span id="runButton"><span>Run</span></span>
    </div>
</article>
Let’s add a little CSS to make it more attractive. In the main directory add a file named style.css and include it.
Add these lines of CSS:
#index h2{
    text-align: center;
    margin-top: 60px;
}

#runButton{
    display: block;
    margin: 80px auto;
    width: 100px;
    height: 100px;
    border-radius: 999px;
    border: 10px solid green;
    font-size: 26px;
}

#runButton span{
    display: block;
    padding-top: 34px;
    padding-bottom: 34px;
    margin: 0 auto;
    text-align: center;
}
Now let’s make the second page, which can be a modification of the first. Hide the h2 title. We will change the button’s text from “Run” to “Stop” and print text that shows the distance and time run by the user. This text will be updated every seconds. We’ll do this with jQuery. We include the jquery.js and other JavaScript libraries and also the jQuery plugin for the color animation.
<script type="text/javascript" src="js/jquery-2.1.0.min.js"></script>
<script type="text/javascript" src="js/jquery.animate-colors-min.js"></script>
Now that we have a functioning sample, we can test it in the simulator. Go to the app-manager and click Start Simulator and select Firefox OS 1.3 (there might be other versions of the simulator). Using the simulator you can see how the app looks on a device.
Click add packaged app, navigate to your manifest file and click update. This is the installation of the application into the simulator, or an update, if the app was installed before. Beside the update button, there is the console button, which helps us debug.
Let’s add some JavaScript to hide the title and change the text and button’s border color. We put this at the end of the document.
<script>
    $("#runButton").on("click", function(){

        if($(this).find("span").html() === "Run"){
            $(this).find("span").html("Stop");
            $(this).animate({"borderColor": "red"}, "fast");
            $("#index").find("h2").slideUp();
            $("#realTimeStats").slideDown();
        }else{
            $("#realTimeStats").slideUp();
            $("#index").find("h2").slideDown();
            $(this).find("span").html("Run");
            $(this).animate({"borderColor": "green"}, "fast");
        }

    });
</script>
Here we create an event handler for the run button. If the text in the button is “Run” it is changed to “Stop” (and vice versa) and the border changes its color by using the jQuery plugin jquery.animate-colors-min.js. The functions slideUp() and slideDown() are two functions that make an element visible or hidden with a simple animation.
Until now, we had a button that changes the text and its border color, an h2 title and real-time data which become hidden and visible by clicking the button. We now add the code to find the coordinates and the run distance. Delete all the code in app.js and add this:
var distance = 0;

var locationCords = {
    firstPos: null,
    secondPos: null
};

var distanceInterval;

function getLocation() {
    // Gets the current position
    navigator.geolocation.getCurrentPosition(function(position) {
        if(locationCords.firstPos === null){
            locationCords.firstPos = position.coords;
        }else{
            locationCords.secondPos = locationCords.firstPos;
            locationCords.firstPos = position.coords;
            distance += calculateDistance(locationCords.secondPos, locationCords.firstPos);
        }
    }, function(error){ // error handling
        switch(error.code){
            case error.PERMISSION_DENIED:
                alert("User denied the request for Geolocation.");
                break;
            case error.POSITION_UNAVAILABLE:
                // Some error handling here
                break;
            case error.TIMEOUT:
                // Some error handling here
                break;
            case error.UNKNOWN_ERROR:
                // Some error handling here
                break;
        }
    });
}

function calculateDistance(loc1, loc2) {
    var R = 6371; // km
    var dLat = (loc2.latitude-loc1.latitude).toRad();
    var dLon = (loc2.longitude-loc1.longitude).toRad();
    var a = Math.sin(dLat/2) * Math.sin(dLat/2) +
        Math.cos(loc1.latitude.toRad()) * Math.cos(loc2.latitude.toRad()) *
            Math.sin(dLon/2) * Math.sin(dLon/2);
    var c = 2 * Math.atan2(Math.sqrt(a), Math.sqrt(1-a));
    var d = R * c;
    return d * 1000; //meters
}

Number.prototype.toRad = function() {
    return this * Math.PI / 180;
};
Firstly we create 3 variables:
- The “distance”, which holds the run distance
- “locationCoords”, which holds the current and the last coordinates
- The “distanceInterval”, which holds the interval in which the function getLocation() is called.
Inside the event handler of the function we create an interval which get executed every 10 seconds and after we click “Stop” this interval is broken and the variables reset. This is achieved by calling clearInterval() with distanceInterval as an argument.
$("#runButton").on("click", function(){

    if($(this).find("span").html() === "Run"){
        $(this).find("span").html("Stop");
        ...

        distanceInterval = setInterval(function(){getLocation()}, 10000);  // Add this

    }else{
        ...

        clearInterval(distanceInterval); // And this

    }
});
We also add another interval that updates the run data, “timeInterval” which holds this value.
$("#runButton").on("click", function(){

    if($(this).find("span").html() === "Run"){
        ...

        startTime = new Date().getTime();

        timeInterval = setInterval(function(){timeLeft()}, 1000);
        distanceInterval = setInterval(function(){getLocation()}, 5000);

    }else{
        ...

        clearInterval(timeInterval);
        clearInterval(distanceInterval);

        $("#hours").html(0);
        $("#minutes").html(0);
        $("#seconds").html(0);
        $("#meters").html(0);

    }

});
We add another variable called “startTime” which holds the time at the beginning of the run. We create an interval to update the time by calling the function timeLeft().
We add this code in app.js. This makes it possible to calculate the time and update the time and distance.
function timeLeft(){

    var thisTime = new Date().getTime();

    var seconds = Math.floor((thisTime - startTime)/ 1000);

    var hours = Math.floor(seconds/3600);
    var minutes = Math.floor((seconds - (hours * 3600))/60);
    var seconds = Math.floor(seconds - (hours * 3600) - (minutes * 60));

    $("#hours").html(hours);
    $("#minutes").html(minutes);
    $("#seconds").html(seconds);
    $("#meters").html(Math.floor(distance));

}
The only thing left is the page where a user sees the run results. We create a new section, with no header. Let’s copy a section from app.html of Building Blocks and edit it. We put an id and its data-position as “right”. Using these data-positions, we can make transitions from one page to another. We leave only the article element, since we don’t need any other.
<section role="region" id="viewResultsPage" data-position="right">
    <article class="content scrollable header">

        <div style="text-align: center;">
            <div><h2>You have run <em id="resMeters"></em> meters.</h2></div>
            <div><h2>You have rund <em id="spanHours"></em> H <em id="spanMinutes"></em> M <em id="spanSeconds"></em> S.</h2></div>
            <div><h2>Your avarage speed is <em id="avarageSpeed"></em> m/s</h2></div>
            <button class="recommend" style="margin-top: 150px;">Run Again</button>
        </div>

    </article>
</section>
What we need to add is a transition from the section with id=“index” into a section with id=“viewResultsPage”.
$("#runButton").on("click", function(){

    if($(this).find("span").html() === "Run"){
        ...

    }else{
        ...

        $("#viewResultsPage").removeClass("right");
        $("#viewResultsPage").addClass("current");
        $("#index").addClass('left');
    }

});
Test it again in the simulator. Just click update to the app-manager and see the result.
We select the section with id=“viewResultsPage”, remove the class “right” and add the class “current”. In the section with id=“index” add the class “left”. In order to get back to the section with id=“index”, just add those classes back.
$("#viewResultsPage").find("button").on("click", function(){
    $("#viewResultsPage").addClass("right");
    $("#viewResultsPage").removeClass("current");
    $("#index").removeClass('left');
});
This is a simple event handler for the “Run Again” button which reverses what we did to get from index to viewResultsPage.
The last thing is to print the run data into the viewResultsPage and reset every variable for a new run.
function timeLeft(){
    ...

    $("#emMeters").html(Math.floor(distance));
    $("#emHours").html(hours);
    $("#emMinutes").html(minutes);
    $("#emSeconds").html(seconds);
    $("#avarageSpeed").html(Math.floor(distance/((hours*3600) + (minutes*60) +seconds)));

}

$("#viewResultsPage").find("button").on("click", function(){
    ...

    startTime = 0;
    distance = 0;
    locationCords.firstPos = null;
    locationCords.secondPos = null;

});
Conclusion
Creating a Firefox OS application is not hard, it is easy for anyone who has experience in web development. Using Building Blocks makes it even simpler. Firefox OS is a new mobile OS and is making moves that no other OS has made before. I believe that the Open Web will bring a new epoch in the web and Firefox OS and Mozilla are making fantastic efforts.
What do you think about Firefox OS?
 Aleksander Koko
Aleksander is young developer who loves to play with the newest web technologies. In his free time, he reads about PHP, Firefox OS or experiments with a new language. Currently, his main interests are PHP design patterns, laravel, dart and cloud.


