There are a number of different ways to create Websites. While some may choose to hand draw a concept and then start coding HTML, others may want to take a more graphical approach to the design and layout.
This graphical approach is what I’m here to show you.
So today, I’ll explain the design process I go through when a new customer hires me. Being very visual, I find it easier to start with an image when I design a Website, and these are the basic steps I follow:
- First, using Photoshop, create an image that mimics the general layout you’d like to use for your site.
- Once you’re happy with the image you’ll need to “slice” it up for use in your Website template. In this process, it helps to have a working knowledge of HTML. You must know how tables work, so that you can slice your image in a way that will work with tables.
- Then it’s time to create an HTML document that’s comprised of those slices. This will become the template you’ll use to create all the pages of your Website.
To make it easier to follow along with the directions, here’s a downloadable Photoshop image that is yours to use, alter or demolish as you choose!
Note: if you publish this image, all I ask for is a link back to my site
Let’s get started!
Interface Image Creation
Interface Design
This is the most critical part of the whole design process. The design of your interface is very important for usability. You’ve probably heard it a thousand times, but the old saying is true: if your visitors can’t find all your content, or they’re confused by your layout, they really are only one click away from leaving your site.
Planning Ahead
With any new design, you must plan ahead. This will enable you to adapt to any changes that arise quickly and easily. For example, imagine you wanted to add another section to your Website. Does the navigation of your site allow for this, or will it entail a complete redesign? If you’re in the latter category, expect to waste time and money — resources that can easily be saved if you design your site layout well the first time.
It’s important to imagine where you’d like to be in the future. Websites are like any other business: you must change with the times.
Layout
We’re going to start with an image that is 740×460 pixels in size. In this space, we need to include the header, navigation and content areas.
Below, you can see a layout image that I created in Photoshop. The dark blue bars at the top and bottom of the page represent where our navigation will be — this kind of layout is very effective if, for example, you have a lot of content and you like fast loading pages.
After you’ve created your image in Photoshop, it’s time to prepare each section so you can use them in an HTML document. Let’s slice it up!
Slicing Your Image
Although you can use any graphics software to create your image, I recommend Photoshop. Packaged with this program is ImageReady, which you can use to save images for the Web, create gif animations, and slice up Photoshop images.
Now, “slicing” means that we’ll take your original page layout image, and make smaller individual images out of it, which you can then insert into an HTML table.
You could just use the large image as a page on your Website, and make image maps over the areas that you want to be links. The problem with this solution is that it will take forever to download — your users won’t be impressed!
As you’ll see in this example, when you slice up a large image, you have the ability to optimize each section individually to make the total file size smaller. Also, as in this example, some slices are duplicated, so you need to only use one of them, which will in turn make the total file size even smaller. The example image I created for this is only 26.1k. What this means to you is that this page will only take 9 seconds for a person on a 28.8k modem to download. Are you starting to see the benefits?
Here we have our image in Photoshop, prepared for slicing:
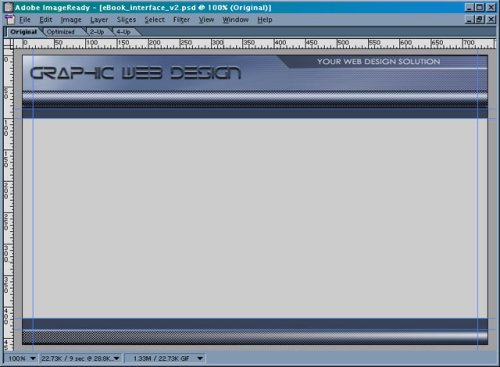
As you can see, blue lines cross the image. These are guidelines that Photoshop allows you to simply drag out of the ruler area — they mark where we are going to slice the image.
 Adem Martin del Campo
Adem has been a Web Designer for over 5 years. Along with creating Websites for his clients he also makes pre-made Web templates.