- Getting Started
- Setting up Stamplay
- A book club needs books
- Try out the Stamplay API console
- Allowing users to sign up / login
- Creating book reviews
- More Stamplay Integrations
- Connecting Stripe
- Implementing Search
- Conclusion
- Frequently Asked Questions (FAQs) about Creating a Fully-Featured Book Club App with Stamplay
This article was sponsored by Stamplay. Thank you for supporting the sponsors who make SitePoint possible.
As a front end developer I often find myself creating rich UI’s for my side projects with frameworks like Angular and React but there comes a point where your app needs data, persistence, business logic, email and a whole host of other behaviours that are usually the domain of back-end developers. Stamplay is a service that aims to make these aspects of application development as easy as filling out a form. Let’s flesh out a simple Book Club application by building a “back-end” for it using Stamplay. Users will be able to leave reviews with a rating for books they’ve read. They can also upvote other reviews. We’ll charge users for access to the bookclub and we’ll email them a welcome package when they signup.Getting Started
I’ve already created the shell of a front-end for the Book Club application. As we progress through this tutorial, we’ll be filling in the blanks with Stamplay. To get started you’ll need to clone the following repo:git clone git@github.com:bradbarrow/sp-stamplay.gitstarter branch:
git checkout starterbower install- AngularJS
- Stamplay SDK
- Bootstrap CSS
- Angular Bootstrap UI
- IonIcons
- Algolia Search Client
lr-http-server which you can install by running:
npm install -g lr-http-serverlr-http-server -p 8080.
Setting up Stamplay
It’s easy to get started with Stamplay. Simply visit their signup page and click the Create a new account button to get an account.Creating our first app
In the Stamplay Editor give your new app a unique name and then click the Create button. We’ve called our app bookclub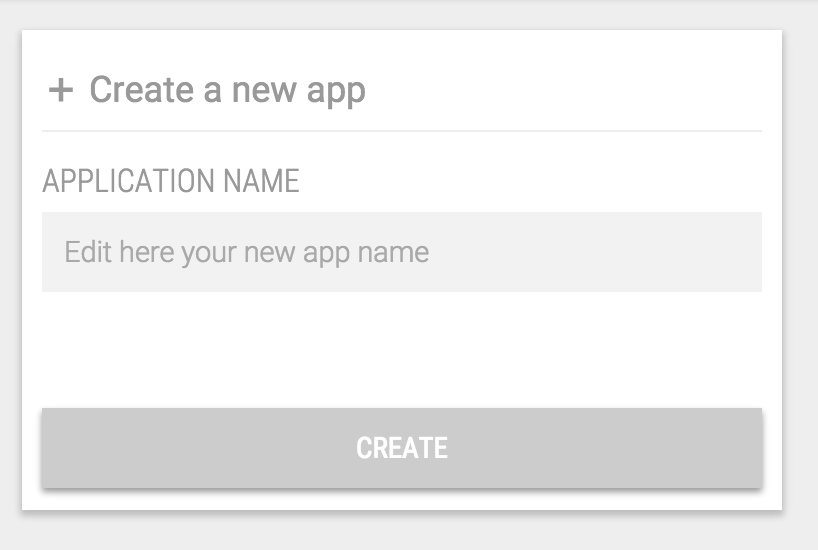 You’ll now land on your dashboard for this app. Take note of this page as it has some important information for connecting our front-end to Stamplay.
The Stamplay CLI
In order to work with Stamplay we’ll need to connect our app to Stamplay’s API. Stamplay have provided an npm package for this purpose. Go ahead and install the stamplay-cli package.npm install -g stamplay-clistamplay init in your project directory to generate a stamplay.json file.
You’ll need your app’s APP ID and API KEY both of which can be found on your apps dashboard as mentioned above.
A book club needs books
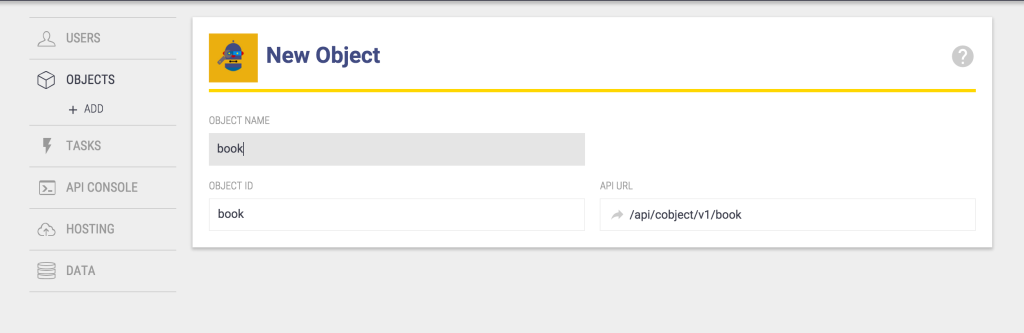
We’re going to need books if we’re going to have a book club. Our app already has a book list inindex.html and a BooksController in scripts/app.js. Let’s go over to Stamplay and setup our Book CustomObject before wiring it into our application.
On your app’s dashboard, click the Object link in the left hand menu then click + Add. Type book in the Object Name field then hit enter to start filling out it’s properties.
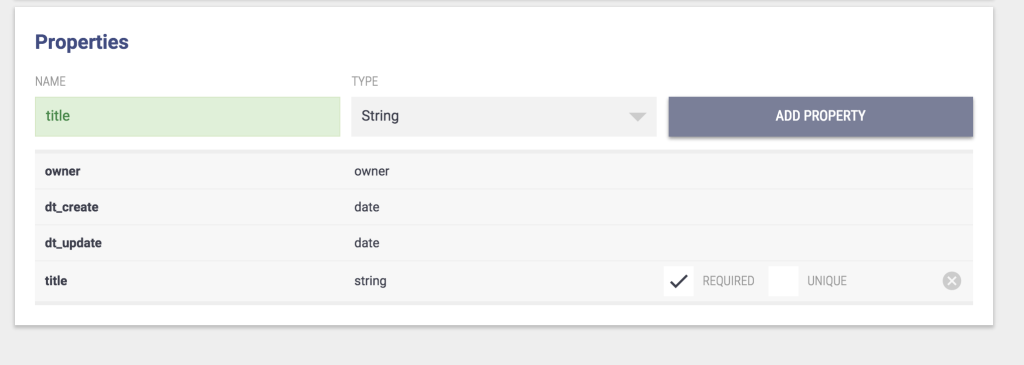
 We’ll just add a single string property called “title”.
Try out the Stamplay API console
Stamplay has an API console that helps you to interact with your application. It let’s you perform API actions to get / set data and see how your application responds. Let’s use the console to add our first book (we’ll add books using our own app in just a moment). Click on API Console in the left hand menu of the Stamplay editor. From the Operation menu, choose “Create object”. In the API URL field, choose “book” from the dropdown.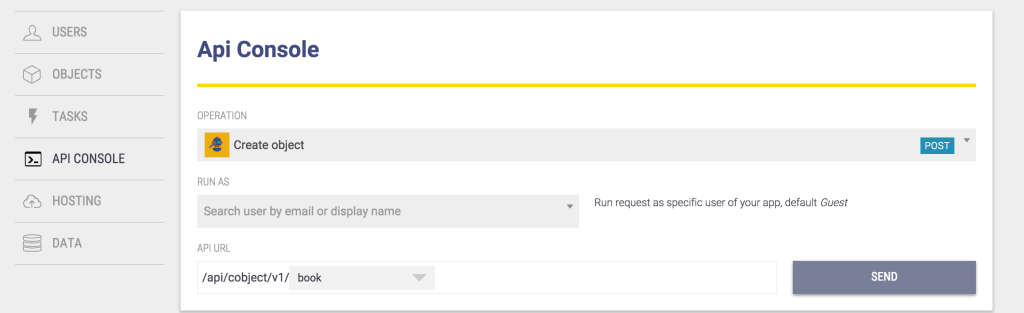 A form will appear asking for the title of the Book you want to add. Let’s add “To Kill a Mocking Bird”. Hit the Send button.
We’ll see the request as it’s sent to your app’s API, and eventually we’ll get a response. All going well, it should be a 200 OK.
Let’s change our Operation to “Get all objects” and choose “Book” again. Hit send once more and we should get back a response containing “To Kill a Mocking Bird”.
Now it’s time to get that data into our front-end.
A form will appear asking for the title of the Book you want to add. Let’s add “To Kill a Mocking Bird”. Hit the Send button.
We’ll see the request as it’s sent to your app’s API, and eventually we’ll get a response. All going well, it should be a 200 OK.
Let’s change our Operation to “Get all objects” and choose “Book” again. Hit send once more and we should get back a response containing “To Kill a Mocking Bird”.
Now it’s time to get that data into our front-end.
Wiring the books into our front-end
Open upscripts/app.js. At the very top of the file add the following line:
Stamplay.init('YOURAPPID');Stamplay global from the Stamplay SDK we include in index.html. The init function identifies our application so that the rest of our calls go to the correct app.
Next we’ll create a Book service to fetch our books from Stamplay. Update app.js as follows:
Stamplay.init("bookclub");

var app = angular.module('stamplay', ['ngStamplay']);

app.controller('BooksController', function($scope, $rootScope, $stamplay, Book){
  $scope.books = [];

  Book.all().then(function(books){
    $scope.books = books;
  });
});

app.factory('Book', function($q, $stamplay){
  function all() {
    var deferred = $q.defer();

    var BookCollection = $stamplay.Cobject('book').Collection;
    BookCollection.fetch().then(function() {
      deferred.resolve(BookCollection.instance);
    });

    return deferred.promise;
  }

  return {
    all: all
  }
});
You’ll notice we use $stamplay here. This is available since we’ve included the ngStamplay module.
What we’re doing here is using the Angular Stamplay SDK to fetch our book collection. We’ve created a simple Book service with an all() method.
The all method internally calls fetch() on the Stamplay book Collection which returns a promise. Once it resolves the BookCollection will be populated. (Remember, Stamplay models and collections are essentially Backbone.js structures.
In BooksController we simply inject our service and call the all() method to populate our books array on the scope.
In index.html we’ll need to change the {{book.title}} line to be {{book.instance.title}} in keeping with Stamplay’s data structure. You could also call book.get(‘title’).
Now you should see “To Kill a Mocking Bird” in your book list when you view the app in your browser.
Adding new books
Let’s add the ability to create new books from the application. First, we’ll create a form at the top of our books list:<div class="panel panel-default" ng-controller="BooksController">
<div class="panel-heading">
Books
</div>
<div class="panel-body">
<form class="form-horizontal" ng-submit="addBook()">
<div class="form-group">
<label for="title" class="col-sm-2 control-label">Book Title</label>
<div class="col-sm-10">
<input
type="text"
ng-model="newBook.title"
class="form-control"
id="title"
placeholder="The Lord of the Rings"
autocomplete="off">
</div>
</div>
<div class="form-group">
<div class="col-sm-offset-2 col-sm-10">
<button type="submit" class="btn btn-default">Add Book</button>
</div>
</div>
</form>
</div>
<div class="list-group">
<div class="list-group-item" ng-repeat="book in books">
{{book.instance.title}}
</div>
</div>
</div>add:
app.factory('Book', function($q, $stamplay){
  function all() {
    ...
  }

  function add(book) {
    var deferred = $q.defer();

    var BookModel = $stamplay.Cobject('book').Model;
    BookModel.set('title', book.title);
    BookModel.save().then(function() {
      deferred.resolve(BookModel);
    });

    return deferred.promise;
  }

  return {
    all: all,
    add: add
  }
});app.controller('BooksController', function($scope, $rootScope, $stamplay, Book){
...
$scope.newBook = { title: '' }; // Empty book for form
$scope.addBook = function() {
Book.add($scope.newBook).then(function(savedBook){
$scope.books.push(savedBook); // Immediate UI response
});
$scope.newBook.title = ''; // Blank out the form
}
});Allowing users to sign up / login
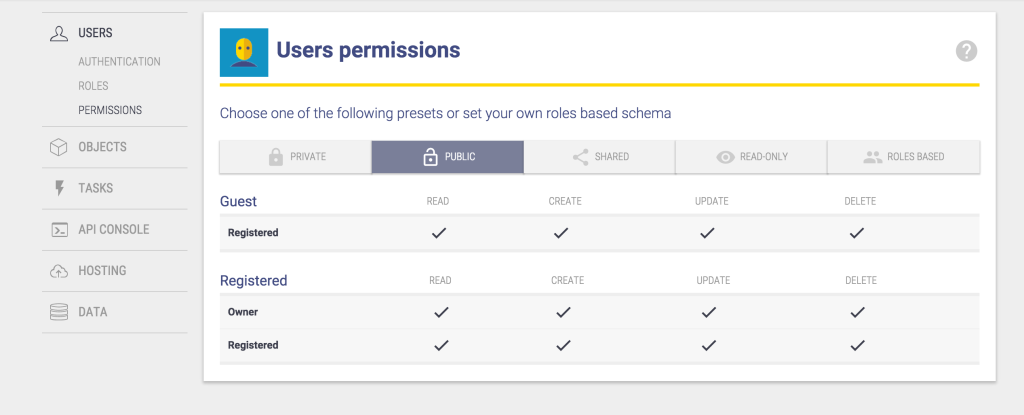
Currently any visitor to our site can add books. Let’s say we only want registered users to be able to add new books to the list. Stamplay makes login easy. First of all, click on “Users” and then “Authentication” in the left hand menu of the Stamplay Editor. Here you can choose from a range of authentication solutions for your Stamplay application. Today, we’ll use Google Plus. You can find instructions for this process here. It’s very easy and only takes a few minutes. Once you have your Google Plus App Id and Secret, click on the Google Plus logo in the Stamplay authentication section and enter your details, then hit save.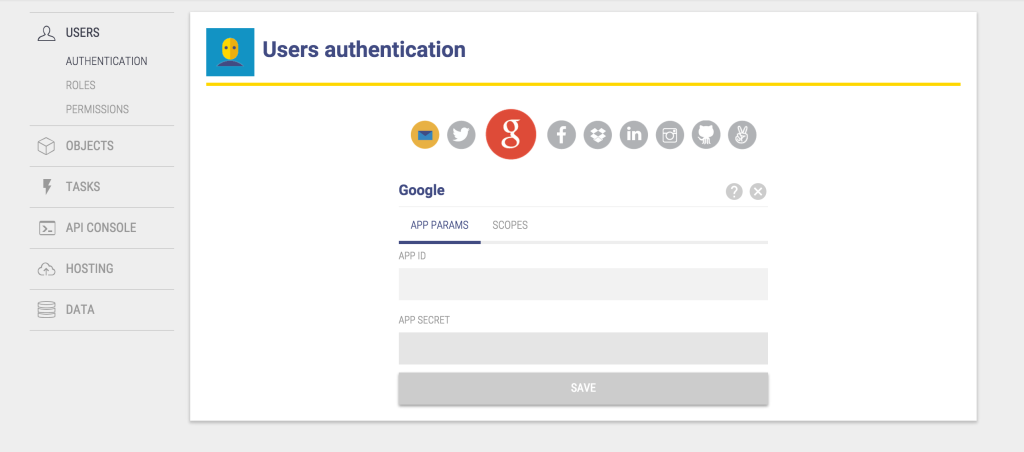 For the purposes of this tutorial, we’re also going to set out apps permissions to public, this way we won’t need to worry about who’s logged in and who can do what. That said, the roles and permissions system in Stamplay is powerful and can easily take care of complex user permission setups in your apps.
To set permissions to public, click on “Permissions” under the User menu, then click the “Public” tab.
For the purposes of this tutorial, we’re also going to set out apps permissions to public, this way we won’t need to worry about who’s logged in and who can do what. That said, the roles and permissions system in Stamplay is powerful and can easily take care of complex user permission setups in your apps.
To set permissions to public, click on “Permissions” under the User menu, then click the “Public” tab.
Implementing Auth in our application
Now that we’ve connected with Google Plus, login is trivial. We’ll create a User service that allows us to login and logout and to fetch information about the currently logged in user:app.factory('User', function($q, $stamplay){
function login() {
var deferred = $q.defer();
var User = $stamplay.User().Model;
User.login('google').then(function(){
deferred.resolve(User);
});
}
function active() {
var deferred = $q.defer();
var User = $stamplay.User().Model;
User.currentUser().then(function() {
deferred.resolve(User);
}).catch(function(err) {
deferred.reject(err);
});
return deferred.promise;
}
function logout() {
var User = $stamplay.User().Model;
User.logout();
}
return {
active: active,
logout: logout,
login: login
};
});User.login('google'), Stamplay will send our users through the OAuth process before returning them logged in.
We’re going to add a login link to our NavBar but first let’s create a NavController to handle the actions:
app.controller('NavController', function($scope, User, $rootScope){
  $scope.login = function(){
    User.login().then(function(user){
      // Add their details to root scope
      $rootScope.$emit('User::loggedIn', {user: user});
    });
  }

  $scope.logout = function(){
    User.logout();
  }
});app.run(function($rootScope, User){
// Listen for login events
$rootScope.$on('User::loggedIn', function(event, data){
$rootScope.loggedIn = true;
$rootScope.user = data.user;
});
// Check if there's a user logged in already
User.active().then(function(activeUser){
if(activeUser.isLogged()){
// Add their details to rootScope
$rootScope.$emit('User::loggedIn', {user: activeUser});
}
});
});run() function we’re going to setup a listener for login events. If you’ve not used the run() function before, it’s basically a function that’s run immediately after the application bootstraps.
When a user logs in, we’ll store the fact there’s a logged in a user, and we’ll store their details.
The next section checks if there is an active user and if they’re logged in, it emits the login event. This is here so that when users who are already logged in visit your site, their details are put back onto $rootScope.
Now that we know if someone’s logged in, and we have methods for login and logout, we can add some links to our nav:
<div class="collapse navbar-collapse" id="bs-example-navbar-collapse-6" ng-controller="NavController">
   <ul class="nav navbar-nav">
     <li class="active"><a ng-href="#">Books</a></li>
     <li>
       <a
         ng-href="#"
         ng-show="!loggedIn"
         ng-click="login()">

         Login
       </a>
     </li>
     <li>
       <a
         ng-href="#"
         ng-show="loggedIn"
         ng-click="logout()">

         Logout {{user.instance.displayName}}
       </a>
     </li>
   </ul>
</div>http://localhost/auth/v1/google/connect or something similar. This won’t work since Google (for security reasons) expects a real URL to handle auth. Luckily, Stamplay makes it easy to deploy our application to a real URL.
Simply run stamplay deploy in the project directory.
When that’s complete you can see your app live at http://yourappid.stamplayapp.com. The login / logout process should now work as well.
Finally, we’ll only show the “Add book” form when users are logged in:
<div class="panel-body" ng-show="loggedIn">
  <form class="form-horizontal" ng-submit="addBook()">
    ...
  </form>
</div>
Sending Email
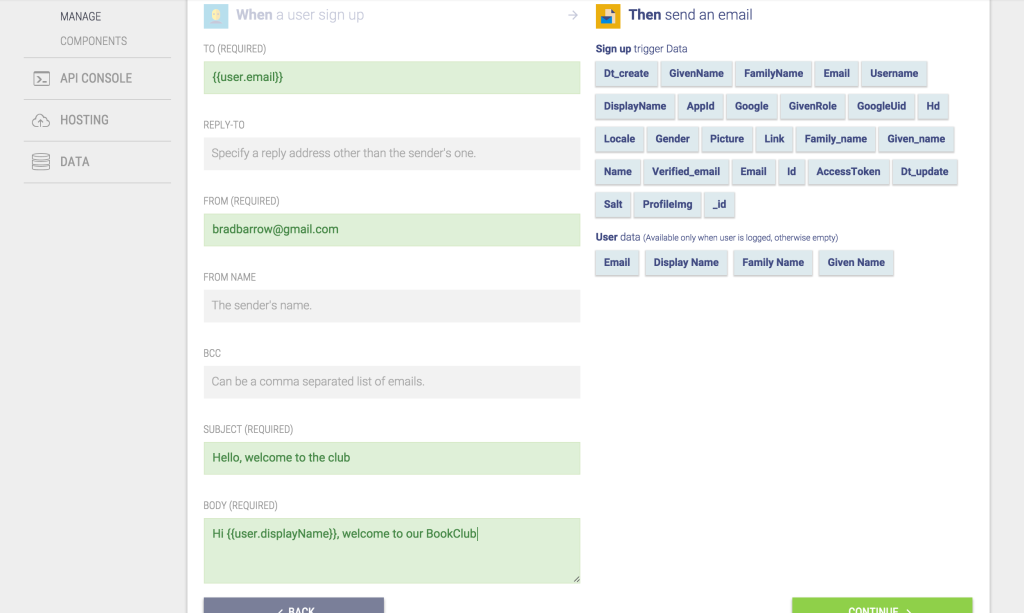
Let’s send a welcome email to new users. Click on “Manage” under “Tasks” in the Stamplay left hand menu, then click “New Task”. We’re going to select: “When a user signs up, Email – Send Email”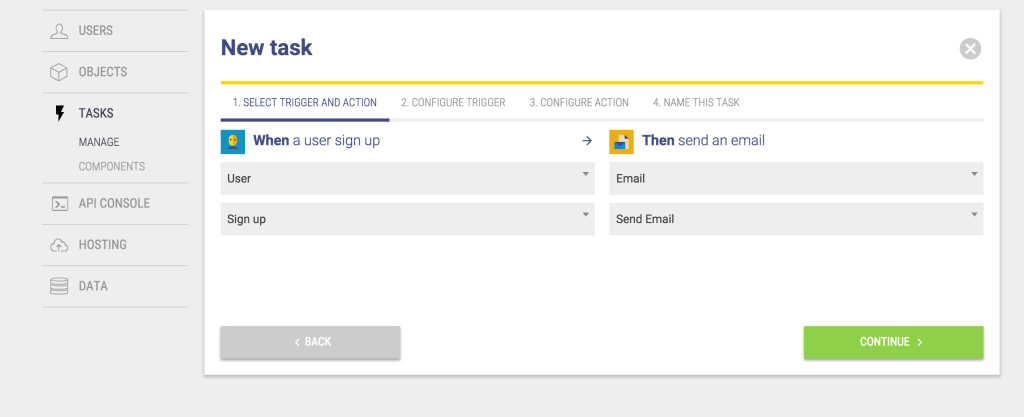 Click “Continue” to get to Step 3 where you can use the values on the right to populate your email.
 “Continue” again, give your task a name and that’s it. When new users signup, they’ll now receive an email from you :)
Creating book reviews
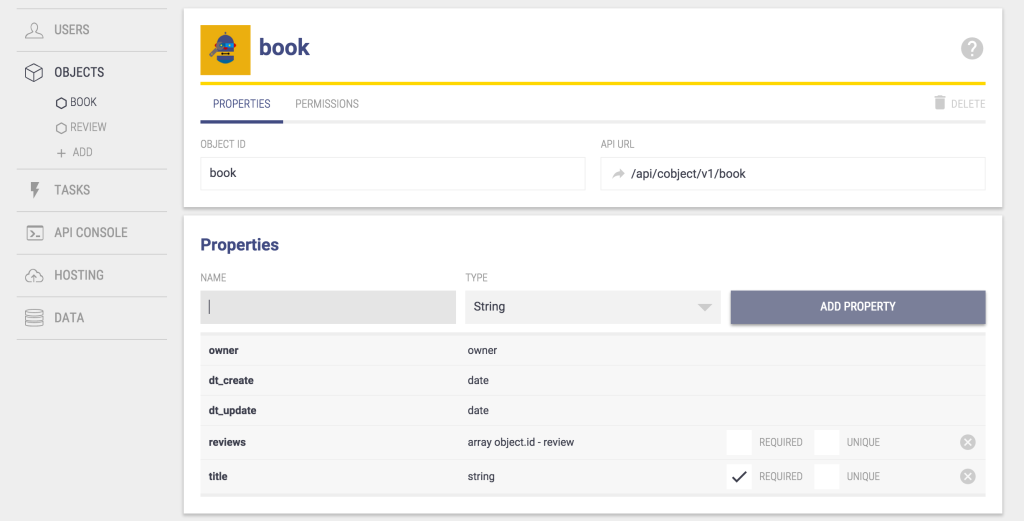
We’re going to allow our users to leave reviews about the books they’ve read. For this to work, the review objects we create in Stamplay will be connected to the book object the review is about so we can work with that association. We’ll also associate reviews with the logged in user. From the Stamplay editor, let’s go back to the Objects tab and add a new custom object called “review”: Add a string property called “text” which will hold the reviews content.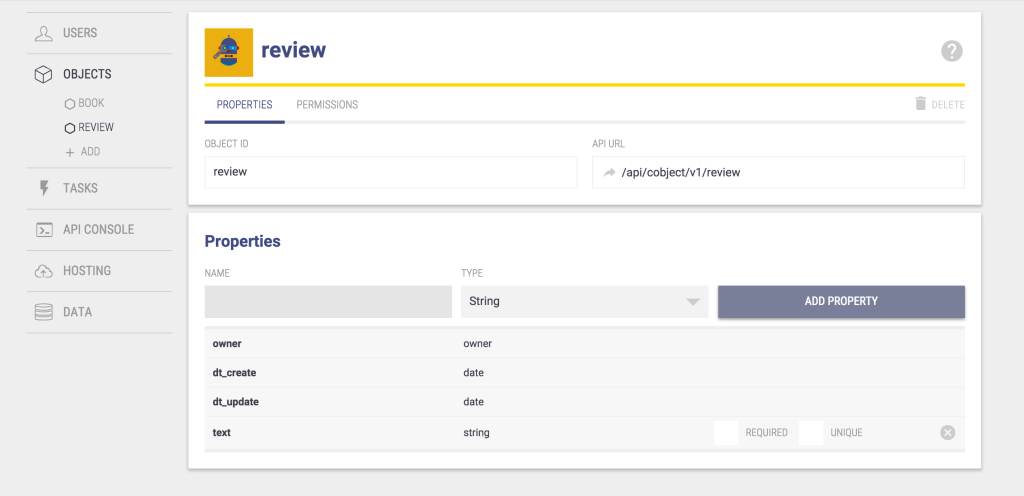 Now, go to the book object in the Stamplay editor. We’re going to add a field to the book object, which is an array of it’s reviews.
Create a new field on the book object called reviews, and choose Object relation – review for the type.
Now, go to the book object in the Stamplay editor. We’re going to add a field to the book object, which is an array of it’s reviews.
Create a new field on the book object called reviews, and choose Object relation – review for the type.
A form for reviews in our application
Now that we’ve got reviews setup on Stamplay, we’ll need to add the ability to write reviews to our app. Firstly let’s create a service to handle some tasks for our Reviews:app.factory('Review', function($q, $stamplay, Book, $rootScope){
function all() {
var deferred = $q.defer();
var ReviewCollection = $stamplay.Cobject('review').Collection;
ReviewCollection.fetch().then(function() {
deferred.resolve(ReviewCollection.instance);
});
return deferred.promise;
}
function add(review) {
var deferred = $q.defer();
var ReviewModel = $stamplay.Cobject('review').Model;
ReviewModel.set('text', review.text); // The review text
ReviewModel.set('owner', $rootScope.user.instance.id); //Associate with logged in user
// Save the review
ReviewModel.save().then(function() {
// If it saves, update the book
Book.find(review.bookId).then(function(BookToUpdate){
// Store the saved review on the book
var currentReviews = BookToUpdate.get('reviews') || [];
currentReviews.push(ReviewModel.get('_id'));
BookToUpdate.set('reviews', currentReviews)
BookToUpdate.save().then(function(){
// We're done
deferred.resolve(ReviewModel);
});
});
});
return deferred.promise;
}
return {
all: all,
add: add,
}
});- when adding a review, we save the logged in user’s ID as the owner of the review
- when adding a review, we find the associated book and push our review into the books reviews list before saving the book.
find() method to our Book service:
function find(id) {
  var deferred = $q.defer();

  var BookModel = $stamplay.Cobject('book').Model;
  BookModel.fetch(id).then(function() {
    deferred.resolve(BookModel);
  }).catch(function(err) {
    deferred.reject(err);
  });

  return deferred.promise;
}
Then add this to the exports for your service:
return {
    all: all,
    add: add,
    find: find // Now we can use Book.find()
}
The fetch() method takes an ID to search on.
app.controller('ReviewController', function($scope, Book, $rootScope, Review){
  $scope.bookOptions = [];

  Book.all().then(function(books){
    $scope.bookOptions = books;
  });

  $scope.newReview = {
    bookId: null,
    text: '',
  };

  $scope.leaveReview = function() {
    Review.add($scope.newReview).then(function(savedReview){
      $rootScope.$emit('Review::added', {review: savedReview});
      $scope.newReview.text = '';
      $scope.newReview.bookId = null;
    });
  }
});<div class="row" ng-show="loggedIn">
<div class="col-md-12">
<div class="panel panel-default" ng-controller="ReviewController">
<div class="panel-heading">
Add a review
</div>
<div class="panel-body" ng-show="loggedIn">
<form class="form-horizontal" ng-submit="leaveReview()">
<div class="form-group">
<label for="book" class="col-sm-2 control-label">Book</label>
<div class="col-sm-10">
<select
ng-model="newReview.bookId"
ng-options="book.instance.id as book.instance.title for book in bookOptions"
class="form-control"
id="book"
autocomplete="off">
<option value="">-- Choose a book --</option>
</select>
</div>
</div>
<div class="form-group">
<label for="text" class="col-sm-2 control-label">Review</label>
<div class="col-sm-10">
<input
type="text"
ng-model="newReview.text"
class="form-control"
id="text"
placeholder="I thought it was hilarious!"
autocomplete="off">
</div>
</div>
<div class="form-group">
<div class="col-sm-offset-2 col-sm-10">
<button type="submit" class="btn btn-default">Leave Review</button>
</div>
</div>
</form>
</div>
</div>
</div>
</div>{populate: true} to the fetch method when fetching our books. Update your book service as follows:
app.factory('Book', function($q, $stamplay){
  function all() {
    var deferred = $q.defer();

    var BookCollection = $stamplay.Cobject('book').Collection;
    BookCollection.fetch({populate: true}).then(function() {
      deferred.resolve(BookCollection.instance);
    });

    return deferred.promise;
  }

  ...
});app.controller('BooksController', function($scope, $rootScope, $stamplay, Book, Review, User){
$scope.books = [];
var loadBooks = function(){
Book.all().then(function(books){
$scope.books = books;
});
}
$scope.newBook = {
title: ''
};
$scope.addBook = function() {
Book.add($scope.newBook).then(function(savedBook){
$scope.books.push(savedBook);
// Emit new book was added
$rootScope.$emit('Book::added');
});
$scope.newBook.title = '';
}
$rootScope.$on('Book::added', function(data){
loadBooks();
});
$rootScope.$on('Review::added', function(data){
loadBooks();
});
loadBooks();
});<div class="list-group" ng-repeat="book in books">
<div class="list-group-item">
<h4 class="list-group-item-heading">{{book.instance.title}}</h4>
</div>
<div class="list-group-item" ng-repeat="review in book.instance.reviews">
{{review.text}}
</div>
</div>app.factory('User', function($q, $stamplay){
function find(id) {
var deferred = $q.defer();
var User = $stamplay.User().Model;
User.fetch(id).then(function() {
deferred.resolve(User);
}).catch(function(err) {
deferred.reject(err);
});
return deferred.promise;
}
...
});return {
active: active,
logout: logout,
login: login,
find: find
};app.controller('BooksController', function($scope, $rootScope, $stamplay, Book, Review, User){
$scope.books = [];
var loadBooks = function(){
Book.all().then(function(books){
$scope.books = books;
$scope.books.forEach(function(book){
var reviews = book.instance.reviews || [];
reviews.forEach(function(review){
if(review.owner){
User.find(review.owner).then(function(user){
review.user = user.get('displayName');
});
} else {
review.user = 'Anonymous';
}
});
})
});
}
...
});<div class="list-group-item" ng-repeat="review in book.instance.reviews">
<strong>{{review.user}}</strong> {{review.text}}
</div>More Stamplay Integrations
Stamplay provides us with all sorts of plug and play functionality. Let’s add a few more elements to our UI to make our application feel feature rich:Add ratings to our reviews
Generally when you leave a review you also give a star rating. Stamplay has a built in ability to rate items. Let’s use that now. First, we’ll add a new field to our review form for the rating:<div class="form-group">
<label for="text" class="col-sm-2 control-label">Rating</label>
<div class="col-sm-10">
<input
type="number"
ng-model="newReview.rating"
class="form-control"
id="text"
ng-minlength="1"
ng-maxlength="5"
placeholder="Rating out of 5"
autocomplete="off">
</div>
</div>// Save the review
ReviewModel.save().then(function() {
// If it saves, update the book
Book.find(review.bookId).then(function(BookToUpdate){
// Rate it
BookToUpdate.rate(review.rating);
// Store the saved review on the book
var currentReviews = BookToUpdate.get('reviews') || [];
currentReviews.push(ReviewModel.get('_id'));
BookToUpdate.set('reviews', currentReviews)
BookToUpdate.save().then(function(){
// We're done
deferred.resolve(ReviewModel);
});
});
});<div class="list-group" ng-repeat="book in books">
<div class="list-group-item">
<h4 class="list-group-item-heading">{{book.instance.title}}</h4>
<span ng-repeat="n in [1,2,3,4,5]">
<i class="icon ion-ios-star" ng-if="book.instance.actions.ratings.avg >= n"></i>
<i class="icon ion-ios-star-outline" ng-if="book.instance.actions.ratings.avg < n"></i>
</span>
</div>
<div class="list-group-item" ng-repeat="review in book.instance.reviews">
 <strong>{{review.user}}</strong> {{review.text}}
 </div>
</div>Add upvotes to your reviews
Reviews might be popular even if they’re bad reviews… so let’s allow users to upvote the reviews they enjoyed reading. Let’s augment our review service so that it can post upvotesapp.factory('Review', function($q, $stamplay, Book){
function all() {
...
}
function upvote(review) {
var deferred = $q.defer();
var ReviewModel = $stamplay.Cobject('review').Model;
ReviewModel.fetch(review.id).then(function(){
ReviewModel.upVote().then(function(){
deferred.resolve(ReviewModel);
});
}).catch(function(err){
deferred.resolve(err);
});
return deferred.promise;
}
});return {
all: all,
add: add,
upvote: upvote
}<div class="list-group-item" ng-repeat="review in book.instance.reviews">
<button class="btn-default btn btn-xs" ng-click="upvote(review)">
{{review.actions.votes.total}} <i class="icon ion-arrow-up-a"></i>
</button>
<strong>{{review.user}}</strong> {{review.text}}
</div>upvote() method to our BooksController to save the upvote
  $scope.upvote = function(review){
  Review.upvote(review).then(function(){
    $rootScope.$emit('Review::upvoted');
  });
}

$rootScope.$on('Review::upvoted', function(data){
  loadBooks();
});Connecting Stripe
Our book club is pretty awesome, let’s charge our visitors for an account. You’ll need a Stripe account for this section. We’ll first need to setup the Stripe component. Under the tasks menu in the Stamplay editor, click on Components, then click the Stripe icon.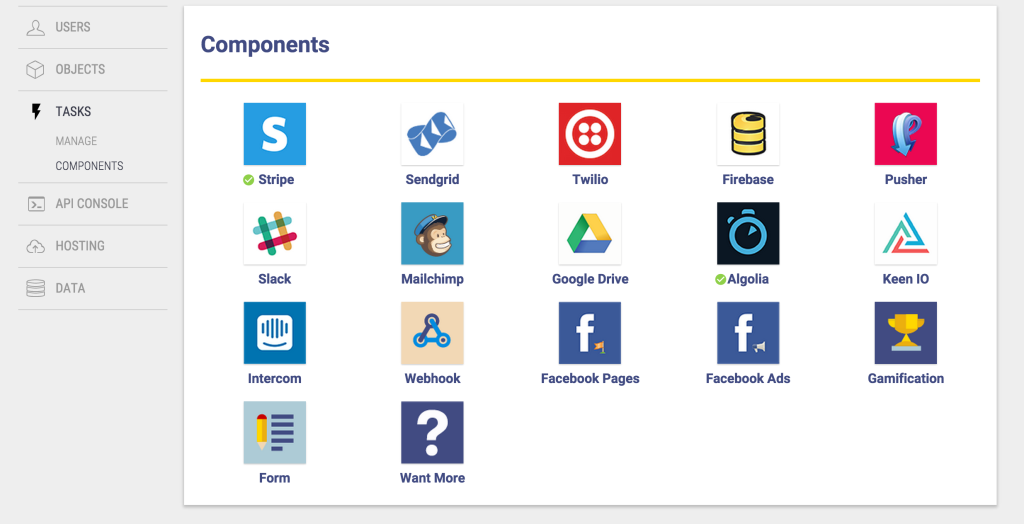 Click the big green connect button and you’ll be asked to login to your Stripe account. If you don’t have one, you can create one at stripe.com. You will need to enter your bank details (for people to pay you) although we will only be using test mode in this tutorial.
Follow the prompts to login and connect your Stripe account.
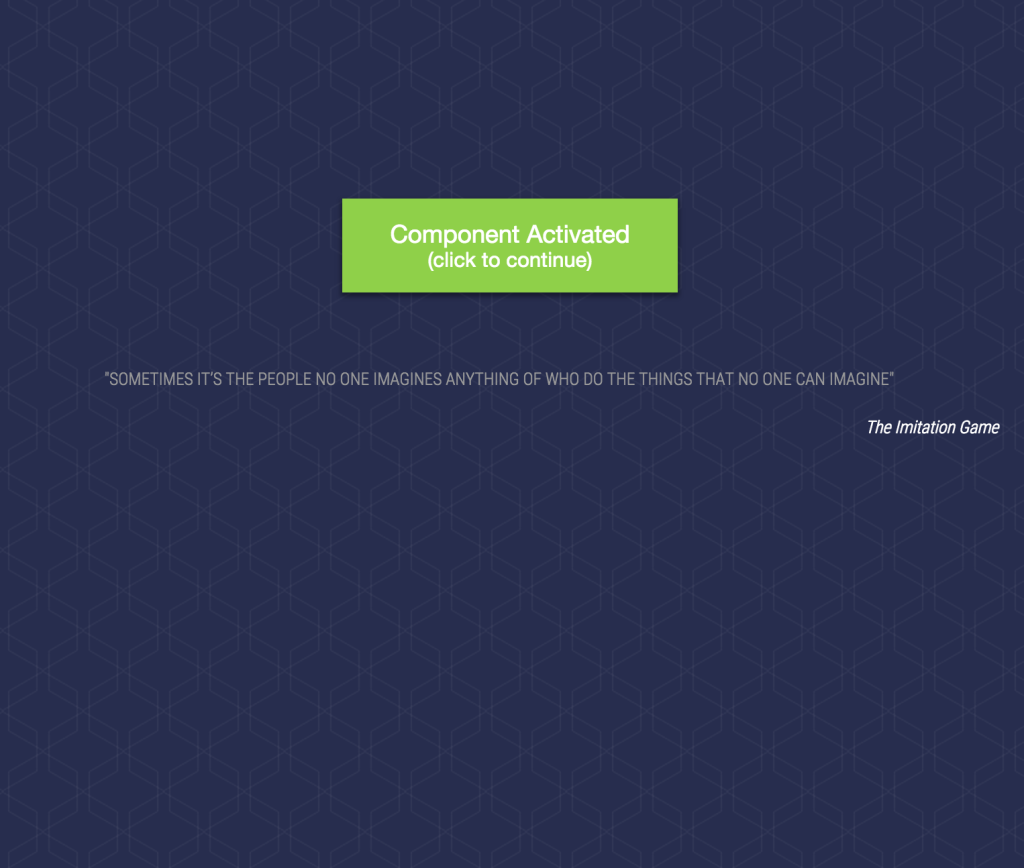
When you’re done, you should see a green button saying “Component Activated”
Click the big green connect button and you’ll be asked to login to your Stripe account. If you don’t have one, you can create one at stripe.com. You will need to enter your bank details (for people to pay you) although we will only be using test mode in this tutorial.
Follow the prompts to login and connect your Stripe account.
When you’re done, you should see a green button saying “Component Activated”
 Back on the Stripe component page, you should see your details (Test keys etc). Ensure that live mode is disabled.
Now we’ll need to create a task so that when users signup, we create new Stripe Customers for them. Click on Manage under the tasks menu, then click “New Task”.
From the dropdowns we’re going to select “When a user signs up” then “Stripe – Add customer”.
Back on the Stripe component page, you should see your details (Test keys etc). Ensure that live mode is disabled.
Now we’ll need to create a task so that when users signup, we create new Stripe Customers for them. Click on Manage under the tasks menu, then click “New Task”.
From the dropdowns we’re going to select “When a user signs up” then “Stripe – Add customer”.
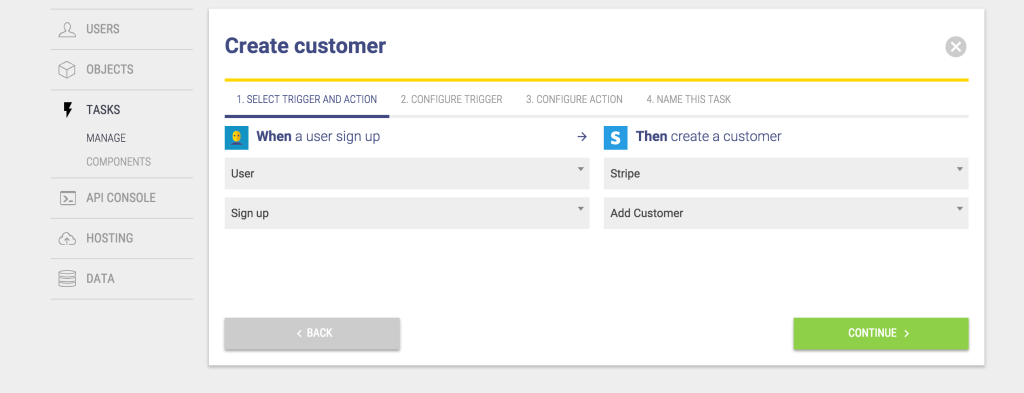 Click next, on step 3 ensure that you’re passing
 {{user._id}}.
Click next and give your task a name such as “Create customer” then click save.
Now when users signup we’ll have a new Customer created in Stripe.
Now that we have customers associated with our users, we can charge logged in users before they can access the app.
First off, we’ll set a variable paid to false initially and use it to hide the application until the user has paid. We’ll set an attribute paid on the logged in user later as well, so let’s check for that here too:
app.run(function($rootScope, User){
  $rootScope.paid = false;

  // Listen for login events
  $rootScope.$on('User::loggedIn', function(event, data){
    $rootScope.loggedIn = true;
    $rootScope.paid = data.user.instance.paid || false; // Has the user already paid?
    $rootScope.user = data.user;
  });

  // Check if there's a user logged in already
  User.active().then(function(activeUser){
    ...
  });
});ng-show="loggedIn" let’s also add a check for payment:
For e.g.
<div class="panel-heading">
   Books
 </div>
 <div class="panel-body" ng-show="loggedIn && paid">
   <form class="form-horizontal" ng-submit="addBook()">

...<div class="row" ng-show="loggedIn && !paid">
<div class="col-md-12">
<div class="panel panel-default" ng-controller="PaymentController">
<div class="panel-heading">
Pay to subscribe
</div>
<div class="panel-body" ng-show="loggedIn">
<form class="form-horizontal" ng-submit="pay()">
<div class="form-group">
<label for="book" class="col-sm-2 control-label">Card Number</label>
<div class="col-sm-10">
<input
type="text"
ng-model="card.number"
class="form-control"
id="text"
autocomplete="off">
</div>
</div>
<div class="form-group">
<label for="book" class="col-sm-2 control-label">CVC</label>
<div class="col-sm-10">
<input
type="text"
ng-model="card.cvc"
class="form-control"
id="text"
autocomplete="off">
</div>
</div>
<div class="form-group">
<label for="book" class="col-sm-2 control-label">Expiry Month</label>
<div class="col-sm-10">
<input
type="text"
ng-model="card.exp_month"
class="form-control"
id="text"
placeholder="02"
autocomplete="off">
</div>
</div>
<div class="form-group">
<label for="book" class="col-sm-2 control-label">Expiry Year</label>
<div class="col-sm-10">
<input
type="text"
ng-model="card.exp_year"
class="form-control"
id="text"
placeholder="2015"
autocomplete="off">
</div>
</div>
<div class="form-group">
<div class="col-sm-offset-2 col-sm-10">
<button type="submit" class="btn btn-default">Pay</button>
</div>
</div>
</form>
</div>
</div>
</div>
</div>app.controller('PaymentController', function($scope, $rootScope, $stamplay, User){
Stripe.setPublishableKey('your_stripe_TEST_key');
$scope.card = {
number: '',
cvc: '',
exp_month: '',
exp_year: ''
}
$scope.pay = function(){
Stripe.card.createToken($scope.card, function(status, response){
if (response.error) {
console.log('error', response.error);
} else {
var token = response.id;
var customerStripe = new $stamplay.Stripe();
customerStripe.charge($rootScope.user.instance.id, token, 50, 'USD').then(function (response) {
$scope.$apply(function(){
User.update($rootScope.user.instance.id, 'paid', true).then(function(){
$rootScope.paid = true;
});
})
}, function(err){
console.log('error', err);
})
}
});
}
});paid on the user for persistence. We’ll need to create the update method on User.
function update(id, key, value) {
  var deferred = $q.defer();

  var User = $stamplay.User().Model;
  User.fetch(id).then(function() {
    User.set(key, value);
    User.save().then(function(){
      deferred.resolve(User);
    });
  }).catch(function(err) {
    deferred.reject(err);
  });

  return deferred.promise;
}n.4242 4242 4242 4242
date: 07/2020
cvc: 424Implementing Search
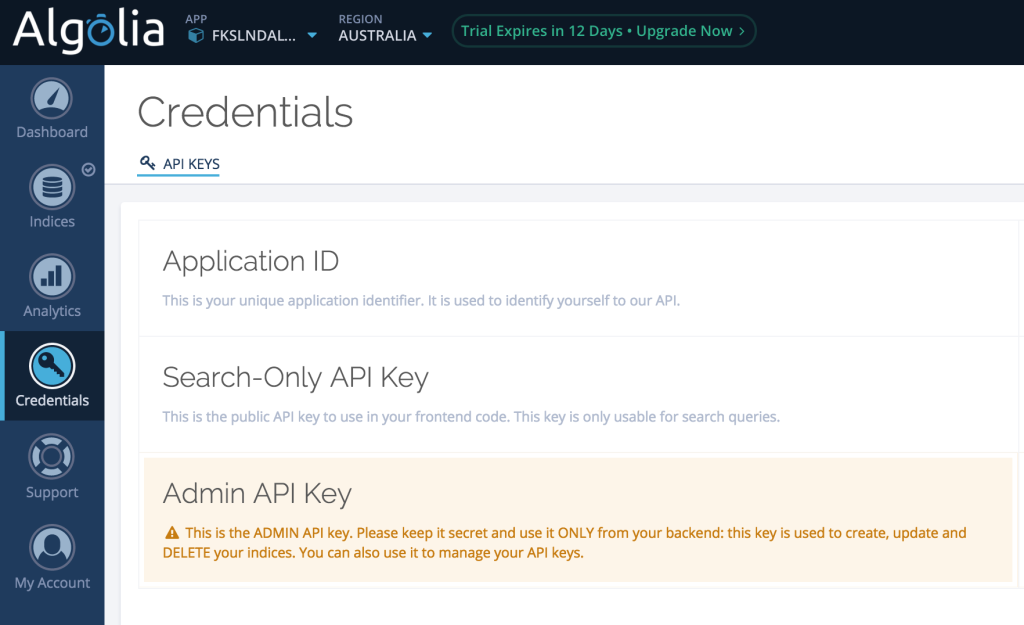
As more and more books get added to our club, it’s going to become impractical to use a dropdown to choose the book we’d like to review. Let’s implement a typeahead search. Stamplay allows us to integrate with Algolia, a hosted search back-end. We’ll need an Algolia account for this section (there’s a free trial). In Stamplay, we need to connect to Algolia. Go to the components, page and click Algolia. Enter you details (avaiable on the credentials tab of your Algolia dashboard) and then click connect.
 We’ll need to create an index in Algolia. Algolia’s online app makes it easy to add an index and their tutorials are clear.
We’ll call our index “books” – make sure that there’s no data (dummy data) in the index to begin with.
Now we can add a new task in Stamplay.
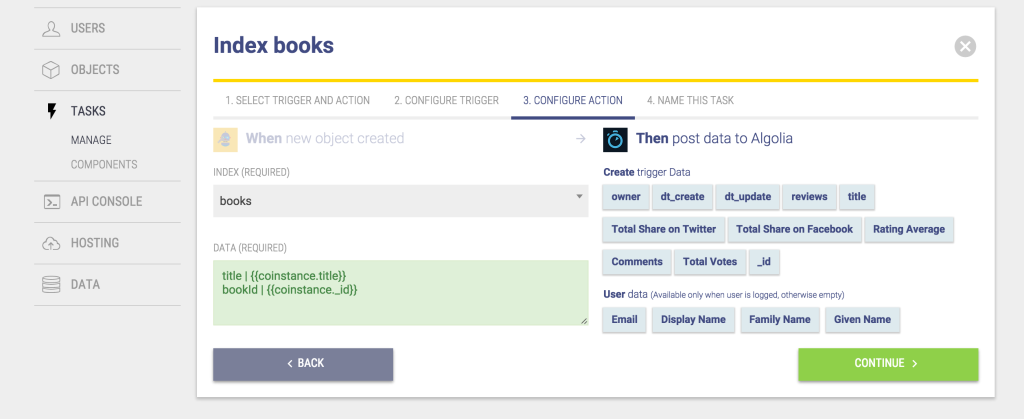
From the criteria select: When a new Object is created, push data to Algolia.
We’ll need to create an index in Algolia. Algolia’s online app makes it easy to add an index and their tutorials are clear.
We’ll call our index “books” – make sure that there’s no data (dummy data) in the index to begin with.
Now we can add a new task in Stamplay.
From the criteria select: When a new Object is created, push data to Algolia.
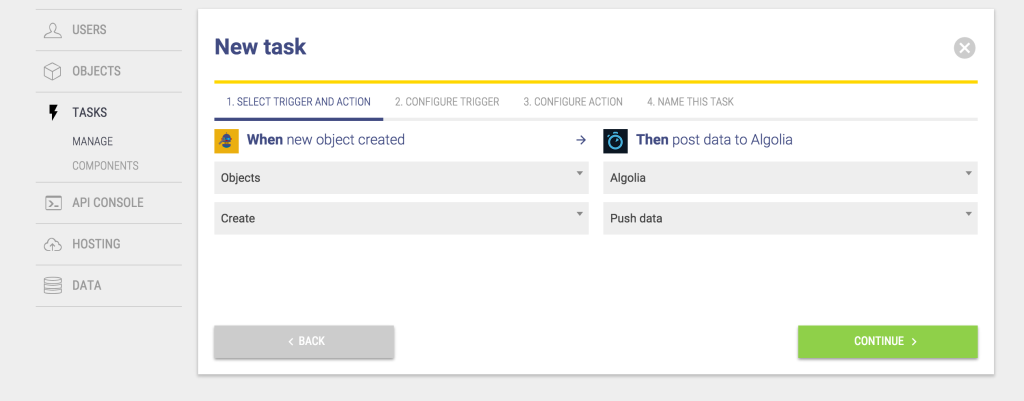 On the next pages we’re going to select Books (the objects we want to search) and we’ll put them into our index named books.
We’ll index the title property as “title”, and the “_id” property as bookId:
On the next pages we’re going to select Books (the objects we want to search) and we’ll put them into our index named books.
We’ll index the title property as “title”, and the “_id” property as bookId:
 Any books you’d added before this point will not be indexed. You can add another task to index them when they’re updated, or since it’s test data you can delete the older books and add new ones. New books you add should appear in your Algolia index.
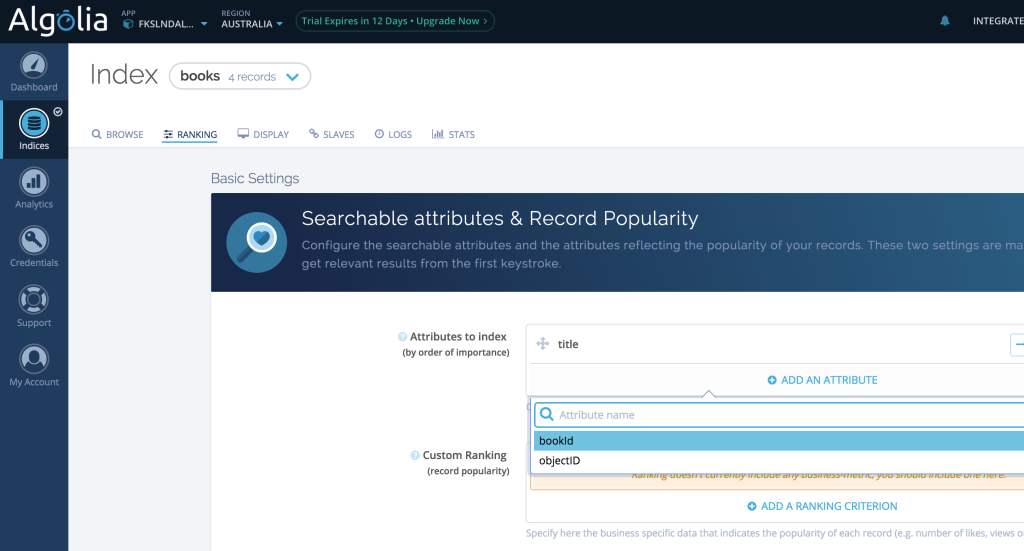
We can now go into Algolia, and select which properties to make searchable. You can configure this on the rankings tab of your books index. We’ll make the title attribute searchable.
Any books you’d added before this point will not be indexed. You can add another task to index them when they’re updated, or since it’s test data you can delete the older books and add new ones. New books you add should appear in your Algolia index.
We can now go into Algolia, and select which properties to make searchable. You can configure this on the rankings tab of your books index. We’ll make the title attribute searchable.
 Let’s swap that dropdown for a typeahead. We’ve already got the Algolia search client included in
 index.html. We’ll need to include it as an Angular module:
var app = angular.module('stamplay', ['ngStamplay', 'algoliasearch']);index.html so let’s include it as an Angular module as well:
var app = angular.module('stamplay', ['ngStamplay', 'algoliasearch', 'ui.bootstrap']);<div class="form-group">
<label for="book" class="col-sm-2 control-label">Book</label>
<div class="col-sm-10">
<input
type="text"
ng-model="newReview.book"
placeholder="Find a book"
typeahead="book as book.title for book in findBook($viewValue)"
typeahead-loading="loadingBooks" class="form-control">
<i ng-show="loadingBooks" class="glyphicon glyphicon-refresh"></i>
</div>
</div>findBook() function. Let’s implement that now:
app.controller('ReviewController', function($scope, Book, $rootScope, Review, algolia, $q){
  // Replace the following values by your ApplicationID and ApiKey.
  var client = algolia.Client('FKSLNDAL5R', 'b1c739979a51be636bf6d2eb4eee8243');
  // Replace the following value by the name of the index you want to query.
  var index = client.initIndex('books');

  $scope.findBook = function(value) {
    var deferred = $q.defer();

    index.search(value, { hitsPerPage: 5 }).then(function(content) {
      if (content.query !== value) {
        // do not take out-dated answers into account
        return;
      }
      deferred.resolve(content.hits);
    }, function(content) {
      deferred.resolve([]);
      return [];
    });

    return deferred.promise;
  };

  $scope.newReview = {
    book: null,
    text: '',
  };

  $scope.leaveReview = function() {
    Review.add($scope.newReview).then(function(savedReview){
      $rootScope.$emit('Review::added', {review: savedReview});
      $scope.newReview.text = '';
      $scope.newReview.book = null;
    });
  }
});newReview to have a book property instead of bookId since our typeahead is going to assign entire book objects to the model. ( This is due to a limitation in the Bootstrap directive to do with presentational values )
We’ll need to update our Review service to get the bookId property off the Algolia book object:
// Save the review
 ReviewModel.save().then(function() {
   // If it saves, update the book
   // Access bookId on review.book (an Algolia object)
   Book.find(review.book.bookId).then(function(BookToUpdate){
     // Rate it
     BookToUpdate.rate(review.rating);

     // Store the saved review on the book
     var currentReviews = BookToUpdate.get('reviews') || [];
     currentReviews.push(ReviewModel.get('_id'));
     BookToUpdate.set('reviews', currentReviews)
     BookToUpdate.save().then(function(){
       // We're done
       deferred.resolve(ReviewModel);
     });
   });
});Conclusion
You can view a completed version of this application at bookclub.stamplayapp.com. The completed code is also available on master here. We’ve spent almost all of our time in our front-end application building the user interface and yet we now have a powerful back-end too. Stamplay really does make it easy to achieve common back-end tasks, allowing you to focus on creating feature rich complex applications. I’d love to see what you create with Stamplay. Stamplay has provided SitePoint users an exclusive coupon to provide 3 months of the premium plan for free ($600 value). The coupon code is STAMPLAY4SP and it expires on July 30.Frequently Asked Questions (FAQs) about Creating a Fully-Featured Book Club App with Stamplay
How can I integrate other programming languages with Stamplay?
Stamplay is a low-code development platform that primarily supports JavaScript. However, it also provides REST APIs that can be used to integrate with other programming languages. You can use these APIs to send HTTP requests from your application written in any language that supports HTTP, such as Python, Java, or C#. This way, you can leverage the power of Stamplay in your existing applications.
Can I use Stamplay for large-scale applications?
Yes, Stamplay is designed to scale with your application. It uses a serverless architecture, which means it can automatically scale up to handle high traffic and scale down when traffic is low. This makes it suitable for both small and large-scale applications. Additionally, Stamplay provides features like data storage, user authentication, and third-party integrations, which are essential for building complex applications.
How secure is Stamplay?
Stamplay takes security seriously. It uses secure HTTPS connections for all data transfers, and all data stored in Stamplay is encrypted at rest. Additionally, Stamplay provides built-in user authentication and authorization features, which help protect your application from unauthorized access.
Can I use Stamplay for mobile app development?
Yes, Stamplay can be used for both web and mobile app development. It provides a set of APIs that can be used to build mobile apps using any technology that can make HTTP requests. This includes native technologies like Swift and Java, as well as cross-platform technologies like React Native and Ionic.
How can I debug my Stamplay application?
Stamplay provides a logging feature that allows you to track the execution of your application. You can use these logs to identify and fix any issues in your application. Additionally, Stamplay provides error messages that can help you understand what went wrong when an error occurs.
Can I use Stamplay with AngularJS?
Yes, Stamplay works well with AngularJS. You can use Stamplay’s REST APIs to send and receive data from your AngularJS application. Additionally, Stamplay provides a JavaScript SDK that can be used to integrate Stamplay features directly into your AngularJS application.
How can I test my Stamplay application?
You can test your Stamplay application using any testing framework that supports HTTP requests. This includes frameworks like Mocha, Jasmine, and Jest. You can use these frameworks to write tests that send HTTP requests to your Stamplay application and verify the responses.
Can I use Stamplay for free?
Stamplay offers a free tier that you can use to try out the platform. However, the free tier has some limitations, and you may need to upgrade to a paid plan if you need more resources or features.
How can I deploy my Stamplay application?
Stamplay provides a built-in deployment feature that allows you to deploy your application with a single click. You can also use Stamplay’s APIs to automate the deployment process.
Can I use Stamplay with other cloud platforms?
Yes, Stamplay can be used with other cloud platforms. It provides integrations with popular cloud platforms like AWS, Google Cloud, and Azure. You can use these integrations to leverage the features of these platforms in your Stamplay application.
 Brad Barrow
Brad is a front-end developer and designer living in Melbourne and working with the team at SitePoint. He tries to keep on top of the ever changing front-end universe by eating JavaScript/CSS for breakfast.


