Suppose you could convince your visitors to give their undivided attention to your company logo and message for one to two full minutes. And then watch your commercial. And then give you their email address. Sound too good to be true? Well, there is one catch: you have to be willing to chop your message up into little pieces.
In this tutorial, we’ll work through the process of building a jigsaw puzzle, based on either a still image or a video. In the process, we’ll cover some useful Flash techniques for loading and masking images, and for responding to user actions.
For a sneak preview of what we’re building, unzip the download files and fire up sitePointPuzzle.swf. If you look in the .fla, you’ll find a couple of functions not described here: randomize scatters the puzzle pieces across the Stage, and displayTime shows a running timer. We’ll focus on the key features of the jigsaw puzzle application: cutting the loaded .jpg or .swf into puzzle pieces, and putting those pieces back together.
Make a Reusable Puzzle Template
First, you need to decide on the dimensions of your puzzle, in order to make the puzzle template — the collection of shapes that fit together in the complete puzzle. The example template I’ve used here is 550 x 230 pixels. If you go much bigger than that, or if you use more than about 20 pieces, you risk bogging down slower machines. The actual JPG or SWF that provides the visible content will be loaded in at run-time, so we can get a lot of mileage out of a single template, reusing it with many different images.
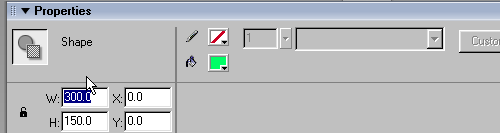
In Frame 1 of a new Flash document, use the rectangle tool to draw a rectangle with no border, using any fill color. The color will not be visible in the final product. In the property inspector, set the width and height of the rectangle, and set its x and y position to 0. Insert an empty keyframe in Frame 2 of the timeline.
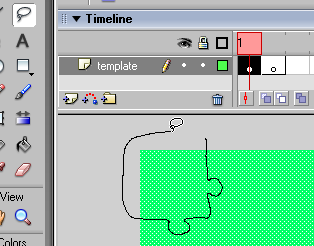
Now select the lasso tool, and use it to cut out a puzzle piece from one corner of the rectangle.
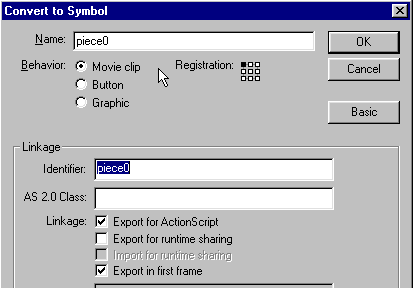
Choose Modify > Shape > Optimize, and find a setting that seems to work well. Optimizing the shapes will speed up the performance of the final movie, but over-optimizing will distort the shapes of your puzzle pieces. Press F8 to open the Convert to Symbol dialogue window. Give the piece the name piece0, select Movie clip, set the registration point in the upper left corner, and check Export for Actionscript. Press OK to close the window.
Your freshly-minted puzzle piece is selected. Use the property inspector to give the shape the instance name a0. Cut it (Control-X), and Paste-in-Place (Control-Shift-V) into Frame 2 of the timeline. This instance serves to record the position of this piece in the final puzzle. When the Flash movie is published, a script will use this information to make a real picture-bearing puzzle piece, and then will delete this instance.
Repeat the cutting-out process until you’ve dissected the entire rectangle into movie clips with clip names piece0 through piece17 and instance names a0 through a17. Of course, replace 17 with the appropriate number for your own puzzle. Finally, delete the now-empty Frame 1. That completes most of the graphical interaction in this project–the rest is done with Actionscript code. If you’re impatient, you can skip this stage for now, and use the puzzle template in the file puzzleTemplate300x150.fla.
Preload the Image
We need a copy of the image for each puzzle piece. If we were to issue a loadMovie call for each puzzle piece at the start, the Flash player would start multiple processes to retrieve the movie from the server. Instead, we will load the visible content once, using Flash’s MovieClipLoader class. Once this first load completes, we will create the individual puzzle pieces. Because we wait for the loading to complete, the Flash player will use the cached copy of the image for all the puzzle pieces.
The MovieClipLoader class dispatches several events to any registered listeners. In this application, we create an object called loadListener, and give it onLoadProgress and onLoadComplete event handlers. These are used to update a preloader display, and to call the makePuzzle function when loading is complete. The preloader is a movie clip that contains another clip called preloader.bar, and we simply change the width of the bar to show progress.
var p : MovieClip = _root.createEmptyMovieClip("picture", 1);

var h = p.createEmptyMovieClip("holder", 1);


var loadListener : Object = new Object();

loadListener.onLoadProgress = function(target, loaded, total) {

  preloader.bar._width = 100 * loaded / total;

}

loadListener.onLoadComplete = function() {

  preloader._visible = false;

  makePuzzle();

  randomizeInt = setInterval(randomize, 3000);

}


var loader:MovieClipLoader = new MovieClipLoader();

loader.addListener(loadListener);

loader.loadClip(puzzleContent, h);
Cut the Image According to the Puzzle Template
The code for this step is in the aptly-named makePuzzle function. Here’s the code for this function. (We’ll examine it in more detail momentarily.)
function makePuzzle() : Void {

  // initialize the class array "pieces," that holds references to all puzzle pieces

  PuzzlePiece.pieces = new Array();

  PuzzlePiece.puzzleContent = puzzleContent;

  var piece : MovieClip;


  for(var i : Number = 0; i < numPieces; i++){

    piece = _root.attachMovie("PuzzlePieceSymbol", "piece" + i, 100 + i);

    piece.init(_root["a" + i], i);

  }


  // Now that we have all the puzzle pieces, we dim the original image

  p._alpha = 10;


  /* We start loading the main content, which will be displayed after

    the puzzle is completed.  This can be a much larger

    file, but since it loads while the user is solving the puzzle,

    it won't slow things down. */

  loadListener.onLoadComplete = null;

  loadListener.onLoadProgress = null;

  loader.loadClip(mainContent, h);

}
First, we initialize the class array PuzzlePiece.pieces, which will hold references to all the puzzle pieces. We also store the name of the .swf or .jpg to load as a class property, for convenience.
  PuzzlePiece.pieces = new Array();

  PuzzlePiece.puzzleContent = puzzleContent;
Here’s the key step: we run through a loop that creates the individual puzzle pieces. Because the class PuzzlePiece is an extension of the MovieClip class, we do not use the new operator; instead, we use attachMovie to put on stage an instance of PuzzlePieceSymbol. This movie clip has no visible content, but it is linked to the custom class PuzzlePiece, as we can see in the properties window.

When an instance of PuzzlePieceSymbol is created, the constructor function for the class PuzzlePiece is called automatically. This creates an instance of PuzzlePiece, but there is one problem: because we are not calling the constructor directly from Actionscript code, we have no way to pass any parameters to the constructor.
The solution is to give PuzzlePiece a public initialization function, which we can call explicitly with the needed parameters. So the loop that creates the puzzle pieces also calls the init() function of each piece, passing as parameters a reference to the original puzzle piece on the stage, and an index number:
for(var i : Number = 0; i < numPieces; i++){
piece = _root.attachMovie("PuzzlePieceSymbol", "piece" + i, 100 + i);
piece.init(_root["a" + i], i);
}We'll examine this
init()function in a moment, after finishing with themakePuzzlefunction. The last thingmakePuzzledoes is to start loading themainContentswf into the same movieclip that we used to preload thepuzzleContent. This can be a much larger file (in this example, it has music and sound effects included) without causing any delays: it will be preloaded while the user is assembling the puzzle pieces, and doesn't need to be displayed until the puzzle is finished.
  loadListener.onLoadComplete = null;

  loadListener.onLoadProgress = null;

  loader.loadClip(mainContent, h);
Create the Puzzle Pieces
Here’s where the magic happens! We need to create a copy of puzzleContent, but mask it so that only the portion corresponding to a given puzzle piece is visible. This is done by the function PuzzlePiece.init():
  function init(templatePiece : MovieClip, index : Number) : Void {

    _index = index;
We save the index (which will also serve as a depth), and then load the puzzleContent into a holder subclip. This is a wise practice in general, since loadMovie() obliterates various movieclip properties, including masking and event handlers. By loading content into a subclip, we avoid wrecking properties of the main puzzle piece clip.
    holder = this.createEmptyMovieClip("holder", 1);

    holder.loadMovie(puzzleContent);
Now, for the all-important mask.
Flash allows us to use one movie clip as a mask for another. The masked clip will be visible only in places where the masking clip has some visible content. In this application, we use an empty movie clip as a mask, and then attach a puzzle piece to the mask. When the movie is published, only the portion of the image that overlaps the puzzle piece will be visible.
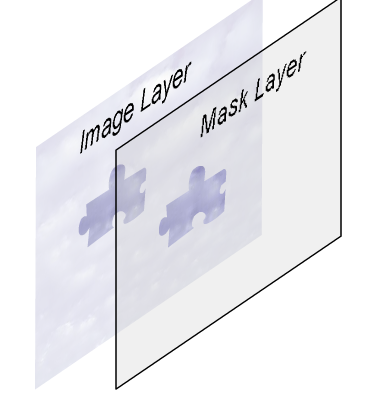
Note that we do not use the puzzle piece itself as a mask, but instead attach a copy of the puzzle piece to an initially empty mask. We’ll see in a moment that this approach will give us a convenient way to join puzzle pieces together.
  //create a mask, and attach the puzzle piece to the mask

  createEmptyMovieClip("mask", 2);

  mask.attachMovie("piece" + index, "piece" + index,  index);

  maskPiece = mask["piece" + index];  // reference to the mask piece

  maskPiece.number = index;    // the piece knows its own number

  setMask(mask);
Now we need to place the masking puzzle piece in its proper position. For this, we refer to the original puzzle piece on the Stage. We set the mask piece to have the same _x and _y values as the original piece, then remove the original piece.
  this.maskPiece._x = templatePiece._x;

  this.maskPiece._y = templatePiece._y;


  templatePiece.swapDepths(99);

  templatePiece.removeMovieClip();
Movie clips created in the authoring tool, like our original puzzle pieces, are placed at negative depths. The method removeMovieClip() can only be used on movie clips at positive depths. So we need to send each puzzle piece to a positive depth, using swapDepths(), before we can remove it.
Finally, we add our new puzzle piece to the master list of puzzle pieces, update the maxDepth variable, and assign functions to fire when the puzzle piece is pressed or released.
pieces.push(this);
maxDepth = Math.max(maxDepth, this.getDepth());
this.onPress = pressFunction;
this.onRelease = this.onReleaseOutside = releaseFunction;
}Make the Pieces Movable
It's all very well to have a bunch of puzzle pieces, but without some way to move them around, it won't be much fun!
Here is the function that fires when a puzzle piece is pressed. This function does four things. First, it moves the puzzle piece we've selected to a depth above all the other movie clips, to prevent the piece sliding under other pieces as it moves. Then it emits a click sound, by calling the
start()method of the sound objectdownClick. Then, it calls thestartDrag()method of the puzzle piece, causing it to follow the mouse. Finally, it cancels theonEnterFramefunction. This will cancel the piece's desire to move to a random spot on the Stage, in case the user clicks on it during the randomization process.
    private function pressFunction() {

  if(!draggable) return;    // do nothing if puzzle not yet active

  this.swapDepths(++maxDepth);   // bring piece above other pieces

  downClick.start();      // emit click sound

  this.startDrag();      // start dragging the piece

  delete this.onEnterFrame;    // cancel randomization

    }
Take Action When a Piece is Released
When a puzzle piece is released, we have to do several things. Of course, we need to stop dragging, and emit a click sound so the user can tell something happened.
    private function releaseFunction() {

  if(!draggable) return;

  upClick.start();    // emit a lower-pitched click

  this.stopDrag();    // stop dragging
But we also need to check whether the piece is adjacent to any of its neighboring pieces. If so, these pieces will snap together, and effectively become a single piece.
Because we’ve set up all the pieces with the same reference point, it is easy to check whether two pieces are in the correct relative position. We need only check whether the differences between their _x and _y coordinates are sufficiently close to zero.
We need to set some tolerance around how close to their proper alignment pieces must be in order to be counted as correctly aligned. I’ve used a relatively large value of 16 pixels in this example, but larger or smaller values may work better for other puzzles.
Again, we use a loop that runs through all the elements of the pieces array.
  for(var j in pieces) {

    otherPiece = pieces[j];
Following the programming principle of putting shorter actions first, we skip over a piece if any one of several conditions occurs:
We will not join a piece to itself::
if(otherPiece == this) continue;If the puzzle pieces are not touching, we will not join them:
if( !this.mask.hitTest(otherPiece .mask) ) continue;And if the pieces are out of alignment by more than the tolerance, in either the x or the y direction, we will not join them:
    if( Math.abs(this._x - otherPiece._x) > tol ||

Math.abs(this._y - otherPiece._y) > tol ) continue;
If we make it through all these tests, we know that the piece we’ve just released is aligned with another piece, and should be joined to it. In fact, we take the puzzle piece (or pieces, if a piece is already the result of previous joining) from the aligned movie clip, and add it to the mask layer of the released clip.
    for(var m in otherPiece.mask) {

      maskPiece = otherPiece.mask[m];

      var n = this.mask.attachMovie("piece" + maskPiece.number,

         "piece" + maskPiece.number, maskPiece.number);

      n.number = maskPiece.number;

      n._x = maskPiece._x;

      n._y = maskPiece._y;

    }
Then we delete the other piece from the array of puzzle pieces, and remove it from the stage:
    pieces.splice(parseInt(j), 1);

    otherPiece.removeMovieClip();

  }
Finally, we check to see whether the puzzle has been completed. Here’s the full release function:
    private function releaseFunction() {

  if(!draggable) return;

  upClick.start();        // emit a lower-pitched click

  this.stopDrag();        // stop dragging


  // check for connection to neighboring pieces

  var otherPiece : MovieClip;

  var maskPiece : MovieClip;

  for(var j in pieces) {

    otherPiece = pieces[j];

    if(otherPiece == this) continue;

    if( !this.mask.hitTest(otherPiece.mask) ) continue;

    if( Math.abs(this._x - otherPiece._x) > tol ||

      Math.abs(this._y - otherPiece._y) > tol ) continue;

    for(var m in otherPiece.mask) {

      maskPiece = otherPiece.mask[m];

      var n = this.mask.attachMovie("piece" + maskPiece.number,

        "piece" + maskPiece.number, maskPiece.number);

      n.number = maskPiece.number;

      n._x = maskPiece._x;

      n._y = maskPiece._y;

    }

    pieces.splice(parseInt(j), 1);

    otherPiece.removeMovieClip();

  }

  _root.checkForCompletion();

    }
Respond When the Puzzle is Completed
Because we merge any aligned puzzle pieces into a single piece, it is very easy to check whether the puzzle is finished: we just check whether the array of pieces has been reduced to a single element! If more than one element remains, we’ll continue with the puzzle. Otherwise, we’ll reward the user for successfully completing the puzzle. In this example, we remove the one remaining puzzle piece, and show a version of the movie that includes sound.
The sound-enhanced version of the movie has a stop() command on frame 1, so that we can preload it while the user is working on the puzzle, without having it launch immediately upon loading. So when the puzzle is done, we issue a gotoAndPlay(2) command to start the movie rolling.
function checkForCompletion() {

  if(pieces.length > 1) return;

  clearInterval(timerInt);  // stop the timer


  // show the movie with sound

  p._alpha = 100;

  p.holder.gotoAndPlay(2);

  pieces[0].removeMovieClip();

}
Further Developments
On completion, we stop the timer, to record how long the user took to complete the puzzle. On a commercial Website, one could offer the user various rewards for having completed the puzzle. A free sample, or a lottery entry to win a prize, could be made available to those who complete the puzzle in less than one minute, for instance. Having accomplished a task requiring some effort, your visitor will likely feel that they have earned whatever prize you offer, and be more willing to give their contact information than they would for a free offer. And the user who misses the time cutoff may return to your site to try again.
A video jigsaw puzzle can be an enticing — even addictive — entertainment. See what you can do with it!
 Mike Kantor
Mike is a Flash programmer and developer of rich internet applications. He develops online university courses, and provides Flash development services. His site is FlashGizmo.com.