This article is part of a web dev tech series from Microsoft. Thank you for supporting the partners who make SitePoint possible.
This Node.js tutorial series will help you build a Node.js-powered real-time chatroom web app fully deployed in the cloud. In this series, you will learn how to setup Node.js on your Windows machine (or just learn the concepts if you’re on Mac), how to develop a web frontend with Express, how to deploy a Node.js Express app to Azure, how to use Socket.IO to add a real-time layer, and how to deploy it all together.
The tutorial will use the optional Visual Studio and the Node.js Tools for Visual Studio plug-in as a development environment. I have provided links to free downloads of both tools. This is a beginner to intermediate-level article –you’re expected to know HTML5 and JavaScript.
Part 1 – Introduction to Node.js
Part 2 – Welcome to Express with Node.js and Azure
Part 3 – Building a Backend with Node.js, Mongo and Socket.IO
Part 4 – Building a Chatroom UI with Bootstrap
Part 5 – Connecting the Chatroom with WebSockets
Part 5 – Connecting the Chatroom with WebSockets
Welcome to Part 5 of the hands-on Node.js tutorial series: Build a Node.js-powered chatroom web app.
In this installment, I will show you how to connect the front-end chatroom to the Node.js chatroom backend that you built in Part 2, Part 3 and Part 4.
Adding jQuery, SocketIO and index.js
The first thing we want to do before we start writing our front-end JavaScript code is to ensure the files and dependencies we need are going to be delivered by the Node.js server. Let’s add jQuery and Socket.IO first to the layout.jade file which is extended by all the other jade files in our project.
Replace the single link to bootstrap.min.js with a link to all the other files we need.
script(type='text/javascript'
src='http://ajax.aspnetcdn.com/ajax/jQuery/jquery2.1.1.min.js')
script(type='text/javascript' src='/js/bootstrap.min.js')
script(type='text/javascript' src='/socket.io/socket.io.js')Note, the first line links to jQuery hosted on the Microsoft Ajax Content Delivery Network. This CDN hosts popular third party JavaScript libraries such as jQuery and enables you to easily add them to your Web applications. You can significantly improve the performance of your Ajax applications by using a CDN. The contents of the CDN are cached on servers located around the world. The CDN supports SSL (HTTPS) in case you need to serve a web page using the Secure Sockets Layer.
Now I will add one more line at the end to create a new block.
block body_endI am doing this so that any Jade file that extends layout.jade can also add script tags right before the end of the body tag.
Now we want to use that new block to add a link to our index.js file which we will create in the public/js folder, make sure to create the file.
block body_end
    script(type='text/javascript' src='/js/index.js')
Make sure that the block starts with zero indentation to follow Jade coding conventions. If you run the Node.js server and navigate to the main page in your browser, you will notice in your F12 tools that the files are being served correctly.
Quick Changes to app.js
There’s a few things I want to change in app.js. First, I want to reverse the sorting direction so that the oldest messages are sent first and second. I also want to emit the previously received chat messages on the same channel as I plan on receiving the new messages. The changes will go to line 49 and 50 in app.js. This is the result:
var stream = collection.find().sort().limit(10).stream();
stream.on('data', function (chat) { socket.emit('chat', chat.content); });
Don’t forget to set the CUSTOMCONNSTR_MONGOLAB_URI environment variable before rerunning the app.js file as otherwise the Node.js backend will crash when it can’t connect to your MongoDB.
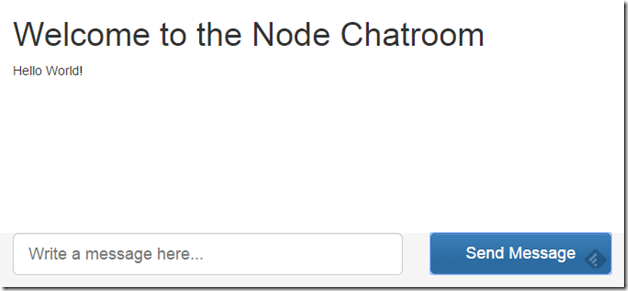
Powering Up the Send Button
It is time to power up that send button to send messages in the message box using WebSockets to the backend server on the chat channel.
var socket = io();
$('#send-message-btn').click(function () {
    var msg = $('#message-box').val();
    socket.emit('chat', msg);
    $('#messages').append($('<p>').text(msg));
    $('#message-box').val('');
    return false;
});
socket.on('chat', function (msg) {
    $('#messages').append($('<p>').text(msg));
});
Line 1
We want to create a socket and we can do that by calling the io() function which is in the socket.io-client.js file.
Line 2
After that, we want to execute a function on the click of the “Send Message” button using the jQuery’s $() function and the click() method.
Line 3
We will get the string value in the message box using jQuery’s $() function and the val() method.
Line 4
We use the emit() function on the socket variable we created in line 1 to send a message on the “chat” channel containing the message box’s value.
Line 5-7
At this point, we will append the message in the message box to the div having messages as its ID, so that the user can see the message was sent. We will assign the value of the message box to an empty string to clear it up.
Line 9-10
We want to append the message received on the chat channel from other users to the div having messages as its ID. The Node.js backend will not resend the message that the client wrote back to itself, but that’s alright because we added the message right away in the click() function handler.
Conclusion
Voila! You have connected your backend and your front-end using WebSockets. If you want to identify the people in the chatroom or add an avatar for each user, it is up to you but you can use this chatroom onward. In the next installment, I will show you how to deploy this anonymous chatroom to Azure and show you how you can debug it.
Stay Tuned for Part 6!
Part 6— The Finale and Debugging Remote Node Apps! is here. You can stay up-to-date on this and other articles by following my twitter account
More Node.js Learning on Azure
For more in-depth learning on node, my course is available here on Microsoft Virtual Academy.
Or some shorter-format videos on similar node subjects:
This article is part of the web dev tech series from Microsoft. We’re excited to share Project Spartan and its new rendering engine with you. Get free virtual machines or test remotely on your Mac, iOS, Android, or Windows device at modern.IE.
 Rami Sayar
Rami Sayar is a technical evangelist at Microsoft Canada focusing on web development (JavaScript, AngularJS, Node.js, HTML5, CSS3, D3.js, Backbone.js, Babylon.js), open data and open source technologies (Python, PHP, Java, Android, Linux, etc.) Read his blog or follow him on Twitter.