One the best ways to get a website up and running quickly is to use a WordPress theme that already has the approximate look and feel and tailor it to suit your needs. But, one dangerous practice that many WordPress developers are guilt of is modifying the theme’s files directly. This is a big no-no! Even if it’s a simple theme like one of the stock WordPress versions of TwentyTwelve, child themes give you a powerful, simple way to make all the changes you want without any risk to having your careful design work wiped out by an upgrade-happy client.
Beyond the power of child themes, I want to show you my own methodology for quickly creating design changes to a theme. Using a couple of readily available tools, I can make design changes almost as quickly as they’re requested, save the changes in a child theme, and continue doing great, time-efficient design work.
Some of the tools you will need for this article are FTP, Chrome web browser, and a text editor. That’s it! As I’ll demonstrate, this process allows for fast site changes with no risk of losing your work with a theme upgrade, which is a common issue as more and more sites are using a few standard base themes for development.
What’s a Child Theme?
A child theme has all the characteristics, code, and functions of its parent. So, if you’re working with something like the Skeleton or Responsive theme, two awesome, free base themes, you can get all the benefits of the parent theme while adding your changes without directly modifying the base theme.
WordPress makes the child theme the primary source for code, so if you have CSS for a particular class in the parent theme that is modified in the child, the child theme’s CSS supercedes the parent. In short, you get all the good without worrying about an edit or upgrade breaking your theme.
Another huge, but overlooked, benefit of a child theme is that you have a much smaller file that you can reference later. I’ve worked with scores of themes that have 2,000+ lines of code just in their CSS files alone. My child themes typically have under 200 lines, so it’s a lot easier to jump back into the code and find what I’m looking for to make changes.
Step 1: Create a Child Theme
If you haven’t worked with a child theme before, I understand the apprehension. Thankfully, they take a few seconds to set up — literally. Once in place, you have an easy way to change the site without modifying the theme’s core files.
Create a new CSS file and drop this code into it. I’m assuming you have the TwentyEleven theme, since it comes with almost all the WordPress installations in the last year or two.
You MUST name this file style.css
[sourcecode language=””]
/*
Theme Name: Twenty Eleven Child
Template: twentyeleven
*/
[/sourcecode]
Upload this file into a new folder within your wp-content/themes folder. It doesn’t matter what you name the folder, but good practice is to add a “-child” to the theme name you are creating a child theme for. So, in the above example, I would place my new child theme document into a folder called “twentyeleven-child”.
The above code doesn’t do anything as of yet. But, you will be able to see it in the Admin->Appearance->Themes section of your WordPress admin site. By selecting the child theme we just created as the theme for your site, you will be using the Twenty Eleven theme as your primary theme.
Step 2: Adding Functionality to Your Child Theme
Now, all you have to do is add a functions.php file to your child theme folder and any functions you write will automatically be available to you. This is a powerful way to quickly add a ton of functions to your site if you find yourself regularly creating and recreating the same functionality.
Case in point, I have a few shortcodes I like to use, as well as some forms that I like to be able to quickly add to most of clients’ sites. So I have a standard functions.php file that I automatically put into the child theme folder I create.
Just add your functions to a functions.php file you can start from scratch with and upload to your child theme folder. That’s it! No includes statements or other code necessary.
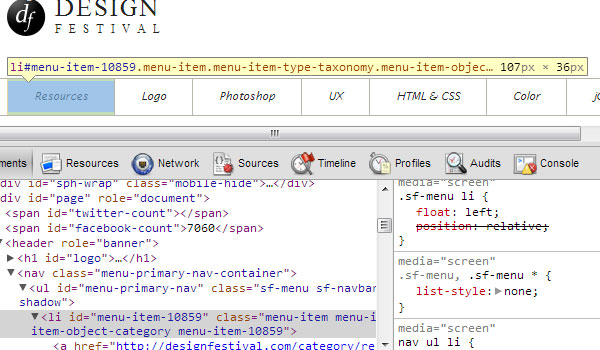
Step 3: Chrome’s Inspect Element Feature
Hands down, one of the easiest ways to work with CSS on a live website is through Google Chrome’s “Inspect Element” tool. Whenever you want to identify the CSS that is defining how an element appears on the page, just right-click and select “Inspect Element”:

The Development Panel will pop and you can drill down into what class and CSS is being used to define the element.
If you want to see the actual CSS document and location within the document for the CSS you’re interested in examining, simply click on the file name in the right panel:
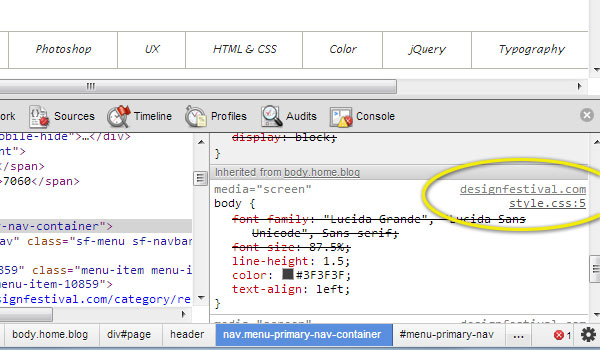
This is a powerful way to learn from other sites that have a design element that looks the way you want. Just inspect it using Chrome and look through their CSS. It’s amazing what you can learn and quickly adapt to your site.
Step 4: Real-time CSS Development Using Chrome
Another powerful tool built right into the Inspect Element feature of Chrome is that you can actually manipulate the CSS live. Just right-click, inspect the element, and make your changes in the right side of the development panel. You can change any CSS on the page and see the results as you change them.
This is a great way to tinker with your designs to see how the CSS will affect the overall look and feel. I use this method when making initial changes to see my results, as well as to make sure that my CSS changes only affect the elements I’m interested in changing. (In the past, I’ve added some CSS code and inadvertently changed something else.)
A final reason why this is so helpful is that you don’t have to change the CSS, upload/save the changes, refresh the page, and then see how your changes affected the site. It’s a fast way to get it right and then you only have to upload/save your CSS changes once.
Step 5: Commit the Changes
Once you have the CSS the way you want it, simply add your new CSS to the style.css file within your child theme folder. You can edit this directly in the Appearance->Editor menu option in WordPress, or you could use FTP to upload the changes.
It’s that easy! Once you have a directory in place, it’s takes just a few minutes to get the child theme up and running and you get to keep the benefits of themes that get regular updates.
Rapid development using Chrome’s Inspect Element feature then allows you to use a quick, non-destructive trial-and-error process to test CSS changes in real-time. Then you simply add the code to your approved CSS file and upload/save it.
What other tricks do you use for CSS development in WordPress?
 Justyn Hornor
When he's not being a complete goofball, “they” drag Justyn into the office where he pretends to be a Senior Editor and Content Engineer at Creative Content Experts — a content marketing firm out of NW Arkansas. He has 10+ years’ experience in technical writing and geek-related fields. He loves WordPress, coffee, and peanut butter a little too much.


