

This article is part of a series created in partnership with SiteGround. Thank you for supporting the partners who make SitePoint possible.
Are you thinking of making changes to your site? Perhaps an update or a redesign?
Before you jump in head first, you should know there is a quicker and safer way to do that.
Enter website staging.
A handful of hosting companies offer website staging to their clients and this article aims to unveil all the greatness that is website staging and why they are a game changer for not only designers and developers, but everyday site owners.
What is Website Staging?
A staging site is essentially a clone of your website that is actually independent from your live site that visitors can see. It has the same settings, same software, and same hardware as your live site but is safely placed in a staging area while you work on it. This staging area can be thought of as a sandbox or demo site that can be altered for any purpose while having no effect on your live site.
When you are satisfied with the changes you have made, then this clone site can be pushed live with the click of a button at any time. The staged site will essentially overwrite or become your live site.
Why is Website Staging Important?
Website staging is a key feature in any great hosting package because it allows you to make changes to your website without interrupting your live site. This means no downtime while making changes, so you can keep on engaging your readers and selling products. This also means you won’t take a hit on your SEO ranking because search engines won’t be indexing the staging copy of your site.
Website staging is important not just to keep your site operational at all times but also to test out site changes before making them live. Installing a new plugin or theme? That’s a perfect time to test it on a staging site. Making routine updates to your WordPress themes or plugins? Another great scenario to use a cloned site. Making a staging site a part of your website maintenance schedule is definitely a best practice that will pay dividends in the long run. It will prevent downtime from faulty plugins or theme updates being incompatible with your unique site features.
Another key feature of website staging is the ability to do site redesigns on the fly without any site interruption. You or your designer can create a quick clone of the site in the staging area and make all the necessary changes without having to go through the arduous process of downloading all the files, plugins, themes, etc. and setting them up on a new site. That process can take hours. With a staging site, you are making changes in a matter of minutes. Once everything is complete, and you’re satisfied that the changes look good and function properly you can simply click a button and push that site live for your customers to see.
How Can You Use Website Staging?
While the exact staging process may differ with each hosting provider, you can rest assured they all work in a similar fashion. Here’s a breakdown of the standard step-by-step process of website staging:
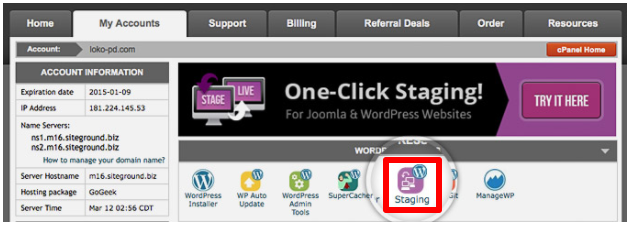
1. Navigate to your cPanel or WordPress dashboard where you will find an option for ‘Staging’.
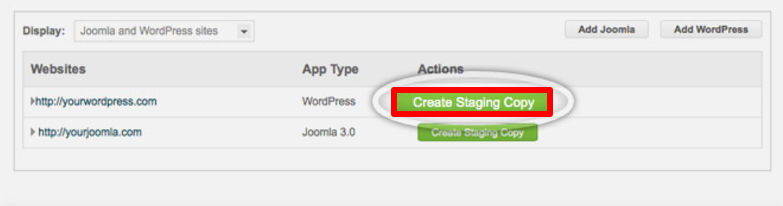
2. Create your staging site by selecting the website you wish to copy and select the option to stage which may read as “Create Staging Copy” or some other variety.
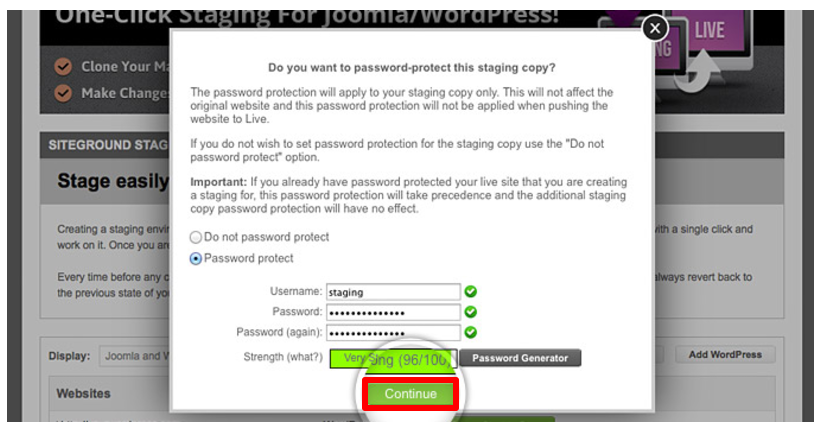
3. Select if you want to password protect this cloned site in your staging environment. This matters because if you don’t do this, Google and other search engines will start indexing the staging copy and can show your site visitors and unfinished site. The indexing of an unfinished site can also negatively affect your SEO.
4. Make your changes by clicking on the link or button provided by your hosting provider which will take you to this staging site you’ve just created. Usually, your website’s URL will read normally except it will have a string on the front to signify it is a staging environment. As an example, it might read “staging1.website.com”. Now you are safe to download any new themes, plugins, or just simply update your existing features.
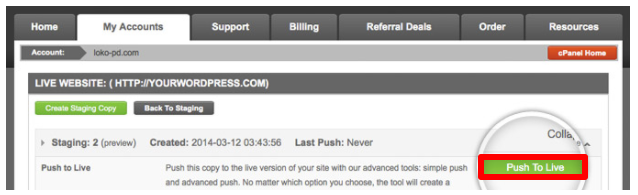
5. Push the staging site live. This process will essentially overwrite your current site and let all your site visitors see your new site with all the changes you just made. Some hosting companies will offer an ‘advanced’ push to live option which will allow you to basically soft test the new changes without overwriting and erasing you previous site forever. This way you don’t break your site with incompatible changes and updates. As a workaround if your hosting company doesn’t have this option, you can restore a backup version of the site to fix it.
That’s it! You can’t make it much simpler than that. If you run into any unknown prompts or messages along the way, we would suggest simply typing your hosting providers name into any search engine followed by the word “staging” to find detailed instructions on how to proceed.
If your site is small, this entire process can take a matter of minutes; especially if you are only updating plugins or performing routine maintenance. If you have a large site and are doing redesign work, then the process can take considerably longer for creating cloned site, making changes, and pushing to live.
Summary
Does your hosting company offer website staging?
Is so, then days of ‘cowboy coding’ on a live site and hoping everything works out are over. Now that you know the basics of website staging, you can venture into major website changes and routine site maintenance with confidence.
If your hosting company doesn’t offer website staging, then it might be time to shop around. Our partner, SiteGround, offers free website migration and includes staging environments in all hosting plans. Their WordPress staging feature makes a copy of your live website in case you need to restore it. All SiteGround hosting plans now come with up to 65% off for SitePoint users.
Do you have any questions about staging or helpful stories to share about your staging experience? Please share them in the comments below.
Frequently Asked Questions (FAQs) about Website Staging
What is the main purpose of a staging site?
The primary purpose of a staging site is to provide a testing environment for changes before they are implemented on the live website. This includes new features, updates, or design changes. By testing these changes on a staging site first, you can ensure that they work correctly and won’t cause any issues when they’re made live. This helps to maintain the integrity and functionality of the live site, providing a better user experience for visitors.
How does a staging site differ from a live site?
A staging site is a clone of your live website. It’s a separate environment where you can test changes without affecting the live site. While the live site is accessible to the public and used for daily operations, the staging site is typically only accessible to developers or site administrators for testing purposes.
Is it necessary to have a staging site?
While not mandatory, having a staging site is highly recommended, especially for businesses. It allows you to test changes and fix any issues before they affect your live site. This can prevent potential downtime or loss of functionality that could negatively impact your business.
How often should I use my staging site?
The frequency of use for your staging site depends on how often you make changes to your website. If you regularly update your site or add new features, you should use your staging site frequently to test these changes. Even for minor updates, it’s a good practice to test them on your staging site first.
Can I make my staging site public?
While technically possible, it’s generally not recommended to make your staging site public. The purpose of a staging site is to test changes before they go live. If the staging site is public, it could confuse visitors or negatively impact your site’s SEO if search engines index it.
How do I create a staging site?
The process of creating a staging site depends on your hosting provider. Some providers offer built-in tools for creating staging sites. If your provider doesn’t offer this, you can manually create a staging site by cloning your live site and setting up a separate environment for it.
What should I test on my staging site?
You should test any changes you plan to make on your live site. This includes new features, updates, design changes, and more. By testing these changes on your staging site first, you can ensure they work correctly and won’t cause issues when implemented on the live site.
Can I use a staging site for training purposes?
Yes, a staging site can be an excellent tool for training. It allows new team members to familiarize themselves with the site and its features without the risk of affecting the live site.
How do I move changes from my staging site to my live site?
The process of moving changes from your staging site to your live site depends on your hosting provider. Some providers offer tools that make this process easy. If your provider doesn’t offer this, you can manually move the changes by copying the updated files and database from your staging site to your live site.
What happens if I make a mistake on my staging site?
One of the benefits of a staging site is that it allows you to make mistakes without affecting your live site. If you make a mistake on your staging site, you can simply revert the changes or re-clone your live site to start over.
 Jacob McMillen
Jacob McMillen is a marketing copywriter and content strategist. His blog Digital Careerist helps businesses grow and freelancers make bank. Head on over to grab his free guide: 2 Fail-Proof Marketing Strategies For Businesses On A Budget.