In this second article of our vector graphics series, we’ll take the basics that were covered in part one and make use of them in a fun application of vector graphics programs: Faux 3D Graphics.
There are plenty of powerful programs that create “true” 3D graphics — graphics that can have lighting and textures applied to their surfaces, and can be rotated in space. In fact, later versions of Adobe Illustrator and Macromedia Freehand have 3D capabilities that allow you to “extrude” shapes (e.g. take a 2D rectangle and turn it into a 3D box), rotate them, and apply different lighting. For more information on Illustrator and Freehand’s 3D functions, see the links at the end of this article.
So, if even Illustrator and Freehand have 3D graphics capabilities, why would anyone try to make vector graphics that “look” 3D, but aren’t truly 3D?
-
- Just for the challenge! There is something quite satisfying about a 3D-looking image that you’ve created yourself in Illustrator or Freehand. But if you don’t have anything to prove, these next reasons might be more compelling…
- To make fast buttons and other interface elements. Create round bullet-type buttons, beveled rectangular or rounded rectangular buttons, and other 3D-looking objects for your website or graphic user interface. Here’s an example:

-
- To create stylized logos or images. Some illustration or logo projects might require a more stylized look, perhaps involving skewed edges, imperfect perspective, or non-linear lighting. Here’s an example of a “funky shape” that takes less than a minute to create in Illustrator or Freehand:
-
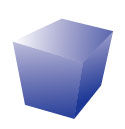
- To make XP-style icons. This graphic of a computer is an example of a more complex vector graphic that looks 3D, but isn’t “truly” 3D. And it’s a graphic that can be created using a vector graphic program!

Are you convinced? Let’s get started! As you follow this tutorial, you’ll hone your skills with the use of gradients, and you might even pick up a few other skills, too.
Note: I’ll be making my diagrams and commands using Adobe Illustrator 8. I’ll also add a few comments for people who use Macromedia Fireworks to make it easy for you to follow along.
Faux 3D Round Shapes
Creating imitation 3D round shapes is quite easy.
- Start with a round shape using the ellipse tool.
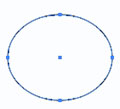
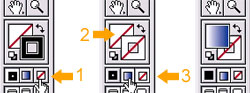
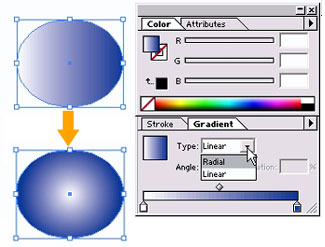
- Our current shape has no fill and a black stroke. We’ll change this to no stroke (1), then choose the fill square by clicking on it (2) and choose the gradient fill option (3). (You can skip #2 and just click on the gradient fill square if you wish.)
This fills the shape with a gradient:
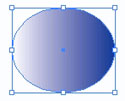
- Now, open the Gradient palette and change the type of fill from Linear to Radial.
- Choose the Gradient tool from the toolbar, or hit “g” for the keyboard shortcut.

- To make it look like the light source is coming from above and to the left, click in the upper left of the round shape, hold, and drag down to the bottom left to change the centering of the radial gradient.

Easy! Now, remember that these are imitation 3D shapes. The shading and highlights won’t be perfect for round shapes that aren’t perfect circles.
Faux 3D Beveled Shapes
Beveled shapes can be used to make buttons. Here, I’ll demonstrate how to make a round beveled button and a rectangular beveled button.
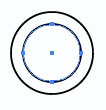
- Start with two circles (see Create Vector Graphics in Illustrator and Freehand for tips on how to make two circles inside one another).
- Select the circles, set the stroke to “none”, and the fill to a linear gradient fill.
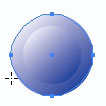
- Use the Gradient Tool to set the inner circle’s gradient in one direction and the outer circle’s gradient in the opposite direction. This makes it look as if the inside of the button is indented slightly, with a beveled edge.
OK, a round beveled button was pretty easy. But the creation of beveled shapes with “hard”-edged objects will take a few extra steps. In this demonstration, I’ll create a basic rectangular beveled shape.
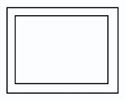
- Let’s start with two rectangles.
- Select the inner rectangle and Edit > Copy (Ctrl-C or Command-C). Then go to Edit > Paste In Back (Ctrl-B or Command-B).
- With the inner rectangle selected, go to Object > Hide Selection (Ctrl-3 or Command-3). This now-hidden shape will eventually be our top “surface.”
Freehand side note: If you’re using Freehand, you’ll want to put the duplicate inner rectangle on its own layer, then hide the layer from view.
- Select the Scissors tool.
![]()
Freehand side note: You’ll want to select the Knife tool.
- Use the Scissors tool and click on each corner of the two rectangles.
This cuts the shapes into eight individual line segments. It will still look like you have two rectangles until you try to use the black arrow tool; the individual line segments are now independent of each other.
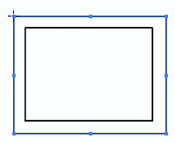
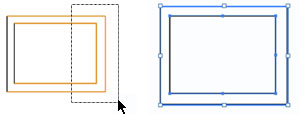
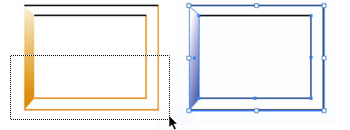
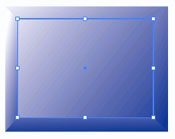
- Use the black arrow tool to select the line segments from three sides of the shape. In the diagram below, we’ve marked the line segments to select in orange so that you can see them clearly. The right side of the diagram shows what it looks like in Illustrator.
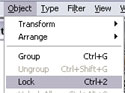
- Now, go to Object > Lock (Ctrl-2 or Command-2). This fixes the line segments in place so that you don’t select them by accident.
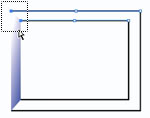
- Use the white arrow tool to select the top pair of endpoints.
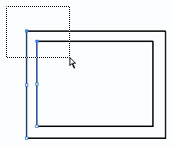
- Go to Object > Path > Join (Ctrl-J or Command-J).

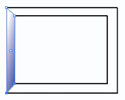
This takes the two open endpoints and connects them with a line segment.
![]()
Freehand note: Sometimes, using the Join command in Freehand doesn’t work as expected. If you’re having more trouble than you think it’s worth, use the Pen tool to connect the line segments together instead!
- Repeat the same process for the bottom endpoints (select with white arrow tool, then Join command), then set the Stroke to none and the Fill to a gradient. The first beveled edge is complete!
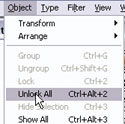
- We will repeat these steps to create the other beveled edges. First, unlock the other line segments by going to Object > Unlock All (Ctrl-Alt-2 or Command-Option-2).
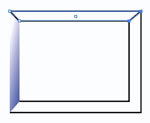
- Now, select everything but the two line segments that you want to work with and lock them (Ctrl-2 or Command-2). Again, I’ve colored the selected objects orange in the diagram below.
- Use the white arrow tool to select the endpoints, then Join them.
- Repeat for the other side. You may then change the stroke and fill colors.
- Continue the “Unlock > select > Lock > select points > Join > select other points > Join > change stroke and fill” sequence for the other sides. Here’s the result:

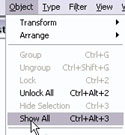
- Now, let’s put the middle part back by selecting Object > Show All (Ctrl-Alt-3 or Command-Alt-3).
- The middle rectangle will reappear. You may then add a gradient fill to the middle area.
- Here’s our final beveled rectangle. I’ve split up the different shapes just for demonstration purposes:

Feeling good about your imitation 3D shapes so far? Let’s move on to something more complex…
Faux 3D Box Shapes
Let’s try to create a “funky box shape” that you can use as a base for lots of other types of imitation 3D objects.
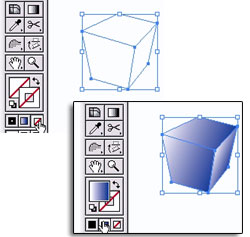
- Use the pen tool to create three different shapes that, lined up together, make a box shape.
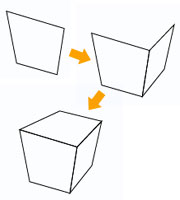
Here are the individual shapes, in case you’re wondering what they look like separately:
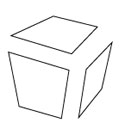
- Use the black arrow tool (selection tool) to select all of the shapes. Select the Stroke option in the tools palette, then click the “none” option to remove the black stroke. (You can also use the keyboard shortcut “/” to remove the stroke.) Then, click the gradient option to fill all three shapes with a gradient. (You can use the keyboard shortcut “.” or “>” to select the gradient option.)
- Use the black arrow tool to select the individual shapes, then use the gradient tool to “fix” the coloring.
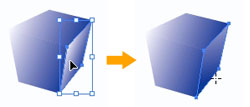
Here’s the result:
Is this box too boring for you? Let’s look at a couple ways that you can use this “funky box” for other purposes…
- Use the pen tool to create a distorted square on the front side of the box (roughly following the lines of that side) and fill it with a grey-white gradient. Can you see where this is going?
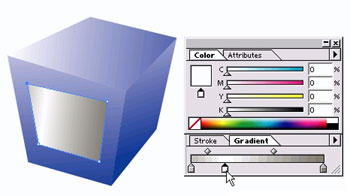
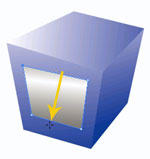
- Use the gradient tool, if necessary, to fix the direction of the gradient.
- Finally, use the pen tool to create two long, thin triangles to create a funky TV graphic. Just what you’ve always needed!

In the next example, we’ll take the funky box and lay text over it to use in a retro-style Website catalog as a “no product image available” placeholder.
- First, copy and paste the box into Photoshop and create a text layer.
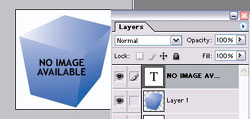
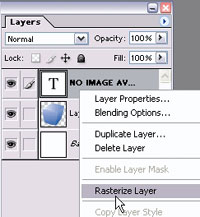
- Right-click on the text layer and choose Rasterize Layer.
- Go to Edit > Transform > Distort.
- Use the cursor to drag on the corners of the text so that it conforms to the same lines as the surface of the object.
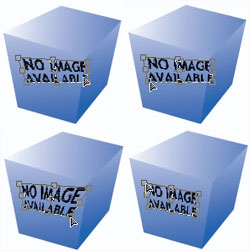
- Double-click inside the text area to commit your changes, then save for Web. Use it in your local retro or fun-and-funky-style Website.

Side Note: If you have Illustrator 10+, you may use the Envelope Distort command to fit the text to the object. This tutorial shows you how to use the Envelope Distort command.
Congratulations!
You now know how to create common imitation 3D shapes:
- round shapes
- beveled shapes
- box shapes and variations
And you’ve also realized that creating these 3D-looking 2D shapes really comes down to fancy use of the gradient tool. So, to use the gradient tool well, you’ll want to spend some time looking at photographs or real-life objects to see how lighting affects the shadows and shading of the object. Below are a few links to resources that might be helpful in understanding light and shadow.
- a nice basic overview of lighting, shapes, and shadows
- shows how placing a light source at different positions affects shadows
- scrolling down a little bit gives some helpful basic 3D renderings of objects
Furthermore, because these imitation 3D graphics simply combine shapes and gradients, you can use the same gradient tool techniques to create quick 3D-like graphics in Photoshop or Fireworks as well (using vector tools or selections!). Just remember that you’ll want to use vector graphics if there’s a chance that you’ll want to be able easily to resize and reuse the graphic later.
 Corrie Haffly
Corrie is the lead designer and developer for PixelMill. This would-be triathlete has a mathematics degree but wishes she had double-majored in computer science and art instead. Maybe next time...