As your WordPress site grows, more and more data is accumulated and stored on the server. You accrue configuration settings, themes, and plugins; users upload files; and, of course, your database evolves, with posts, pages, and comments.
No matter how much you trust your hosting company, disasters happen to everyone. You might also decide to change hosts, in which case you’ll need to migrate your WordPress installation. In either case, you should have a full backup of your WordPress database and files from which you can easily restore, without losing any important data.
In order to make a full backup of a WordPress site, you need to back up both the WordPress installation’s files and its database. While this is fairly easy to do manually, there are a few great plugins that make the task even easier.
I’ll start by showing you how to back up your site manually, so that you’ll have a better idea of what exactly is being backed up, and what’s involved in restoring the site.
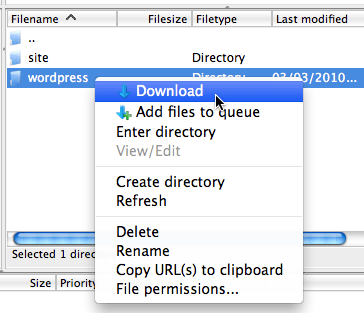
To manually back up your WordPress files, you’ll need an FTP client (FileZilla is a good free one that works on any platform.) Connect to your host’s FTP, and locate your WordPress installation directory. If you installed WordPress yourself this should be simple, otherwise you may need to find out where the installation is located. Usually it’s in a folder called wordpress.
Simply download the entire directory to your computer and keep it in a safe place.
That was the easy part. Now for the slightly less easy part. Many hosting providers give you access to your database via phpMyAdmin. If you’re using a different database administration tool, the instructions may vary a little, but the same functionality should exist.
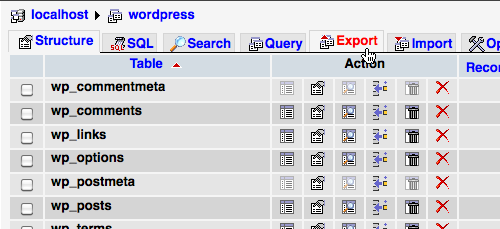
Log into phpMyAdmin and browse to your WordPress database. Once there, click the Export tab to export your database.
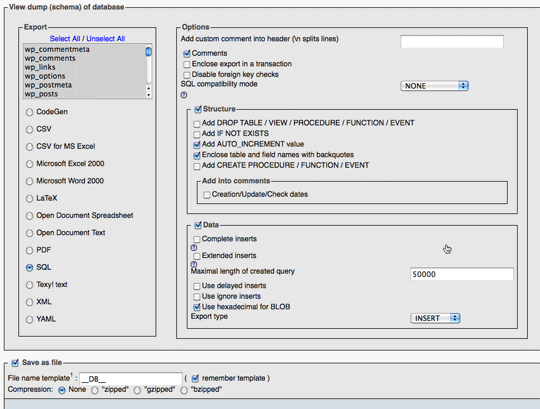
Once Export is clicked, you’ll be shown the following export screen in Figure 3, “Export as SQL, and save as a file”. On the left you’ll see a list of all the tables in your WordPress database. Select SQL as the export format, and tick the option Save as file. Finally, click to export your database. When done, you’ll have downloaded a file containing all the SQL statements required to recreate your database. If you left the default value in the File name template field, the filename will be yourdatabasename.sql, where yourdatabasename is your database’s name.
To restore your WordPress installation, all you need to do is put your downloaded wordpress directory back in place on the server, and restore your database from the yourdatabasename.sql backup file you made.
To restore your WordPress files you’ll need to use your trusty FTP client again. Put them back in the same place you found them.
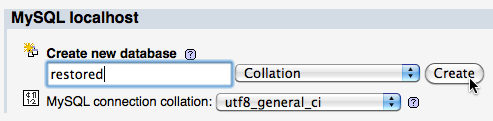
Before you can restore all of your data, you’ll have to create a new database. How you do this depends on your hosting provider. Some hosts will allow you to create a database using phpMyAdmin, while others require you to use a special form located within your hosting control panel. If you’re having trouble finding how to create a new database, ask your host; they should be able to point you in the right direction. Figure 4, “Create a new database” shows the new database form in phpMyAdmin.
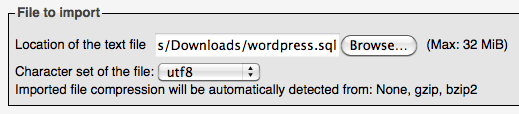
After you’ve created a new database, you should be able to navigate to it and click the Import link, as shown in Figure 5, “Click the Import link”.

phpMyAdmin will then prompt you to select your yourdatabasename.sql file.
After selecting the file, click and your WordPress database will be restored.
If you’d prefer to avoid backing up your site manually, here are a couple of plugins that will automate the task for you.
WP-DB-Backup is a plugin that backs up your WordPress site database. You’ll have to download this plugin and activate it from your WordPress admin panel. Once this plugin is activated, you’ll see that a link has been added under the menu, as in Figure 7, “New Backup link”.

When you click the link, a list of your WordPress database tables will be shown, as seen in Figure 8, “A list of all your tables”. There’s a list of database tables that will always be backed up; these are essential for WordPress to function normally. You’ll also see a list of tables that can be backed up optionally; often these are tables that were created when you installed plugins, and you should probably back these up too.

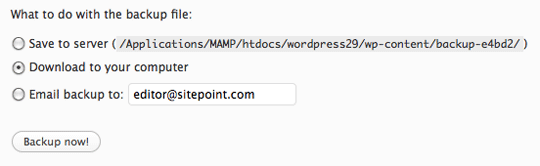
The plugin also gives you different options for the handling of the generated backup file, as you can see in Figure 9, “Backup options”. You can choose one of the following options:
-
Save to server: the database backup file is stored in a folder on the server where your website resides.
-
Download to your computer: you can download and save the file to your local computer.
-
Email backup to: the file will be emailed to the email address specified.
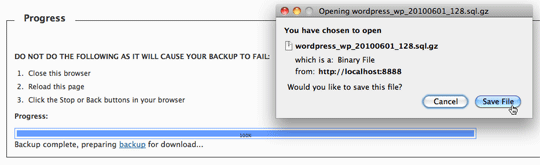
Click and it will generate the backup SQL file of your database. This might take a little time, depending on the size of your database. If you chose the option Download to your computer, you’ll be prompted to save the file, as in Figure 10, “Downloading the backup file”.
This plugin also provides the option to schedule backups regularly—hourly, daily, or weekly—and email the backup file to a specified email address, as shown in Figure 11, “Scheduling a regular backup”.
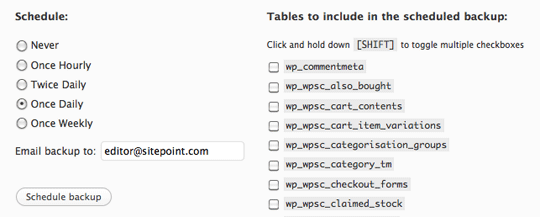
Scheduling automatic backups is a wise practice. If the content on your site (posts or comments) is added frequently and you do not make regular backups, you may be faced with the dilemma of having to restore an old version of your site—with all the most recent content lost forever.
WordPress Backup is a plugin that backs up the files of your WordPress installation.
WordPress Backup will back up your upload directory (images, videos, and other files), current theme directory, and plugins directory to a .zip file stored on your server. You can even email the .zip file to a specified email address, although, as the size of the .zip file increases, this may be unfeasible.
To access the configuration options, visit your plugin administration page in WordPress admin and click the Configuration options are here link, as shown in Figure 12, “Configuration options are here”.

On the options form, shown in Figure 13, “WordPress Backup Options form”, you can specify the backup interval, the email address to send the backup file, and the directory in which to store all the backup files on your server. As seen above from the drop-down, you can select the interval at when you’d like backups made. You can specify the folder where the backups would be stored.
Your backup interval should reflect how often files are uploaded to your site. You’ll need to ensure you download these backup files regularly, in case a server crash makes them inaccessible. Having the backups emailed is useful for this situation too, although you may find its size prevents it from being emailed.

To set up this plugin properly, there’s one other important step. Prevent users from browsing your backup directory by adding an .htaccess file to the directory with the following content:
<Files ~ ".*..*">order allow,denydeny from all</Files>
This is recommended on the options page, as you can see in Figure 13, “WordPress Backup Options form”, and also on the plugin’s website.
A good backup strategy is essential for any busy website. If disaster hits, the time it takes to restore your site to perfect working order—with a minimum of lost content—is directly related to how careful you’ve been with your backups.
From your users’ point of view, there’s nothing worse than watching all the comments disappear from a site after a server failure; it’s likely to test their loyalty, not to mention your authors’ sanity if they discover their lovingly crafted posts have vanished. In a commercial situation this could cost you money, so it’s essential to take regular backups and keep them in a safe place.
This is only a simply introduction to backups and WordPress; there are other considerations we lack the space to cover here. Most importantly, you should consider doing regular practice restorations. What’s the use of a backup if you’re unable to restore your site using it? Create a dummy WordPress site and try to restore your most recent backup.
Generally, on a WordPress blog the post and comment content changes faster than the theme or the plugins, so the database backups become outdated much faster than the installation file backups. Therefore, database backups should be made more frequently—perhaps hourly or even more often—for high traffic websites.
Regardless of the strategy you adopt, enjoy the peace of mind of knowing that should disaster strike, you’re covered.
Feature image by Ivan Walsh.
 Abbas Suterwala
Abbas is a software engineer by profession and a passionate coder who lives every moment to the fullest. He loves open source projects and WordPress. When not chilling around with friends he's occupied with one of the following open source projects he's built: Choomantar, The Browser Counter WordPress plugin, and Google Buzz From Admin.