This is a follow-up article to my recent ebook, Build Your Own Firefox Extension – an extra selection of useful tips, tricks, and hacks that I’ve collected from my experience with building extensions for Firefox, including CodeBurner, the SitePoint Reference extension. Basic knowledge of how to build a Firefox extension is assumed, so you might like to grab your free copy of the ebook first, if you’ve yet to do so already.
Most of what’s here is not explicitly documented at the Mozilla Developer Center (MDC), either because it’s still on their “to do” list, or because I made it up myself. Some of it is well documented, but it’s so useful that I thought it was worth directing your attention to it anyway.
The tips are listed in order of complexity, beginning with the shortest and simplest, and moving onto the longer and more complex ideas.
Please note: in many places throughout this article, I’ll be creating little methods to package-up self-contained techniques, and in all cases I’ll create them as top-level functions (using the function keyword). In practice though, you should create them as methods of your main extension object.
1. Add Icons with list-style-image
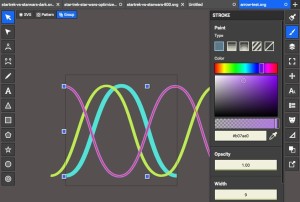
Many XUL elements are without support for the CSS background-image property, but many of them do support list-style-image. This includes <menuitem>, <button>, and <textbox>. You could use these for adding your application’s icon to its main menu item, or affixing a little magnifying glass icon to a textbox used for searching:
textbox[type="search"]
{
  list-style-image:url(chrome://myextension/content/images/magglass.png);
}
2. Make <tab> Elements Keyboard-accessible in Mac OS X
<tab>elements are natively inaccessible to the keyboard in Firefox for Mac OS X. To make them accessible you need to manually insert them into the tab order, by adding atabindexattribute with the value0. This value is effectively "auto", and places the element at its source-order position in the overall tab order:
<tab label="About" tabindex="0"/>Once that’s done you can use the arrow keys to switch between tabs, just the same as in Windows and Linux.
![]() A keyboard-focused tab in Mac OS X
A keyboard-focused tab in Mac OS X
3. Reference the Original Mouse-target of a Context Menu Event
When you click on an item in an XUL context menu, the event target reference is to the <menuitem> you clicked on. But what if you wanted a reference to the original target element; that is, the element you right-clicked on to spawn the menu in the first place?
This is incredibly simple, as Firefox provides a property that contains this very reference. It’s called popupNode and is a property of the document. The easiest way to use it is to pass it through the menu item’s command event:
<popup id="contentAreaContextMenu">
  <menuitem label="This bloke won't haggle"
            oncommand="offerMeFourteen(document.popupNode)"
  />
</popup>
4. Preventing an Element from Inheriting flex
If you add the flex attribute to most XUL elements, they’ll expand to fill the available space. But flex is inherited, so its children will also expand, which in some cases is highly undesirable. For example, if the child element is an <image> you would want it to have precise dimensions; but there is no way to explicitly negate inherited flex.
But it only inherits one level deep, so you can negate it by adding an intermediate wrapper element, without a declared flex attribute:
<hbox flex="1">

  <hbox>
    <image
       src="chrome://myextension/content/images/logo.png"
       width="135"
       height="130"
     />
  </hbox>

</hbox>
5. Spawn a Dialog from the Chrome load Event
If you use window.openDialog to spawn a dialog with the modal and centerscreen features from the chrome load event, the dialog will be mostly invisible in Mac OS X, hidden in the top-left corner of the screen. This is because the dialog is positioned before the window’s size is established, so the centerscreen property fails to work as expected. The same problem occurs with the alert function, which can be an issue if you’re using it as a quick and dirty debugging tool.
One solution is to wrap the openDialog or alert function in a quick setTimeout. This ensures that the main window is sized before the dialog fires, so it will be positioned correctly:
setTimeout(function(){ alert(foo.bar); },1);6. Add Custom Dialog Icons for Windows and Linux
To add a custom icon to a dialog, first create a folder named icons inside your extension’s chrome directory. Then, inside the icons folder, create another folder called default. Within the default folder, save an icon with the same name as the <dialog> element’s ID.
So, for example, if the dialog had the ID myextension-preferences you would create an icon called myextension-preferences.ico (for Windows, or .png for Linux). The MDC documentation says to use XPM images for Linux, but they lack support for alpha-channel transparency. PNG files do provide support, and they work just as well.
In Windows the icon will also show up in the taskbar:
![]() A custom dialog icon in Windows XP
A custom dialog icon in Windows XP
This differs to Mac OS X, because its dialogs are displayed without icons.
7. Get a Reference to the Most Recently Opened Window
You can use Firefox’s window mediator interface to get a reference to the most recently opened browser window. This might be useful if you wanted to open a web link from an external dialog, and is more reliable than window.opener.
Here’s a short and sweet little method that returns the window reference, or null if no browser windows are open:
function getRecentWindow()
{
  var wm = Components.classes["@mozilla.org/appshell/window-mediator;1"].getService(Components.interfaces.nsIWindowMediator);
  var win = wm.getMostRecentWindow("navigator:browser");

  return win;
}
8. Get the URL of every Open Tab
Following on from the previous tip, we can iterate through all currently open browser windows, extract their URLs, and package them into a hierarchical array (grouped first by window, then by tab).
The following method does precisely that. Each member of the final matrix is itself an array, containing the tab’s URL and a Boolean flag (selected) to indicate if it’s the currently selected tab in that window:
function getTabsHeirarchy()
{
  var heirarchy = [],
      wm = Components.classes["@mozilla.org/appshell/window-mediator;1"].getService(Components.interfaces.nsIWindowMediator),
      benumerator = wm.getEnumerator('navigator:browser');

  while(benumerator.hasMoreElements())
  {
    var browserwin = benumerator.getNext(),
        tabbrowser = browserwin.getBrowser(),
        tabs = [];

    for(var i=0; i<tabbrowser.browsers.length; i++)
    {
      var browser = tabbrowser.getBrowserAtIndex(i);
      tabs[i] = {
        'uri' : browser.currentURI.spec,
        'selected' : (tabbrowser.selectedTab == tabbrowser.mTabs[i])
      };
    }

    heirarchy.push(tabs);
  }

  return heirarchy;
}
9. Make Your Interface Respond to Window Focus Changes
Most Mac windows change their appearance when the window loses focus: lighter backgrounds, window decorations, or grayed-out buttons, for example. To implement this effect on your own interface controls you need to know when the window gains and loses focus.
Your first instinct might be to use the window focus and blur events, but it turns out they’re unreliable for this purpose, since they sometimes behave unintuitively. For example, if the application focus moves to a document in an embedded <browser>, the main window blur event will fire, even though the window is still the focused one. This is because the <window> element itself no longer has the application focus. Although this behavior is logical, it may also be unexpected. The good news is that Firefox’s main interface window has an active attribute that changes from true to "" (an empty string) when the window genuinely loses focus. You can watch this attribute with a DOM mutation event listener, and use it as the trigger for whatever you need to do:
window.addEventListener('DOMAttrModified', function(e)
{
  if(e.attrName == 'active')
  {
    if(e.newValue == 'true')
    {
      //window has gained the focus
    }
    else
    {
      //window has lost the focus
    }
  }
}, false);
Be careful how you use this. For example, if you used it to trigger a modal dialog such as alert, the action of spawning the dialog would cause the window to lose focus; dismissing it would regain the focus, which would re-trigger the dialog!
Alternatively, if the effect you want to achieve can be achieved with pure CSS, you can use an attribute selector along with the negation pseudo-class. For instance, to switch an icon between its normal and disabled states:
window[active="true"] #main-icon
{
  list-style-image:url(chrome://myextension/content/images/main-icon.png);
}

window:not([active="true"]) #main-icon
{
  list-style-image:url(chrome://myextension/content/images/main-icon-disabled.png);
}
10. Implement Platform-specific Style Sheets
Firefox is available on multiple platforms, and each of these has its own conventions with regard to the appearance and even the placement of interface components. A good example of this is the OK and Cancel buttons in an alert dialog: on Windows and Linux the OK button is to the left of the Cancel button, while on Mac OS it’s the other way round. The appearance of the close and minimize window buttons is another instance, as they differ for each platform.
So given these variations, it’s often useful to be able to apply platform-specific style sheets to your own extension’s interface. This enables you to implement variations like alternate icons for buttons, different fonts for custom interface controls, and so on.
Fortunately, Firefox provides a simple mechanism for doing this, using a special folder hierarchy and a set of manifest files.
First of all you need to create the folder hierarchy. The top-level platform folder in the following diagram should go inside your extension’s root folder – at the same level as the chrome folder. All the folder names and filenames must be exactly as shown here (they are also case-sensitive), except for the name of the style sheet itself; this can be anything you like, but of course it must be the same for each platform’s copy.
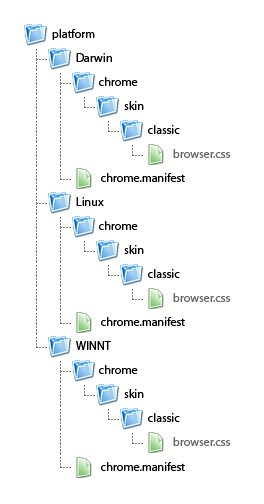 The folder hierarchy for platform-specific style sheets
Just in case it was less than obvious, “Darwin” is Mac OS X, “WINNT” is Windows, and “Linux” is … er … Linux. Each of those chrome.manifest files should contain this identical tab-delimited line (replacing “myextension” with the name of your extension):
skin myextension classic/1.0 chrome/skin/classic/To add the style sheets to your interface, simply add an xml-stylesheet processing instruction with the following URL pattern:
<?xml-stylesheet href="chrome://myextension/skin/browser.css"?>See how all you need to do is refer to the skin directory, and Firefox will work out which specific style sheet to include, according to the platform it’s running on. You can extend the principle with as many different style sheets as you want: just create a version in each of the platform folders, and then add it to an XUL document using the same URL pattern.
11. Add a URL to the Browser’s History
Here’s an extra bonus tip. The XUL Reference at MDC tells you how to create a textbox with history auto-complete. Unfortunately, it fails to tell you how to add new URLs to the history, so I had to work this out the hard way, by trawling through Firefox’s source code. The method I’m going to show you here adds URLs, retrieves and saves favicons, and includes the basic history auto-complete into the bargain!
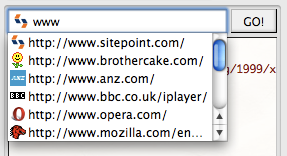 A textbox with a history auto-complete menu, showing entries we added programmatically
Note: adding to the browser’s history will work in Firefox 3 or later, but retrieving the favicon will only work in version 3.5 or later.
So, to begin with we need a <textbox> with the necessary attributes. In the following code example, the function name addURLToHistory can be anything you want, and the flex attribute is optional, but everything else must be exactly as shown:
<textbox flex="1"
         newlines="stripsurroundingwhitespace"
         type="autocomplete"
         autocompletesearch="history"
         completeselectedindex="true"
         onkeydown="if(event.keyCode == KeyEvent.DOM_VK_RETURN) { addURLToHistory(this); }"
       />
The type and autocompletesearch attributes are what trigger the primary auto-complete behavior. The completeselectedindex attribute is so that when you select an item from the auto-complete menu, its value is automatically written into the textbox; this allows you to press the Enter key straight away to fire the command function. The newlines attribute is simply so that we can avoid manually parsing the value of unwanted whitespace (such as leading or trailing spaces).
Note how the command function is triggered by onkeydown, rather than oncommand. That’s because the <textbox> element lacks an oncommand event. The events that are normally used for it are oninput (fired when displayable text is entered) and onchange (fired when the value changes). Because the value will be frequently changing in response to auto-complete suggestions, most of which will be unwanted values, we’re deferring the command action until the Enter key is pressed.
What we have here is already enough for a functional auto-completing history box. You can type or paste text into the textbox and a drop-down menu will appear with your history, filtered according to what’s been entered. You can then select from that menu, and your selection will be written into the textbox.
You could also add an arrow button to make the drop-down menu appear by adding enablehistory="true".
So now let’s look at the command function that’s fired when you press Enter. In practice you would go on to perform another task after this, (such as loading the specified URL into a <browser>) but I’m just going to focus on how to add it to the history. I’ll show you the code first, and then go through it bit by bit:
function addURLToHistory(textbox)
{
  var url = textbox.value;

  if(!/^(((ht|f)tp[s]?):)/i.test(url))
  {
    url = 'http://' + url;
  }
  textbox.value = url;

  if(url.indexOf(' ') != -1
     || url.split('?')[0].indexOf('..') != -1)
  {
    alert('Malformed URL');
    return;
  }

  var ioService = Components.classes["@mozilla.org/network/io-service;1"].getService(Components.interfaces.nsIIOService);
  var nsIURI = ioService.newURI(url, null, null);

  var historyService2 = Components.classes["@mozilla.org/browser/nav-history-service;1"].getService(Components.interfaces.nsIGlobalHistory2);
  historyService2.addURI(nsIURI, false, true, null);

  try
  {
    var faviconService = Components.classes["@mozilla.org/browser/favicon-service;1"].getService(Components.interfaces.nsIFaviconService);
    var faviconURI = ioService.newURI('http://' + nsIURI.host + '/favicon.ico', null, null);
    faviconService.setAndLoadFaviconForPage(nsIURI, faviconURI, false);
  }
  catch(err) {}
}
First and foremost we do a little validation, adding a protocol if the URL is without one (so that the user can just type “www.”), then writing the [modified] URL back to the textbox. Then, if it contains any spaces or multiple dots other than in CGI parameters, we throw an alert over the malformed syntax and exit the function. This is all the validation we really need to stop Firefox from choking. You may prefer to handle the error more gracefully, for example by throwing the error to the console or implementing a custom method to alert the user that an error has occurred.
Next, we do the business that actually adds the URL to the history. The history service won’t accept a plain URI string, so we need to create what’s called an IURI. This is a URI object that contains a variety of metadata, including its host, which will come in handy later. We create the IURI object using the IO service, and then pass that to the global history service, to add it to the browser’s history.
The rest of the code is for grabbing the favicon, and this is wrapped in a try ... catch block for two reasons. Firstly, so that an error is not thrown if, for any reason, the favicon fails to be at the expected URL, and secondly, because it only works in Firefox 3.5 or later. So, we first initialize the favicon service, and then create an IURI object for the favicon’s address (using the host name from the original IURI). We then pass the favicon IURI object to the favicon service, to load and save the favicon.
And there we have it! Next time we type that same address into the textbox, it will show up in the auto-complete menu, along with its favicon.
Note that the favicon process is asynchronous. If you want to display it in the textbox straight away, you need to run a setInterval loop to continually check whether it exists yet. You can do that with code like this:
var count = 0, faviconclock = window.setInterval(function()
{
  var fsURI = faviconService.getFaviconImageForPage(nsIURI);
  if(++count == 20 || /moz-anno:favicon:/.test(fsURI.spec))
  {
    window.clearInterval(faviconclock);
    textbox.setAttribute('style', 'list-style-image:url(' + fsURI.spec + ')');
  }
}, 500);
This code is a little tricky: every 500 milliseconds (the second parameter to setInterval), we ask the favicon service for the page’s favicon. It will return a URI formatted either with the moz-anno:favicon: protocol (if the favicon has been downloaded) or with the chrome: protocol (if it’s returning the default image). If we’ve tried 20 times (a total of 10 seconds), or if we’ve successfully downloaded a favicon for the page – as indicated by moz-anno:favicon: in the URI – then we set it as the list-style-image url for the textbox.
We’ll that’s all for the quick tips list. If you haven’t done so already, download my ebook Build Your Own Firefox Extension which comes free with the CodeBurner extension.
Keep a watchful eye out for another article all about building Firefox extensions, as well as some new additions to the CodeBurner family, coming soon!
Frequently Asked Questions (FAQs) about Firefox Extensions
How can I install Firefox extensions?
Installing Firefox extensions is a simple process. First, open your Firefox browser and click on the menu button, which is represented by three horizontal lines in the top right corner. From the drop-down menu, select ‘Add-ons’. This will open the Add-ons Manager tab. In the search bar, type the name of the extension you want to install and press enter. Click on the ‘Add to Firefox’ button next to the extension you want to install. A pop-up will appear asking for your permission to add the extension. Click ‘Add’ and the extension will be installed.
Why are my Firefox extensions not working?
There could be several reasons why your Firefox extensions are not working. It could be due to an outdated version of Firefox, conflicts with other extensions, or issues with the extension itself. Try updating Firefox to the latest version, disabling other extensions to check for conflicts, or reinstalling the problematic extension. If the issue persists, contact the extension developer for support.
How can I manage my Firefox extensions?
To manage your Firefox extensions, open the Firefox menu and select ‘Add-ons’. This will open the Add-ons Manager tab. Here, you can enable or disable extensions, remove extensions, or access the options for each extension.
Can Firefox extensions slow down my browser?
Yes, some Firefox extensions can slow down your browser, especially if you have many extensions installed. Each extension uses some amount of system resources, and having too many can slow down your browser. If you notice your browser is running slowly, try disabling some extensions to see if it improves.
Are Firefox extensions safe?
Most Firefox extensions are safe to use. However, like any software, they can potentially be exploited by malicious actors. To ensure your safety, only install extensions from trusted sources, keep your extensions updated, and regularly review the permissions your extensions have.
How can I update my Firefox extensions?
Firefox automatically checks for updates to your extensions. However, you can also manually check for updates by opening the Firefox menu, selecting ‘Add-ons’, and then clicking on the gear icon and selecting ‘Check for Updates’.
Can I use Firefox extensions on mobile?
Currently, only a limited number of Firefox extensions are available for mobile. To check if an extension is available for mobile, visit the extension’s page on the Firefox Add-ons website and look for the ‘Available for Android’ label.
How can I develop my own Firefox extension?
To develop your own Firefox extension, you will need to have a basic understanding of web technologies like HTML, CSS, and JavaScript. Mozilla provides a comprehensive guide on how to develop Firefox extensions on their developer website.
What are the best Firefox extensions to use?
The best Firefox extensions to use depend on your needs. Some popular extensions include uBlock Origin for ad blocking, LastPass for password management, and Dark Reader for dark mode.
Can I use Chrome extensions on Firefox?
Some Chrome extensions can be used on Firefox using an extension called Chrome Store Foxified. However, not all Chrome extensions will work on Firefox due to differences in how the two browsers handle extensions.
 James Edwards
James is a freelance web developer based in the UK, specialising in JavaScript application development and building accessible websites. With more than a decade's professional experience, he is a published author, a frequent blogger and speaker, and an outspoken advocate of standards-based development.