In Chapter 1: Installation, we installed and set up two software programs: the Apache web server with PHP, and the MySQL database server. In Chapter 2: Introducing MySQL, I showed you how to work with MySQL databases using Structured Query Language (SQL). Now, here’s where the fun really starts. In this chapter, I’ll introduce you to the PHP scripting language, which you can use to build dynamic web pages that present up-to-the-moment information to your visitors.
If you’d rather read this tutorial offline, you can download the chapters in PDF format.
PHP is a server-side language. This concept may be a little difficult to grasp, especially if you’re used to designing pages using only client-side languages like HTML, CSS, and JavaScript.
A server-side language is similar to JavaScript in that it allows you to embed little programs (scripts) into the HTML code of a web page. When executed, these programs give you greater control over what appears in the browser window than HTML alone can provide. The key difference between JavaScript and PHP is the stage of loading the web page at which these embedded programs are executed.
Client-side languages like JavaScript are read and executed by the web browser, after downloading the web page (embedded programs and all) from the web server. In contrast, server-side languages like PHP are run by the web server, before sending the web page to the browser. Whereas client-side languages give you control over how a page behaves once it’s displayed by the browser, server-side languages let you generate customized pages on the fly before they’re even sent to the browser.
Once the web server has executed the PHP code embedded in a web page, the results of that code’s execution take the place of the PHP code in the page. When the browser receives the page, all it sees is standard HTML code, hence the name: server-side language. Let’s look back at the today.php example presented in Chapter 1, Installation:
<!DOCTYPE html PUBLIC "-//W3C//DTD XHTML 1.0 Strict//EN"
"https://www.w3.org/TR/xhtml1/DTD/xhtml1-strict.dtd">
<html xmlns="https://www.w3.org/1999/xhtml" xml:lang="en" lang="en">
<head>
<title>Today’s Date</title>
<meta http-equiv="content-type"
content="text/html; charset=utf-8"/>
</head>
<body>
<p>Today’s date (according to this web server) is
<?php
echo date('l, F dS Y.');
?>
</p>
</body>
</html>Most of this is plain HTML; however, the line between <?php and ?> is PHP code. <?php marks the start of an embedded PHP script and ?> marks the end of such a script. The web server is asked to interpret everything between these two delimiters, and to convert it to regular HTML code before it sends the web page to the requesting browser. The browser is presented with the following:
<!DOCTYPE html PUBLIC "-//W3C//DTD XHTML 1.0 Strict//EN"
"https://www.w3.org/TR/xhtml1/DTD/xhtml1-strict.dtd">
<html xmlns="https://www.w3.org/1999/xhtml" xml:lang="en" lang="en">
<head>
<title>Today’s Date</title>
<meta http-equiv="content-type"
content="text/html; charset=utf-8"/>
</head>
<body>
<p>Today’s Date (according to this web server) is
Wednesday, April 1st 2009. </p>
</body>
</html>Notice that all signs of the PHP code have disappeared. In its place, the output of the script has appeared, and it looks just like standard HTML. This example demonstrates several advantages of server-side scripting:
No browser compatibility issues
PHP scripts are interpreted by the web server alone, so there’s no need to worry about whether the language you’re using is supported by the visitor’s browser.
Access to server-side resources
In the above example, we placed the date, according to the web server, into the web page. If we had inserted the date using JavaScript, we’d only be able to display the date according to the computer on which the web browser was running. Granted, there are more impressive examples of the exploitation of server-side resources; a better example might be inserting content pulled out of a MySQL database (hint, hint …).
Reduced load on the client
JavaScript can delay the display of a web page on slower computers significantly, as the browser must run the script before it can display the web page. With server-side code, this burden is passed to the web server machine, which you can make as beefy as your application requires.
Basic Syntax and Statements
PHP syntax will be very familiar to anyone with an understanding of C, C++, C#, Java, JavaScript, Perl, or any other C-derived language. If you’re unfamiliar with any of these languages, or if you’re new to programming in general, there’s no need to worry about it!
A PHP script consists of a series of commands, or statements. Each statement is an instruction that must be followed by the web server before it can proceed to the next. PHP statements, like those in the above-mentioned languages, are always terminated by a semicolon (;).
This is a typical PHP statement:
echo 'This is a <strong>test</strong>!';This is an echo statement, which is used to generate content (usually HTML code) to be sent to the browser. An echo statement simply takes the text it’s given, and inserts it into the page’s HTML code at the position of the PHP script that contains it.
In this case, we have supplied a string of text to be output: 'This is a <strong>test</strong>!'. Notice that the string of text contains HTML tags (<strong> and </strong>), which is perfectly acceptable. So, if we take this statement and put it into a complete web page, here’s the resulting code:
<!DOCTYPE html PUBLIC "-//W3C//DTD XHTML 1.0 Strict//EN"

    "https://www.w3.org/TR/xhtml1/DTD/xhtml1-strict.dtd">

<html xmlns="https://www.w3.org/1999/xhtml" xml:lang="en" lang="en">

  <head>

    <title>Simple PHP Example</title>

    <meta http-equiv="content-type"

        content="text/html; charset=utf-8"/>

  </head>

  <body>

    <p><?php echo 'This is a <strong>test</strong>!'; ?></p>

  </body>

</html>
If you place this file on your web server, a browser that requests the page will receive this:
<!DOCTYPE html PUBLIC "-//W3C//DTD XHTML 1.0 Strict//EN"

    "https://www.w3.org/TR/xhtml1/DTD/xhtml1-strict.dtd">

<html xmlns="https://www.w3.org/1999/xhtml" xml:lang="en" lang="en">

  <head>

    <title>Simple PHP Example</title>

    <meta http-equiv="content-type"

        content="text/html; charset=utf-8"/>

  </head>

  <body>

    <p>This is a <strong>test</strong>!</p>

  </body>

</html>
The today.php example we looked at earlier contained a slightly more complex echo statement:
echo date('l, F dS Y.');Instead of giving echo a simple string of text to output, this statement invokes a built-in function called date and passes it a string of text: 'l, F dS Y.'. You can think of built-in functions as tasks that PHP knows how to do without your needing to spell out the details. PHP has many built-in functions that let you do everything from sending email to working with information stored in various types of databases.
When you invoke a function in PHP, you’re said to be calling that function. Most functions return a value when they’re called; PHP then replaces the function call with that value when it executes the statement. In this case, our echo statement contains a call to the date function, which returns the current date as a string of text (the format of which is specified by the text string in the function call). The echo statement therefore outputs the value returned by the function call.
You may wonder why we need to surround the string of text with both parentheses (()) and single quotes (''). As in SQL, quotes are used in PHP to mark the beginning and end of strings of text, so it makes sense for them to be there. The parentheses serve two purposes. First, they indicate that date is a function that you want to call. Second, they mark the beginning and end of a list of parameters (or arguments) that you wish to provide, in order to tell the function what to do. In the case of the date function, you need to provide a string of text that describes the format in which you want the date to appear. A full reference is available in the online documentation for the date function. Later on, we’ll look at functions that take more than one parameter, and we’ll separate those parameters with commas. We’ll also consider functions that take no parameters at all. These functions will still need the parentheses, though it’s unnecessary to type anything between them.
Variables, Operators, and Comments
Variables in PHP are identical to variables in most other programming languages. For the uninitiated, a variable can be thought of as a name that’s given to an imaginary box into which any literal value may be placed. The following statement creates a variable called $testvariable (all variable names in PHP begin with a dollar sign) and assigns it a literal value of 3:
$testvariable = 3;PHP is a loosely typed language. This means that a single variable may contain any type of data, be it a number, a string of text, or some other kind of value, and may change types over its lifetime. So the following statement, if you were to type it after the statement above, assigns a new value to the existing $testvariable. In the process, the variable changes type: where it used to contain a number, it now contains a string of text:
$testvariable = 'Three';The equals sign we used in the last two statements is called the assignment operator, as it’s used to assign values to variables. Other operators may be used to perform various mathematical operations on values:
$testvariable = 1 + 1;  // Assigns a value of 2

$testvariable = 1 - 1;  // Assigns a value of 0

$testvariable = 2 * 2;  // Assigns a value of 4

$testvariable = 2 / 2;  // Assigns a value of 1
From the above examples, you can probably tell that + is the addition operator, - is the subtraction operator, * is the multiplication operator, and / is the division operator. These are all called arithmetic operators, because they perform arithmetic on numbers.
Each of the lines above ends with a comment. Comments are a way to describe what your code is doing. They insert explanatory text into your code – text that the PHP interpreter will ignore. Comments begin with // and they finish at the end of the same line. If you need a comment to span several lines, you can instead start your comment with /*, and end it with */. The PHP interpreter will ignore everything between these two delimiters. I’ll use comments throughout the rest of this book to help explain some of the code I present.
Returning to the operators, there’s another one that sticks strings of text together, called the string concatenation operator:
$testvariable = 'Hi ' . 'there!'; // Assigns a value of 'Hi there!'Variables may be used almost anywhere that you use a literal value. Consider this series of statements:
$var1 = 'PHP';          // Assigns a value of 'PHP' to $var1

$var2 = 5;              // Assigns a value of 5 to $var2

$var3 = $var2 + 1;      // Assigns a value of 6 to $var3

$var2 = $var1;          // Assigns a value of 'PHP' to $var2

echo $var1;             // Outputs 'PHP'

echo $var2;             // Outputs 'PHP'

echo $var3;             // Outputs '6'

echo $var1 . ' rules!'; // Outputs 'PHP rules!'

echo "$var1 rules!";    // Outputs 'PHP rules!'

echo '$var1 rules!';    // Outputs '$var1 rules!'
Notice the last two lines in particular. You can include the name of a variable right inside a text string, and have the value inserted in its place if you surround the string with double quotes instead of single quotes. This process of converting variable names to their values is known as variable interpolation. However, as the last line demonstrates, a string surrounded with single quotes will not interpolate the variable names it contains.
Arrays
An array is a special kind of variable that contains multiple values. If you think of a variable as a box that contains a value, then an array can be thought of as a box with compartments, where each compartment is able to store an individual value.
The simplest way to create an array in PHP is to use the built-in array function:
$myarray = array('one', 2, '3');This code creates an array called $myarray that contains three values: 'one', 2, and '3'. Just like an ordinary variable, each space in an array can contain any type of value. In this case, the first and third spaces contain strings, while the second contains a number.
To access a value stored in an array, you need to know its index. Typically, arrays use numbers, starting with zero, as indices to point to the values they contain. That is, the first value (or element) of an array has index 0, the second has index 1, the third has index 2, and so on. In general, therefore, the index of the nth element of an array is n–1. Once you know the index of the value you’re interested in, you can retrieve that value by placing that index in square brackets after the array variable name:
echo $myarray[0];       // Outputs 'one'

echo $myarray[1];       // Outputs '2'

echo $myarray[2];       // Outputs '3'
Each value stored in an array is called an element of that array. You can use an index in square brackets to add new elements, or assign new values to existing array elements:
$myarray[1] = 'two';    // Assign a new value

$myarray[3] = 'four';   // Create a new element
You can add elements to the end of an array using the assignment operator as usual, but leaving empty the square brackets that follow the variable name:
$myarray[] = 'the fifth element';

echo $myarray[4];       // Outputs 'the fifth element'
However, numbers are only the most common choice for array indices; there’s another possibility. You can also use strings as indices to create what’s called an associative array. This type of array is called associative because it associates values with meaningful indices. In this example, we associate a date (in the form of a string) with each of three names:
$birthdays['Kevin'] = '1978-04-12';

$birthdays['Stephanie'] = '1980-05-16';

$birthdays['David'] = '1983-09-09';
The array function also lets you create associative arrays, if you prefer that method. Here’s how we’d use it to create the $birthdays array:
$birthdays = array('Kevin' => '1978-04-12',

    'Stephanie' => '1980-05-16', 'David' => '1983-09-09');
Now, if we want to know Kevin’s birthday, we look it up using the name as the index:
echo 'My birthday is: ' . $birthdays['Kevin'];This type of array is especially important when it comes to user interaction in PHP, as we’ll see in the next section. I’ll demonstrate other uses of arrays throughout this book.
User Interaction and Forms
For most database driven web sites these days, you need to do more that just dynamically generate pages based on database data; you must also provide some degree of interactivity, even if it’s just a search box.
Veterans of JavaScript tend to think of interactivity in terms of event handlers, which let you react directly to the actions of the user – for example, the movement of the cursor over a link on the page. Server-side scripting languages such as PHP have a more limited scope when it comes to support for user interaction. As PHP code is only activated when a request is made to the server, user interaction can occur only in a back-and-forth fashion: the user sends requests to the server, and the server replies with dynamically generated pages.
The Rise of Ajax
To some extent, the rise of Ajax techniques in the JavaScript world over the past few years has changed this. It’s now possible for JavaScript code, responding to a user action such as mouse movement, to send a request to the web server, invoking a PHP script. For the purposes of this book, however, we’ll stick to non-Ajax applications. If you’d like to learn how to use PHP with Ajax, check out Build Your Own AJAX Web Applications by Matthew Eernisse (Melbourne: SitePoint, 2006).
The key to creating interactivity with PHP is to understand the techniques we can use to send information about a user’s interaction along with a request for a new web page. As it turns out, PHP makes this fairly easy.
The simplest method we can use to send information along with a page request is to use the URL query string. If you’ve ever seen a URL in which a question mark followed the file name, you’ve witnessed this technique in use. For example, if you search for “SitePoint” on Google, it will take you to the following URL to see the search results:
http://www.google.com/search?hl=en&q=SitePoint&btnG=Google+Search&meta=See the question mark in the URL? See how the text that follows the question mark contains things like your search query (SitePoint) and the name of the button you clicked (Google+Search)? That information is being sent along with the request for http://www.google.com/search.
Let’s code up an easy example of our own. Create a regular HTML file called welcome1.html (no .php file name extension is required, since there will be no PHP code in this file) and insert this link:
<a href="welcome1.php?name=Kevin">Hi, I’m Kevin!</a>This is a link to a file called welcome1.php, but as well as linking to the file, you’re also passing a variable along with the page request. The variable is passed as part of the query string, which is the portion of the URL that follows the question mark. The variable is called name and its value is Kevin. To restate, you have created a link that loads welcome1.php, and informs the PHP code contained in that file that name equals Kevin.
To really understand the effect of this link, we need to look at welcome1.php. Create it as a new HTML file, but, this time, note the .php file name extension – this tells the web server that it can expect to interpret some PHP code in the file. In the <body> of this new web page, type the following:
<?php
$name = $_GET['name'];
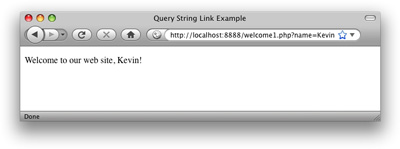
echo 'Welcome to our web site, ' . $name . '!';
?>
Now, put these two files (welcome1.html and welcome1.php) onto your web server, and load the first file in your browser (the URL should be similar to http://localhost/welcome1.html, or http://localhost:8080/welcome1.html if your web server is running on a port other than 80). Click the link in that first page to request the PHP script. You should see that the resulting page says “Welcome to our web site, Kevin!”, as shown below.
Let’s take a closer look at the code that made this possible. The most important line is this one:
$name = $_GET['name'];If you were paying close attention in the section called “Arrays”, you’ll recognize what this line does. It assigns to a new variable called $name the value stored in the ‘name‘ element of the array called $_GET. But where does the $_GET array come from?
It turns out that $_GET is one of a number of variables that PHP automatically creates when it receives a request from a browser. PHP creates $_GET as an array variable that contains any values passed in the query string. $_GET is an associative array, so the value of the name variable passed in the query string can be accessed as $_GET['name']. Your welcome1.php script assigns this value to an ordinary PHP variable ($name), then displays it as part of a text string using an echo statement:
echo 'Welcome to our web site, ' . $name . '!';The value of the $name variable is inserted into the output string using the string concatenation operator (.) that we looked at in the section called “Variables, Operators, and Comments”.
But look out! There is a security hole lurking in this code! Although PHP is an easy programming language to learn, it turns out it’s also especially easy to introduce security issues into web sites using PHP if you’re unaware of what precautions to take. Before we go any further with the language, I want to make sure you’re able to spot and fix this particular security issue, since it’s probably the most common kind of security issue on the Web today.
The security issue here stems from the fact that the welcome1.php script is generating a page containing content that is under the control of the user – in this case, the $name variable. Although the $name variable will normally receive its value from the URL query string in the link on the welcome1.html page, a malicious user could edit the URL to send a different value for the name variable.
To see how this would work, click the link in welcome1.html again. When you see the resulting page (with the welcome message containing the name “Kevin”), take a look at the URL in the address bar of your browser. It should look similar to this:
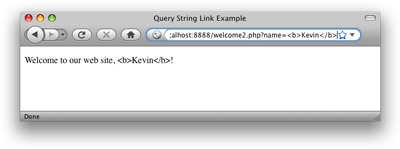
http://localhost/welcome1.php?name=KevinEdit the URL to insert a <b> tag before the name, and a </b> tag following the name, like this:
http://localhost/welcome1.php?name=<b>Kevin</b>Hit Enter to load this new URL, and notice that the name in the page is now bold, as shown below.
See what’s happening here? The user can type any HTML code into the URL, and your PHP script includes it in the code of the generated page without question. If the code is as innocuous as a <b> tag there’s no problem, but a malicious user could include sophisticated JavaScript code that performed malicious actions like steal the user’s password. All the attacker would have to do, then, would be to publish the modified link on some other site under the attacker’s control, and then entice one of your users to click it. The attacker could even embed the link in an email and send it to your users. If one of your users clicked the link, the attacker’s code would be included in your page and the trap would be sprung!
I hate to scare you with this talk of malicious hackers attacking your users by turning your own PHP code against you, particularly when you’e only just learning the language. The fact is, however, that PHP’s biggest weakness as a language is how easy it is to introduce security issues like this. Some might say that most of the energy you spend learning to write PHP to a professional standard is spent on avoiding security issues. The sooner you’re exposed to these issues, however, the sooner you become accustomed to avoiding them, and the less of a stumbling block they’ll be for you going forward.
So, how can we generate a page containing the user’s name without opening it up to abuse by attackers? The solution is to treat the value supplied for the $name variable as plain text to be displayed on your page, rather than as HTML to be included in the page’s code. This is a subtle distinction, so let me show you what I mean.
Copy your welcome1.html file and rename it to welcome2.html. Edit the link it contains so that it points to welcome2.php instead of welcome1.php:
<a href="welcome2.php?name=Kevin">Hi, I’m Kevin!</a>Copy your welcome1.php file and rename it to welcome2.php. Edit the PHP code it contains so that it looks like this:
<?php

$name = $_GET['name'];

echo 'Welcome to our web site, ' .

    htmlspecialchars($name, ENT_QUOTES, 'UTF-8') . '!';

?>
There’s a lot going on in this code, so let me break it down for you. The first line is the same as it was previously, assigning to $name the value of the ‘name‘ element from the $_GET array. The echo statement that follows it is drastically different, though. Whereas previously, we simply dumped the $name variable, naked, into the echo statement, this version of the code uses the built-in PHP function htmlspecialchars to perform a critical conversion.
Remember, the security hole comes from the fact that, in welcome1.php, HTML code in the $name variable is dumped directly into the code of the generated page, and can therefore do anything that HTML code can do. What htmlspecialchars does is convert “special HTML characters” like “<” and “>” into HTML character entities like < and >, which prevents them from being interpreted as HTML code by the browser. I’ll demonstrate this for you in a moment.
First, let’s take a closer look at this new code. The call to the htmlspecialchars function is the first example in this book of a PHP function that takes more than one parameter. Here’s the function call all by itself:
htmlspecialchars($name, ENT_QUOTES, 'UTF-8')The first parameter is the $name variable (the text to be converted). The second parameter is the PHP constant ENT_QUOTES, which tells htmlspecialchars to convert single and double quotes in addition to other special characters. A PHP constant is like a variable whose value you’re unable to change. Unlike variables, constants don’t start with a dollar sign. PHP comes with a number of built-in constants like ENT_QUOTES that are used to control built-in functions like htmlspecialchars. The third parameter is the string 'UTF-8', which tells PHP what character encoding to use to interpret the text you give it.
The Perks and Pitfalls of UTF-8 with PHP
You may have noticed that all of the example HTML pages in this book contain the following <meta> tag near the top:
<meta http-equiv="content-type" content="text/html; charset=utf-8"/>This tag tells the browser that receives this page that the HTML code of the page is encoded as UTF-8 text. UTF-8 is one of many standards for representing text as a series of ones and zeros in computer memory, called character encodings. If you’re curious to learn all about character encodings, check out The Definitive Guide to Web Character Encoding.
In a few pages, we’ll reach the section on building HTML forms. By encoding your pages as UTF-8, your users can submit text containing thousands of foreign characters that your site would otherwise be unable to handle.
Unfortunately, many of PHP’s built-in functions, such as htmlspecialchars, assume you’re using the much simpler ISO-8859-1 character encoding by default. Therefore, you need to let them know you’re using UTF-8 when you use these functions.
If you can, you should also tell your text editor to save your HTML and PHP files as UTF-8 encoded text, but this is only required if you want to type advanced characters (like curly quotes or dashes) or foreign characters (like “é”) into your HTML or PHP code. The code in this book plays it safe and uses HTML character entities (for example, ’ for a curly right quote), which will work regardless.
Open up welcome2.html in your browser and click the link that now points to welcome2.php. Once again, you’ll see the welcome message “Welcome to our web site, Kevin!”. As you did before, modify the URL to include <b> and </b> tags surrounding the name:
http://localhost/welcome2.php?name=<b>Kevin</b>This time, when you hit Enter, instead of the name turning bold in the page, you should see the actual text that you typed, as shown below.
If you view the source of the page, you can confirm that the htmlspecialchars function did its job and converted the “<” and “>” characters present in the provided name into the < and > HTML character entities, respectively. This prevents malicious users from injecting unwanted code into your site. If they try anything like that, the code is harmlessly displayed as plain text on the page.
We’ll make extensive use of the htmlspecialchars function throughout this book to guard against this sort of security hole. No need to worry too much if you’re having trouble grasping the details of how to use it for now. Before long, you’ll find its use becomes second nature. For now, let’s look at some more advanced ways of passing values to PHP scripts when we request them.
Passing a single variable in the query string was nice, but it turns out you can pass more than one value if you want to! Let’s look at a slightly more complex version of the previous example. Save a copy of your welcome2.html file as welcome3.html, and change the link to point to welcome3.php with a query string as follows:
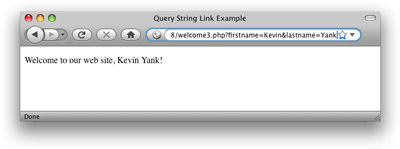
<a href="welcome3.php?firstname=Kevin&lastname=Yank">Hi, I’m Kevin Yank!</a>
This time, our link passes two variables: firstname and lastname. The variables are separated in the query string by an ampersand (&, which must be written as & in HTML). You can pass even more variables by separating each name=value pair from the next with an ampersand.
As before, we can use the two variable values in our welcome3.php file:
<?php

$firstname = $_GET['firstname'];

$lastname = $_GET['lastname'];

echo 'Welcome to our web site, ' .

    htmlspecialchars($firstname, ENT_QUOTES, 'UTF-8') . ' ' .

    htmlspecialchars($lastname, ENT_QUOTES, 'UTF-8') . '!';

?>
The echo statement is becoming quite sizable now, but it should still make sense to you. Using a series of string concatenations (.), it outputs “Welcome to our web site, ” followed by the value of $firstname (made safe for display using htmlspecialchars), a space, the value of $lastname (again, treated with htmlspecialchars), and finally an exclamation mark.
The result is shown below.
This is all well and good, but we still have yet to achieve our goal of true user interaction, where the user can enter arbitrary information and have it processed by PHP. To continue with our example of a personalized welcome message, we’d like to invite the user to type his or her name and have it appear in the resulting page. To enable the user to type in a value, we’ll need to use a HTML form.
Create a new HTML file named welcome4.html and type in this HTML code to create the form:
<form action="welcome4.php" method="get">

  <div><label for="firstname">First name:

    <input type="text" name="firstname" id="firstname"/></label>

  </div>

  <div><label for="lastname">Last name:

    <input type="text" name="lastname" id="lastname"/></label></div>

  <div><input type="submit" value="GO"/></div>

</form>
Self-closing Tags
The slashes that appear in some of these tags (such as <input .../>) are no cause for alarm. The XHTML standard for coding web pages calls for slashes to be used in any tag without a closing tag, which includes <input/> and <meta/> tags, among others.
Many developers prefer to code to the HTML standard instead of adopting XHTML and, in fact, this is a matter of some debate within web development circles. The upcoming HTML 5 standard leaves the choice up to the developer, so neither approach is strictly “more correct” than the other.
If you’re curious about the factors to consider when making this decision for yourself, check out the relevant page of the SitePoint HTML Reference.
The form this code produces is shown below.

This form is quite plain-looking, I’ll grant you. Some judicious application of CSS would make this – and all the other pages in this book – look more attractive. Since this is a book about PHP and MySQL, however, I’ve stuck with the plain look. Check out SitePoint books like The Art & Science of CSS (Melbourne: SitePoint, 2007) for advice on styling your forms with CSS.
Also make a copy of welcome3.php named welcome4.php. There’s nothing that needs changing in this file.
This form has the exact same effect as the second link we looked at (with firstname=Kevin&lastname=Yank in the query string), except that you can now enter whatever names you like. When you click the submit button (which is labeled GO), the browser will load welcome4.php and add the variables and their values to the query string for you automatically. It retrieves the names of the variables from the name attributes of the <input type="text"/> tags, and obtains the values from the text the user types into the text fields.
Apostrophes in Form Fields
If you are burdened with the swollen ego of most programmers (myself included), you probably took this opportunity to type your own name into this form. Who can blame you?
If your last name happens to include an apostrophe (for example, Molly O’Reilly), the welcome message you saw may have included a stray backslash before the apostrophe (that is, “Welcome to our web site, Molly O’Reilly!”).
This bothersome backslash is due to a PHP security feature called magic quotes, which we’ll learn about in Chapter 4: Publishing MySQL Data on the Web. Until then, please bear with me.
The method attribute of the <form> tag is used to tell the browser how to send the variables and their values along with the request. A value of get (as used in welcome4.html above) causes them to be passed in the query string (and appear in PHP’s $_GET array), but there is an alternative. It can be undesirable – or even technically unfeasible – to have the values appear in the query string. What if we included a <textarea> tag in the form, to let the user enter a large amount of text? A URL whose query string contained several paragraphs of text would be ridiculously long, and would possibly exceed the maximum length for a URL in today’s browsers. The alternative is for the browser to pass the information invisibly, behind the scenes.
Make a copy of welcome4.html and name it welcome5.html. The code for the form in this new page is exactly the same, but where we set the form method to get in the last example, here we set it to post. Of course, we’ve also set the action attribute to point at welcome5.php:
<form action="welcome5.php" method="post">

  <div><label for="firstname">First name:

    <input type="text" name="firstname" id="firstname"/></label>

  </div>

  <div><label for="lastname">Last name:

    <input type="text" name="lastname" id="lastname"/></label></div>

  <div><input type="submit" value="GO"/></div>

</form>
This new value for the method attribute instructs the browser to send the form variables invisibly, as part of the page request, rather than embedding them in the query string of the URL.
Again, make a copy of welcome4.php and name it welcome5.php.
As we’re no longer sending the variables as part of the query string, they stop appearing in PHP’s $_GET array. Instead, they’re placed in another array reserved especially for “posted” form variables: $_POST. We must therefore modify welcome5.php to retrieve the values from this new array:
<?php

$firstname = $_POST['firstname'];

$lastname = $_POST['lastname'];

echo 'Welcome to our web site, ' .

    htmlspecialchars($firstname, ENT_QUOTES, 'UTF-8') . ' ' .

    htmlspecialchars($lastname, ENT_QUOTES, 'UTF-8') . '!';

?>
The figure below shows what the resulting page looks like once this new form is submitted.

The form is functionally identical to the previous one; the only difference is that the URL of the page that’s loaded when the user clicks the GO button will be without a query string. On the one hand, this lets you include large values, or sensitive values (like passwords), in the data that’s submitted by the form, without their appearing in the query string. On the other hand, if the user bookmarks the page that results from the form’s submission, that bookmark will be useless, as it lacks the submitted values. This, incidentally, is the main reason why search engines use the query string to submit search terms. If you bookmark a search results page on Google, you can use that bookmark to perform the same search again later, because the search terms are contained in the URL.
Sometimes, you want access to a variable without having to worry about whether it was sent as part of the query string or a form post. In cases like these, the special $_REQUEST array comes in handy. It contains all the variables that appear in both $_GET and $_POST. With this variable, we can modify our form processing script one more time so that it can receive the first and last names of the user from either source:
<?php

$firstname = $_REQUEST['firstname'];

$lastname = $_REQUEST['lastname'];

echo 'Welcome to our web site, ' .

    htmlspecialchars($firstname, ENT_QUOTES, 'UTF-8') . ' ' .

    htmlspecialchars($lastname, ENT_QUOTES, 'UTF-8') . '!';

?>
That covers the basics of using forms to produce rudimentary user interaction with PHP. We’ll look at more advanced issues and techniques in later examples.
Control Structures
All the examples of PHP code we’ve seen so far have been either one-statement scripts that output a string of text to the web page, or series of statements that were to be executed one after the other in order. If you’ve ever written programs in other languages (JavaScript, C, or BASIC) you already know that practical programs are rarely so simple.
PHP, just like any other programming language, provides facilities that enable you to affect the flow of control. That is, the language contains special statements that you can use to deviate from the one-after-another execution order that has dominated our examples so far. Such statements are called control structures. Don’t understand? Don’t worry! A few examples will illustrate perfectly.
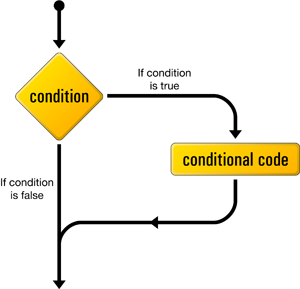
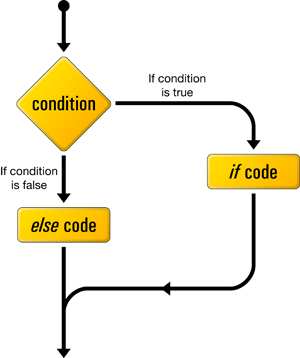
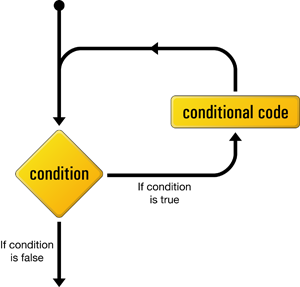
The most basic, and most often used, control structure is the if statement. The flow of a program through an if statement can be visualized as in the figure below.
(This diagram and several similar ones in this book were originally designed by Cameron Adams for the book, Simply JavaScript (Melbourne: SitePoint, 2006), which we wrote together. I have reused them here with his permission, and my thanks.)
Here’s what an if statement looks like in PHP code:
if (condition)

{

  // conditional code to be executed if condition is true

}
This control structure lets us tell PHP to execute a set of statements only if some condition is met.
If you’ll indulge my vanity for a moment, here’s an example that shows a twist on the personalized welcome page example we created earlier. Start by making a copy of welcome6.html called welcome7.html. For simplicity, let’s alter the form it contains so that it submits a single name variable to welcome7.php:
<form action="welcome7.php" method="post">

  <div><label for="name">Name:

    <input type="text" name="name" id="name"/></label></div>

  <div><input type="submit" value="GO"/></div>

</form>
Now make a copy of welcome6.php called welcome7.php. Replace the PHP code it contains with the following:
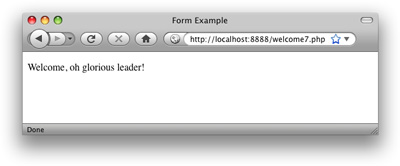
$name = $_REQUEST['name'];

if ($name == 'Kevin')

{

  echo 'Welcome, oh glorious leader!';

}
Now, if the name variable passed to the page has a value of 'Kevin', a special message will be displayed, as shown below.
If a name other than Kevin is entered, this example becomes inhospitable – the conditional code within the if statement fails to execute, and the resulting page will be blank!
To offer an alternative to a blank page to all the plebs who have a different name to Kevin, we can use an if-else statement instead. The structure of an if-else statement is shown below.
The else portion of an if-else statement is tacked onto the end of the if portion, like this:
$name = $_REQUEST['name'];
if ($name == 'Kevin')
{
echo 'Welcome, oh glorious leader!';
}
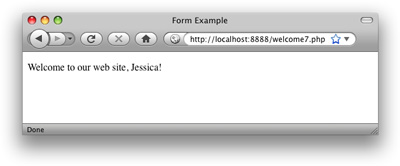
else
{
echo 'Welcome to our web site, ' .
htmlspecialchars($name, ENT_QUOTES, 'UTF-8') . '!';
}Now if you submit a name other than Kevin, you should see the usual welcome message shown below.
The == used in the condition above is the equal operator that’s used to compare two values to see whether they’re equal.
Double Trouble
Remember to type the double-equals (==). A common mistake among beginning PHP programmers is to type a condition like this with a single equals sign:
if ($name = 'Kevin') // Missing equals sign!This condition is using the assignment operator (=) that I introduced back in the section called “Variables, Operators, and Comments”, instead of the equal operator (==). Consequently, instead of comparing the value of $name to the string ‘Kevin’, it will actually set the value of $name to 'Kevin'. Oops!
To make matters worse, the if statement will use this assignment operation as a condition, which it will consider to be true, so the conditional code within the if statement will always be executed, regardless of what the original value of $name happened to be.
Conditions can be more complex than a single check for equality. Recall that our form examples above would receive a first and last name. If we wanted to display a special message only for a particular person, we’d have to check the values of both names.
To do this, first make a copy of welcome6.html (which contains the two-field version of the form) called welcome8.html. Change the action attribute of the <form> tag to point to welcome8.php. Next, make a copy of welcome7.php called welcome8.php, and update the PHP code to match the following:
$firstname = $_REQUEST['firstname'];
$lastname = $_REQUEST['lastname'];
if ($firstname == 'Kevin' and $lastname == 'Yank')
{
echo 'Welcome, oh glorious leader!';
}
else
{
echo 'Welcome to our web site, ' .
htmlspecialchars($firstname, ENT_QUOTES, 'UTF-8') . ' ' .
htmlspecialchars($lastname, ENT_QUOTES, 'UTF-8') . '!';
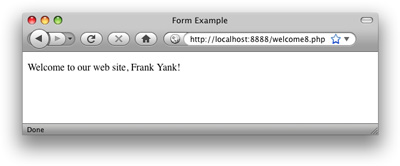
}This updated condition will be true if and only if $firstname has a value of 'Kevin' and $lastname has a value of 'Yank'. The and operator in the condition makes the whole condition true only if both of the comparisons are true. A similar operator is the or operator, which makes the whole condition true if one or both of two simple conditions are true. If you’re more familiar with the JavaScript or C forms of these operators (&& and || for and and or respectively), that’s fine – they work in PHP as well.
The figure below shows that having only one of the names right in this example fails to cut the mustard.
We’ll look at more complicated conditions as the need arises. For the time being, a general familiarity with if-else statements is sufficient.
Another often-used PHP control structure is the while loop. Where the if-else statement allowed us to choose whether or not to execute a set of statements depending on some condition, the while loop allows us to use a condition to determine how many times we’ll execute a set of statements repeatedly.
This figure shows how a while loop operates.
Here’s what a while loop looks like in code:
while (condition)

{

  // statement(s) to execute repeatedly as long as condition is true

}
The while loop works very similarly to an if statement. The difference arises when the condition is true and the statement(s) are executed. Instead of continuing the execution with the statement that follows the closing brace (}), the condition is checked again. If the condition is still true, then the statement(s) are executed a second time, and a third, and will continue to be executed as long as the condition remains true. The first time the condition evaluates false (whether it’s the first time it’s checked, or the 101st), the execution jumps immediately to the statement that follows the while loop, after the closing brace.
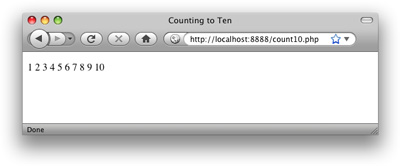
Loops like these come in handy whenever you’re working with long lists of items (such as jokes stored in a database … hint, hint), but for now I’ll illustrate with a trivial example, counting to ten:
$count = 1;

while ($count <= 10)

{

  echo "$count ";

  ++$count;

}
This code may look a bit frightening, I know, but let me talk you through it line by line:
$count = 1; The first line creates a variable called $count and assigns it a value of 1.
while ($count <= 10)
The second line is the start of a while loop, the condition for which is that the value of $count is less than or equal (<=) to 10.
{
The opening brace marks the beginning of the block of conditional code for the while loop. This conditional code is often called the body of the loop, and is executed over and over again, as long as the condition holds true.
echo "$count ";
This line simply outputs the value of $count, followed by a space. To make the code as readable as possible, I’ve used a double-quoted string to take advantage of variable interpolation (as explained in the section called “Variables, Operators, and Comments”), rather than use the string concatenation operator.
++$count;
The fourth line adds one to the value of $count (++$count is a shortcut for $count = $count + 1 – either one would work).
}
The closing brace marks the end of the while loop’s body.
So here’s what happens when this piece of code is executed. The first time the condition is checked, the value of $count is 1, so the condition is definitely true. The value of $count (1) is output, and $count is given a new value of 2. The condition is still true the second time it’s checked, so the value (2) is output and a new value (3) is assigned. This process continues, outputting the values 3, 4, 5, 6, 7, 8, 9, and 10. Finally, $count is given a value of 11, and the condition is found to be false, which ends the loop.
The net result of the code is shown below.
The condition in this example used a new operator: <= (less than or equal). Other numerical comparison operators of this type include >= (greater than or equal), < (less than), > (greater than), and != (not equal). That last one also works when comparing text strings, by the way.
Another type of loop that’s designed specifically to handle examples like that above, in which we’re counting through a series of values until some condition is met, is called a for loop. The figure below shows the structure of a for loop.
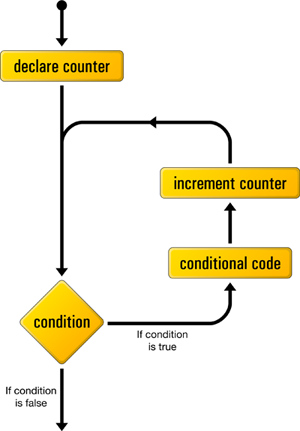
Here’s what it looks like in code:
for (declare counter; condition; increment counter)

{

  // statement(s) to execute repeatedly as long as condition is true

}
The declare counter statement is executed once at the start of the loop; the condition statement is checked each time through the loop, before the statements in the body are executed; the increment counter statement is executed each time through the loop, after the statements in the body.
Here’s what the “counting to 10” example looks like when implemented with a for loop:
for ($count = 1; $count <= 10; ++$count)

{

  echo "$count ";

}
As you can see, the statements that initialize and increment the $count variable join the condition on the first line of the for loop. Although, at first glance, the code seems a little more difficult to read, putting all the code that deals with controlling the loop in the same place actually makes it easier to understand once you’re used to the syntax. Many of the examples in this book will use for loops, so you’ll have plenty of opportunity to practice reading them.
Hiding the Seams
You’re now armed with a working knowledge of the basic syntax of the PHP programming language. You understand that you can take any HTML web page, rename it with a .php file name extension, and inject PHP code into it to make it generate some or all of the page content on the fly. Not bad for a day’s work!
Before we go any further, however, I want to stop and cast a critical eye over the examples we’ve discussed so far. Assuming your objective is to create database driven web sites that hold up to professional standards, there are a few unsightly blemishes we need to clean up.
The techniques in the rest of this chapter will add a coat of professional polish that can set your work apart from the crowd of amateur PHP developers out there. I’ll rely on these techniques throughout the rest of this book to make sure that, no matter how simple the example, you can feel confident in the quality of the product you’re delivering.
Avoid Advertising Your Technology Choices
The examples we’ve seen so far have contained a mixture of plain HTML files (with names ending in .html), and files that contain a mixture of HTML and PHP (with names ending in .php). Although this distinction between file types may be useful to you, the developer, there is no reason your users need to be aware of which pages of your site rely on PHP code to generate them.
Furthermore, although PHP is a very strong choice of technology to build almost any database driven web site, the day may come when you want to switch from PHP to some new technology. When that day comes, do you really want all the URLs for dynamic pages on your site to become invalid as you change the file names to reflect your new language of choice?
These days, professional developers place a lot of importance on the URLs they put out into the world. In general, URLs should be as permanent as possible, so it makes no sense to embrittle them with little “advertisements” for the programming language you used to build each individual page.
An easy way to do away with the file name extensions in your URLs is to take advantage of directory indexes. When a URL points at a directory on your web server, instead of a particular file, the web server will look for a file named index.html or index.php inside that directory, and display that file in response to the request.
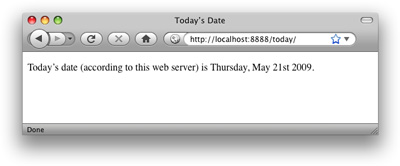
For example, take the today.php page that I introduced at the end of Chapter 1, Installation. Rename it from today.php to index.php. Then, instead of dropping it in the root of your web server, create a subdirectory name today, and drop the index.php file in there. Now, load http://localhost/today/ in your browser (or http://localhost:8080/today/, or similar if you need to specify a port number for your server).
The figure below shows the example with its new URL. This URL omits the unnecessary .php extension, and is shorter and more memorable – both desirable qualities when it comes to URLs today.
Use PHP Templates
In the simple examples we’ve seen so far, inserting PHP code directly into your HTML pages has been a reasonable approach. As the amount of PHP code that goes into generating your average page grows, however, maintaining this mixture of HTML and PHP code can become unmanageable.
Particularly if you work in a team where the web designers are unsavvy, PHP-wise, having large blocks of cryptic PHP code intermingled with the HTML is a recipe for disaster. It’s far too easy for designers to accidentally modify the PHP code, causing errors they’ll be unable to fix.
A much more robust approach is to separate out the bulk of your PHP code, so that it resides in its own file, leaving the HTML largely unpolluted by PHP code.
The key to doing this is the PHP include statement. With an include statement, you can insert the contents of another file into your PHP code at the point of the statement. To show you how this works, let’s rebuild the “count to ten” for loop example we looked at earlier.
Start by creating a new directory called count10, and create a file named index.php in this directory. Open the file for editing and type in this code:
<?php

$output = '';

for ($count = 1; $count <= 10; ++$count)

{

  $output .= "$count ";

}


include 'count.html.php';

?>
Yes, that’s the complete code for this file. It contains no HTML code whatsoever. The for loop should be familiar to you by now, but let me point out the interesting parts of this code:
$output = '';Instead of echoing out the numbers 1 to 10, this script will add these numbers to a variable named
$output. At the start of this script, therefore, we set this variable to contain an empty string.
$output .= "$count ";This line adds each number (followed by a space) to the end of the
$output variable. The .= operator you see here is a shorthand way to add a value to the end of an existing string variable, by combining the assignment and string concatenation operators into one. The longhand version of this line is $output = $output . "$count ";, but the .= operator saves you some typing.
include 'count.html.php';This is an
include statement, which instructs PHP to execute the contents of the count.html.php file at this location.
Outside of this book, you will often see includes coded with parentheses surrounding the filename, as if include were a function like date or htmlspecialchars, which is far from the case. These parentheses, when used, only serve to complicate the filename expression, and are therefore avoided in this book. The same goes for echo, another popular one-liner.
Since the final line of this file includes the count.html.php file, you should create this next:
<!DOCTYPE html PUBLIC "-//W3C//DTD XHTML 1.0 Strict//EN"

    "https://www.w3.org/TR/xhtml1/DTD/xhtml1-strict.dtd">

<html xmlns="https://www.w3.org/1999/xhtml" xml:lang="en" lang="en">

  <head>

    <title>Counting to Ten</title>

    <meta http-equiv="content-type"

        content="text/html; charset=utf-8"/>

  </head>

  <body>

    <p>

      <?php echo $output; ?>

    </p>

  </body>

</html>
This file is almost entirely plain HTML, except for the one line that outputs the value of the $output variable. This is the same $output variable that was created by the index.php file.
What we’ve created here is a PHP template – an HTML page with only very small snippets of PHP code that insert dynamically-generated values into an otherwise static HTML page. Rather than embedding the complex PHP code that generates those values in the page, we put the code to generate the values in a separate PHP script - index.php in this case.
Using PHP templates like this enables you to hand your templates over to HTML-savvy designers without worrying about what they might do to your PHP code. It also lets you focus on your PHP code without being distracted by the surrounding HTML code.
I like to name my PHP templates so that they end with .html.php. Although, as far as your web server is concerned, these are still .php files, the .html.php suffix serves as a useful reminder that these files contain both HTML and PHP code.
Many Templates, One Controller
What’s nice about using include statements to load your PHP template files is that you can have multiple include statements in a single PHP script, and have it display different templates under different circumstances!
A PHP script that responds to a browser request by selecting one of several PHP templates to fill in and send back is commonly called a controller. A controller contains the logic that controls which template is sent to the browser.
Let’s revisit one more example from earlier in this chapter: the welcome form that prompts a visitor for a first and last name.
We’ll start with the PHP template for the form. For this, we can just reuse the welcome8.html file we created earlier. Create a directory named welcome and save a copy of welcome8.html called form.html.php into this directory. The only code you need to change in this file is the action attribute of the <form> tag:
<!DOCTYPE html PUBLIC "-//W3C//DTD XHTML 1.0 Strict//EN"

    "https://www.w3.org/TR/xhtml1/DTD/xhtml1-strict.dtd">

<html xmlns="https://www.w3.org/1999/xhtml" xml:lang="en" lang="en">

  <head>

    <title>Form Example</title>

    <meta http-equiv="content-type"

        content="text/html; charset=utf-8"/>

  </head>

  <body>

    <form action="" method="post">

      <div><label for="firstname">First name:

        <input type="text" name="firstname" id="firstname"/></label>

      </div>

      <div><label for="lastname">Last name:

        <input type="text" name="lastname" id="lastname"/></label>

      </div>

      <div><input type="submit" value="GO"/></div>

    </form>

  </body>

</html>
As you can see, we’re leaving the action attribute blank. This tells the browser to submit the form back to the same URL from which it received the form – in this case, the URL of the controller that included this template file.
Let’s take a look at the controller for this example. Create an index.php script in the welcome directory alongside your form template. Type the following code into this file:
<?php

if (!isset($_REQUEST['firstname']))

{

  include 'form.html.php';

}

else3

{

  $firstname = $_REQUEST['firstname'];

  $lastname = $_REQUEST['lastname'];

  if ($firstname == 'Kevin' and $lastname == 'Yank')

  {

    $output = 'Welcome, oh glorious leader!';

  }

  else

  {

    $output = 'Welcome to our web site, ' .

        htmlspecialchars($firstname, ENT_QUOTES, 'UTF-8') . ' ' .

        htmlspecialchars($lastname, ENT_QUOTES, 'UTF-8') . '!';

  }


  include 'welcome.html.php';5

}

?>
This code should look fairly familiar at first glance; it’s a lot like the welcome8.php script we wrote earlier. Let me explain the differences:
if (!isset($_REQUEST['firstname']))
{
The first thing the controller needs to do is decide whether the current request is a submission of the form inform.html.phpor not. You can do this by checking if the request contains afirstnamevariable. If it does, PHP will have stored the value in$_REQUEST['firstname'].
issetis a built-in PHP function that will tell you if a particular variable (or array element) has been assigned a value or not. If$_REQUEST['firstname']has a value,isset($_REQUEST['firstname'])will betrue. If$_REQUEST['firstname']lacks a value,isset($_REQUEST['firstname'])will befalse.For the sake of readability, I like to put the code that sends the form first in my controller. What we need this if statement to check, therefore, is if
$_REQUEST['firstname']is not set. To do this, we use the not operator (!). By putting this operator before the name of a function, you reverse the value that function returns fromtruetofalse, or fromfalsetotrue.Thus, if the request does not contain a
firstnamevariable, then!isset($_REQUEST['firstname'])will returntrue, and the body of theifstatement will be executed.
include 'form.html.php';
If the request is not a form submission, the controller includes theform.html.phpfile to display the form.
}
else
{
If the request is a form submission, the body of the
elsestatement is executed instead.This code pulls the
firstnameandlastnamevariables out of the$_REQUESTarray, and then generates the appropriate welcome message for the name submitted:
$firstname = $_REQUEST['firstname'];

$lastname = $_REQUEST['lastname'];

if ($firstname == 'Kevin' and $lastname == 'Yank')

{

  $output = 'Welcome, oh glorious leader!';

}

else

{

  $output = 'Welcome to our web site, ' .

      htmlspecialchars($firstname, ENT_QUOTES, 'UTF-8') . ' ' .

      htmlspecialchars($lastname, ENT_QUOTES, 'UTF-8') . '!';

}


Instead of echoing the welcome message, the controller stores the welcome message in a variable named $output.
include 'welcome.html.php';
}
After generating the appropriate welcome message, the controller includes thewelcome.html.phptemplate, which will display that welcome message.All that's left is to write the
welcome.html.phptemplate. Here it is:
<!DOCTYPE html PUBLIC "-//W3C//DTD XHTML 1.0 Strict//EN"

    "https://www.w3.org/TR/xhtml1/DTD/xhtml1-strict.dtd">

<html xmlns="https://www.w3.org/1999/xhtml" xml:lang="en" lang="en">

  <head>

    <title>Form Example</title>

    <meta http-equiv="content-type"

        content="text/html; charset=utf-8"/>

  </head>

  <body>

    <p>

      <?php echo $output; ?>

    </p>

  </body>

</html>
That’s it! Fire up your browser and point it at http://localhost/welcome/ (or http://localhost:8080/welcome/ or similar if you need to specify a port number for your web server). You’ll be prompted for your name, and when you submit the form, you’ll see the appropriate welcome message. The URL should stay the same throughout this process.
One of the benefits of maintaining the same URL throughout the process of prompting the user for a name and displaying the welcome message is that the user can bookmark the page at any time during this process and gain a sensible result: when the user next returns, whether the form page or the welcome message was bookmarked, the form will be present itself once again. In the previous version of this example, where the welcome message had its own URL, returning to that URL without submitting the form would have generated a broken welcome message (“Welcome to our web site, !”).
Why So Forgetful?
In Chapter 9, Cookies, Sessions, and Access Control I’ll show you how to remember the user’s name between visits.
Bring On the Database
In this chapter, we’ve seen the PHP server-side scripting language in action as we’ve explored all the basic language features: statements, variables, operators, comments, and control structures. The sample applications we’ve seen have been reasonably simple, but despite this we’ve taken the time to ensure they have attractive URLs, and that the HTML templates for the pages they generate are uncluttered by the PHP code that controls them.
As you may have begun to suspect, the real power of PHP is in its hundreds (even thousands) of built-in functions that let you access data in a MySQL database, send email, dynamically generate images, and even create Adobe Acrobat PDF files on the fly.
In Chapter 4: Publishing MySQL Data on the Web, we’ll delve into the MySQL functions built into PHP, and see how to publish the joke database we created in Chapter 2: Introducing MySQL to the Web. This chapter will set the scene for the ultimate goal of this book – creating a complete content management system for your web site in PHP and MySQL.
Frequently Asked Questions (FAQs) about Getting Started with MySQL and PHP
How do I connect to a MySQL database using PHP?
To connect to a MySQL database using PHP, you need to use the mysqli_connect() function. This function requires four parameters: the hostname, the username, the password, and the database name. Here’s an example:$connection = mysqli_connect('localhost', 'username', 'password', 'database');if (!$connection) {
die('Connection failed: ' . mysqli_connect_error());}echo 'Connected successfully';mysqli_close($connection);
In this code, ‘localhost’ is the hostname, ‘username’ and ‘password’ are your MySQL username and password, and ‘database’ is the name of your database.
How can I create a table in MySQL using PHP?
To create a table in MySQL using PHP, you need to use the mysqli_query() function. This function sends a query to the currently active database on the server that’s associated with the specified connection. Here’s an example:$connection = mysqli_connect('localhost', 'username', 'password', 'database');if (!$connection) {
die('Connection failed: ' . mysqli_connect_error());}$sql = "CREATE TABLE Users (id INT(6) UNSIGNED AUTO_INCREMENT PRIMARY KEY,firstname VARCHAR(30) NOT NULL,lastname VARCHAR(30) NOT NULL,email VARCHAR(50),reg_date TIMESTAMP)";if (mysqli_query($connection, $sql)) {
echo "Table Users created successfully";} else {
echo "Error creating table: " . mysqli_error($connection);}mysqli_close($connection);
In this code, ‘Users’ is the name of the table, and ‘id’, ‘firstname’, ‘lastname’, ’email’, and ‘reg_date’ are the columns in the table.
How do I insert data into a MySQL table using PHP?
To insert data into a MySQL table using PHP, you need to use the mysqli_query() function. This function sends a query to the currently active database on the server that’s associated with the specified connection. Here’s an example:$connection = mysqli_connect('localhost', 'username', 'password', 'database');if (!$connection) {
die('Connection failed: ' . mysqli_connect_error());}$sql = "INSERT INTO Users (firstname, lastname, email)VALUES ('John', 'Doe', 'john@example.com')";if (mysqli_query($connection, $sql)) {
echo "New record created successfully";} else {
echo "Error: " . $sql . "<br>" . mysqli_error($connection);}mysqli_close($connection);
In this code, ‘Users’ is the name of the table, and ‘John’, ‘Doe’, and ‘john@example.com‘ are the values being inserted into the ‘firstname’, ‘lastname’, and ’email’ columns, respectively.
How do I retrieve data from a MySQL table using PHP?
To retrieve data from a MySQL table using PHP, you need to use the mysqli_query() function to send a SELECT query to the currently active database on the server that’s associated with the specified connection. Here’s an example:$connection = mysqli_connect('localhost', 'username', 'password', 'database');if (!$connection) {
die('Connection failed: ' . mysqli_connect_error());}$sql = "SELECT id, firstname, lastname FROM Users";$result = mysqli_query($connection, $sql);if (mysqli_num_rows($result) > 0) {
while($row = mysqli_fetch_assoc($result)) {
echo "id: " . $row["id"]. " - Name: " . $row["firstname"]. " " . $row["lastname"]. "<br>";
}} else {
echo "0 results";}mysqli_close($connection);
In this code, ‘Users’ is the name of the table, and ‘id’, ‘firstname’, and ‘lastname’ are the columns from which data is being retrieved.
How do I update data in a MySQL table using PHP?
To update data in a MySQL table using PHP, you need to use the mysqli_query() function to send an UPDATE query to the currently active database on the server that’s associated with the specified connection. Here’s an example:$connection = mysqli_connect('localhost', 'username', 'password', 'database');if (!$connection) {
die('Connection failed: ' . mysqli_connect_error());}$sql = "UPDATE Users SET email='john_new@example.com' WHERE id=2";if (mysqli_query($connection, $sql)) {
echo "Record updated successfully";} else {
echo "Error updating record: " . mysqli_error($connection);}mysqli_close($connection);
In this code, ‘Users’ is the name of the table, ’email’ is the column being updated, ‘john_new@example.com‘ is the new value, and ‘id=2’ is the condition that determines which record(s) to update.
How do I delete data from a MySQL table using PHP?
To delete data from a MySQL table using PHP, you need to use the mysqli_query() function to send a DELETE query to the currently active database on the server that’s associated with the specified connection. Here’s an example:$connection = mysqli_connect('localhost', 'username', 'password', 'database');if (!$connection) {
die('Connection failed: ' . mysqli_connect_error());}$sql = "DELETE FROM Users WHERE id=2";if (mysqli_query($connection, $sql)) {
echo "Record deleted successfully";} else {
echo "Error deleting record: " . mysqli_error($connection);}mysqli_close($connection);
In this code, ‘Users’ is the name of the table, and ‘id=2’ is the condition that determines which record(s) to delete.
How do I handle errors in MySQL using PHP?
To handle errors in MySQL using PHP, you can use the mysqli_connect_error() function to return a description of the last connection error, if any. You can also use the mysqli_error() function to return a string description of the last error for the most recent MySQLi function call that can succeed or fail. Here’s an example:$connection = mysqli_connect('localhost', 'username', 'password', 'database');if (!$connection) {
die('Connection failed: ' . mysqli_connect_error());}$sql = "INSERT INTO Users (firstname, lastname, email)VALUES ('John', 'Doe', 'john@example.com')";if (mysqli_query($connection, $sql)) {
echo "New record created successfully";} else {
echo "Error: " . $sql . "<br>" . mysqli_error($connection);}mysqli_close($connection);
In this code, if the connection fails, the mysqli_connect_error() function will return a description of the error. If the query fails, the mysqli_error() function will return a description of the error.
How do I close a MySQL connection using PHP?
To close a MySQL connection using PHP, you can use the mysqli_close() function. This function takes one parameter, which is the connection that you want to close. Here’s an example:$connection = mysqli_connect('localhost', 'username', 'password', 'database');if (!$connection) {
die('Connection failed: ' . mysqli_connect_error());}mysqli_close($connection);echo 'Connection closed';
In this code, the mysqli_close() function is used to close the connection to the MySQL server.
How do I prevent SQL injection in PHP?
To prevent SQL injection in PHP, you can use prepared statements and parameterized queries. These are SQL statements that are sent to and parsed by the database server separately from any parameters. Here’s an example:$connection = new mysqli('localhost', 'username', 'password', 'database');if ($connection->connect_error) {
die('Connection failed: ' . $connection->connect_error);}$stmt = $connection->prepare("INSERT INTO Users (firstname, lastname, email) VALUES (?, ?, ?)");$stmt->bind_param("sss", $firstname, $lastname, $email);$firstname = 'John';$lastname = 'Doe';$email = 'john@example.com';$stmt->execute();echo "New record created successfully";$stmt->close();$connection->close();
In this code, the ‘?’ placeholders in the SQL statement are replaced by the values of the $firstname, $lastname, and $email variables, which are bound to the statement with the bind_param() method.
How do I use PHP to interact with a MySQL database in an object-oriented way?
PHP’s MySQLi extension provides an object-oriented interface for interacting with a MySQL database. Here’s an example:$connection = new mysqli('localhost', 'username', 'password', 'database');if ($connection->connect_error) {
die('Connection failed: ' . $connection->connect_error);}$sql = "SELECT id, firstname, lastname FROM Users";$result = $connection->query($sql);if ($result->num_rows > 0) {
while($row = $result->fetch_assoc()) {
echo "id: " . $row["id"]. " - Name: " . $row["firstname"]. " " . $row["lastname"]. "<br>";
}} else {
echo "0 results";}$connection->close();
In this code, the mysqli object’s methods and properties are used to connect to the database, send a query, and retrieve the results.
 Kevin Yank
Kevin Yank is an accomplished web developer, speaker, trainer and author of Build Your Own Database Driven Website Using PHP & MySQL and Co-Author of Simply JavaScript and Everything You Know About CSS is Wrong! Kevin loves to share his wealth of knowledge and it didn't stop at books, he's also the course instructor to 3 online courses in web development. Currently Kevin is the Director of Front End Engineering at Culture Amp.